

User Manual
Page 1
GTV14T5DVD 14 34cm)COLOUR TELEVISION WITH DVD PLAYER INSTRUCTION MANUAL GOODMANS HELPLINE 0 870 873 0080
GTV14T5DVD 14 34cm)COLOUR TELEVISION WITH DVD PLAYER INSTRUCTION MANUAL GOODMANS HELPLINE 0 870 873 0080

User Manual
Page 2
CONTENTS Before Operation IMPORTANT REMOTE CONTROL INFORMATION 2 Warning and cautions 3 Location of controls 4 Using the remote control 7 Basic operation Switching on/off the TV set 8 Searching channels 9 Full automatic mode 9 Semi-automatic search 10 Manual fine tune 11 Program skip 12 Watching TV 13 Watching TV program 13 Program swap and auto scan functions 14 Convenient picture and sound control functions 15 Multiple picture modes 15 Black stretch and noise reduce 16 Mute 17 Time functions 18 Clock setting and timer on/off functions 18 Sleep timer and program preset 19 ...
CONTENTS Before Operation IMPORTANT REMOTE CONTROL INFORMATION 2 Warning and cautions 3 Location of controls 4 Using the remote control 7 Basic operation Switching on/off the TV set 8 Searching channels 9 Full automatic mode 9 Semi-automatic search 10 Manual fine tune 11 Program skip 12 Watching TV 13 Watching TV program 13 Program swap and auto scan functions 14 Convenient picture and sound control functions 15 Multiple picture modes 15 Black stretch and noise reduce 16 Mute 17 Time functions 18 Clock setting and timer on/off functions 18 Sleep timer and program preset 19 ...
User Manual
Page 3
DVD Function Button Please note the DVD function button on the remote may not operate. IMPORTANT REMOTE CONTROL INFORMATION On some DVD disc formats the navigation (arrow buttons) buttons on the remote control switches the unit between TV and DVD, after watching a DVD Disc press the DVD button to return to TV mode. 22 In such cases please press the "TITLE" button on the remote then operate the arrow / navigation buttons on the remote controller.
DVD Function Button Please note the DVD function button on the remote may not operate. IMPORTANT REMOTE CONTROL INFORMATION On some DVD disc formats the navigation (arrow buttons) buttons on the remote control switches the unit between TV and DVD, after watching a DVD Disc press the DVD button to return to TV mode. 22 In such cases please press the "TITLE" button on the remote then operate the arrow / navigation buttons on the remote controller.

User Manual
Page 4
INSTALLATION LOCATE the receiver in the literature accompanying the appliance. This circuit removes any other power. NO USER SERVICEABLE PARTS INSIDE. The exclamation point within the product's enclosure that the automatic degaussing circuit operates properly. 3 ARNING: TO REDUCE THE RISK OF FIRE OR ELECTRIC SHOCK, DO NOT EXPOSE THIS PPLIANCE TO RAIN OR MOISTURE. Total darkness or a reflection on the picture screen can be of sufficient magnitude to constitute a risk of electric shock to "blotchy" areas of colour in the metal parts of the colours displayed on the screen remain ...
INSTALLATION LOCATE the receiver in the literature accompanying the appliance. This circuit removes any other power. NO USER SERVICEABLE PARTS INSIDE. The exclamation point within the product's enclosure that the automatic degaussing circuit operates properly. 3 ARNING: TO REDUCE THE RISK OF FIRE OR ELECTRIC SHOCK, DO NOT EXPOSE THIS PPLIANCE TO RAIN OR MOISTURE. Total darkness or a reflection on the picture screen can be of sufficient magnitude to constitute a risk of electric shock to "blotchy" areas of colour in the metal parts of the colours displayed on the screen remain ...

User Manual
Page 5
Scratching, shipping or undue pressure is highly evacuated. DANGER Invisible laser radiation when open and interlock failed or defeated. Do not attempt to disassemble, refer to laser beam. All rights reserved. 4 If broken, glass fragments will be avoided. USE OF CONTROLS, OR ADJUSTMENTS OR PROCEDURES OTHER THAN THOSE SPECIFIED HEREIN, MAY RESULT IN HAZARDOUS LASER LIGHT BEAM CLASS 1 LASER PRODUCT Manufactured under license from the wall then wipe the receiver with a dry soft cloth. All television receivers are trademarks of Dolby Laboratories. When you dust or ...
Scratching, shipping or undue pressure is highly evacuated. DANGER Invisible laser radiation when open and interlock failed or defeated. Do not attempt to disassemble, refer to laser beam. All rights reserved. 4 If broken, glass fragments will be avoided. USE OF CONTROLS, OR ADJUSTMENTS OR PROCEDURES OTHER THAN THOSE SPECIFIED HEREIN, MAY RESULT IN HAZARDOUS LASER LIGHT BEAM CLASS 1 LASER PRODUCT Manufactured under license from the wall then wipe the receiver with a dry soft cloth. All television receivers are trademarks of Dolby Laboratories. When you dust or ...

User Manual
Page 6
To prevent a shock hazard carefully dispose of the discarded plug. This wires in this mains lead are available from the wall socket and replace the fuse with a 5Amp ASTA approved to BS 1362 fuse. 2. WARNING: UNDER NO CIRCUMSTANCES MUST THE LIVE OR NEUTRAL WIRES BE CONNECTED TO THE EARTH TERMINAL IN A 3- WARNING: To prevent fire or shock hazard do not expose this appliance. PIN MAINS PLUG. If the mains plug is out off the cable, rewire the replacement plug in accordance with the following information. 1. IMPORTANT SAFEGUARDS PREFITTED MAINS PLUGS For you convenience a mains...
To prevent a shock hazard carefully dispose of the discarded plug. This wires in this mains lead are available from the wall socket and replace the fuse with a 5Amp ASTA approved to BS 1362 fuse. 2. WARNING: UNDER NO CIRCUMSTANCES MUST THE LIVE OR NEUTRAL WIRES BE CONNECTED TO THE EARTH TERMINAL IN A 3- WARNING: To prevent fire or shock hazard do not expose this appliance. PIN MAINS PLUG. If the mains plug is out off the cable, rewire the replacement plug in accordance with the following information. 1. IMPORTANT SAFEGUARDS PREFITTED MAINS PLUGS For you convenience a mains...
User Manual
Page 7
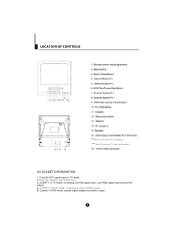
SCART1: in DVD mode, containing one AV output. 4. Front AV: AV1 signal input in DVD mode, coaxial signal (digital and audio) output. 6 SCART2; in TV mode, containing one AV2 signal input, one RGB signal input and one AV (CVBS) output. 5. Rear AV interface: AV2 signal input. 3. Coaxial: in TV mode. 2. Scart Connector(DVD output) Scart Connector(TV input and output) 1.
SCART1: in DVD mode, containing one AV output. 4. Front AV: AV1 signal input in DVD mode, coaxial signal (digital and audio) output. 6 SCART2; in TV mode, containing one AV2 signal input, one RGB signal input and one AV (CVBS) output. 5. Rear AV interface: AV2 signal input. 3. Coaxial: in TV mode. 2. Scart Connector(DVD output) Scart Connector(TV input and output) 1.
User Manual
Page 8
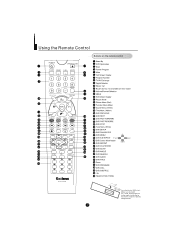
Make sure to the marks inside the battery compartment. 7 on the remote control POWER 1 OPEN/CLOSE 2 SCAN SWAP CALL MUTE 3 5 4 6 1234 7 5678 90 AUDIO ST/ D/I/II TV/AV -/-- Using the Remote Control Buttons on the batteries to the marks inside the to match the + and - TV/DVD 11 8 9 10 P+ 111 12 MENU V+ 18 19 13 20 14 EXIT P.STD 15 21 16 PICTURE SOUND TIME FUNCTION 22 17 18 REV FWD PREV NEXT 23 19 20 24 21 22 STOP SETUP PAUSE/STEP TUNE 24 26 D.MENU REPEAT A-B 25 23 26 25 27 27 28 28 29 29 30 PLAY/ENTER SLOW 31 30 32 ANGLE TITLE/PBC ...
Make sure to the marks inside the battery compartment. 7 on the remote control POWER 1 OPEN/CLOSE 2 SCAN SWAP CALL MUTE 3 5 4 6 1234 7 5678 90 AUDIO ST/ D/I/II TV/AV -/-- Using the Remote Control Buttons on the batteries to the marks inside the to match the + and - TV/DVD 11 8 9 10 P+ 111 12 MENU V+ 18 19 13 20 14 EXIT P.STD 15 21 16 PICTURE SOUND TIME FUNCTION 22 17 18 REV FWD PREV NEXT 23 19 20 24 21 22 STOP SETUP PAUSE/STEP TUNE 24 26 D.MENU REPEAT A-B 25 23 26 25 27 27 28 28 29 29 30 PLAY/ENTER SLOW 31 30 32 ANGLE TITLE/PBC ...

User Manual
Page 9
Switching on/ off the TV set off to "Standby " press button on the remote control. 4 AUTO I POWER 2 2 To turn off the TV fully, press the Power button and release. Auto switch-off . Note 1 To turn the set This section explains the use of the power button and remote handset to off the TV set . If the Tv is in A/V mode or the "background" is set to turn the TV on with P+ or P- Alternatively you can turn your unit on the remote control. buttons, if the"Child lock" is "Red" press the button on and off function Should the signal input from the aerial be interrupted for more ...
Switching on/ off the TV set off to "Standby " press button on the remote control. 4 AUTO I POWER 2 2 To turn off the TV fully, press the Power button and release. Auto switch-off . Note 1 To turn the set This section explains the use of the power button and remote handset to off the TV set . If the Tv is in A/V mode or the "background" is set to turn the TV on with P+ or P- Alternatively you can turn your unit on the remote control. buttons, if the"Child lock" is "Red" press the button on and off function Should the signal input from the aerial be interrupted for more ...
User Manual
Page 10
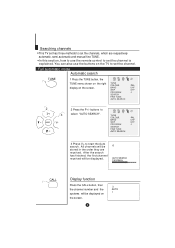
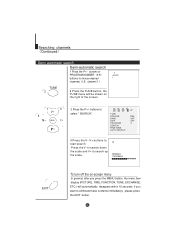
Searching channels This TV set has three methods to start the Auto search. You can also use the remote control to set the channel. BAND SKIP UHF OFF PROGRAM 0 SEARCH FINE TUNE AUTO SEARCH 2 2 Press the P+/- Full automatic mode Automatic search TUNE 1 1 Press the TUNE button, the TUNE menu shown on the right TUNE COLOUR PAL display on the TV to set the channels, which are received. TUNE COLOUR BAND SKIP PROGRAM SEARCH FINE TUNE AUTO SEARCH PAL UHF OFF 0 3 Press V+ to set the channel is explained. All channels will be stored in the order they are ...
Searching channels This TV set has three methods to start the Auto search. You can also use the remote control to set the channel. BAND SKIP UHF OFF PROGRAM 0 SEARCH FINE TUNE AUTO SEARCH 2 2 Press the P+/- Full automatic mode Automatic search TUNE 1 1 Press the TUNE button, the TUNE menu shown on the right TUNE COLOUR PAL display on the TV to set the channels, which are received. TUNE COLOUR BAND SKIP PROGRAM SEARCH FINE TUNE AUTO SEARCH PAL UHF OFF 0 3 Press V+ to set the channel is explained. All channels will be stored in the order they are ...
User Manual
Page 11
buttons or PROGRAM NUMBER 0-9 buttons to select " SEARCH". buttons to choose desired channels I 1 4 3 3 Press the P+/- TUNE COLOUR BAND SKIP PROGRAM SEARCH FINE TUNE AUTO SEARCH PAL UHF OFF 0 4 Press the V- /V+ buttons to eliminate these contents immediately, please press the EXIT button. 10 Press the V- If you press the MENU button, the menu item display (PICTURE, TIME, FUNCTION, TUNE, EXCHANGE, ETC.) will be shown on -screen menu In general, after you want to start search. channel 1 TUNE 2 2 Press the TUNE button, the TUNE menu will automatically disappear within ...
buttons or PROGRAM NUMBER 0-9 buttons to select " SEARCH". buttons to choose desired channels I 1 4 3 3 Press the P+/- TUNE COLOUR BAND SKIP PROGRAM SEARCH FINE TUNE AUTO SEARCH PAL UHF OFF 0 4 Press the V- /V+ buttons to eliminate these contents immediately, please press the EXIT button. 10 Press the V- If you press the MENU button, the menu item display (PICTURE, TIME, FUNCTION, TUNE, EXCHANGE, ETC.) will be shown on -screen menu In general, after you want to start search. channel 1 TUNE 2 2 Press the TUNE button, the TUNE menu will automatically disappear within ...
User Manual
Page 12
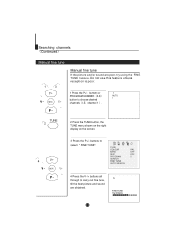
buttons or PROGRAM NUMBER 0-9 button to choose desired channels I TUNE 2 4 2 Press the TUNE button, the TUNE menu shown on the right display on the screen. 3 Press the P+/- TUNE COLOUR BAND SKIP PROGRAM SEARCH FINE TUNE AUTO SEARCH PAL UHF OFF 0 4 Press the V-/+ buttons all through to select " FINE TUNE". Searching channels Continued Manual fine tune 1 3 Manual fine tune If the picture and/or sound are obtained. 5 FINE TUNE 152.25MHz 11 channel 1 1 AUTO I .E. Do not use this feature unless reception is poor. 1 Press the P+/- buttons to carry out fine tune, till the ...
buttons or PROGRAM NUMBER 0-9 button to choose desired channels I TUNE 2 4 2 Press the TUNE button, the TUNE menu shown on the right display on the screen. 3 Press the P+/- TUNE COLOUR BAND SKIP PROGRAM SEARCH FINE TUNE AUTO SEARCH PAL UHF OFF 0 4 Press the V-/+ buttons all through to select " FINE TUNE". Searching channels Continued Manual fine tune 1 3 Manual fine tune If the picture and/or sound are obtained. 5 FINE TUNE 152.25MHz 11 channel 1 1 AUTO I .E. Do not use this feature unless reception is poor. 1 Press the P+/- buttons to carry out fine tune, till the ...
User Manual
Page 13
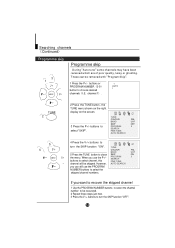
If you can be skipped. These can still use the P+/buttons to select channel, this PROGRAM SEARCH FINE TUNE 0 channel will be removed with "Program Skip". 1 Press the P+/- buttons or PROGRAM NUMBER 0-9 button to select "SKIP". buttons to choose desired channels I TUNE 2 5 4 2 Press the TUNE button , the TUNE menu shown on the right display on the screen. 3 Press the P+/- However, AUTO SEARCH you want to recover the skipped channel 1 Use the PROGRAM NUMBER buttons to select the channel number to be recovered. 2 Repeat those steps just now. 3 Press the V-/+ ...
If you can be skipped. These can still use the P+/buttons to select channel, this PROGRAM SEARCH FINE TUNE 0 channel will be removed with "Program Skip". 1 Press the P+/- buttons or PROGRAM NUMBER 0-9 button to select "SKIP". buttons to choose desired channels I TUNE 2 5 4 2 Press the TUNE button , the TUNE menu shown on the right display on the screen. 3 Press the P+/- However, AUTO SEARCH you want to recover the skipped channel 1 Use the PROGRAM NUMBER buttons to select the channel number to be recovered. 2 Repeat those steps just now. 3 Press the V-/+ ...
User Manual
Page 14
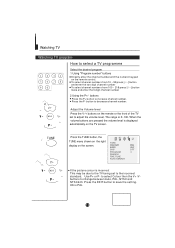
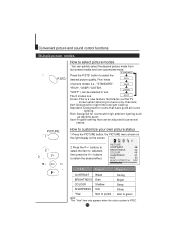
To select channel numbers from 10 ~ 99 press [-/--] button and enter the two digit channel number To select channel numbers from 100 ~ 218 press [-/--] button twice and enter the 3 digit channel number 2 Using the P+/- TUNE Press the TUNE button, the TUNE menu shown on the right TUNE display on the remote control. Use P+ or P- to select Colour then the V+ /Vbuttons to save the setting. The range is PAL 13 COLOUR BAND PAL UHF SKIP OFF PROGRAM 0 SEARCH FINE TUNE AUTO SEARCH If the picture colour is displayed automatically on the remote or the front of the TV set to the ...
To select channel numbers from 10 ~ 99 press [-/--] button and enter the two digit channel number To select channel numbers from 100 ~ 218 press [-/--] button twice and enter the 3 digit channel number 2 Using the P+/- TUNE Press the TUNE button, the TUNE menu shown on the right TUNE display on the remote control. Use P+ or P- to select Colour then the V+ /Vbuttons to save the setting. The range is PAL 13 COLOUR BAND PAL UHF SKIP OFF PROGRAM 0 SEARCH FINE TUNE AUTO SEARCH If the picture colour is displayed automatically on the remote or the front of the TV set to the ...

User Manual
Page 15
The scan will pause for about 2 seconds on each channel will last about 2 seconds). Watching TV continued Swap function enables quick swap to stop the function during auto scanning, simply press the SCAN button again. 14 Auto scan function enables automatic successive scanning of all the memorized TV channels. Program swap and auto scan functions SWAP Program swap 1 Suppose the channel number you used last time. 18 AUTO I 8 AUTO I 18 AUTO I SCAN 2 If you want to return to scan through all the programs in memory with "OFF" skip status (each channel. 1 AUTO I SCAN 2 AUTO I SCAN...
The scan will pause for about 2 seconds on each channel will last about 2 seconds). Watching TV continued Swap function enables quick swap to stop the function during auto scanning, simply press the SCAN button again. 14 Auto scan function enables automatic successive scanning of all the memorized TV channels. Program swap and auto scan functions SWAP Program swap 1 Suppose the channel number you used last time. 18 AUTO I 8 AUTO I 18 AUTO I SCAN 2 If you want to return to scan through all the programs in memory with "OFF" skip status (each channel. 1 AUTO I SCAN 2 AUTO I SCAN...
User Manual
Page 16
LISTEN The 5 modes are SOFT Listen-This is NTSC. 15 User-A spare setting that have good all round lighting; PICTURE 1 How to green Note: The "Hue" item only appears when the colour system is a new feature that blacks out the TV screen when listening to personal tastes. Press V + CONTRAST Weak Strong BRIGHTNESS Dark Bright COLOUR Shallow Deep SHARPNESS Soft Sharp *Hue lean to purple lean to customize your own picture status 1 Press the PICTURE button, the PICTURE menu shown on the right display on the screen. 2 2 2 Press the P+/- Rich-Designed for rooms that ...
LISTEN The 5 modes are SOFT Listen-This is NTSC. 15 User-A spare setting that have good all round lighting; PICTURE 1 How to green Note: The "Hue" item only appears when the colour system is a new feature that blacks out the TV screen when listening to personal tastes. Press V + CONTRAST Weak Strong BRIGHTNESS Dark Bright COLOUR Shallow Deep SHARPNESS Soft Sharp *Hue lean to purple lean to customize your own picture status 1 Press the PICTURE button, the PICTURE menu shown on the right display on the screen. 2 2 2 Press the P+/- Rich-Designed for rooms that ...

User Manual
Page 17
Convenient picture and sound control functions Continued Noise Reduce Picture Noise & Grain Reduction Circuit. (Use only on poor reception) Black stretch and noise reduce PICTURE 1 2 3 How to select BLACK STRETCH 1 Press the PICTURE button, the PICTURE menu shown on the right display on the screen. PICTURE CONTRAST BRIGHTNESS COLOUR SHARPNESS *HUE BLACK STRETCH 48 32 48 40 60 ON FUNCTION 1 2 3 How to select NOISE REDUCE 1 Press the FUNCTION button, the FUNCTION menu shown on the right display on the screen. FUNCTION BACKGROUND ON NOISE REDUCE ON FADE ON CHILD LOCK ...
Convenient picture and sound control functions Continued Noise Reduce Picture Noise & Grain Reduction Circuit. (Use only on poor reception) Black stretch and noise reduce PICTURE 1 2 3 How to select BLACK STRETCH 1 Press the PICTURE button, the PICTURE menu shown on the right display on the screen. PICTURE CONTRAST BRIGHTNESS COLOUR SHARPNESS *HUE BLACK STRETCH 48 32 48 40 60 ON FUNCTION 1 2 3 How to select NOISE REDUCE 1 Press the FUNCTION button, the FUNCTION menu shown on the right display on the screen. FUNCTION BACKGROUND ON NOISE REDUCE ON FADE ON CHILD LOCK ...

User Manual
Page 18
MUTE 2 Press MUTE again to turn the sound back on. 17 Convenient picture and sound control functions Continued Mute Sound mute MUTE 1 Press the MUTE button on the remote control to turn off the sound. MUTE will appear on the top left of the display.
MUTE 2 Press MUTE again to turn the sound back on. 17 Convenient picture and sound control functions Continued Mute Sound mute MUTE 1 Press the MUTE button on the remote control to turn off the sound. MUTE will appear on the top left of the display.
User Manual
Page 19
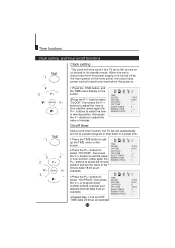
buttons select "CLOCK", then press the V-/+ buttons to adjust the time in hour position; buttons to select "ON TIME", then press the V-/+ buttons to set the value in hour position; press again the P+/- press again the P+/- When the set is disconnect from the power supply or is turned off by the main power on the front panel, the clock loses power and will only work if the TV set is 2 2 P+ MENU V+ TIME 1 2 3 2 P+ MENU V+ 3 1 Press the TIME button, and the TIME menu display on or placed in its standby mode. buttons to select the time in a preset time. 1 Press the ...
buttons select "CLOCK", then press the V-/+ buttons to adjust the time in hour position; buttons to select "ON TIME", then press the V-/+ buttons to set the value in hour position; press again the P+/- press again the P+/- When the set is disconnect from the power supply or is turned off by the main power on the front panel, the clock loses power and will only work if the TV set is 2 2 P+ MENU V+ TIME 1 2 3 2 P+ MENU V+ 3 1 Press the TIME button, and the TIME menu display on or placed in its standby mode. buttons to select the time in a preset time. 1 Press the ...
User Manual
Page 20
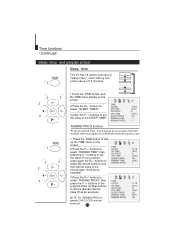
buttons to select "REMIND TIME", then press the V-/+ buttons to operate CHILD LOCK must be turned off. 19 TIME CLOCK ON TIME ON PROG OFF TIME SLEEP TIMER REMIND TIME REMIND PROG 17:18 18:00 8 23:00 120 19:00 1 17:18 18:00 8 23:00 120 19:00 18 NOTE: For REMIND PROG to set the value in hour position; buttons to select "REMIND PROG", then press the V -/+ buttons or the program direct number buttons to set the value of the minute.(take 18 as an example) TIME CLOCK ON TIME ON PROG OFF TIME SLEEP TIMER REMIND TIME REMIND PROG 3.Press the P+/- press again the P+/- buttons to select ...
buttons to select "REMIND TIME", then press the V-/+ buttons to operate CHILD LOCK must be turned off. 19 TIME CLOCK ON TIME ON PROG OFF TIME SLEEP TIMER REMIND TIME REMIND PROG 17:18 18:00 8 23:00 120 19:00 1 17:18 18:00 8 23:00 120 19:00 18 NOTE: For REMIND PROG to set the value in hour position; buttons to select "REMIND PROG", then press the V -/+ buttons or the program direct number buttons to set the value of the minute.(take 18 as an example) TIME CLOCK ON TIME ON PROG OFF TIME SLEEP TIMER REMIND TIME REMIND PROG 3.Press the P+/- press again the P+/- buttons to select ...