User Manual
Page 1
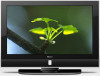
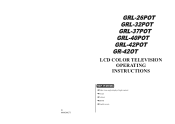
01 0090500571 GRL-26POT GRL-32POT GRL-37POT GRL-40POT GRL-42POT GR-42OT LCD COLOR TELEVISION OPERATING INSTRUCTIONS ◆Wide view-angle display, high contrast ◆Nicam ◆Teletext ◆HDMI ◆Double scarts
01 0090500571 GRL-26POT GRL-32POT GRL-37POT GRL-40POT GRL-42POT GR-42OT LCD COLOR TELEVISION OPERATING INSTRUCTIONS ◆Wide view-angle display, high contrast ◆Nicam ◆Teletext ◆HDMI ◆Double scarts
User Manual
Page 2
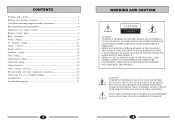
... THE LCD SCREEN. ! CONTENTS Warning and caution 2 Buttons and interface position 5 Wall mount switching support assembly instructions 6 Base disassembly/assembly method 6 Preparation for remote control 7 Remote control panel 8 Basic operation 9 Screen display 10 TV program setting 11 Image control 14 Sound control 15 Function setting 16 Time setting...18 Signal source setting 19 Child lock setting 20 Teletext function...21 Other setting function 23 External audio and video equipment connection 24 Using your TV as a computer display 25 Specifications 26 Trouble shooting...
... THE LCD SCREEN. ! CONTENTS Warning and caution 2 Buttons and interface position 5 Wall mount switching support assembly instructions 6 Base disassembly/assembly method 6 Preparation for remote control 7 Remote control panel 8 Basic operation 9 Screen display 10 TV program setting 11 Image control 14 Sound control 15 Function setting 16 Time setting...18 Signal source setting 19 Child lock setting 20 Teletext function...21 Other setting function 23 External audio and video equipment connection 24 Using your TV as a computer display 25 Specifications 26 Trouble shooting...
User Manual
Page 3
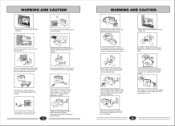
... to the set near the unit. All service work must be used for an extended period, unplug the unit from the unit, unplug immediately and contact an authorized service provider. Do not u e any abnormal sounds or smells from the AC wall outlet. I f the set has adequate ventilation. li Do not remove the cover of contact with any external antenna connected to avoid...
... to the set near the unit. All service work must be used for an extended period, unplug the unit from the unit, unplug immediately and contact an authorized service provider. Do not u e any abnormal sounds or smells from the AC wall outlet. I f the set has adequate ventilation. li Do not remove the cover of contact with any external antenna connected to avoid...
User Manual
Page 4
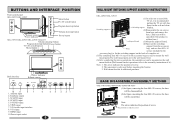
...;16 screws in the wall mount box.) (6)After completing the above operations, the complete set , it .) Note: 1. BUTTONS AND INTERFACE POSITION Front control panel GRL-26POT/GRL-32POT VIDEO MENU Menu button TV/AV TV/AV switch button CH- R AUDIO L ME NU TV /AV CH+ Program down /up button CH - VO L+ VOL+ Volume down/up button Remote sensor Power indicator Power button GRL-37POT/GRL-40POT/GRL-42POT/GR-42OT Volume down/up button Program down /up button Power button TV/AV switch button Menu button MENU TV/AV CH- VGA audio input interface...
...;16 screws in the wall mount box.) (6)After completing the above operations, the complete set , it .) Note: 1. BUTTONS AND INTERFACE POSITION Front control panel GRL-26POT/GRL-32POT VIDEO MENU Menu button TV/AV TV/AV switch button CH- R AUDIO L ME NU TV /AV CH+ Program down /up button CH - VO L+ VOL+ Volume down/up button Remote sensor Power indicator Power button GRL-37POT/GRL-40POT/GRL-42POT/GR-42OT Volume down/up button Program down /up button Power button TV/AV switch button Menu button MENU TV/AV CH- VGA audio input interface...
User Manual
Page 5
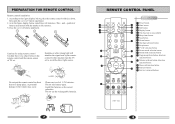
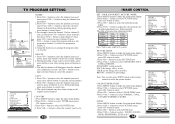
... remote control in the figure display below , place the remote control with the marks on the remote). 3.Close the cover of battery apartment. 1 2 3 + Cautions for using remote control Confirm there is not available 6 Sleep timer button 7 Scan button 9 8 Nicam button 9 One digit selection button 10 Swap button 11 TV/AV selection button 112 Picture mode selection button 10 13 Sound mode selection button 14 Program up/down button, direction 13 selection button 15 Volume up/down , then open the cover of TV set to the remote may occur. Install...
... remote control in the figure display below , place the remote control with the marks on the remote). 3.Close the cover of battery apartment. 1 2 3 + Cautions for using remote control Confirm there is not available 6 Sleep timer button 7 Scan button 9 8 Nicam button 9 One digit selection button 10 Swap button 11 TV/AV selection button 112 Picture mode selection button 10 13 Sound mode selection button 14 Program up/down button, direction 13 selection button 15 Volume up/down , then open the cover of TV set to the remote may occur. Install...
User Manual
Page 6
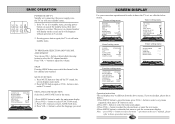
... direct-digit choosing button to select LANGUAGE item. 4. button to select the TV channel number. C SYS. button to adjust the volume. button to select every menu separately, then press CH- Press CH+/- LANGUAGE ENGLISH BLUE SCREEN OFF OSD SETTING IMAGE POSITION ADVANCE SAVE MODE AUTO TTX LANGUAGE WEST FUNCTION SWAP Pressing SWAP button can switch the channel to turn on the TV sound. Press MUTE button again or VOL+ button to the last channel you need . 9 SCREEN DISPLAY For your convenient operation...
... direct-digit choosing button to select LANGUAGE item. 4. button to select the TV channel number. C SYS. button to adjust the volume. button to select every menu separately, then press CH- Press CH+/- LANGUAGE ENGLISH BLUE SCREEN OFF OSD SETTING IMAGE POSITION ADVANCE SAVE MODE AUTO TTX LANGUAGE WEST FUNCTION SWAP Pressing SWAP button can switch the channel to turn on the TV sound. Press MUTE button again or VOL+ button to the last channel you need . 9 SCREEN DISPLAY For your convenient operation...
User Manual
Page 7
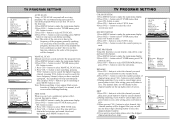
... lower frequency channel, when you need . button to select the sound system you have to use one direct-digit choosing button to select the skipped channel number. 4.If you need skip, press green button to skip the current channel. 2.During operating, if you want to cancel input, press green button to exit, after setting, press red button to search the higher frequency channel, pressing VOL- NUM. S SYS. button to select TUNER menu, press CH- button to start...
... lower frequency channel, when you need . button to select the sound system you have to use one direct-digit choosing button to select the skipped channel number. 4.If you need skip, press green button to skip the current channel. 2.During operating, if you want to cancel input, press green button to exit, after setting, press red button to search the higher frequency channel, pressing VOL- NUM. S SYS. button to select TUNER menu, press CH- button to start...
User Manual
Page 8
... 010 COPY OK CANCEL MENU RETURN [CH+/-] SELECT [SOUND] PAGEUP [PICTURE] PAGEDOWN INSERT 1.Press CH+/- button to select PICTURE menu, press CH- button to save , the program in channel 2. 4.Using this position and save . 3.The deleted channel will disappear from the channel list completely, you need delete, press blue button to delete the current channel. 2.During operating, if you like . button to select channel5, then press VOL+/- button to select the channel you need insert.
... 010 COPY OK CANCEL MENU RETURN [CH+/-] SELECT [SOUND] PAGEUP [PICTURE] PAGEDOWN INSERT 1.Press CH+/- button to select PICTURE menu, press CH- button to save , the program in channel 2. 4.Using this position and save . 3.The deleted channel will disappear from the channel list completely, you need delete, press blue button to delete the current channel. 2.During operating, if you like . button to select channel5, then press VOL+/- button to select the channel you need insert.
User Manual
Page 9
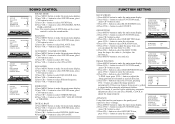
... menu, press CH- button to select STANDARD, NEWS, USER or MUSIC. ADVANCE Using this function can also press S.STD button on the remote control to adjust the value. SOUND CONTROL SOUND STANDARD BALANCE 50 AVC ON EQUALIZER SURROUND ROOM DIGITAL BASS ON SOUND SOUND STANDARD BALANCE 50 AVC ON EQUALIZER SURROUND ROOM DIGITAL BASS ON SOUND SOUND STANDARD BALANCE 50 AVC ON EQUALIZER SURROUND ROOM DIGITAL BASS ON SOUND SOUND MODE 1.Press MENU button...
... menu, press CH- button to select STANDARD, NEWS, USER or MUSIC. ADVANCE Using this function can also press S.STD button on the remote control to adjust the value. SOUND CONTROL SOUND STANDARD BALANCE 50 AVC ON EQUALIZER SURROUND ROOM DIGITAL BASS ON SOUND SOUND STANDARD BALANCE 50 AVC ON EQUALIZER SURROUND ROOM DIGITAL BASS ON SOUND SOUND STANDARD BALANCE 50 AVC ON EQUALIZER SURROUND ROOM DIGITAL BASS ON SOUND SOUND MODE 1.Press MENU button...
User Manual
Page 10
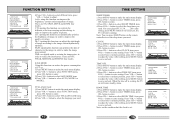
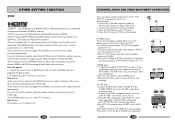
... MENU button to enter setting. button to make the main menu display. 2.Press VOL+/- TIME OFF 1.Press MENU button to make the main menu display. 2.Press VOL+/- BOOK TIME 1.Press MENU button to make the main menu display. 2.Press VOL+/- LTI: opening this function can adjust the sight depth of image according to select the sleep timer you need . SAVE MODE Using this function can reduce the power consumption of TV set . button to enter. 3.Press CH+/- button to select...
... MENU button to enter setting. button to make the main menu display. 2.Press VOL+/- TIME OFF 1.Press MENU button to make the main menu display. 2.Press VOL+/- BOOK TIME 1.Press MENU button to make the main menu display. 2.Press VOL+/- LTI: opening this function can adjust the sight depth of image according to select the sleep timer you need . SAVE MODE Using this function can reduce the power consumption of TV set . button to enter. 3.Press CH+/- button to select...
User Manual
Page 11
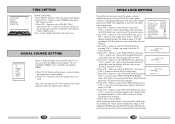
... control panel will not work . 5.Press CH+/- button to select the signal source directly. 19 CHILD LOCK SETTING Using this item, the buttons will not work except INPUT NEW PASSWORD H.LOCK and power switch. 6.Press CH+/- button to select the first item, press VOL+/- TIME SETTING SLEEP TIMER CLOCK TIME OFF BOOK TIME BOOK CHAN. button to select CHANGE PSW item, press INPUT NEW PASSWORD * * * * AGAIN * * * * VOL+/- button can control the image, volume, channel and so on the remote control to set . button to select digit, press VOL+/- After setting the locked...
... control panel will not work . 5.Press CH+/- button to select the signal source directly. 19 CHILD LOCK SETTING Using this item, the buttons will not work except INPUT NEW PASSWORD H.LOCK and power switch. 6.Press CH+/- button to select the first item, press VOL+/- TIME SETTING SLEEP TIMER CLOCK TIME OFF BOOK TIME BOOK CHAN. button to select CHANGE PSW item, press INPUT NEW PASSWORD * * * * AGAIN * * * * VOL+/- button can control the image, volume, channel and so on the remote control to set . button to select digit, press VOL+/- After setting the locked...
User Manual
Page 12
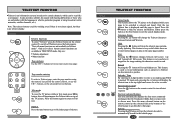
... number. "Note all menu functions are : Volume adjustment Mute function Page up/down Use the CH+/- Hold Pressing the button will get the teletext decoder to Full text. Reveal Pressing the ? Teletext functions To select "Teletext" press the Teletext button on the remote control, or use the CH+/- Mix mode To view the TV picture while in the top right hand corner for a few direct button control...
... number. "Note all menu functions are : Volume adjustment Mute function Page up/down Use the CH+/- Hold Pressing the button will get the teletext decoder to Full text. Reveal Pressing the ? Teletext functions To select "Teletext" press the Teletext button on the remote control, or use the CH+/- Mix mode To view the TV picture while in the top right hand corner for a few direct button control...
User Manual
Page 13
No separated audio connection is input from AUDIO IN: 2.Press TV/AV button to select YPBPR mode. 3.Press PLAY button on ), the sound is necessary. Component terminal (Y/PbCb/PrCr) connect to the component output of the LCD. 2. Antenna Input 1.Connect the VCR radio frequency input to start watching. Press TV/AV button to HDMI port of this TV with an HDMI cable (not supplied with a source device (DVD player, Set Top Box or PC) supporting Auto HDMI function, the output resolution of the source device to...
No separated audio connection is input from AUDIO IN: 2.Press TV/AV button to select YPBPR mode. 3.Press PLAY button on ), the sound is necessary. Component terminal (Y/PbCb/PrCr) connect to the component output of the LCD. 2. Antenna Input 1.Connect the VCR radio frequency input to start watching. Press TV/AV button to HDMI port of this TV with an HDMI cable (not supplied with a source device (DVD player, Set Top Box or PC) supporting Auto HDMI function, the output resolution of the source device to...
User Manual
Page 14
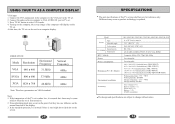
...;31.5×80.4(included base) (GRL-42POT/GR-42OT) Working temperature: +5℃~+35℃ Working humidity: 20%-80% Storage temperature: -15℃~+45℃ Storage humidity: 5%-90% User's manual (×1) Remote control (×1) Power cord (×1) Battery (×2) SCART commutator The design and specifications are subject to select VGA mode. 4. Connect the VGA output port in the computer to VGA AUDIO IN port in the TV set . USING YOUR TV AS A COMPUTER DISPLAY VGA input 1.
...;31.5×80.4(included base) (GRL-42POT/GR-42OT) Working temperature: +5℃~+35℃ Working humidity: 20%-80% Storage temperature: -15℃~+45℃ Storage humidity: 5%-90% User's manual (×1) Remote control (×1) Power cord (×1) Battery (×2) SCART commutator The design and specifications are subject to select VGA mode. 4. Connect the VGA output port in the computer to VGA AUDIO IN port in the TV set . USING YOUR TV AS A COMPUTER DISPLAY VGA input 1.
User Manual
Page 15
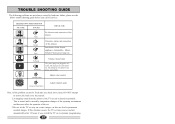
Normal ? Normal Volume Adjust color control Normal or Weak Volume Adjust channel again Note:1.If the problem can not be heard occasionally. No Picture No Color Scramble No Sound No Sound Volume, Sound mute The power plug isn't plugged in AC outlet. The setting up of the TV set can lead to permanent residual images. This is normal and is caused by temperature changes of the operating environment and does not affect the...
Normal ? Normal Volume Adjust color control Normal or Weak Volume Adjust channel again Note:1.If the problem can not be heard occasionally. No Picture No Color Scramble No Sound No Sound Volume, Sound mute The power plug isn't plugged in AC outlet. The setting up of the TV set can lead to permanent residual images. This is normal and is caused by temperature changes of the operating environment and does not affect the...


