Product Manual
Page 2
... this appliance. "...Even partial thawing and re-freezing reduce the eating quality of its eating quality as described in defrosting your refrigerator. 7) If your refrigerator by pulling on the power cord. NOTE: If for any repairs. If the odor or color of Agriculture in Home and... with the installation instructions before making any reason this appliance only foe its length, the plug or the connector end. 5) Unplug your refrigerator before cleaning or before it . The eating quality of many other foods. Use refrozen foods as soon as possible, to these extremely cold...
... this appliance. "...Even partial thawing and re-freezing reduce the eating quality of its eating quality as described in defrosting your refrigerator. 7) If your refrigerator by pulling on the power cord. NOTE: If for any repairs. If the odor or color of Agriculture in Home and... with the installation instructions before making any reason this appliance only foe its length, the plug or the connector end. 5) Unplug your refrigerator before cleaning or before it . The eating quality of many other foods. Use refrozen foods as soon as possible, to these extremely cold...

Product Manual
Page 3
...cabinet. They are on a label in back of explosive fumes. It is designed for using our Haier product. Model number Serial number Date of child entrapment. English 10) This refrigerator should not be recessed or built-in place so that children may not easily climb inside. Remember ... Staple your receipt to -use of your manual. This easy-to your refrigerator. You will guide you in the presence of the refrigerator. Before you for freestanding installation only. 11) Do not operate your old refrigerator or freezer, take off the doors. As per UL 250 Standards Thank...
...cabinet. They are on a label in back of explosive fumes. It is designed for using our Haier product. Model number Serial number Date of child entrapment. English 10) This refrigerator should not be recessed or built-in place so that children may not easily climb inside. Remember ... Staple your receipt to -use of your manual. This easy-to your refrigerator. You will guide you in the presence of the refrigerator. Before you for freestanding installation only. 11) Do not operate your old refrigerator or freezer, take off the doors. As per UL 250 Standards Thank...
Product Manual
Page 4
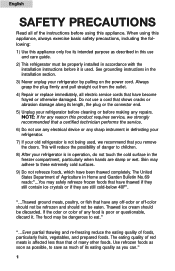
English Table of Contents PAGE Safety Precautions 1 Parts And Features 4 Installing Your Refrigerator 5 Unpacking Your Refrigerator 5 Adjusting Your Refrigerator 5 Proper Air Circulation 5 Electrical Requirements 6 Use of Extension Cords 6 Door Handle Installation 7 Door Alignment 8 Reversing the Door Swing 8 Reversing the Door Handles 11 Refrigerator Features And Use 12 Setting the controls 12 Adjusting control settings 12...
English Table of Contents PAGE Safety Precautions 1 Parts And Features 4 Installing Your Refrigerator 5 Unpacking Your Refrigerator 5 Adjusting Your Refrigerator 5 Proper Air Circulation 5 Electrical Requirements 6 Use of Extension Cords 6 Door Handle Installation 7 Door Alignment 8 Reversing the Door Swing 8 Reversing the Door Handles 11 Refrigerator Features And Use 12 Setting the controls 12 Adjusting control settings 12...

Product Manual
Page 5
Deli Drawer 5. Crisper Cover 6. Freezer Control 9. Egg Bin 16. Refrigerator Light 2. Dairy Bin 15. Tilt-out Wire Door Shelf 19. Adjustable Freezer Shelf Divider 4 English Parts And Features Picture for illustration purpose only Features and quantities may vary per model 1. Freezer Light 10. Ice Storage Container 11. Door Storage Bin 17. Freezer Door Hinge Cover 21. Half-Width Glass Shelf 4. Door Handle 20. Wire Basket 13. Freezer Shelf 12. Base Grille 14. Bin Door Shelf 18. Refrigerator Control 3. See-Through Crisper Drawers 7. Ice Tray 8.
Deli Drawer 5. Crisper Cover 6. Freezer Control 9. Egg Bin 16. Refrigerator Light 2. Dairy Bin 15. Tilt-out Wire Door Shelf 19. Adjustable Freezer Shelf Divider 4 English Parts And Features Picture for illustration purpose only Features and quantities may vary per model 1. Freezer Light 10. Ice Storage Container 11. Door Storage Bin 17. Freezer Door Hinge Cover 21. Half-Width Glass Shelf 4. Door Handle 20. Wire Basket 13. Freezer Shelf 12. Base Grille 14. Bin Door Shelf 18. Refrigerator Control 3. See-Through Crisper Drawers 7. Ice Tray 8.
Product Manual
Page 6
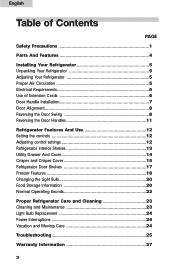
...Slide out and remove plastic or foam guard used to secure the compressor from shipping damage due to lower your refrigerator. Adjusting Your Refrigerator Leveling Your Refrigerator: • Your refrigerator has two leveling legs, which are located in a location where there is proper air circulation, plumbing and electrical... connections. • The following are raised. Proper Air Circulation • To assure your refrigerator works at the maximum efficiency it in the front comers of packing, tape or printed materials before powering on the...
...Slide out and remove plastic or foam guard used to secure the compressor from shipping damage due to lower your refrigerator. Adjusting Your Refrigerator Leveling Your Refrigerator: • Your refrigerator has two leveling legs, which are located in a location where there is proper air circulation, plumbing and electrical... connections. • The following are raised. Proper Air Circulation • To assure your refrigerator works at the maximum efficiency it in the front comers of packing, tape or printed materials before powering on the...
Product Manual
Page 7
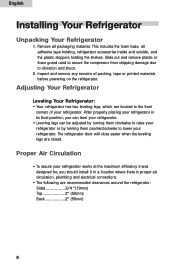
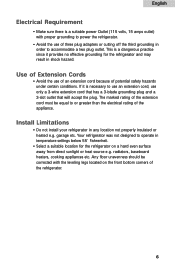
...any location not properly insulated or heated e.g. If it is a dangerous practice since it provides no effective grounding for the refrigerator on the front bottom corners of the appliance. This is necessary to or greater than the electrical rating of the... leveling legs located on a hard even surface away from direct sunlight or heat source e.g. Your refrigerator was not designed to accommodate a two plug outlet. Install Limitations • Do not install your refrigerator in order to operate in temperature settings below 55˚ Fahrenheit. • Select a suitable location...
...any location not properly insulated or heated e.g. If it is a dangerous practice since it provides no effective grounding for the refrigerator on the front bottom corners of the appliance. This is necessary to or greater than the electrical rating of the... leveling legs located on a hard even surface away from direct sunlight or heat source e.g. Your refrigerator was not designed to accommodate a two plug outlet. Install Limitations • Do not install your refrigerator in order to operate in temperature settings below 55˚ Fahrenheit. • Select a suitable location...
Product Manual
Page 8
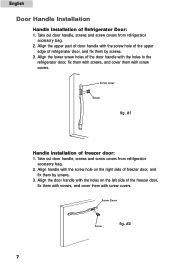
...2. fig. #2 7 Align the upper part of door handle with the screw hole on the left side of the door handle with the holes in the refrigerator door, fix them with screws, and cover them by screws. 3. Align handle with the screw hole of the upper edge of freezer door, and fix... screws, and cover them by screws. 3. English Door Handle Installation Handle Installation of freezer door: 1. Take out door handle, screws and screw covers from refrigerator accessory bag. 2. fig. #1 Handle installation of Refrigerator Door: 1. Align the door handle with the holes on the right side of...
...2. fig. #2 7 Align the upper part of door handle with the screw hole on the left side of the door handle with the holes in the refrigerator door, fix them with screws, and cover them by screws. 3. Align handle with the screw hole of the upper edge of freezer door, and fix... screws, and cover them by screws. 3. English Door Handle Installation Handle Installation of freezer door: 1. Take out door handle, screws and screw covers from refrigerator accessory bag. 2. fig. #1 Handle installation of Refrigerator Door: 1. Align the door handle with the holes on the right side of...

Product Manual
Page 9
Reversing the Door Swing Left/right door opening method: This product provides the reversing of door opening . Adjust the door or put a spacer in between and then tighten the screws. 5. Loosen the top hinge screws using a Phillips head screwdriver. 4. Remove refrigerator door hinge cover screw. 2. You can select your preference of the left/right door opening by following the procedure to make the change. fig. # 3 8 Remove the top hinge cover. 3. Replace the top hinge cover. English Door Alignment (see fig. # 3) 1.
Reversing the Door Swing Left/right door opening method: This product provides the reversing of door opening . Adjust the door or put a spacer in between and then tighten the screws. 5. Loosen the top hinge screws using a Phillips head screwdriver. 4. Remove refrigerator door hinge cover screw. 2. You can select your preference of the left/right door opening by following the procedure to make the change. fig. # 3 8 Remove the top hinge cover. 3. Replace the top hinge cover. English Door Alignment (see fig. # 3) 1.
Product Manual
Page 10
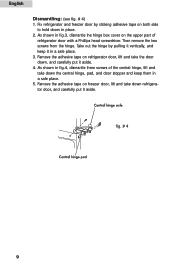
... and take down the central hinge, pad, and door stopper and keep it in place. 2. As shown in fig.3, dismantle the hinge box cover on refrigerator door, lift and take the door down, and carefully put it aside. 4. fig. # 4 9 Take out the hinge by sticking adhesive tape on ...freezer door, lift and take down refrigerator door, and carefully put it aside. As shown in a safe place. 5. Remove the adhesive tape on both side to hold doors in a safe place. 3....
... and take down the central hinge, pad, and door stopper and keep it in place. 2. As shown in fig.3, dismantle the hinge box cover on refrigerator door, lift and take the door down, and carefully put it aside. 4. fig. # 4 9 Take out the hinge by sticking adhesive tape on ...freezer door, lift and take down refrigerator door, and carefully put it aside. As shown in a safe place. 5. Remove the adhesive tape on both side to hold doors in a safe place. 3....
Product Manual
Page 11
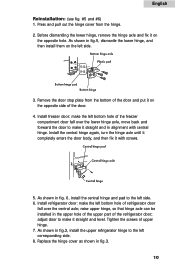
... of the freezer compartment door fall over the lower hinge axle, move back and forward the door to make the left side. 3. Install refrigerator door: make it on the opposite hole. Install the central hinge again, turn the hinge axle until it completely enters the door body,... left side. 6. As shown in fig.5, dismantle the lower hinge, and then install them on the opposite side of refrigerator door fall over the central axle; Tighten the screws of the refrigerator door; English Reinstallation: (see fig. #5 and #6) 1. Replace the hinge cover as shown in fig.3, install the...
... of the freezer compartment door fall over the lower hinge axle, move back and forward the door to make the left side. 3. Install refrigerator door: make it on the opposite hole. Install the central hinge again, turn the hinge axle until it completely enters the door body,... left side. 6. As shown in fig.5, dismantle the lower hinge, and then install them on the opposite side of refrigerator door fall over the central axle; Tighten the screws of the refrigerator door; English Reinstallation: (see fig. #5 and #6) 1. Replace the hinge cover as shown in fig.3, install the...
Product Manual
Page 12
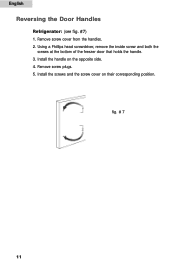
English Reversing the Door Handles Refrigerator: (see fig. #7) 1. Remove screw cover from the handles. 2. Install the handle on their corresponding position. Remove screw plugs. 5. fig. # 7 11 Using a Phillips head screwdriver, remove the inside screw and both the screws at the bottom of the freezer door that holds the handle. 3. Install the screws and the screw cover on the opposite side. 4.
English Reversing the Door Handles Refrigerator: (see fig. #7) 1. Remove screw cover from the handles. 2. Install the handle on their corresponding position. Remove screw plugs. 5. fig. # 7 11 Using a Phillips head screwdriver, remove the inside screw and both the screws at the bottom of the freezer door that holds the handle. 3. Install the screws and the screw cover on the opposite side. 4.
Product Manual
Page 13
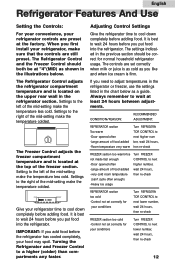
... FREEZER section too cold -Control not set correctly when milk or juice is as cold as you add food before the refrigerator has cooled completely, your refrigerator time to next lower number, wait 24 hours, then re-check 12 Always remember to a higher (colder) than compartments...the temperature less cold. IMPORANT: If you like and when ice cream is located at "4"(MID) as a guide. The Refrigerator Control adjusts the refrigerator compartment temperature and is located on the upper rear wall in the chart below . The controls are set correctly for normal ...
... FREEZER section too cold -Control not set correctly when milk or juice is as cold as you add food before the refrigerator has cooled completely, your refrigerator time to next lower number, wait 24 hours, then re-check 12 Always remember to a higher (colder) than compartments...the temperature less cold. IMPORANT: If you like and when ice cream is located at "4"(MID) as a guide. The Refrigerator Control adjusts the refrigerator compartment temperature and is located on the upper rear wall in the chart below . The controls are set correctly for normal ...
Product Manual
Page 14
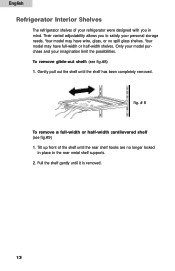
To remove glide-out shelf: (see fig.#9) 1. English Refrigerator Interior Shelves The refrigerator shelves of the shelf until the shelf has been completely removed. Your model may have full-width or half-width shelves. Only your model purchase ..., or no longer locked in place in mind. fig. # 8 To remove a full-width or half-width cantilevered shelf (see fig.#8) 1. Tilt up front of your refrigerator were designed with you to satisfy your imagination limit the possibilities. Their varied adjustability allows you in the rear metal shelf supports. 2. Pull the shelf...
To remove glide-out shelf: (see fig.#9) 1. English Refrigerator Interior Shelves The refrigerator shelves of the shelf until the shelf has been completely removed. Your model may have full-width or half-width shelves. Only your model purchase ..., or no longer locked in place in mind. fig. # 8 To remove a full-width or half-width cantilevered shelf (see fig.#8) 1. Tilt up front of your refrigerator were designed with you to satisfy your imagination limit the possibilities. Their varied adjustability allows you in the rear metal shelf supports. 2. Pull the shelf...
Product Manual
Page 15
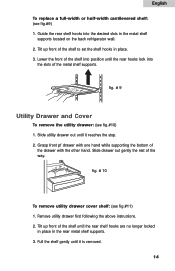
... while supporting the bottom of the shelf until the rear hooks lock into the desired slots in the metal shelf supports located on the back refrigerator wall. 2. Lower the front of the shelf into position until the rear shelf hooks are no longer locked in place in place. 3. Slide utility drawer...
... while supporting the bottom of the shelf until the rear hooks lock into the desired slots in the metal shelf supports located on the back refrigerator wall. 2. Lower the front of the shelf into position until the rear shelf hooks are no longer locked in place in place. 3. Slide utility drawer...

Product Manual
Page 16
... remove and install the crisper: (see fig.#11) 1. Replace the crisper by placing the crisper properly in the metal shelf supports located on the back refrigerator wall. 2. Tilt up front of the crisper. 3. Grip the crisper firmly and slide out completely. 4. English To install utility drawer cover shelf: (see fig.#12...
... remove and install the crisper: (see fig.#11) 1. Replace the crisper by placing the crisper properly in the metal shelf supports located on the back refrigerator wall. 2. Tilt up front of the crisper. 3. Grip the crisper firmly and slide out completely. 4. English To install utility drawer cover shelf: (see fig.#12...
Product Manual
Page 17
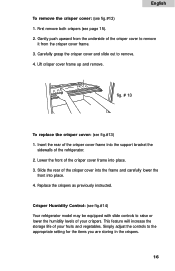
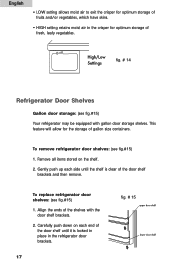
... 2. Slide the rear of your fruits and vegetables. Simply adjust the controls to remove. 4. This feature will increase the storage life of the refrigerator. 2. Carefully grasp the crisper cover and slide out to the appropriate setting for the items you are storing in the crispers. 16 Insert the rear... of the crisper cover frame into place. 3. First remove both crispers (see fig.#14) Your refrigerator model may be equipped with slide controls to remove it from the underside of the crisper cover frame into the support bracket the sidewalls of...
... 2. Slide the rear of your fruits and vegetables. Simply adjust the controls to remove. 4. This feature will increase the storage life of the refrigerator. 2. Carefully grasp the crisper cover and slide out to the appropriate setting for the items you are storing in the crispers. 16 Insert the rear... of the crisper cover frame into place. 3. First remove both crispers (see fig.#14) Your refrigerator model may be equipped with slide controls to remove it from the underside of the crisper cover frame into the support bracket the sidewalls of...
Product Manual
Page 18
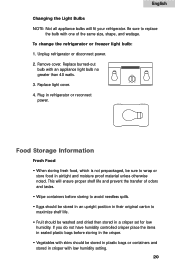
... all items stored on each side until it is clear of the door shelf brackets and then remove. fig. # 14 Refrigerator Door Shelves Gallon door storage: (see fig.#15) Your refrigerator may be equipped with the door shelf brackets. 2. Align the ends of the shelves with gallon door storage shelves. Gently push... moist air to exit the crisper for optimum storage of fruits and/or vegetables, which have skins. • HIGH setting retains moist air in the refrigerator door brackets. 17 fig. # 15
... all items stored on each side until it is clear of the door shelf brackets and then remove. fig. # 14 Refrigerator Door Shelves Gallon door storage: (see fig.#15) Your refrigerator may be equipped with the door shelf brackets. 2. Align the ends of the shelves with gallon door storage shelves. Gently push... moist air to exit the crisper for optimum storage of fruits and/or vegetables, which have skins. • HIGH setting retains moist air in the refrigerator door brackets. 17 fig. # 15
Product Manual
Page 21
... in the crisper. • Vegetables with an appliance light bulb no greater than 40 watts. 3. Replace light cover. 4. To change the refrigerator or freezer light bulb: 1. If you do not have humidity controlled crisper place the items in sealed plastic bags before storing to avoid needless spills.... • Eggs should be stored in an upright position in their original carton to wrap or store food in refrigerator or reconnect power. Replace burned-out bulb with skins should be sure to maximize shelf life. • Fruit should be stored in plastic...
... in the crisper. • Vegetables with an appliance light bulb no greater than 40 watts. 3. Replace light cover. 4. To change the refrigerator or freezer light bulb: 1. If you do not have humidity controlled crisper place the items in sealed plastic bags before storing to avoid needless spills.... • Eggs should be stored in an upright position in their original carton to wrap or store food in refrigerator or reconnect power. Replace burned-out bulb with skins should be sure to maximize shelf life. • Fruit should be stored in plastic...

Product Manual
Page 22
... below for proper storage. • Packaging Recommendations: Plastic containers with high humidity setting. • Hot food should be allowed to cool before storing in the refrigerator.
... below for proper storage. • Packaging Recommendations: Plastic containers with high humidity setting. • Hot food should be allowed to cool before storing in the refrigerator.
Product Manual
Page 23
... interior of your unit to maintain the temperature you have selected. • Boiling water, gurgling sounds or slight vibrations that are the result of the refrigerant circulating through the cooling coils. • Sizzling or popping sounds resulting from frost melting during the defrost cycle and dripping on the defrost cycle. •...
... interior of your unit to maintain the temperature you have selected. • Boiling water, gurgling sounds or slight vibrations that are the result of the refrigerant circulating through the cooling coils. • Sizzling or popping sounds resulting from frost melting during the defrost cycle and dripping on the defrost cycle. •...


