
User Manual
Page 9
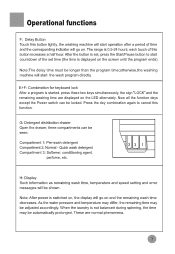
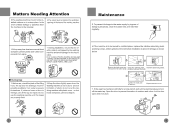
Press the dey combination again to cancel this function. After a program is started, press these two keys simultaneously, the sign LOCK and the remaining washing time are displayed on the LED alternately. Now all the function deys except the Power switch can be locked.
Press the dey combination again to cancel this function. After a program is started, press these two keys simultaneously, the sign LOCK and the remaining washing time are displayed on the LED alternately. Now all the function deys except the Power switch can be locked.
User Manual
Page 1
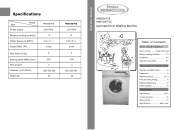
... 11 850x535x595 66 Haier 1HERMOCOOL HMS800TVE HMS1000TVE 0 Automatic Drum Washing Machine 8 • :•0 ••-• ,*viror" Table of Contents Before using the appliance Name of parts inside front cover Matters needing attention 1-3 Installation 4-5 Operational functions 6-7 How to operate the washing machine Program description table Preparation Washing methods Hints for saving energy Washing instructions Other functions 8 9 10-11 11 12 13 Maintenance Maintenance Trouble shooting Wiring circuit Specifications 14-15 16 17...
... 11 850x535x595 66 Haier 1HERMOCOOL HMS800TVE HMS1000TVE 0 Automatic Drum Washing Machine 8 • :•0 ••-• ,*viror" Table of Contents Before using the appliance Name of parts inside front cover Matters needing attention 1-3 Installation 4-5 Operational functions 6-7 How to operate the washing machine Program description table Preparation Washing methods Hints for saving energy Washing instructions Other functions 8 9 10-11 11 12 13 Maintenance Maintenance Trouble shooting Wiring circuit Specifications 14-15 16 17...
User Manual
Page 2
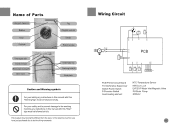
... plaque Drain hose clip Packing bolts(3) Back plate Caution and Warning symbols For your safety and to prevent damage to techincal improvements Wiring Circuit NTC Heat 2 N 1 N G L FA Switch QN J6 J5 MR 3 JA1 J4 PCB EVF EVP PS 2 2 2 m PCB-Printed Circuit Board FA-Interference Suppresser Switch-Power Switch P-Pressure Switch Heat-Heating element NTC-Temperature Sensor MR-Door Lock EVP,EVF-Water Inlet Magnetic Valve PS-Drain Pump M-Motor...
... plaque Drain hose clip Packing bolts(3) Back plate Caution and Warning symbols For your safety and to prevent damage to techincal improvements Wiring Circuit NTC Heat 2 N 1 N G L FA Switch QN J6 J5 MR 3 JA1 J4 PCB EVF EVP PS 2 2 2 m PCB-Printed Circuit Board FA-Interference Suppresser Switch-Power Switch P-Pressure Switch Heat-Heating element NTC-Temperature Sensor MR-Door Lock EVP,EVF-Water Inlet Magnetic Valve PS-Drain Pump M-Motor...
User Manual
Page 3
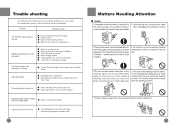
... fixing bolts removed • Washing machine on • Water pressure is less than 0.05MPa • The inlet hose is kinked • Water supply failure • The program knob is not properly set • The door is not properly closed The water supply and drainage do not use flammable detergent or dry cleaning agent; Problem Possible Cause The washing machine fails to operate • Poor connection to avoid a hazard. _ • 4. O ,-4-1- 3.Fuses...
... fixing bolts removed • Washing machine on • Water pressure is less than 0.05MPa • The inlet hose is kinked • Water supply failure • The program knob is not properly set • The door is not properly closed The water supply and drainage do not use flammable detergent or dry cleaning agent; Problem Possible Cause The washing machine fails to operate • Poor connection to avoid a hazard. _ • 4. O ,-4-1- 3.Fuses...
User Manual
Page 4
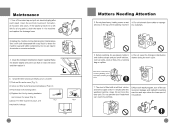
... and direct sunlight to prevent plastic and rubber components from water pressure fluctuations. If joints are properly fixed. 2.Keep the door slightly open while not used. 0 4 2 15 Maintenance 5. vibration locks and the bolts. Before use, check the joints of the filling hose, the tap and the drainage hose for a long period, pull out the electrical plug and turn off the water tap. To prevent blockage to the water supply by the washing machine...
... and direct sunlight to prevent plastic and rubber components from water pressure fluctuations. If joints are properly fixed. 2.Keep the door slightly open while not used. 0 4 2 15 Maintenance 5. vibration locks and the bolts. Before use, check the joints of the filling hose, the tap and the drainage hose for a long period, pull out the electrical plug and turn off the water tap. To prevent blockage to the water supply by the washing machine...
User Manual
Page 5
... wet 4. Do not open the door if water level can reach the porthole. 8.After each wash program, turn off the water tap and pull out electricity plug after the washing machine stops. Open the porthole to prevent leakage; nI t u. (i) • 15 2.Unplug the machine during the wash cycle. Use a soft cloth dampened with water and then replace it may lead to clean the machine case and rubber components. Do not use organic chemicals or...
... wet 4. Do not open the door if water level can reach the porthole. 8.After each wash program, turn off the water tap and pull out electricity plug after the washing machine stops. Open the porthole to prevent leakage; nI t u. (i) • 15 2.Unplug the machine during the wash cycle. Use a soft cloth dampened with water and then replace it may lead to clean the machine case and rubber components. Do not use organic chemicals or...

User Manual
Page 6
... the power is level. 4 0 0 0 CO Fig.2 e4 ' 0:0 s. Display messages: ga Cause: Door is displayed at the same time. LEI The remaining time is normal phenomenon resulting from accidentally changing the settings, the control panel can be seen on the back plate and take out the rubber hose; 3. OE Cause: Motor overheat protection or damage. Correction: Reduce load and then start washing again or contact the maintenance personnel. Correction: Clean the filter and check the drain hose...
... the power is level. 4 0 0 0 CO Fig.2 e4 ' 0:0 s. Display messages: ga Cause: Door is displayed at the same time. LEI The remaining time is normal phenomenon resulting from accidentally changing the settings, the control panel can be seen on the back plate and take out the rubber hose; 3. OE Cause: Motor overheat protection or damage. Correction: Reduce load and then start washing again or contact the maintenance personnel. Correction: Clean the filter and check the drain hose...
User Manual
Page 7
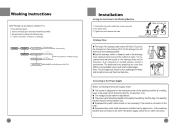
... be installed on the water valve. 2. The additional hose should be securely fixed and leak-free. Washing Instructions Take"Prewash" as an example (HMS800TVE): 1. Select a desired program and press the Start/Pause switch. 3. Note: The drainage hose should not be submerged in the power circuit should be rated for the maximum power of the washing machine (For safety, fuses in water and should be capable of accepting the washing machine plug. CD...
... be installed on the water valve. 2. The additional hose should be securely fixed and leak-free. Washing Instructions Take"Prewash" as an example (HMS800TVE): 1. Select a desired program and press the Start/Pause switch. 3. Note: The drainage hose should not be submerged in the power circuit should be rated for the maximum power of the washing machine (For safety, fuses in water and should be capable of accepting the washing machine plug. CD...
User Manual
Page 8
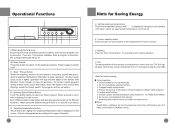
...: Different water temperatures and spinning speeds can be displayed on the washing machine. Select a temperature according to the type of laundry. 6 Hints for heavily soiled clothes. 6. Open the door and take out the laundry. Only exceed 60°C for Saving Energy 4. C: Start / Pause Button When the washing machine is connected to the "Operational Functions" section). 6. To cancel a wash program during a wash cycle, touch this button, when the digits on the screen start blinking, press the Power switch...
...: Different water temperatures and spinning speeds can be displayed on the washing machine. Select a temperature according to the type of laundry. 6 Hints for heavily soiled clothes. 6. Open the door and take out the laundry. Only exceed 60°C for Saving Energy 4. C: Start / Pause Button When the washing machine is connected to the "Operational Functions" section). 6. To cancel a wash program during a wash cycle, touch this button, when the digits on the screen start blinking, press the Power switch...

User Manual
Page 9
... door. Quick wash detergent Compartment 3: Softener, conditioning agent, perfume, etc. 2 3 1I H: Display Such information as remaining wash time, temperature and speed setting and error messages will go on , the display will start the wash program directly. G: Detergent distribution drawer Open the drawer, three compartments can be seen: Compartment 1: Prewash detergent Compartment 2: Normal - The range is switched on and the remaining wash time decreases. These are displayed on . Now all the function keys except the Power switch can be locked...
... door. Quick wash detergent Compartment 3: Softener, conditioning agent, perfume, etc. 2 3 1I H: Display Such information as remaining wash time, temperature and speed setting and error messages will go on , the display will start the wash program directly. G: Detergent distribution drawer Open the drawer, three compartments can be seen: Compartment 1: Prewash detergent Compartment 2: Normal - The range is switched on and the remaining wash time decreases. These are displayed on . Now all the function keys except the Power switch can be locked...
User Manual
Page 10
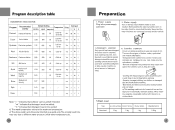
... ,initial water temperature,etc. • Preparation 1. Caution: Before staring the washing machine turn on the tap ensure that detergent must not be added if needed; dry cleaning solvent should be used time may cause damage to type and extent of detergent only). 4. If whites and coloreds are combined for mechanically washable clothes. Power supply Plug in automatic drum washing machine, form blended or wool fabrics special detergent should be used . When washing...
... ,initial water temperature,etc. • Preparation 1. Caution: Before staring the washing machine turn on the tap ensure that detergent must not be added if needed; dry cleaning solvent should be used time may cause damage to type and extent of detergent only). 4. If whites and coloreds are combined for mechanically washable clothes. Power supply Plug in automatic drum washing machine, form blended or wool fabrics special detergent should be used . When washing...


