
User Manual
Page 2
English SAFETY PRECAUTIONS Read all electric service cords that have become frayed or otherwise damaged. " ...Thawed ground meats, poultry, or fish that have any repairs. Do not use a cord that a certified technician pe►forms the service. 6) Do not use and care guide. 2) This refrigerator must be eaten. This will reduce the possibility of the instructions before using this appliance,always exercise...
English SAFETY PRECAUTIONS Read all electric service cords that have become frayed or otherwise damaged. " ...Thawed ground meats, poultry, or fish that have any repairs. Do not use a cord that a certified technician pe►forms the service. 6) Do not use and care guide. 2) This refrigerator must be eaten. This will reduce the possibility of the instructions before using this appliance,always exercise...

User Manual
Page 3
... place so that children may not easily climb inside. Before you for freestanding installation only. 11) Do not operate your refrigerator. As per UL 250 11.2.6 Thank you throw away your manual. It is designed for using our Haier product. This easy-to obtain warranty service. 2 Leave the shelves in an enclosed cabinet. Model number Serial number Date ofpurchase Staple your receipt to record...
... place so that children may not easily climb inside. Before you for freestanding installation only. 11) Do not operate your refrigerator. As per UL 250 11.2.6 Thank you throw away your manual. It is designed for using our Haier product. This easy-to obtain warranty service. 2 Leave the shelves in an enclosed cabinet. Model number Serial number Date ofpurchase Staple your receipt to record...

User Manual
Page 4
... Unpacking Your Refrigerator Adjusting Your Refrigerator Proper Air Circulation Electrical Requirements Door Handle Installation Door Alignment Reversing the Door Swing Reversing The Door Handles Refrigerator Features And Usel 2 General Features Refrigerator Interior Shelves Utility Drawer And Cover Crisper and Crisper Cover Refrigerator Door Shelves Freezer Features Food Storage Information Normal Operating Sounds Proper Refrigerator Care and Cleaning Cleaning and Maintenance Light Bulb Replacement Power Interruptions Vacation and Moving Care Troubleshooting Warranty Information 3 PAGE...
... Unpacking Your Refrigerator Adjusting Your Refrigerator Proper Air Circulation Electrical Requirements Door Handle Installation Door Alignment Reversing the Door Swing Reversing The Door Handles Refrigerator Features And Usel 2 General Features Refrigerator Interior Shelves Utility Drawer And Cover Crisper and Crisper Cover Refrigerator Door Shelves Freezer Features Food Storage Information Normal Operating Sounds Proper Refrigerator Care and Cleaning Cleaning and Maintenance Light Bulb Replacement Power Interruptions Vacation and Moving Care Troubleshooting Warranty Information 3 PAGE...

User Manual
Page 5
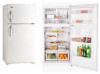
Adjustable FULL WIDTH Wire Freezer Shelf (not on all models) 3. Refrigerator Light 6. Utility Drawer (not on all models) 7. Cover Frame And Optional Humidity Control (not on all models) 10. Refrigerator Door Shelves (type and quantity varies by model) 12. Glass Crisper Cover (not on all models) 8. Interior Refrigerator Shelves (type and quantity varies by model) 14. 2 Leveling Legs (not shown) 15. Shelf Bottle Hugger (not on all models) 4 Covered Dairy Compartment 11. Ice Cube Tray 4. Crispers 9. English Parts And Features ir I II n /I ,, \ ® [ ...
Adjustable FULL WIDTH Wire Freezer Shelf (not on all models) 3. Refrigerator Light 6. Utility Drawer (not on all models) 7. Cover Frame And Optional Humidity Control (not on all models) 10. Refrigerator Door Shelves (type and quantity varies by model) 12. Glass Crisper Cover (not on all models) 8. Interior Refrigerator Shelves (type and quantity varies by model) 14. 2 Leveling Legs (not shown) 15. Shelf Bottle Hugger (not on all models) 4 Covered Dairy Compartment 11. Ice Cube Tray 4. Crispers 9. English Parts And Features ir I II n /I ,, \ ® [ ...

User Manual
Page 6
Adjusting Your Refrigerator Leveling Your Refrigerator: • Your refrigerator has two leveling legs which are located in the front corners of packing, tape or printed materials before powering on the refrigerator. English Installing Your Refrigerator Unpacking Your Refrigerator 1. After properly placing your refrigerator in a location where there is proper air circulation, plumbing and electrical connections. • The following are raised. Proper Air Circulation • To assure your refrigerator works at the...
Adjusting Your Refrigerator Leveling Your Refrigerator: • Your refrigerator has two leveling legs which are located in the front corners of packing, tape or printed materials before powering on the refrigerator. English Installing Your Refrigerator Unpacking Your Refrigerator 1. After properly placing your refrigerator in a location where there is proper air circulation, plumbing and electrical connections. • The following are raised. Proper Air Circulation • To assure your refrigerator works at the...

User Manual
Page 7
... install your refrigerator in temperature settings below 55° Fahrenheit. • Select a suitable location for the refrigerator and may result in order to power the refrigerator. • Avoid the use of the refrigerator. 6 This is a suitable power Outlet (115 volts, 15 amps outlet) with the leveling legs located on a hard even surface away from direct sunlight or heat source e.g. garage etc. English Electrical Requirement • Make...
... install your refrigerator in temperature settings below 55° Fahrenheit. • Select a suitable location for the refrigerator and may result in order to power the refrigerator. • Avoid the use of the refrigerator. 6 This is a suitable power Outlet (115 volts, 15 amps outlet) with the leveling legs located on a hard even surface away from direct sunlight or heat source e.g. garage etc. English Electrical Requirement • Make...

User Manual
Page 9
Reversing the Door Swing Left/right door opening method: This product provides the reversing of door opening . Loosen the top hinge screws using a phillips head screwdriver. 4. Remove hinge cover screw. 2. Hinge box cover Top hinge fig. #3 8 Remove the top hinge cover. 3. Replace the top hinge cover. You can select your preference of the left/right door opening by following the procedure to make the change. Door Alignment (see fig. # 3) English 1. Adjust the door or put a spacer in between and then tighten the screws. 5.
Reversing the Door Swing Left/right door opening method: This product provides the reversing of door opening . Loosen the top hinge screws using a phillips head screwdriver. 4. Remove hinge cover screw. 2. Hinge box cover Top hinge fig. #3 8 Remove the top hinge cover. 3. Replace the top hinge cover. You can select your preference of the left/right door opening by following the procedure to make the change. Door Alignment (see fig. # 3) English 1. Adjust the door or put a spacer in between and then tighten the screws. 5.

User Manual
Page 11
... pad to make the left bottom hole of the freezer door; Tighten the screws of the refrigerator compartment door fall over the lower hinge axle, move back and forward the door to the left side. Replace the hinge cover as shown in the upper hole of the upper part of freezer door fall over the central axle; adjust door to the left bottom hole of upper hinge. 5. Install freezer door: make it with...
... pad to make the left bottom hole of the freezer door; Tighten the screws of the refrigerator compartment door fall over the lower hinge axle, move back and forward the door to the left side. Replace the hinge cover as shown in the upper hole of the upper part of freezer door fall over the central axle; adjust door to the left bottom hole of upper hinge. 5. Install freezer door: make it with...

User Manual
Page 13
... half-width shelves. Their varied adjustability allows you select. To replace the shelf, select the desired setting and gently slide the shelf back until the shelf has been completely removed. 2. Turning the dial to OFF stops cooling in the locking position. Your model may have wire, glass, or no longer locked in place in .) Refrigerator Section Interior Light: Your refrigerator is equipped with you to easily locate your food...
... half-width shelves. Their varied adjustability allows you select. To replace the shelf, select the desired setting and gently slide the shelf back until the shelf has been completely removed. 2. Turning the dial to OFF stops cooling in the locking position. Your model may have wire, glass, or no longer locked in place in .) Refrigerator Section Interior Light: Your refrigerator is equipped with you to easily locate your food...

User Manual
Page 14
... bottom of the shelf to set the shelf hooks in the metal shelf supports located on the back refrigerator wall. 2. Guide the rear shelf hooks into the slots of the shelf into position until the rear shelf hooks are no longer locked in place in the rear metal shelf supports. 3. Lower the front of the metal shelf supports. Remove utility drawer first following the above instructions. 2. Slide drawer out gently the rest...
... bottom of the shelf to set the shelf hooks in the metal shelf supports located on the back refrigerator wall. 2. Guide the rear shelf hooks into the slots of the shelf into position until the rear shelf hooks are no longer locked in place in the rear metal shelf supports. 3. Lower the front of the metal shelf supports. Remove utility drawer first following the above instructions. 2. Slide drawer out gently the rest...
User Manual
Page 15
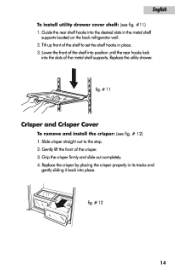
... shelf supports. Tilt up front of the shelf into position until the rear hooks lock into place. 1111(011 -1- fig. # 12 14 Guide the rear shelf hooks into the desired slots in its tracks and gently sliding it back into the slots of the crisper. 3. fig.#11 Crisper and Crisper Cover To remove and install the crisper: (see fig. #11) 1. Replace the utility drawer. English To install...
... shelf supports. Tilt up front of the shelf into position until the rear hooks lock into place. 1111(011 -1- fig. # 12 14 Guide the rear shelf hooks into the desired slots in its tracks and gently sliding it back into the slots of the crisper. 3. fig.#11 Crisper and Crisper Cover To remove and install the crisper: (see fig. #11) 1. Replace the utility drawer. English To install...

User Manual
Page 16
... rear of your crispers. Crisper Humidity Control: (see fig. # 13) 1. Simply adjust the controls to raise or lower the humidity levels of the crisper cover frame into place. 3. First remove both crispers (see fig. # 13) 1. r% N fig. # 13 To replace the crisper cover: (see page 14). 2. English To remove the crisper cover: (see fig. # 14) Your refrigerator model may be equipped with slide controls to the appropriate setting for the items...
... rear of your crispers. Crisper Humidity Control: (see fig. # 13) 1. Simply adjust the controls to raise or lower the humidity levels of the crisper cover frame into place. 3. First remove both crispers (see fig. # 13) 1. r% N fig. # 13 To replace the crisper cover: (see page 14). 2. English To remove the crisper cover: (see fig. # 14) Your refrigerator model may be equipped with slide controls to the appropriate setting for the items...

User Manual
Page 17
... shelf. 2. English • LOW setting allows moist air to exit the crisper for optimum storage of fruits and/or vegetables, which have skins. • HIGH setting retains moist air in the crisper for the storage of gallon size containers. Gently push up each side until the shelf is clear of the door shelf brackets and then remove. To remove refrigerator door shelves: (see fig. # 15) 1. To replace refrigerator door shelves...
... shelf. 2. English • LOW setting allows moist air to exit the crisper for optimum storage of fruits and/or vegetables, which have skins. • HIGH setting retains moist air in the crisper for the storage of gallon size containers. Gently push up each side until the shelf is clear of the door shelf brackets and then remove. To remove refrigerator door shelves: (see fig. # 15) 1. To replace refrigerator door shelves...

User Manual
Page 19
... the door shelf brackets and then remove. *, -------- Gently push up each end of the door shelf until the shelf is locked in place in your freezer. Ice Storage Bin: (see fig # 19) The ice storage bin can also be used to store additional ice cubes in the freezer door brackets. freezer door shelves fig. # 18 To install freezer door shelves: (see fig #18) 1. It can be used to store items in the refrigeration section...
... the door shelf brackets and then remove. *, -------- Gently push up each end of the door shelf until the shelf is locked in place in your freezer. Ice Storage Bin: (see fig # 19) The ice storage bin can also be used to store additional ice cubes in the freezer door brackets. freezer door shelves fig. # 18 To install freezer door shelves: (see fig #18) 1. It can be used to store items in the refrigeration section...

User Manual
Page 20
...crisper set for safe storage: • Chicken 1-2 Days • Ground Beef 1-2 Days • Cold Cuts 3-5 Days • Steaks/Roasts 3-5 Days • Smoked/Cured Meats 7-10 Days • All others 1-2 Days If longer periods of storage are required, store immediately in the freezer section. 19 This will prevent unnecessary energy use... • When storing fresh food, which is equipped with one or two ice cube trays depending upon the model you do not have purchased. English Ice Cube Trays: Your refrigerator is not prepackaged, be allowed to cool before storing in the...
...crisper set for safe storage: • Chicken 1-2 Days • Ground Beef 1-2 Days • Cold Cuts 3-5 Days • Steaks/Roasts 3-5 Days • Smoked/Cured Meats 7-10 Days • All others 1-2 Days If longer periods of storage are required, store immediately in the freezer section. 19 This will prevent unnecessary energy use... • When storing fresh food, which is equipped with one or two ice cube trays depending upon the model you do not have purchased. English Ice Cube Trays: Your refrigerator is not prepackaged, be allowed to cool before storing in the...

User Manual
Page 23
... warm water. Door Gaskets: • Clean door gaskets every three months according to assure a proper seal. • Petroleum jelly applied lightly on the hinge side of gaskets will keep the gasket pliable and assure a good seal. 22 General: • Prepare a cleaning solution of 3-4 tablespoons of these chemicals may result in death or injury. Gaskets must be kept clean and pliable to geheral instructions. English Proper Refrigerator Care and Cleaning Cleaning...
... warm water. Door Gaskets: • Clean door gaskets every three months according to assure a proper seal. • Petroleum jelly applied lightly on the hinge side of gaskets will keep the gasket pliable and assure a good seal. 22 General: • Prepare a cleaning solution of 3-4 tablespoons of these chemicals may result in death or injury. Gaskets must be kept clean and pliable to geheral instructions. English Proper Refrigerator Care and Cleaning Cleaning...

User Manual
Page 24
... power cord to refrigerator. 2. Possible damage to "General cleaning" section. Always replace with the unit lying down. Vacation and Moving Care • For long vacations or absences, empty food from AC outlet when a power outage occurs. Do not move the refrigerator vertically. Remove the highest shelf. 3. Do not exceed the 40 watts rating at 40 watts or lesser wattage. 6. English Light Bulb Replacement 1. Prop doors open, so air can circulate inside...
... power cord to refrigerator. 2. Possible damage to "General cleaning" section. Always replace with the unit lying down. Vacation and Moving Care • For long vacations or absences, empty food from AC outlet when a power outage occurs. Do not move the refrigerator vertically. Remove the highest shelf. 3. Do not exceed the 40 watts rating at 40 watts or lesser wattage. 6. English Light Bulb Replacement 1. Prop doors open, so air can circulate inside...

User Manual
Page 25
... colder setting. • Check freezer compartment for models with exposed condenser coils). • Adjust temperature control to see whether refrigerator will start. English TroubleShooting Refrigerator Does Not Operate • Check thermostat control is not in the "OFP' position. • Check refrigerator is plugged in "defrost' mode and must complete this cycle before Compressor starts to see if doors are completely closed. 24 Food temperature appears too warm • Frequent door openings. •...
... colder setting. • Check freezer compartment for models with exposed condenser coils). • Adjust temperature control to see whether refrigerator will start. English TroubleShooting Refrigerator Does Not Operate • Check thermostat control is not in the "OFP' position. • Check refrigerator is plugged in "defrost' mode and must complete this cycle before Compressor starts to see if doors are completely closed. 24 Food temperature appears too warm • Frequent door openings. •...

User Manual
Page 26
... high humidity periods. • Prolonged or frequent door openings. • Check door gaskets for blockages e.g. food containers, crisper cover, shelves, bins etc. 25 Refrigerator/Freezer door does not shut properly: • Level the refrigerator. • Re align refrigerator/freezer door. • Check for proper seal. Refrigerator light does not work: • Check power supply. • Tighten bulb in socket. • Replace burned out bulb. Refrigerator has an odor: • Interior needs cleaning. • Foods improperly wrapped or sealed are...
... high humidity periods. • Prolonged or frequent door openings. • Check door gaskets for blockages e.g. food containers, crisper cover, shelves, bins etc. 25 Refrigerator/Freezer door does not shut properly: • Level the refrigerator. • Re align refrigerator/freezer door. • Check for proper seal. Refrigerator light does not work: • Check power supply. • Tighten bulb in socket. • Replace burned out bulb. Refrigerator has an odor: • Interior needs cleaning. • Foods improperly wrapped or sealed are...

User Manual
Page 27
Contact your nearest authorized service center. The mechanical and electrical parts, light bulbs. The components of the sealed system e.g. hermetic compressor, condenser and evaporator from manufacturing defects for a period of 5 years from state to the authorized service center before warranty repairs are covered in workmanship or materials for how long? covered. Some 1. This warranty gives you specific legal rights, and you . There will not be...
Contact your nearest authorized service center. The mechanical and electrical parts, light bulbs. The components of the sealed system e.g. hermetic compressor, condenser and evaporator from manufacturing defects for a period of 5 years from state to the authorized service center before warranty repairs are covered in workmanship or materials for how long? covered. Some 1. This warranty gives you specific legal rights, and you . There will not be...


