
User Manual
Page 4
... Of Contents Safety Precautions Parts And Features Installing Your Refrigerator Unpacking Your Refrigerator Adjusting Your Refrigerator Proper Air Circulation Electrical Requirements Door Handle Installation Door Alignment Reversing the Door Swing Reversing The Door Handles Refrigerator Features And Usel 2 General Features Refrigerator Interior Shelves Utility Drawer And Cover Crisper and Crisper Cover Refrigerator Door Shelves Freezer Features Food...
... Of Contents Safety Precautions Parts And Features Installing Your Refrigerator Unpacking Your Refrigerator Adjusting Your Refrigerator Proper Air Circulation Electrical Requirements Door Handle Installation Door Alignment Reversing the Door Swing Reversing The Door Handles Refrigerator Features And Usel 2 General Features Refrigerator Interior Shelves Utility Drawer And Cover Crisper and Crisper Cover Refrigerator Door Shelves Freezer Features Food...

User Manual
Page 5
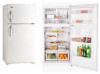
...models) 2. Adjustable FULL WIDTH Wire Freezer Shelf (not on all models) 3. Cover Frame And Optional Humidity Control (not on all models) 10. Refrigerator Door Shelves (type and quantity varies by model) 12. Glass Crisper Cover (not on all models) 8. Bottom Rollers (located front and rear,...9. Shelf Bottle Hugger (not on all models) 4 Utility Shelf/Ice Cube Tray Holder 5. Utility Drawer (not on all models) 7. English Parts And Features ir I II n /I ,, \ ® [ ------_,--- 0 o- \ usaaaaaaaaaao al EIDDIMMD ® --------- ) © 1. Refrigerator Light 6.
...models) 2. Adjustable FULL WIDTH Wire Freezer Shelf (not on all models) 3. Cover Frame And Optional Humidity Control (not on all models) 10. Refrigerator Door Shelves (type and quantity varies by model) 12. Glass Crisper Cover (not on all models) 8. Bottom Rollers (located front and rear,...9. Shelf Bottle Hugger (not on all models) 4 Utility Shelf/Ice Cube Tray Holder 5. Utility Drawer (not on all models) 7. English Parts And Features ir I II n /I ,, \ ® [ ------_,--- 0 o- \ usaaaaaaaaaao al EIDDIMMD ® --------- ) © 1. Refrigerator Light 6.

User Manual
Page 8
... with the screw hole of the upper edge of freezer door, and fix them by screws. 3. Align the upper part of door handle with the screw hole of the lower edge of refrigerator door, and fix them by screws. 3. Screw cover u--------- Align the lower screw holes of the door handle with the... holes in the refrigerator door, fix them with screws, and cover them with screw covers. Align the upper screw holes of the door handle with the holes in the ...
... with the screw hole of the upper edge of freezer door, and fix them by screws. 3. Align the upper part of door handle with the screw hole of the lower edge of refrigerator door, and fix them by screws. 3. Screw cover u--------- Align the lower screw holes of the door handle with the... holes in the refrigerator door, fix them with screws, and cover them with screw covers. Align the upper screw holes of the door handle with the holes in the ...

User Manual
Page 10
... freezer door by pulling it aside. 4. Take out the hinge by sticking adhesive tape on the upper part of the central hinge, lift and take down refrigerator door, and carefully put it vertically, and keep them in fig. 3, dismantle the hinge box cover on both sides to hold doors in... a safe place. 3. As shown in fig. 4, dismantle three screws of freezer door with a phillips head screwdriver. Remove the adhesive tape on refrigerator door, lift and take down , and carefully put it in place. 2. Remove the adhesive tape on freezer door, lift and toke the door down ...
... freezer door by pulling it aside. 4. Take out the hinge by sticking adhesive tape on the upper part of the central hinge, lift and take down refrigerator door, and carefully put it vertically, and keep them in fig. 3, dismantle the hinge box cover on both sides to hold doors in... a safe place. 3. As shown in fig. 4, dismantle three screws of freezer door with a phillips head screwdriver. Remove the adhesive tape on refrigerator door, lift and take down , and carefully put it in place. 2. Remove the adhesive tape on freezer door, lift and toke the door down ...

User Manual
Page 11
.... As shown in fig. 5, dismantle the lower hinge and plastic pad from right side and then install them on the left bottom hole of the refrigerator compartment door fall over the lower hinge axle, move back and forward the door to make it straight and in fig. 6, install the central hinge... and pad to the left corresponding position. 6. Replace the hinge cover as shown in the upper hole of the upper part of upper hinge. 5. raise upper hinge, so that hinge axle can be installed in Fig. 3. 10 Tighten the screws of the freezer door; English ...
.... As shown in fig. 5, dismantle the lower hinge and plastic pad from right side and then install them on the left bottom hole of the refrigerator compartment door fall over the lower hinge axle, move back and forward the door to make it straight and in fig. 6, install the central hinge... and pad to the left corresponding position. 6. Replace the hinge cover as shown in the upper hole of the upper part of upper hinge. 5. raise upper hinge, so that hinge axle can be installed in Fig. 3. 10 Tighten the screws of the freezer door; English ...


