
User Manual
Page 1
Retain it for HWM80-0626S HWM80-0626SH Please read this manual carefully before using. Twin-tub Washing Machine User's manual This manual is for future reference. 0030807884
Retain it for HWM80-0626S HWM80-0626SH Please read this manual carefully before using. Twin-tub Washing Machine User's manual This manual is for future reference. 0030807884
User Manual
Page 2
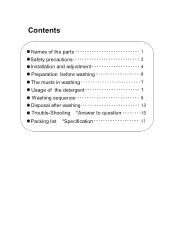
Contents Names of the parts Safety precautions Installation and adjustment Preparation before washing The musts in washing Usage of the detergent Washing sequence Disposal after washing Trouble-Shooting *Answer to question Packing list *Specification
Contents Names of the parts Safety precautions Installation and adjustment Preparation before washing The musts in washing Usage of the detergent Washing sequence Disposal after washing Trouble-Shooting *Answer to question Packing list *Specification

User Manual
Page 3
... improvement. Names of the parts Wash tub cover Drain selector Program selector Wash timer Control panel seat Water-filling entrance Control panel Plate support (left) Water filling control handle Bypass channel Water level adjust lever Overflow filter Lint filter Drain hose Cabinet handle Wash tub Cabinet Base frame Outer cover of the spin tub Inner cover of the spin tub Spin timer Plate support(right) Spin tub frame Spin tub Front door Power cord Pulsator Notes: All illustrations in this Manual are actions forbidden to...
... improvement. Names of the parts Wash tub cover Drain selector Program selector Wash timer Control panel seat Water-filling entrance Control panel Plate support (left) Water filling control handle Bypass channel Water level adjust lever Overflow filter Lint filter Drain hose Cabinet handle Wash tub Cabinet Base frame Outer cover of the spin tub Inner cover of the spin tub Spin timer Plate support(right) Spin tub frame Spin tub Front door Power cord Pulsator Notes: All illustrations in this Manual are actions forbidden to...

User Manual
Page 4
... receptacle with dry cloth carefully. location easily to pull the must be inserted and The earthing terminal of the washing machine Do not wash water-proof laundries like the bathroom . Be sure to be earthed reliably. Never wash it with water. Do not use the plug any more. 2 In case the washing machine is installed on the control panel. Safety precautions Please insert the power cord into the receptacle...
... receptacle with dry cloth carefully. location easily to pull the must be inserted and The earthing terminal of the washing machine Do not wash water-proof laundries like the bathroom . Be sure to be earthed reliably. Never wash it with water. Do not use the plug any more. 2 In case the washing machine is installed on the control panel. Safety precautions Please insert the power cord into the receptacle...
User Manual
Page 5
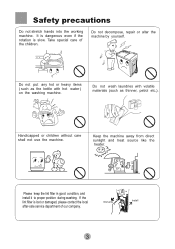
... not wash laundries with hot water ) on the washing machine. Keep the machine away from direct sunlight and heat source like the heater. Please keep the lint filter in good condition, and install it to proper position during washing. Safety precautions Do not stretch hands into the working machine. If the lint filter is slow. Petrol Thinner Handicapped or children without care shall not use the machine...
... not wash laundries with hot water ) on the washing machine. Keep the machine away from direct sunlight and heat source like the heater. Please keep the lint filter in good condition, and install it to proper position during washing. Safety precautions Do not stretch hands into the working machine. If the lint filter is slow. Petrol Thinner Handicapped or children without care shall not use the machine...

User Manual
Page 6
Installation and adjustment Please install and adjust the machine according to your security and correct operating the machine. Usage of the drain hose The drain hose shall drain smoothly 1.The height of the manual. It is very important to the requirement of the drain hose shall be less than 10cm, or the drainage will not be smooth, and cost such long time that the machine may stop at mid way. 30mm
Installation and adjustment Please install and adjust the machine according to your security and correct operating the machine. Usage of the drain hose The drain hose shall drain smoothly 1.The height of the manual. It is very important to the requirement of the drain hose shall be less than 10cm, or the drainage will not be smooth, and cost such long time that the machine may stop at mid way. 30mm

User Manual
Page 7
... the drain hose fixing clamp and take the hose out of the drain hose. Set the water level adjusting lever to the spin tub side Fig ure 3 Install the water inlet hose; Water inlet hose Water-filling entrance Water level indicator Maximum Max Medium Med Minimum Min 5 Take off the drain hose from the side of the laundries. Back Extend the drain hose from the cabinet. Lean the machine down gently with hands. Select the water level Insert the water inlet hose...
... the drain hose fixing clamp and take the hose out of the drain hose. Set the water level adjusting lever to the spin tub side Fig ure 3 Install the water inlet hose; Water inlet hose Water-filling entrance Water level indicator Maximum Max Medium Med Minimum Min 5 Take off the drain hose from the side of the laundries. Back Extend the drain hose from the cabinet. Lean the machine down gently with hands. Select the water level Insert the water inlet hose...
User Manual
Page 8
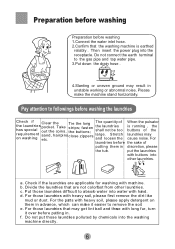
... remove the soi.l e. Do not connect the earth terminal to followings before putting in unstable working or abnormal noise. put those laundries with machine. d. Pay attention to the gas pipe and tap water pipe. 3.Put down the drain hose . 4.Slanting or uneven ground may cause noise. fasten the buttons; Check if the laundries are not colorfast from other laundries. For the parts with buttons into the washing machine directly...
... remove the soi.l e. Do not connect the earth terminal to followings before putting in unstable working or abnormal noise. put those laundries with machine. d. Pay attention to the gas pipe and tap water pipe. 3.Put down the drain hose . 4.Slanting or uneven ground may cause noise. fasten the buttons; Check if the laundries are not colorfast from other laundries. For the parts with buttons into the washing machine directly...

User Manual
Page 9
... one time washing. The thickness ,size , type of the cloth will influence the actual washing capacity. Refer to the instruction of the washing powder for laundries less 1.5kg , so as they are prone to lose color. Please refer to the user's manual for one time. It is more prone to fully dissolve it slowly into the washing tub. The musts in washing The capacity of washing and spinning of the machine...
... one time washing. The thickness ,size , type of the cloth will influence the actual washing capacity. Refer to the instruction of the washing powder for laundries less 1.5kg , so as they are prone to lose color. Please refer to the user's manual for one time. It is more prone to fully dissolve it slowly into the washing tub. The musts in washing The capacity of washing and spinning of the machine...

User Manual
Page 10
... SOFT CALEFACTION OFF DRAIN WASH TIMER (HWM80-0626S) (HWM80-0626SH) FUNCTION SELECTOR DRAIN SWITCH Spin timer (To set to below 2 minutes, first set to stir and dissolve the powder completely. it can increase the service life of the current according to FUNCTION SELECTOR the laundries. (Figure 3) 5.Select the washing time Select the washing time according to needed line. 2. Fill the water and add the dissolved washing powder to make the water level reach the...
... SOFT CALEFACTION OFF DRAIN WASH TIMER (HWM80-0626S) (HWM80-0626SH) FUNCTION SELECTOR DRAIN SWITCH Spin timer (To set to below 2 minutes, first set to stir and dissolve the powder completely. it can increase the service life of the current according to FUNCTION SELECTOR the laundries. (Figure 3) 5.Select the washing time Select the washing time according to needed line. 2. Fill the water and add the dissolved washing powder to make the water level reach the...

User Manual
Page 11
Remarks Don not open the wash tub when heating otherwise it will stop alarming. It begins to wash after close the wash tub, when the temperature reaches 45 5 , the Buzzer will give an musical alarm. It begins to heat after turning the WASH TIMER. Then turn the SELECTOR to the CALEFACTION after put in the laundries. CWalaesfahction Function selector (Soft current, Standard current...
Remarks Don not open the wash tub when heating otherwise it will stop alarming. It begins to wash after close the wash tub, when the temperature reaches 45 5 , the Buzzer will give an musical alarm. It begins to heat after turning the WASH TIMER. Then turn the SELECTOR to the CALEFACTION after put in the laundries. CWalaesfahction Function selector (Soft current, Standard current...

User Manual
Page 12
... of The spin tub 3.Run the foam-removing spinning. 1 Set the inlet selector handle on spin side and fill water for about 1 - 2 min. 10 In case water flows out from wash tub side due to too much inflow, please turn down the water tap a bit. WASH SPIN WATER INLET SELECTOR 2 Close the spin tub outer cover and spin for 1-2 minutes. Please put in properly. Midway spinning 1.Put the laundries into the spin tub evenly and...
... of The spin tub 3.Run the foam-removing spinning. 1 Set the inlet selector handle on spin side and fill water for about 1 - 2 min. 10 In case water flows out from wash tub side due to too much inflow, please turn down the water tap a bit. WASH SPIN WATER INLET SELECTOR 2 Close the spin tub outer cover and spin for 1-2 minutes. Please put in properly. Midway spinning 1.Put the laundries into the spin tub evenly and...

User Manual
Page 13
... laundries. 2.Adjust the water level Set the water level with stored water 1. Put the laundries into the wash tub. Then fill suitable water continuously. 3.Rinse Adjust the wash timer to 5-7 minutes to the laundries quantity. Fill water to the laundries. 2. Rinsing Rinse with water-filling 1.Put the laundries into the wash tub. Rinse Adjust the wash timer to 2-3 minutes to do rinsing. (Repeat the midway spinning and rinsing with stored water for 2-3 times.) Rinse with water level adjusting lever according to do rinsing...
... laundries. 2.Adjust the water level Set the water level with stored water 1. Put the laundries into the wash tub. Then fill suitable water continuously. 3.Rinse Adjust the wash timer to 5-7 minutes to the laundries quantity. Fill water to the laundries. 2. Rinsing Rinse with water-filling 1.Put the laundries into the wash tub. Rinse Adjust the wash timer to 2-3 minutes to do rinsing. (Repeat the midway spinning and rinsing with stored water for 2-3 times.) Rinse with water level adjusting lever according to do rinsing...

User Manual
Page 14
... spin time according to slanting placement of the laundries. Please stop owing to resume the spinning. Close the inner and outer cover of the spin tub. Close it is abnormal sound, it to too much water stored in the tub properly. To do spinning and draining and rinse with water-filling together, please first do spinning for around 1 minute, then do spinning. In spinning, it will stop the machine...
... spin time according to slanting placement of the laundries. Please stop owing to resume the spinning. Close the inner and outer cover of the spin tub. Close it is abnormal sound, it to too much water stored in the tub properly. To do spinning and draining and rinse with water-filling together, please first do spinning for around 1 minute, then do spinning. In spinning, it will stop the machine...

User Manual
Page 15
... take it from the lint filter front cover. Install lint filter Page 8 Lint filter front cover Figure 8 Cleaning the overflow filter Too much lint on the overflow filter will influence the normal usage of the lint filter and overflow filter in time after washing After using the machine. Otherwise it . (See Figure 7). 2. Lint filter rear cover Remove lint completely with clear water. (See Figure 8). Remove lint Figure 7 Pull the...
... take it from the lint filter front cover. Install lint filter Page 8 Lint filter front cover Figure 8 Cleaning the overflow filter Too much lint on the overflow filter will influence the normal usage of the lint filter and overflow filter in time after washing After using the machine. Otherwise it . (See Figure 7). 2. Lint filter rear cover Remove lint completely with clear water. (See Figure 8). Remove lint Figure 7 Pull the...

User Manual
Page 16
... wash it directly by water. Wipe off the water drops on the surface and inside the overflow filter ( as indicated in the tub for some time (about one hour), then close them. 14 Take off the power plug and hang up the drain hose. Water level adjusting lever Corrugation Pipe Figure 9 Figure 10 Disposal of the spin tub for long period. Cleaning the overflow filter 2. Wipe with soft cloth...
... wash it directly by water. Wipe off the water drops on the surface and inside the overflow filter ( as indicated in the tub for some time (about one hour), then close them. 14 Take off the power plug and hang up the drain hose. Water level adjusting lever Corrugation Pipe Figure 9 Figure 10 Disposal of the spin tub for long period. Cleaning the overflow filter 2. Wipe with soft cloth...

User Manual
Page 17
Spin tub frame Figure 1 Please check carefully. When the water is frozen Prevent the freezing Drain completely after using . The laundries may fall to the outer side of the spin tub, during spinning the draining will get blocked and the rotation speed of the spin tub frame to proper position, push the four points marked with " " by force to reset it, fix it completely. Spin tub Laundries Figure 2 2.Install After install the...
Spin tub frame Figure 1 Please check carefully. When the water is frozen Prevent the freezing Drain completely after using . The laundries may fall to the outer side of the spin tub, during spinning the draining will get blocked and the rotation speed of the spin tub frame to proper position, push the four points marked with " " by force to reset it, fix it completely. Spin tub Laundries Figure 2 2.Install After install the...

User Manual
Page 18
Phenomena The reason The machine does not act. The draining does not work. There's abnormal sound during washing There's abnormal sound and violent vibration during spinning There may be some waterflowing out of the machine. If there are not breakdowns sometimes. Is the power plug loose? Does the drain hose put down? Are there laundries falling to the outer side of the spin tub? Is the pulsator...
Phenomena The reason The machine does not act. The draining does not work. There's abnormal sound during washing There's abnormal sound and violent vibration during spinning There may be some waterflowing out of the machine. If there are not breakdowns sometimes. Is the power plug loose? Does the drain hose put down? Are there laundries falling to the outer side of the spin tub? Is the pulsator...

User Manual
Page 19
Packing list Name User's manual Warranty card Water inlet hose Gland Twin-tub washing machine Quantity One piece One piece One piece One piece One set Specification Water level / Water quantity (about)(L) Injection pressure(MPa) Rated washing / spinning capacity kg Maximum/71 Medium/60 Minimum/49 0.02 0.2 8.0/6.0 17
Packing list Name User's manual Warranty card Water inlet hose Gland Twin-tub washing machine Quantity One piece One piece One piece One piece One set Specification Water level / Water quantity (about)(L) Injection pressure(MPa) Rated washing / spinning capacity kg Maximum/71 Medium/60 Minimum/49 0.02 0.2 8.0/6.0 17


