User Manual
Page 1
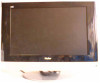
HD Ready Digital LCD TV and HD Ready Digital LCD TV/DVD Combi USER'S MANUAL Please read this manual carefully before using your television and keep this manual for future reference.
HD Ready Digital LCD TV and HD Ready Digital LCD TV/DVD Combi USER'S MANUAL Please read this manual carefully before using your television and keep this manual for future reference.

User Manual
Page 2
... 7 VGA Input 8 YPbPr Input 8 S-VIDEO Input 9 SCART Input 10 HDMI Input 1. 0 Wall Mounting 10 Basic Operating Instructions 11 Turn on the LCD-TV 11 Audio Control 11 Mute 11 Select the TV Channel 12 Picture Mode 12 Program Swap 12 Program Scan 12 Menu Operations 13 Picture Menu Options 13 Audio Menu Options...
... 7 VGA Input 8 YPbPr Input 8 S-VIDEO Input 9 SCART Input 10 HDMI Input 1. 0 Wall Mounting 10 Basic Operating Instructions 11 Turn on the LCD-TV 11 Audio Control 11 Mute 11 Select the TV Channel 12 Picture Mode 12 Program Swap 12 Program Scan 12 Menu Operations 13 Picture Menu Options 13 Audio Menu Options...
User Manual
Page 3
... that are not recommended by the manufacturer: Before operation, make sure the operating voltage of this unit is required , please refer to contact with the LCD-TV, disconnect the power cord from the LCD-TV . If water comes in to customer helpline.
... that are not recommended by the manufacturer: Before operation, make sure the operating voltage of this unit is required , please refer to contact with the LCD-TV, disconnect the power cord from the LCD-TV . If water comes in to customer helpline.

User Manual
Page 10
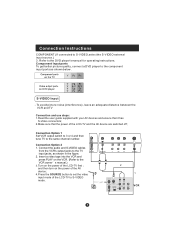
... in the figure. If noise is present, change the PC mode to another resolution, change the PC graphic card or consult the manufacturer of the LCD -TV and the PC are off; 3.Connect a D type 15-pin VGAinterface cable ( not supplied ) to select Mode VGA Resolution 640*480 Line frequency (Khz) Frame frequency... Note: All above listed are firmly connected, connect the audio cable(not supplied)to the audio input on the back of your LCD-TV; 4.Turn on the power of the LCD-TV first , and then turn on the power of the PC; 5.Press the SOURCE button to set the video input mode of the...
... in the figure. If noise is present, change the PC mode to another resolution, change the PC graphic card or consult the manufacturer of the LCD -TV and the PC are off; 3.Connect a D type 15-pin VGAinterface cable ( not supplied ) to select Mode VGA Resolution 640*480 Line frequency (Khz) Frame frequency... Note: All above listed are firmly connected, connect the audio cable(not supplied)to the audio input on the back of your LCD-TV; 4.Turn on the power of the LCD-TV first , and then turn on the power of the PC; 5.Press the SOURCE button to set the video input mode of the...
User Manual
Page 11
... Connection Option 2 1. Insert a video tape into the VCR and press PLAY on the power of the LCD-TV first ; To avoid picture noise (interference), leave an adequate distance between the VCR and TV Connection and use steps: 1.Read the user guide supplied with your AV devices and ensure that it has... S-Video connectors; 2.Make sure that the power of the LCD-TV to set the video in the figure. 2. Connection Instructions COMPONENT (If connected to the component input ports as shown in . Component Input ports...
... Connection Option 2 1. Insert a video tape into the VCR and press PLAY on the power of the LCD-TV first ; To avoid picture noise (interference), leave an adequate distance between the VCR and TV Connection and use steps: 1.Read the user guide supplied with your AV devices and ensure that it has... S-Video connectors; 2.Make sure that the power of the LCD-TV to set the video in the figure. 2. Connection Instructions COMPONENT (If connected to the component input ports as shown in . Component Input ports...
User Manual
Page 13
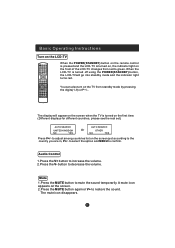
... option and MENU to mute the sound temporarily. A mute icon appears on the screen just according to green. The mute icon disappears. When the LCD-TV is turned on the LCD-TV STANDBY P.STD SCAN SWAP OPEN/CLOSE 10+ CALL MUTE 1 5 9 NICAM 234 678 SOURCE 0 -/-- You can also turn on the front of... the LCD-TV changes from standby mode by pressing the digits(1-9) or P+/- . Audio Control 1.Press the V+ button to decrease the volume. AUDIO STOP SETUP PAUSE/STEP TUNE...
... option and MENU to mute the sound temporarily. A mute icon appears on the screen just according to green. The mute icon disappears. When the LCD-TV is turned on the LCD-TV STANDBY P.STD SCAN SWAP OPEN/CLOSE 10+ CALL MUTE 1 5 9 NICAM 234 678 SOURCE 0 -/-- You can also turn on the front of... the LCD-TV changes from standby mode by pressing the digits(1-9) or P+/- . Audio Control 1.Press the V+ button to decrease the volume. AUDIO STOP SETUP PAUSE/STEP TUNE...

User Manual
Page 14
... used is now channel 8 and the channel number you are using and the channel you should press 0 first and then one digit number key. The LCD-TV can store up to 100 channels , and you want to return to channel 18, press the button again. if you can press the keys on... the remote control or on the remote control to directly select TV channels. Basic Operating Instructions Select the TV Channel You can use the number keys on the panel to make a selection. 1.
... used is now channel 8 and the channel number you are using and the channel you should press 0 first and then one digit number key. The LCD-TV can store up to 100 channels , and you want to return to channel 18, press the button again. if you can press the keys on... the remote control or on the remote control to directly select TV channels. Basic Operating Instructions Select the TV Channel You can use the number keys on the panel to make a selection. 1.
User Manual
Page 21
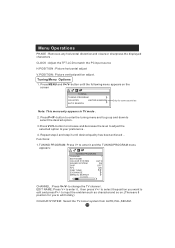
...position adjust . Press MENU and V+/V- Menu Operations PHASE : Removes any horizontal distortion and clears or sharpness the displayed characters . CLOCK : Adjust the TFT-LCD to enter it , then press V+/- button to increase and decrease the level to adjust the selected option to edit and press P+/- to select the ... EXCHANGE MANUAL SEARCH 143.65MHZ CHANNEL : Press V+/V- button to enter the tuning menu and to go up and down to change the TV channel . Repeat step 2 and step 3 until the following menu appears on .(There are 8 position for some countries Note: This menu only ...
...position adjust . Press MENU and V+/V- Menu Operations PHASE : Removes any horizontal distortion and clears or sharpness the displayed characters . CLOCK : Adjust the TFT-LCD to enter it , then press V+/- button to increase and decrease the level to adjust the selected option to edit and press P+/- to select the ... EXCHANGE MANUAL SEARCH 143.65MHZ CHANNEL : Press V+/V- button to enter the tuning menu and to go up and down to change the TV channel . Repeat step 2 and step 3 until the following menu appears on .(There are 8 position for some countries Note: This menu only ...


