

User Manual
Page 1
21TA COLOUR TELEVISION OPERATING INSTRUCTIONS 0090504393 ◆Stage curtain for open and close effect ◆Digital I2C bus control ◆Auto search tuning & 218 programs stored ◆Full infrared remote control ◆Multi-Picture modes selection ◆Multi-function timer,appointing programme
21TA COLOUR TELEVISION OPERATING INSTRUCTIONS 0090504393 ◆Stage curtain for open and close effect ◆Digital I2C bus control ◆Auto search tuning & 218 programs stored ◆Full infrared remote control ◆Multi-Picture modes selection ◆Multi-function timer,appointing programme
User Manual
Page 2
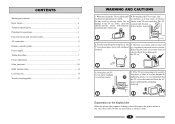
... not going to the TV set be used for operations 3 Function buttons and external sockets 4 AV connection...5 Remote controller guide 6 Power supply...7 Tuning procedure...7 Picture adjustment 9 Other functions...10 Multi function timer 14 Lock function...15 Trouble shooting guide 17 WARNING AND CAUTIONS 1. If the TV set is recommended that the TV set . 3. Don't clean the cabinet and the screen with benzene, petrol and other chemicals. 4. Removing the back cover may...
... not going to the TV set be used for operations 3 Function buttons and external sockets 4 AV connection...5 Remote controller guide 6 Power supply...7 Tuning procedure...7 Picture adjustment 9 Other functions...10 Multi function timer 14 Lock function...15 Trouble shooting guide 17 WARNING AND CAUTIONS 1. If the TV set is recommended that the TV set . 3. Don't clean the cabinet and the screen with benzene, petrol and other chemicals. 4. Removing the back cover may...

User Manual
Page 3
... antenna plug (see figure C) into 75Ωsocket (see figure B) Plug Figure B 300 twin-lead cable + + Antenna connector Coaxial cable(75Ω) twin-lead cable(300Ω) Power source wire connection Insert the power plug into a fire. Install and replace batteries of the remote control unit: 1.Place the remote control unit with the face down, then open and close effect TECHNICAL SPECIFICATION 1.POWER SUPPLY: 2.COLOUR SYSTEM: 3.AUDIO SYSTEM: 4.CRT: 5.ANTENNA INPUT : 6.SOUND OUTPUT POWER: 7.POWER CONSUMPTION: 8.NET WEIGHT(kg): 9.NET DIMENSION...
... antenna plug (see figure C) into 75Ωsocket (see figure B) Plug Figure B 300 twin-lead cable + + Antenna connector Coaxial cable(75Ω) twin-lead cable(300Ω) Power source wire connection Insert the power plug into a fire. Install and replace batteries of the remote control unit: 1.Place the remote control unit with the face down, then open and close effect TECHNICAL SPECIFICATION 1.POWER SUPPLY: 2.COLOUR SYSTEM: 3.AUDIO SYSTEM: 4.CRT: 5.ANTENNA INPUT : 6.SOUND OUTPUT POWER: 7.POWER CONSUMPTION: 8.NET WEIGHT(kg): 9.NET DIMENSION...
User Manual
Page 4
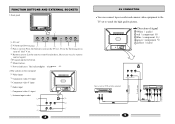
...; Volume up /down button ① ② ③ ④ ⑤ ⑥ ③Power switch:Press the button to turn on the rear panel ① Video input ② Component video Cb input ③Component video Y input ④Audio input ⑤ Component video Cr input ⑥ Antenna input socket ④ ① ⑤ ⑥ Y CB CR VIDEO IN AUDIO IN ② ③ 4 AV CONNECTION You can connect tape recorder and camera video equipment to watch the high quality picture. Direction of signal W White( audio) R red...
...; Volume up /down button ① ② ③ ④ ⑤ ⑥ ③Power switch:Press the button to turn on the rear panel ① Video input ② Component video Cb input ③Component video Y input ④Audio input ⑤ Component video Cr input ⑥ Antenna input socket ④ ① ⑤ ⑥ Y CB CR VIDEO IN AUDIO IN ② ③ 4 AV CONNECTION You can connect tape recorder and camera video equipment to watch the high quality picture. Direction of signal W White( audio) R red...

User Manual
Page 5
... LIGHT 8 SHORT WIDE NARROW SECOND 9 Remote control functions 1 TV/AV exchanging button 18 2 Mute button 3 Numeric button 17 4 One/two/three digital buttons 5 Picture mode selection 16 6 Volume up/dwon button 15 7 Recall 14 8 Calendar/game selection 13 9 Second timer button 12 10 Programme promote 10 11 Volume mode selection 11 12 Display 19 13 Invalid button 14 System preset button 15 Lock preset button 10 16 Scan button 17 DC standby button 18 Sleep timer 19 Program number up/down button 20 Menu button...
... LIGHT 8 SHORT WIDE NARROW SECOND 9 Remote control functions 1 TV/AV exchanging button 18 2 Mute button 3 Numeric button 17 4 One/two/three digital buttons 5 Picture mode selection 16 6 Volume up/dwon button 15 7 Recall 14 8 Calendar/game selection 13 9 Second timer button 12 10 Programme promote 10 11 Volume mode selection 11 12 Display 19 13 Invalid button 14 System preset button 15 Lock preset button 10 16 Scan button 17 DC standby button 18 Sleep timer 19 Program number up/down button 20 Menu button...

User Manual
Page 6
...+] buttons to adjust the value of the picture and audio are good. 6.Skip The function can change channel number into pointed channel number. (4)Press [-VOL+] buttons, when the TV set has searched a program, stop searching, if the program isn't the one you select program with numeric button. TUNING PROCEDURE (1)Press [MENU] button, let TUNING menu display on the screen. (2)Press [-CH+] buttons, and select SEARCH item. (3)Press [-VOL+] buttons to preset SKIP ON mode. VHFL...
...+] buttons to adjust the value of the picture and audio are good. 6.Skip The function can change channel number into pointed channel number. (4)Press [-VOL+] buttons, when the TV set has searched a program, stop searching, if the program isn't the one you select program with numeric button. TUNING PROCEDURE (1)Press [MENU] button, let TUNING menu display on the screen. (2)Press [-CH+] buttons, and select SEARCH item. (3)Press [-VOL+] buttons to preset SKIP ON mode. VHFL...

User Manual
Page 7
... enter its sub-menu(digits in channel No.9. function: select S.C.C ON, so when you select VOL STORE ON, the TV set can hold the same volume with the program in POS.EX and EX.POS2 items are present channel No.). FUNCTION2 SUBMARINE POS.EX S.C.C COUNT OFF 13:21 SELECT ADJUST OTHER FUNCTIONS 3.POS.EX item: Press [VOL+] button to select EX.POS2 item...
... enter its sub-menu(digits in channel No.9. function: select S.C.C ON, so when you select VOL STORE ON, the TV set can hold the same volume with the program in POS.EX and EX.POS2 items are present channel No.). FUNCTION2 SUBMARINE POS.EX S.C.C COUNT OFF 13:21 SELECT ADJUST OTHER FUNCTIONS 3.POS.EX item: Press [VOL+] button to select EX.POS2 item...
User Manual
Page 8
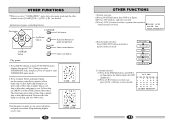
... or blue shot. Yellow ship use the remote controller to enter SUBMARINE game mode. 2.Press red game button and game begins , use [MENU] or blue [FIRE] button shoot shots. Left/Right button CALENDAR FIRE Fire button Up/Down MIX button Selection buttons of game background RESTART Game restart button EXIT LIGHT Game exit button Play game: 1.Press [MENU] button to make FUNCTION2 menu display, then press[ CH-/+] buttons to select SUBMARINE item, and press [VOL+] button to operate yellow battle ship. OTHER FUNCTIONS...
... or blue shot. Yellow ship use the remote controller to enter SUBMARINE game mode. 2.Press red game button and game begins , use [MENU] or blue [FIRE] button shoot shots. Left/Right button CALENDAR FIRE Fire button Up/Down MIX button Selection buttons of game background RESTART Game restart button EXIT LIGHT Game exit button Play game: 1.Press [MENU] button to make FUNCTION2 menu display, then press[ CH-/+] buttons to select SUBMARINE item, and press [VOL+] button to operate yellow battle ship. OTHER FUNCTIONS...

User Manual
Page 9
... APPOINTMENT SELECT ADJUST to change the password, you want to set.(ON-TIMER/OFF-TIMER can fill in four digits. Press [CH-] button, and enter APPOINTMENT mode, then press [-VOL+] buttons to enter "CHANGE PASS" sub-menu. into appointing channel No. . 3.The function is appointing time, the TV set present time. CHANGE PASS: NEW PASS: ---- 15 VOL- LOCK OR UNLOCK CHANGE PASS SEARCH LOCK OFF POS LOCK OFF AV LOCK OFF TIMER LOCK OFF CHILD LOCK OFF...
... APPOINTMENT SELECT ADJUST to change the password, you want to set.(ON-TIMER/OFF-TIMER can fill in four digits. Press [CH-] button, and enter APPOINTMENT mode, then press [-VOL+] buttons to enter "CHANGE PASS" sub-menu. into appointing channel No. . 3.The function is appointing time, the TV set present time. CHANGE PASS: NEW PASS: ---- 15 VOL- LOCK OR UNLOCK CHANGE PASS SEARCH LOCK OFF POS LOCK OFF AV LOCK OFF TIMER LOCK OFF CHILD LOCK OFF...

User Manual
Page 10
... AV LOCK OFF TIMER LOCK OFF CHILD LOCK OFF ALL CLEAR OFF 3.Press [CH+/-] buttons to select "SEARCH LOCK" 123 item, and press [VOL+] button to enter LOCK CH- Automobile、Motor, Vehicle Fluorescence lamp etc. No Picture No Sound No Sound Volume, Sound mute The power plug isn't plugged in password. 16 TROUBLE SHOOTING GUIDE The following problems are invalid. 3.After locking channel search or timer, if you want to enter menu, you need to remove...
... AV LOCK OFF TIMER LOCK OFF CHILD LOCK OFF ALL CLEAR OFF 3.Press [CH+/-] buttons to select "SEARCH LOCK" 123 item, and press [VOL+] button to enter LOCK CH- Automobile、Motor, Vehicle Fluorescence lamp etc. No Picture No Sound No Sound Volume, Sound mute The power plug isn't plugged in password. 16 TROUBLE SHOOTING GUIDE The following problems are invalid. 3.After locking channel search or timer, if you want to enter menu, you need to remove...

