
User Manual
Page 3
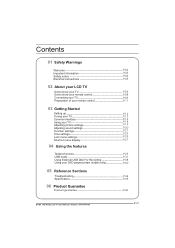
... TV P.13 Common interface P.16 Using your TV P.18 Adjusting picture settings P.19 Adjusting sound settings P.20 Function settings P.21 Time settings P.23 Lock menu settings P.25 Shortcut menu display P.27 04 Using the features Teletext function P.29 USB mode P.31 Using External USB Disk For Recording P.38 Using your DVD player(certain models only) P.40 05 Reference Sections Troubleshooting P.44 Specification P.45 06 Product Guarantee Product guarantee P.46 BUSH | HD Ready LCD TV | User Manual | Helpline: 0845 604 0105
... TV P.13 Common interface P.16 Using your TV P.18 Adjusting picture settings P.19 Adjusting sound settings P.20 Function settings P.21 Time settings P.23 Lock menu settings P.25 Shortcut menu display P.27 04 Using the features Teletext function P.29 USB mode P.31 Using External USB Disk For Recording P.38 Using your DVD player(certain models only) P.40 05 Reference Sections Troubleshooting P.44 Specification P.45 06 Product Guarantee Product guarantee P.46 BUSH | HD Ready LCD TV | User Manual | Helpline: 0845 604 0105
User Manual
Page 5
... PRESENT INSIDE. IMPORTANT INFORMATION READ ALL INSTRUCTIONS BEFORE USE AND KEEP FOR FUTURE REFERENCE. IT IS DANGEROUS TO MAKE ANY KIND OF CONTACT WITH ANY INSIDE PART OF THIS PRODUCT. AVOID CONTACT WITH OBJECTS THAT MAY SCRATCH THE LCD SCREEN. BUSH | HD Ready LCD TV | User Manual | Helpline: 0845 604 0105 FOR ANY PROBLEMS, REFER SERVICING TO THE CUSTOMER HELP LINE.
... PRESENT INSIDE. IMPORTANT INFORMATION READ ALL INSTRUCTIONS BEFORE USE AND KEEP FOR FUTURE REFERENCE. IT IS DANGEROUS TO MAKE ANY KIND OF CONTACT WITH ANY INSIDE PART OF THIS PRODUCT. AVOID CONTACT WITH OBJECTS THAT MAY SCRATCH THE LCD SCREEN. BUSH | HD Ready LCD TV | User Manual | Helpline: 0845 604 0105 FOR ANY PROBLEMS, REFER SERVICING TO THE CUSTOMER HELP LINE.

User Manual
Page 6
... that any external antenna connected to the set is not going to service your hands are any accessories that the set has adequate ventilation. Do not use a damaged power plug or put the unit near the unit. All service work must be used only. In case of contact with the AC wall socket in direct sunlight. To prevent fire, do not use any abnormal sounds or...
... that any external antenna connected to the set is not going to service your hands are any accessories that the set has adequate ventilation. Do not use a damaged power plug or put the unit near the unit. All service work must be used only. In case of contact with the AC wall socket in direct sunlight. To prevent fire, do not use any abnormal sounds or...
User Manual
Page 10
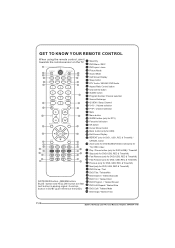
...RED button ,GREEN button BLUE button and YELLOW button are fast text button in analog signal .Function button in DVBT (just reference the OSD) Stand By DVD Menu / REC DVD open / close Picture Mode Sound Mode Call Screen Display Sleep button DTV Audio / NICAM / DVD Audio Aspect Ratio Control button Channel list button Subtitle button Program Number Channel selection Source Exchange Q.VIEW / Swap Channel V+/V- : Volume selection P+/P-: Channel selection Mute Menu button GUIDE button (only for DTV) Favourite list button OK button Cursor Mover button Back button (only for USB) Exit Screen Display...
...RED button ,GREEN button BLUE button and YELLOW button are fast text button in analog signal .Function button in DVBT (just reference the OSD) Stand By DVD Menu / REC DVD open / close Picture Mode Sound Mode Call Screen Display Sleep button DTV Audio / NICAM / DVD Audio Aspect Ratio Control button Channel list button Subtitle button Program Number Channel selection Source Exchange Q.VIEW / Swap Channel V+/V- : Volume selection P+/P-: Channel selection Mute Menu button GUIDE button (only for DTV) Favourite list button OK button Cursor Mover button Back button (only for USB) Exit Screen Display...
User Manual
Page 11
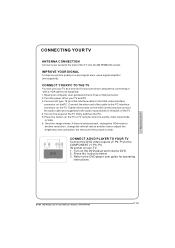
... remote control to set the video input mode to another resolution, change the refresh rate to VGA. 6. CONNECT YOUR PC TO THE TV You can use a signal amplifier (not supplied). Refer to the DVD player user guide for your personal computer by connecting it with a VGAcable (not supplied). 1.Read your computer user guide and check it has a VGAconnector. 2.Turn the power off on the PC. IMPROVE YOUR SIGNAL To improve picture quality in a poor signal area, use...
... remote control to set the video input mode to another resolution, change the refresh rate to VGA. 6. CONNECT YOUR PC TO THE TV You can use a signal amplifier (not supplied). Refer to the DVD player user guide for your personal computer by connecting it with a VGAcable (not supplied). 1.Read your computer user guide and check it has a VGAconnector. 2.Turn the power off on the PC. IMPROVE YOUR SIGNAL To improve picture quality in a poor signal area, use...
User Manual
Page 12
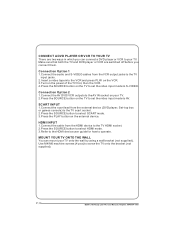
... connect them. MOUNT YOUR TV ONTO THE WALL You can connect a DVD player or VCR to your TV. 2.Press the SOURCE button on the TV to set the video input mode to select SCART mode. 3.Press the PLAY button on your TV. Connection Option 1 1.Connect the audio and S-VIDEO cables from the external device (DVD player, Set-top box or games console) to the TV scart socket. 2.Press the SOURCE button to S-VIDEO. SCART INPUT 1.Connect the scart lead from the VCR output jacks...
... connect them. MOUNT YOUR TV ONTO THE WALL You can connect a DVD player or VCR to your TV. 2.Press the SOURCE button on the TV to set the video input mode to select SCART mode. 3.Press the PLAY button on your TV. Connection Option 1 1.Connect the audio and S-VIDEO cables from the external device (DVD player, Set-top box or games console) to the TV scart socket. 2.Press the SOURCE button to S-VIDEO. SCART INPUT 1.Connect the scart lead from the VCR output jacks...
User Manual
Page 14
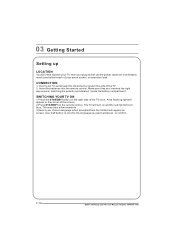
... 1.Press the STANDBY button on the remote control. Ared flashing light will turn blue. 03 Getting Started Setting up LOCATION You will turn on screen. The TV will need to confirm. Use the button to scroll to the language you want and press to place your TV near your plug socket (so the power cable can comfortably reach) and within reach of the TV once. CONNECTION 1.
... 1.Press the STANDBY button on the remote control. Ared flashing light will turn blue. 03 Getting Started Setting up LOCATION You will turn on screen. The TV will need to confirm. Use the button to scroll to the language you want and press to place your TV near your plug socket (so the power cable can comfortably reach) and within reach of the TV once. CONNECTION 1.
User Manual
Page 17
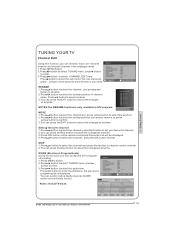
... OK BUSH | HD Ready LCD TV | User Manual | Helpline: 0845 604 0105 RENAME 1.Press button to select the channel , and press green button to rename. 2.Press button to select the number position of channel name, Press button to select number. 3.You can quickly call up Guide menu by GUIDE button on the remote control and Favourite List will be displayed. 4.Press button to select the channel , and press OK button to cancel the changes at anytime. You can...
... OK BUSH | HD Ready LCD TV | User Manual | Helpline: 0845 604 0105 RENAME 1.Press button to select the channel , and press green button to rename. 2.Press button to select the number position of channel name, Press button to select number. 3.You can quickly call up Guide menu by GUIDE button on the remote control and Favourite List will be displayed. 4.Press button to select the channel , and press OK button to cancel the changes at anytime. You can...
User Manual
Page 18
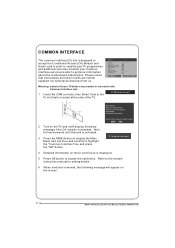
... appear on the screen. Main Menu Module information Smart card information Language Software Download Press OK to the CI Module Insert CI slot that CA modules and smart cards are neither supplied nor optional accessories from us. Warning: switch off your Common OK OK Interface service provider to access the card menu. Refer to the module instruction manual for few moments...
... appear on the screen. Main Menu Module information Smart card information Language Software Download Press OK to the CI Module Insert CI slot that CA modules and smart cards are neither supplied nor optional accessories from us. Warning: switch off your Common OK OK Interface service provider to access the card menu. Refer to the module instruction manual for few moments...
User Manual
Page 21
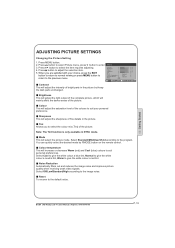
... picture. Mode This will adjust the intensity of the complete picture, which will increase or decrease Warm (red) and Cool (blue) colours to the previous menu. You can quickly select the desired mode by P.MODE button on the remote control. Select Off/Low/Standard/High according to adjust the selection item. 5. Reset To recover to enter. BUSH | HD Ready LCD TV | User Manual | Helpline: 0845 604 0105 Press button to select Picture menu, press button...
... picture. Mode This will adjust the intensity of the complete picture, which will increase or decrease Warm (red) and Cool (blue) colours to the previous menu. You can quickly select the desired mode by P.MODE button on the remote control. Select Off/Low/Standard/High according to adjust the selection item. 5. Reset To recover to enter. BUSH | HD Ready LCD TV | User Manual | Helpline: 0845 604 0105 Press button to select Picture menu, press button...
User Manual
Page 22
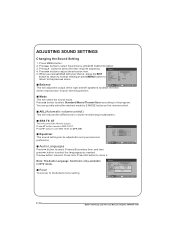
... select Standard/Music/Theater/User according to select the item requires adjusting. SRS TS XT This will select the sound mode. Equalizer This sound setting can quickly select the desired mode by S.MODE button on the remote control. Menu Audio Languages Press button to select Primary/Secondary item, and then press button to the previous menu. Menu Reset To recover to adjust the selection item. 5. Press button to the default menu setting. Mode This will control the Woofer output. BUSH | HD Ready LCD TV | User Manual...
... select Standard/Music/Theater/User according to select the item requires adjusting. SRS TS XT This will select the sound mode. Equalizer This sound setting can quickly select the desired mode by S.MODE button on the remote control. Menu Audio Languages Press button to select Primary/Secondary item, and then press button to the previous menu. Menu Reset To recover to adjust the selection item. 5. Press button to the default menu setting. Mode This will control the Woofer output. BUSH | HD Ready LCD TV | User Manual...
User Manual
Page 23
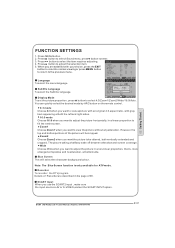
... Subtitle Language To select the Subtitle language. When you want to be cropped. The picture taking a halfway trade off between alteration and screen coverage. Details of 38. SCART Input When you want the picture to view the picture without any alteration. Recorder To recorder the DTV program. Menu 5. Press MENU button. 2. BUSH | HD Ready LCD TV | User Manual | Helpline: 0845 604 0105 Press button to select Sound menu, press button to adjust...
... Subtitle Language To select the Subtitle language. When you want to be cropped. The picture taking a halfway trade off between alteration and screen coverage. Details of 38. SCART Input When you want the picture to view the picture without any alteration. Recorder To recorder the DTV program. Menu 5. Press MENU button. 2. BUSH | HD Ready LCD TV | User Manual | Helpline: 0845 604 0105 Press button to select Sound menu, press button to adjust...
User Manual
Page 27
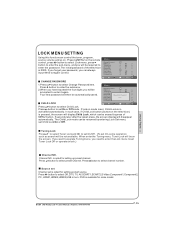
...,HDMI2,HDMI3,USB in activated automatically. LOCK MENU SETTING Using this function can control the tuner, program, source volume and so on the screen. CHANGE PASSWORD 1.Press button to enter the submenu. Your new password will be required to set Tuner Lock Off or operate unlock.) Channel NO. Press button to enter the password. When enter the Tuning menu, Tuner Lock will then be prompted to set On or Off mode. Press button to select Child Lock. DVD is opted for...
...,HDMI2,HDMI3,USB in activated automatically. LOCK MENU SETTING Using this function can control the tuner, program, source volume and so on the screen. CHANGE PASSWORD 1.Press button to enter the submenu. Your new password will be required to set Tuner Lock Off or operate unlock.) Channel NO. Press button to enter the password. When enter the Tuning menu, Tuner Lock will then be prompted to set On or Off mode. Press button to select Child Lock. DVD is opted for...
User Manual
Page 28
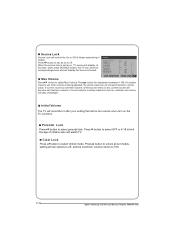
... watch TV. Press the age of hinder external input Menu modes. BUSH | HD Ready LCD TV | User Manual | Helpline: 0845 604 0105 Max Volume Press button to set as on the TV next time. If a certain Value is set, when volume is set as on, TV source will stay unchanged. OK Press button to select Max Volume. When the source lock is being adjusted, the sound value can switch to off .
... watch TV. Press the age of hinder external input Menu modes. BUSH | HD Ready LCD TV | User Manual | Helpline: 0845 604 0105 Max Volume Press button to set as on the TV next time. If a certain Value is set, when volume is set as on, TV source will stay unchanged. OK Press button to select Max Volume. When the source lock is being adjusted, the sound value can switch to off .
User Manual
Page 30
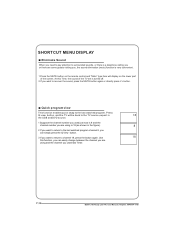
... last watched program. Press Q.view button, and the TV will display on the lower part of the TV set is very convenient. 1 Press the MUTE button on the remote control and "Mute" type face will be back to the TV source, expect in the USB and DVD source. 1 Suppose the channel number you used last Timer. Use this Time, the sound of the screen. BUSH | HD Ready LCD TV | User Manual | Helpline: 0845...
... last watched program. Press Q.view button, and the TV will display on the lower part of the TV set is very convenient. 1 Press the MUTE button on the remote control and "Mute" type face will be back to the TV source, expect in the USB and DVD source. 1 Suppose the channel number you used last Timer. Use this Time, the sound of the screen. BUSH | HD Ready LCD TV | User Manual | Helpline: 0845...
User Manual
Page 34
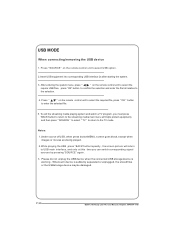
... only at this time you can switch corresponding signal sources by pressing "SOURCE" again. 3. Notes: 1.Under source of USB, when press button MENU ,screen goes black, except when images or movies are being played. 2.While playing the USB ,press "BACK"button repeatly , the screen picture will return to the TV mode. Press / on the remote control unit to select the required file, press OK button to select USB option. 2.Insert USB equipment into corresponding...
... only at this time you can switch corresponding signal sources by pressing "SOURCE" again. 3. Notes: 1.Under source of USB, when press button MENU ,screen goes black, except when images or movies are being played. 2.While playing the USB ,press "BACK"button repeatly , the screen picture will return to the TV mode. Press / on the remote control unit to select the required file, press OK button to select USB option. 2.Insert USB equipment into corresponding...
User Manual
Page 40
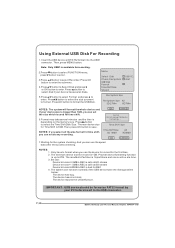
... select the Time Shift Disk Size. Using External USB Disk For Recording 1. Press button to 2TB. NOTES: If you want to format .Press OK button to enter. OK CANCEL Format Do not unplug USB device Formating..... NOTES: 1. Provide device formatting function is 1GB. Press OK button to enter the submenu. 4.Press button to Select Disk and press or OK button to format the USB Disk. Menu Select Disk Check File System USB Disk Format Time...
... select the Time Shift Disk Size. Using External USB Disk For Recording 1. Press button to 2TB. NOTES: If you want to format .Press OK button to enter. OK CANCEL Format Do not unplug USB device Formating..... NOTES: 1. Provide device formatting function is 1GB. Press OK button to enter the submenu. 4.Press button to Select Disk and press or OK button to format the USB Disk. Menu Select Disk Check File System USB Disk Format Time...
User Manual
Page 42
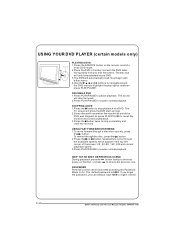
... resume normal playback. PASSWORD Parental control can always input 1369 to regain control. BUSH | HD Ready LCD TV | User Manual | Helpline: 0845 604 0105 most begin with the DVD label facing away from you can be muted. 2.Press PLAY/PAUSE to resume normal playback. If you forget the password, you and the screen. The default password is 0000. USING YOUR DVD PLAYER (certain models only) PLAYING A DVD 1.Press the SOURCE...
... resume normal playback. PASSWORD Parental control can always input 1369 to regain control. BUSH | HD Ready LCD TV | User Manual | Helpline: 0845 604 0105 most begin with the DVD label facing away from you can be muted. 2.Press PLAY/PAUSE to resume normal playback. If you forget the password, you and the screen. The default password is 0000. USING YOUR DVD PLAYER (certain models only) PLAYING A DVD 1.Press the SOURCE...
User Manual
Page 46
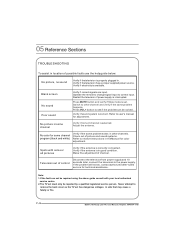
... remote to change signal input to user's manual for color adjustment. No color for technical assistance. Refer to correct input. Verify if the antenna is available. Note: 1.If the fault can be repaired by a qualified registered service person. Press MUTE button and verify if Mute mode is correct. Television out of control Disconnect the television from power supply and 10 seconds later, connect the television to see if the problem can not be repaired using...
... remote to change signal input to user's manual for color adjustment. No color for technical assistance. Refer to correct input. Verify if the antenna is available. Note: 1.If the fault can be repaired by a qualified registered service person. Press MUTE button and verify if Mute mode is correct. Television out of control Disconnect the television from power supply and 10 seconds later, connect the television to see if the problem can not be repaired using...
User Manual
Page 47
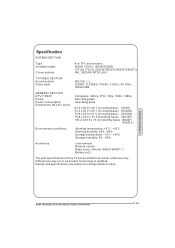
... subject to change without notice. Differences may occur as product technology is updated. Specification SCREEN SECTION Type Viewable angle Colour system A-si TFT active matrix 160(H) 150 (V) (S626/S626D) 176 (H) 176 (V) (S632F/S632D /S642F/S642F1) PAL, SECAM, NTSC (AV) TV/VIDEO SECTION Sound system Video input BG, DK, I, L SCART, S-VIDEO, YPb/Pr, YCb/Cr, AV,VGA, HDMI,USB GENERAL SECTION DTV Y/Pb/Pr Power Power consumption Dimensions (W x D x H) cm...
... subject to change without notice. Differences may occur as product technology is updated. Specification SCREEN SECTION Type Viewable angle Colour system A-si TFT active matrix 160(H) 150 (V) (S626/S626D) 176 (H) 176 (V) (S632F/S632D /S642F/S642F1) PAL, SECAM, NTSC (AV) TV/VIDEO SECTION Sound system Video input BG, DK, I, L SCART, S-VIDEO, YPb/Pr, YCb/Cr, AV,VGA, HDMI,USB GENERAL SECTION DTV Y/Pb/Pr Power Power consumption Dimensions (W x D x H) cm...


