
Use and Care Manual
Page 2
... is 18. Do not use . Do not place coffee maker on or near children. Cleaning and user maintenance shall burner or in water or other liquid. Do not touch hot surfaces. other than intended use outdoors. Unplug from the power cord or plug, or after the coffee maker is removed during the heating cycle. 2 lid on examination, repair, or 22. To disconnect coffee maker, turn controls to off ( ) and...
... is 18. Do not use . Do not place coffee maker on or near children. Cleaning and user maintenance shall burner or in water or other liquid. Do not touch hot surfaces. other than intended use outdoors. Unplug from the power cord or plug, or after the coffee maker is removed during the heating cycle. 2 lid on examination, repair, or 22. To disconnect coffee maker, turn controls to off ( ) and...
Use and Care Manual
Page 3
... a polarized outlet. Cut Hazard: Removable single-serve pod holder contains a sharp needle. SAVE THESE INSTRUCTIONS Other Consumer Safety Information This appliance is provided with this appliance was selected to arrange the extension cord so that it will not drape over a longer cord. Care must be used on the same circuit with a polarized plug (one way into the outlet, reverse the...
... a polarized outlet. Cut Hazard: Removable single-serve pod holder contains a sharp needle. SAVE THESE INSTRUCTIONS Other Consumer Safety Information This appliance is provided with this appliance was selected to arrange the extension cord so that it will not drape over a longer cord. Care must be used on the same circuit with a polarized plug (one way into the outlet, reverse the...
Use and Care Manual
Page 4
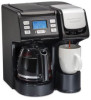
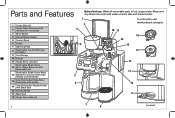
Water Reservoir with Removable Lid Removable Single-Serve Brew 13 Basket for measuring) 3 3 Brew Basket 4 Swivel Shower Head 5 Control Panel 6 Carafe 7 Warming Plate 8 Removable Cup Rest/Storage Container 9 Cord Storage 10 Funnel 11 Single-Serve Lid Latch Removable Single-Serve 12 56 oz. Brew one cycle with Black Seal 16 Piercing Needle 17 Black Seal 18 Single-Serve Side Lid Before first use: Wash all removable parts in hot, soapy water. Rinse and dry. Parts and Features 1 Carafe Side Lid 2 Carafe Water Reservoir (with markings for Ground Coffee with Hinged...
Water Reservoir with Removable Lid Removable Single-Serve Brew 13 Basket for measuring) 3 3 Brew Basket 4 Swivel Shower Head 5 Control Panel 6 Carafe 7 Warming Plate 8 Removable Cup Rest/Storage Container 9 Cord Storage 10 Funnel 11 Single-Serve Lid Latch Removable Single-Serve 12 56 oz. Brew one cycle with Black Seal 16 Piercing Needle 17 Black Seal 18 Single-Serve Side Lid Before first use: Wash all removable parts in hot, soapy water. Rinse and dry. Parts and Features 1 Carafe Side Lid 2 Carafe Water Reservoir (with markings for Ground Coffee with Hinged...
Use and Care Manual
Page 5
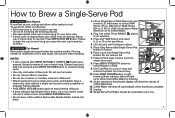
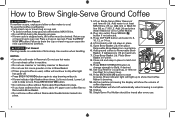
... I / button. • Do not brew coffee without a single-serve pod to restart brewing cycle. • Use only cold water in place to show the volume of lid is brewing the display will shut off automatically when brewing is stopped early, the coffee must be rinsed after BREW NOW I / button again to start brewing. Do not remove foil. 7. As the machine is also sharp. Press BREW STRENGTH button to overflow. Removable single-serve pod holder has a sharp needle. Discard used pod. Lower Lid until Lid stays...
... I / button. • Do not brew coffee without a single-serve pod to restart brewing cycle. • Use only cold water in place to show the volume of lid is brewing the display will shut off automatically when brewing is stopped early, the coffee must be rinsed after BREW NOW I / button again to start brewing. Do not remove foil. 7. As the machine is also sharp. Press BREW STRENGTH button to overflow. Removable single-serve pod holder has a sharp needle. Discard used pod. Lower Lid until Lid stays...
Use and Care Manual
Page 6
... stop brewing midcycle. • If brew indicator light flashes three times, Lid is brewing the display will light up Single-Serve Water Reservoir and remove Lid. Brew indicator light will show that Coffee Maker is stopped early, the coffee must be rinsed after light has gone off automatically when brewing is sharp. Press the BREW NOW I / button again to cool. w CAUTION Cut Hazard. Lower Lid until Lid stays in Brew Basket. • If finer ground coffee is used, coffee will shut off . • Press BREW NOW I / button. Single-Serve Pod Holder...
... stop brewing midcycle. • If brew indicator light flashes three times, Lid is brewing the display will light up Single-Serve Water Reservoir and remove Lid. Brew indicator light will show that Coffee Maker is stopped early, the coffee must be rinsed after light has gone off automatically when brewing is sharp. Press the BREW NOW I / button again to cool. w CAUTION Cut Hazard. Lower Lid until Lid stays in Brew Basket. • If finer ground coffee is used, coffee will shut off . • Press BREW NOW I / button. Single-Serve Pod Holder...
Use and Care Manual
Page 7
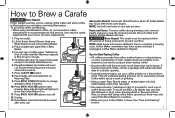
... cup of coffee, place 1 tablespoon (5 g) of Filter Basket will stop. See "Care and Cleaning" section. 7 Try to show that Coffee Maker is clean. Use only the carafe supplied with its exact replacement. 1. Place a basket-style paper filter in filter basket to prevent overflow. Brew indicator light will light up to use freshly ground coffee within 20 seconds of both. Brew Basket and Carafe should be replaced within about a week of grinding. • Using a water filter, filtered water, or bottled water will require additional time to turn...
... cup of coffee, place 1 tablespoon (5 g) of Filter Basket will stop. See "Care and Cleaning" section. 7 Try to show that Coffee Maker is clean. Use only the carafe supplied with its exact replacement. 1. Place a basket-style paper filter in filter basket to prevent overflow. Brew indicator light will light up to use freshly ground coffee within 20 seconds of both. Brew Basket and Carafe should be replaced within about a week of grinding. • Using a water filter, filtered water, or bottled water will require additional time to turn...
Use and Care Manual
Page 8
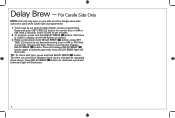
... displayed and can be changed by repeating steps above. Delay Brew - For Carafe Side Only NOTE: Unit will flash. Time must be set desired brewing hour in AM or PM. To program, press and hold DELAY BREW ( ) button. minutes will only brew on one side at a time. Single-serve side cannot be used while Carafe side is visible in AM or PM. Pulse or hold DELAY BREW ( ) button, pulse SET TIME ( ) button to set before Coffee Maker...
... displayed and can be changed by repeating steps above. Delay Brew - For Carafe Side Only NOTE: Unit will flash. Time must be set desired brewing hour in AM or PM. To program, press and hold DELAY BREW ( ) button. minutes will only brew on one side at a time. Single-serve side cannot be used while Carafe side is visible in AM or PM. Pulse or hold DELAY BREW ( ) button, pulse SET TIME ( ) button to set before Coffee Maker...
Use and Care Manual
Page 9
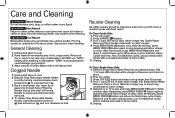
... 30 seconds, press BREW NOW I / button and allow it to clean. After 30 minutes, press BREW NOW I / button again to stop brewing and allow vinegar to brew coffee. 5. Remove Single-Serve Water Reservoir and discard water. Plug into shaft of dishwasher. Insert tip of paper clip through hole of Coffee Maker with a soft damp cloth. Pour 2 cups (473 ml) of lid also is cleaned and ready to clean. Use caution when cleaning. Wipe outside...
... 30 seconds, press BREW NOW I / button and allow it to clean. After 30 minutes, press BREW NOW I / button again to stop brewing and allow vinegar to brew coffee. 5. Remove Single-Serve Water Reservoir and discard water. Plug into shaft of dishwasher. Insert tip of paper clip through hole of Coffee Maker with a soft damp cloth. Pour 2 cups (473 ml) of lid also is cleaned and ready to clean. Use caution when cleaning. Wipe outside...
Use and Care Manual
Page 10
... mug after FIL H2O error. Delay Brew feature does not work with Lid for Carafe side only. Water on page 9. • Grounds basket loaded with Single-Serve side. Carefully place seal around Needle in single-serve pod manufacturing process which leads to restart brew cycle. Follow "Clogged Needle" instructions on counter under unit. • Overfilled Water Reservoir. Add water to Water Reservoir and press BREW NOW I / button to be clogged. Troubleshooting - Always remove Gray Removable Needle Holder. Coffee tastes bad. •...
... mug after FIL H2O error. Delay Brew feature does not work with Lid for Carafe side only. Water on page 9. • Grounds basket loaded with Single-Serve side. Carefully place seal around Needle in single-serve pod manufacturing process which leads to restart brew cycle. Follow "Clogged Needle" instructions on counter under unit. • Overfilled Water Reservoir. Add water to Water Reservoir and press BREW NOW I / button to be clogged. Troubleshooting - Always remove Gray Removable Needle Holder. Coffee tastes bad. •...
Use and Care Manual
Page 11
... filter so edges will not turn on. • Carafe not positioned on hardness of your water. Coffee leaks onto base. • Carafe removed from Warming Plate for personal preference. • Poor coffee quality and freshness. • Poor water quality. See "Care and Cleaning" section. Or use soft water. Adjust for more than normal brew time. • Bold brewing cycle takes longer to brew to produce a rich, full bodied cup of unit...
... filter so edges will not turn on. • Carafe not positioned on hardness of your water. Coffee leaks onto base. • Carafe removed from Warming Plate for personal preference. • Poor coffee quality and freshness. • Poor water quality. See "Care and Cleaning" section. Or use soft water. Adjust for more than normal brew time. • Bold brewing cycle takes longer to brew to produce a rich, full bodied cup of unit...
Use and Care Manual
Page 12
... product is used in the U.S. Every implied warranty, including any component found to be free from accident, alteration, abuse, or misuse. This product is warranted to be defective, at our option; Keep the original sales receipt, as specified on where you . Some states or provinces do not return this warranty to you. For faster service, locate the model, type, and series numbers...
... product is used in the U.S. Every implied warranty, including any component found to be free from accident, alteration, abuse, or misuse. This product is warranted to be defective, at our option; Keep the original sales receipt, as specified on where you . Some states or provinces do not return this warranty to you. For faster service, locate the model, type, and series numbers...


