
Use and Care Manual
Page 2
... injury to persons. 9. Do not operate any manner. especially when assembling, disassembling, or cleaning inside blender jar. 14. Do not use outdoors. 10. Read all instructions. 2. This appliance is not running. 13. handle carefully - The use by persons (including children) with reduced physical, sensory, or mental capabilities, or lack of experience and knowledge, unless they do not put cord, plug, base, or motor in a heated...
... injury to persons. 9. Do not operate any manner. especially when assembling, disassembling, or cleaning inside blender jar. 14. Do not use outdoors. 10. Read all instructions. 2. This appliance is not running. 13. handle carefully - The use by persons (including children) with reduced physical, sensory, or mental capabilities, or lack of experience and knowledge, unless they do not put cord, plug, base, or motor in a heated...

Use and Care Manual
Page 3
... the lid, and start blending at lowest speed. 19. If the plug does not fit fully into a polarized outlet. The electrical rating of the appliance. When blending hot liquids, remove filler-cap of injury, never place cutting blade assembly on top of blender jar is intended for other than the rating of the extension cord must be pulled on by using an adapter. To disconnect cord, turn the...
... the lid, and start blending at lowest speed. 19. If the plug does not fit fully into a polarized outlet. The electrical rating of the appliance. When blending hot liquids, remove filler-cap of injury, never place cutting blade assembly on top of blender jar is intended for other than the rating of the extension cord must be pulled on by using an adapter. To disconnect cord, turn the...
Use and Care Manual
Page 4
...-free customer service number for information. Wattage/Peak Power Information The wattage/ampere rating of what a blender motor can result in damage to crush ice, frozen fruit, etc. Do not use. This is a better measure of the blender is determined by an Underwriters Laboratory test and is very sharp. 4 840243700 ENv04.indd 4 3/27/14 5:43 PM This is needed most power to the cutting blade assembly, jar, blender...
...-free customer service number for information. Wattage/Peak Power Information The wattage/ampere rating of what a blender motor can result in damage to crush ice, frozen fruit, etc. Do not use. This is a better measure of the blender is determined by an Underwriters Laboratory test and is very sharp. 4 840243700 ENv04.indd 4 3/27/14 5:43 PM This is needed most power to the cutting blade assembly, jar, blender...
Use and Care Manual
Page 5
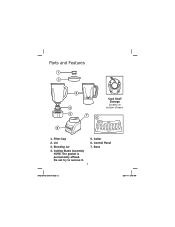
Collar 2. Base 4. Do not try to remove it. 5 840243700 ENv04.indd 5 3/27/14 5:43 PM Lid 6. Control Panel 3. Cutting Blade Assembly NOTE: The gasket is permanently affixed. Blending Jar 7. Filler-Cap 5. Parts and Features Cord Stuff Storage (located on bottom of base) 1.
Collar 2. Base 4. Do not try to remove it. 5 840243700 ENv04.indd 5 3/27/14 5:43 PM Lid 6. Control Panel 3. Cutting Blade Assembly NOTE: The gasket is permanently affixed. Blending Jar 7. Filler-Cap 5. Parts and Features Cord Stuff Storage (located on bottom of base) 1.
Use and Care Manual
Page 6
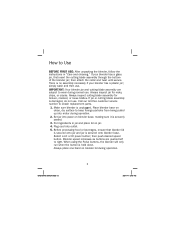
... replacement parts. 1. If jar or cutting blade assembly is securely seated. 3. Call our toll-free customer service number to Use BEFORE FIRST USE: After unpacking the blender, follow the instructions in jar and place lid on blender base, making sure it is damaged, do not use . Make sure blender is secured onto blender base. Set jar into outlet. 5. Before processing food or beverages, ensure that blender lid is secured onto jar and jar is unplugged. Select a LO or HI power button...
... replacement parts. 1. If jar or cutting blade assembly is securely seated. 3. Call our toll-free customer service number to Use BEFORE FIRST USE: After unpacking the blender, follow the instructions in jar and place lid on blender base, making sure it is damaged, do not use . Make sure blender is secured onto blender base. Set jar into outlet. 5. Before processing food or beverages, ensure that blender lid is secured onto jar and jar is unplugged. Select a LO or HI power button...
Use and Care Manual
Page 7
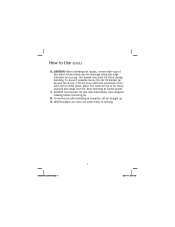
... two-piece lid and close any lid openings along the edge intended for pouring. Start blending at lowest speed. 7. To remove jar after blending is running. 7 840243700 ENv04.indd 7 3/27/14 5:43 PM NEVER replace jar onto unit while motor is complete, lift jar straight up. 9. ALWAYS turn blender off jar during blending. Hot liquids may push lid off and wait until blades have stopped rotating before removing jar. 8. How to Use (cont...
... two-piece lid and close any lid openings along the edge intended for pouring. Start blending at lowest speed. 7. To remove jar after blending is running. 7 840243700 ENv04.indd 7 3/27/14 5:43 PM NEVER replace jar onto unit while motor is complete, lift jar straight up. 9. ALWAYS turn blender off jar during blending. Hot liquids may push lid off and wait until blades have stopped rotating before removing jar. 8. How to Use (cont...
Use and Care Manual
Page 8
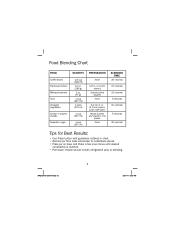
...) 2 cups (473 ml) 1 cup (237 ml) 1 cup (237 ml) PREPARATION None 1/2-in. (1.3-cm) chunks Coarsely chop squares None Cut into 1-in. (2.5-cm) pieces, cover with water Break cookies and crackers into pieces None BLENDING TIME 30 seconds 15 seconds 15 seconds 5 seconds 10 seconds 5 seconds 30 seconds Tips for Best Results: • Use Pulse button with guidelines outlined in chart. • Remove jar from base and...
...) 2 cups (473 ml) 1 cup (237 ml) 1 cup (237 ml) PREPARATION None 1/2-in. (1.3-cm) chunks Coarsely chop squares None Cut into 1-in. (2.5-cm) pieces, cover with water Break cookies and crackers into pieces None BLENDING TIME 30 seconds 15 seconds 15 seconds 5 seconds 10 seconds 5 seconds 30 seconds Tips for Best Results: • Use Pulse button with guidelines outlined in chart. • Remove jar from base and...
Use and Care Manual
Page 9
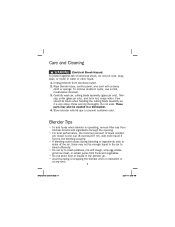
... cutting blade assembly as it is one cup (8 ounces/237 ml). Add more liquid if food is not blending properly. • If blending action stops during blending or ingredients stick to prevent container odor. These parts may not be washed in operation or at any time. 9 840243700 ENv04.indd 9 3/27/14 5:43 PM Carefully wash jar, cutting blade assembly (glass jar only), fillercap, collar (glass jar only), and lid in water or other liquid. 1. Wipe blender base...
... cutting blade assembly as it is one cup (8 ounces/237 ml). Add more liquid if food is not blending properly. • If blending action stops during blending or ingredients stick to prevent container odor. These parts may not be washed in operation or at any time. 9 840243700 ENv04.indd 9 3/27/14 5:43 PM Carefully wash jar, cutting blade assembly (glass jar only), fillercap, collar (glass jar only), and lid in water or other liquid. 1. Wipe blender base...

Use and Care Manual
Page 10
... the only express warranty for a particular purpose, is disclaimed except to the extent prohibited by breach of express or implied warranty. Please call 1.800.851.8900 in Canada. This warranty does not cover glass, filters,...price. For faster service, locate the model, type, and series numbers on where you specific legal rights. or 1.800.267.2826 in Canada or visit hamiltonbeach.com in the U.S. LIMITED WARRANTY This warranty applies to products purchased and used for other than as proof of purchase is repair or replacement of this product or any component found to be free...
... the only express warranty for a particular purpose, is disclaimed except to the extent prohibited by breach of express or implied warranty. Please call 1.800.851.8900 in Canada. This warranty does not cover glass, filters,...price. For faster service, locate the model, type, and series numbers on where you specific legal rights. or 1.800.267.2826 in Canada or visit hamiltonbeach.com in the U.S. LIMITED WARRANTY This warranty applies to products purchased and used for other than as proof of purchase is repair or replacement of this product or any component found to be free...


