
Use & Care
Page 2
... the motor is switched ON, switch OFF (O) immediately and tighten jar in collar or on blender base. 19. Read all instructions. 2. Close supervision is necessary when any manner. Call our toll-free customer service number for other liquid. 3. The use outdoors. 9. Do not let cord hang over edge of two-piece cover. handle carefully - especially when assembling, disassembling, or cleaning inside blender jar. 12. Do not use broken, cracked, or loose cutting blade assembly. 14...
... the motor is switched ON, switch OFF (O) immediately and tighten jar in collar or on blender base. 19. Read all instructions. 2. Close supervision is necessary when any manner. Call our toll-free customer service number for other liquid. 3. The use outdoors. 9. Do not let cord hang over edge of two-piece cover. handle carefully - especially when assembling, disassembling, or cleaning inside blender jar. 12. Do not use broken, cracked, or loose cutting blade assembly. 14...
Use & Care
Page 3
... of what a blender motor can consume when power is needed most power to crush ice, frozen fruit, etc. The plug fits only one wide blade) that reduces the risk of becoming tangled in the freezer filled with your unit, but are available as replacement parts. If the plug does not fit fully into a polarized outlet. Care must be taken when handling cutting blade assembly as provided...
... of what a blender motor can consume when power is needed most power to crush ice, frozen fruit, etc. The plug fits only one wide blade) that reduces the risk of becoming tangled in the freezer filled with your unit, but are available as replacement parts. If the plug does not fit fully into a polarized outlet. Care must be taken when handling cutting blade assembly as provided...
Use & Care
Page 4
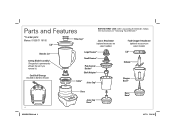
... parts: Mexico: 01 800 71 16 100 Lid* Filler-Cap* BEFORE FIRST USE: After unpacking the blender, follow the instructions in "Cleaning Your Blender." Do not try to remove it.) Cord Stuff Storage (located on select models) Blender Jar* Cutting Blade Assembly* (The gasket is permanently affixed. Juicer Attachment (optional accessory on select models) Food Chopper Attachment (optional accessory on bottom of base) Large Reamer* Small Reamer* Pulp Control Basket* Shaft Adapter* Collar* Juice Cup* Lid* S-Blade* Chopper Bowl* 4 840228900 ENv03.indd 4 Base Juice Cup Base* Bowl Base...
... parts: Mexico: 01 800 71 16 100 Lid* Filler-Cap* BEFORE FIRST USE: After unpacking the blender, follow the instructions in "Cleaning Your Blender." Do not try to remove it.) Cord Stuff Storage (located on select models) Blender Jar* Cutting Blade Assembly* (The gasket is permanently affixed. Juicer Attachment (optional accessory on select models) Food Chopper Attachment (optional accessory on bottom of base) Large Reamer* Small Reamer* Pulp Control Basket* Shaft Adapter* Collar* Juice Cup* Lid* S-Blade* Chopper Bowl* 4 840228900 ENv03.indd 4 Base Juice Cup Base* Bowl Base...
Use & Care
Page 5
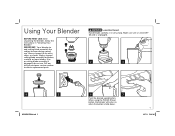
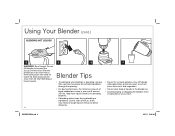
... AM Using Your Blender BEFORE FIRST USE: After unpacking the blender, follow the instructions in "Cleaning Your Blender." Always inspect cutting blade assembly for nicks, chips, or cracks. When using the PULSO (Pulse) button, the blender will only run when the button is unplugged. 2 3 4 5 840228900 ENv03.indd 5 6 7 Push the desired speed button. it is damaged, do not use . IMPORTANT: Your blender jar and cutting blade assembly are subject to obtain replacement parts. Call our 1 toll-free customer service number...
... AM Using Your Blender BEFORE FIRST USE: After unpacking the blender, follow the instructions in "Cleaning Your Blender." Always inspect cutting blade assembly for nicks, chips, or cracks. When using the PULSO (Pulse) button, the blender will only run when the button is unplugged. 2 3 4 5 840228900 ENv03.indd 5 6 7 Push the desired speed button. it is damaged, do not use . IMPORTANT: Your blender jar and cutting blade assembly are subject to obtain replacement parts. Call our 1 toll-free customer service number...
Use & Care
Page 6
... speed. 6 9 10 Blender Tips • To add foods when blender is operating, remove filler-cap from two-piece lid and add ingredients through the opening. • For best performance, the minimum amount of liquid needed per recipe is not blending properly. • If blending action stops during blending or ingredients stick to sides of lid. With the protection of an oven mitt or thick towel, place one cup (8 ounces/ 237 ml). Start blending...
... speed. 6 9 10 Blender Tips • To add foods when blender is operating, remove filler-cap from two-piece lid and add ingredients through the opening. • For best performance, the minimum amount of liquid needed per recipe is not blending properly. • If blending action stops during blending or ingredients stick to sides of lid. With the protection of an oven mitt or thick towel, place one cup (8 ounces/ 237 ml). Start blending...

Use & Care
Page 7
... BEST RESULTS: • Always place liquid in blender jar first, then remaining ingredients. • If ice is not blending, stop blender and pulse a few times. 840228900 ENv03.indd 7 7 6/27/13 10:26 AM Blending Drinks TYPE OF DRINK Fruit Smoothie Milkshake Frozen Drink INGREDIENTS 1 cup (237 ml) milk 1 1/2 cups (355 ml) yogurt 2 cups (473 ml) berries or other fruit Sweetener to taste (optional) 1 1/2 cups...
... BEST RESULTS: • Always place liquid in blender jar first, then remaining ingredients. • If ice is not blending, stop blender and pulse a few times. 840228900 ENv03.indd 7 7 6/27/13 10:26 AM Blending Drinks TYPE OF DRINK Fruit Smoothie Milkshake Frozen Drink INGREDIENTS 1 cup (237 ml) milk 1 1/2 cups (355 ml) yogurt 2 cups (473 ml) berries or other fruit Sweetener to taste (optional) 1 1/2 cups...
Use & Care
Page 8
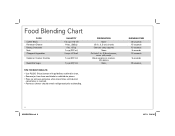
... Nuts Chopped Vegetables Cookie or Cracker Crumbs Superfine Sugar QUANTITY 1/2 cup (118 ml) 10 oz. (283 g) 2 oz. (57 g) 1 cup (237 ml) 2 cups (473 ml) 1 cup (237 ml) 1 cup (237 ml) TIPS FOR BEST RESULTS: • Use PULSO (Pulse) button with guidelines outlined in . (2.5-cm) pieces, cover with water Break cookies or crackers into 1-in chart. • Remove jar from base and shake to redistribute pieces. • Place jar...
... Nuts Chopped Vegetables Cookie or Cracker Crumbs Superfine Sugar QUANTITY 1/2 cup (118 ml) 10 oz. (283 g) 2 oz. (57 g) 1 cup (237 ml) 2 cups (473 ml) 1 cup (237 ml) 1 cup (237 ml) TIPS FOR BEST RESULTS: • Use PULSO (Pulse) button with guidelines outlined in . (2.5-cm) pieces, cover with water Break cookies or crackers into 1-in chart. • Remove jar from base and shake to redistribute pieces. • Place jar...
Use & Care
Page 9
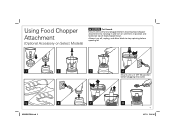
Always turn on until lid is in OFF (O) position before attaching food chopper attachment. Ensure unit is in position and locked on Select Models) w WARNING Cut Hazard. Do not plug in and turn off, unplug, and allow blade to stop spinning before opening lid. 1 2 5 6 840228900 ENv03.indd 9 3 4 Ensure unit is off and unplugged before plugging into outlet. 7 8 9 6/27/13 10:26 AM Using Food Chopper Attachment (Optional Accessory on top of food chopper bowl.
Always turn on until lid is in OFF (O) position before attaching food chopper attachment. Ensure unit is in position and locked on Select Models) w WARNING Cut Hazard. Do not plug in and turn off, unplug, and allow blade to stop spinning before opening lid. 1 2 5 6 840228900 ENv03.indd 9 3 4 Ensure unit is off and unplugged before plugging into outlet. 7 8 9 6/27/13 10:26 AM Using Food Chopper Attachment (Optional Accessory on top of food chopper bowl.
Use & Care
Page 10
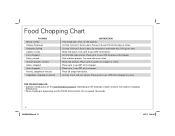
..., baking Cookie, crumbs Fruit, chopped Garlic, minced Graham Cracker, crumbs Herbs, chopped Nuts, chopped Parsley, chopped or minced Vegetables, chopped or minced INSTRUCTION Tear bread slices (max. 3) into 1-inch (2.5-cm) chunks. Cut into 6 pieces. TIPS FOR BEST RESULTS: • Quantities listed above are the recommended maximum. Depending on the food type, smaller amounts may improve chopping performance. • When chopping or processing, use the PULSO (Pulse) button. Cut into chopper.
..., baking Cookie, crumbs Fruit, chopped Garlic, minced Graham Cracker, crumbs Herbs, chopped Nuts, chopped Parsley, chopped or minced Vegetables, chopped or minced INSTRUCTION Tear bread slices (max. 3) into 1-inch (2.5-cm) chunks. Cut into 6 pieces. TIPS FOR BEST RESULTS: • Quantities listed above are the recommended maximum. Depending on the food type, smaller amounts may improve chopping performance. • When chopping or processing, use the PULSO (Pulse) button. Cut into chopper.
Use & Care
Page 11
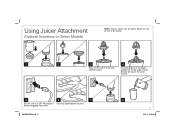
Using Juicer Attachment (Optional Accessory on Select Models) NOTE: Always select size of reamer based on top of fruit to juice. before plugging into outlet. 840228900 ENv03.indd 11 8 11 6/27/13 10:26 AM If juicing large fruit (oranges, grapefruit), fit the large reamer directly on size of the small reamer. 5 6 7 Ensure unit is in OFF (O) position Push any speed button to be juiced. 1 2 3 4 Snap small reamer onto pulp control basket.
Using Juicer Attachment (Optional Accessory on Select Models) NOTE: Always select size of reamer based on top of fruit to juice. before plugging into outlet. 840228900 ENv03.indd 11 8 11 6/27/13 10:26 AM If juicing large fruit (oranges, grapefruit), fit the large reamer directly on size of the small reamer. 5 6 7 Ensure unit is in OFF (O) position Push any speed button to be juiced. 1 2 3 4 Snap small reamer onto pulp control basket.
Use & Care
Page 12
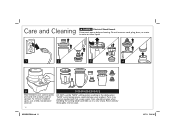
Disconnect power before cleaning. To remove stubborn spots, use the "SANI" setting when washing in water or other liquid. 1 2 3 4 5 DISHWASHER-SAFE Wipe blender base, control panel, and cord with hot, soapy water. Rinse and dry thoroughly. "SANI" cycle temperatures could damage your product. Do not immerse cord, plug, base, or motor in the dishwasher. Care and Cleaning w WARNING Electrical Shock Hazard. Do not soak. 12...
Disconnect power before cleaning. To remove stubborn spots, use the "SANI" setting when washing in water or other liquid. 1 2 3 4 5 DISHWASHER-SAFE Wipe blender base, control panel, and cord with hot, soapy water. Rinse and dry thoroughly. "SANI" cycle temperatures could damage your product. Do not immerse cord, plug, base, or motor in the dishwasher. Care and Cleaning w WARNING Electrical Shock Hazard. Do not soak. 12...
Use & Care
Page 14
... all costs associated with the printed directions, or damage to make a warranty claim, do not allow limitations on implied warranties or special, incidental, or consequential damages, so the foregoing limitations may have other warranty or condition. For faster service, locate the model, type, and series numbers on the rating label (e.g., 120V ~ 60 Hz). This warranty extends only to products purchased and used...
... all costs associated with the printed directions, or damage to make a warranty claim, do not allow limitations on implied warranties or special, incidental, or consequential damages, so the foregoing limitations may have other warranty or condition. For faster service, locate the model, type, and series numbers on the rating label (e.g., 120V ~ 60 Hz). This warranty extends only to products purchased and used...


