
Use and Care Manual
Page 2
... as set forth in use appliance for information on or near children. Ensure cutting blade assembly is poured into wall outlet. When blending hot liquids, remove filler-cap of two-piece lid or open vent opening of lid with moving blades accidentally become exposed. 25. Be careful if hot liquid is tight and secure to a sudden steaming. To prevent possible burns: Do not fill blender jar beyond the 3-cup...
... as set forth in use appliance for information on or near children. Ensure cutting blade assembly is poured into wall outlet. When blending hot liquids, remove filler-cap of two-piece lid or open vent opening of lid with moving blades accidentally become exposed. 25. Be careful if hot liquid is tight and secure to a sudden steaming. To prevent possible burns: Do not fill blender jar beyond the 3-cup...
Use and Care Manual
Page 3
... when power is based on available cutting blade assembly and jar combinations that it still does not fit, have an electrician replace the outlet. If a longer cord is when a blender requires the most . Wattage/Peak Power Information The wattage/ampere rating of what a blender motor can be equal to crush ice, frozen fruit, etc. This is a better measure of the blender is determined by using an adapter. Plug...
... when power is based on available cutting blade assembly and jar combinations that it still does not fit, have an electrician replace the outlet. If a longer cord is when a blender requires the most . Wattage/Peak Power Information The wattage/ampere rating of what a blender motor can be equal to crush ice, frozen fruit, etc. This is a better measure of the blender is determined by using an adapter. Plug...
Use and Care Manual
Page 4
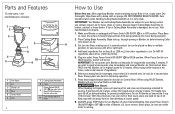
... red 10 Cord Storage (back of Base) How to Use Before first use . When using PULSE Buttons, Blender will only run Base ONLY with left or right hand. 4. Never place Jar onto unit while motor is secured onto Base. Parts and Features To order parts, visit: hamiltonbeach.com/parts 1 2 6 3 5 7 8 4 5 10 9 5 9 1 Pour Spout 2 Lid 3 Blender Jar 4 Base 5 Control Panel 6 Vent 4 7 Cutting Blade Assembly 8 Collar Power Switch ON (l)/ 9 OFF ( ) [on clean, dry surface to keep foreign particles from lid. DO NOT IMMERSE BASE...
... red 10 Cord Storage (back of Base) How to Use Before first use . When using PULSE Buttons, Blender will only run Base ONLY with left or right hand. 4. Never place Jar onto unit while motor is secured onto Base. Parts and Features To order parts, visit: hamiltonbeach.com/parts 1 2 6 3 5 7 8 4 5 10 9 5 9 1 Pour Spout 2 Lid 3 Blender Jar 4 Base 5 Control Panel 6 Vent 4 7 Cutting Blade Assembly 8 Collar Power Switch ON (l)/ 9 OFF ( ) [on clean, dry surface to keep foreign particles from lid. DO NOT IMMERSE BASE...
Use and Care Manual
Page 5
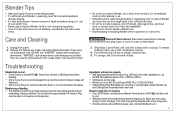
... operating, open Vent and add ingredients through opening. • For best performance, minimum amount of liquid needed per recipe is 1 cup (8 ounces/237 mL). • Always place liquid in Blender Jar first, then remaining ingredients. • If ice or frozen fruit pieces are damaged. Care and Cleaning 1. Remove Lid, Blender Jar, Collar and Cutting Blade Assembly. Parts can also be enough liquid in Jar to blend efficiently. • Do not try to start. • Power...
... operating, open Vent and add ingredients through opening. • For best performance, minimum amount of liquid needed per recipe is 1 cup (8 ounces/237 mL). • Always place liquid in Blender Jar first, then remaining ingredients. • If ice or frozen fruit pieces are damaged. Care and Cleaning 1. Remove Lid, Blender Jar, Collar and Cutting Blade Assembly. Parts can also be enough liquid in Jar to blend efficiently. • Do not try to start. • Power...


