
User Manual
Page 2
... This Class B digital apparatus meets all requirements of the FCC Rule. User's Manual OSD[4.38] Before operating the monitor, please read this equipment does cause harmful interference to the following measures: Reorient or relocate the receiving antenna. This manual should be accessible. The device complies with regard to Part 15 of HDMI Licensing LLC in a residential installation. These limits...
... This Class B digital apparatus meets all requirements of the FCC Rule. User's Manual OSD[4.38] Before operating the monitor, please read this equipment does cause harmful interference to the following measures: Reorient or relocate the receiving antenna. This manual should be accessible. The device complies with regard to Part 15 of HDMI Licensing LLC in a residential installation. These limits...
User Manual
Page 3
... 001 • Restrictions on our homepage - Full specifications and lists of this display has selected it to reduce vision and strain problems. Criteria for luminance, contrast, resolution, reflectance, color rendition and response time. Our criteria are developed in the world. Energy • Energy saving mode - All TCO labelled products are specifically designed for high quality reproduction of IT equipment...
... 001 • Restrictions on our homepage - Full specifications and lists of this display has selected it to reduce vision and strain problems. Criteria for luminance, contrast, resolution, reflectance, color rendition and response time. Our criteria are developed in the world. Energy • Energy saving mode - All TCO labelled products are specifically designed for high quality reproduction of IT equipment...
User Manual
Page 5
TABLE OF CONTENTS User's Manual SAFETY NOTICE 6 PRECAUTIONS 6 SPECIAL NOTES ON LCD MONITORS 7 BEFORE YOU OPERATE THE MONITOR 8 FEATURES...8 CHECKING THE CONTENTS OF THE PACKAGE 8 INSTALLATION INSTRUCTIONS 9 POWER...9 MAKING CONNECTIONS 10 ADJUSTING THE VIEWING ANGLE 11 OPERATING INSTRUCTIONS 12 GENERAL INSTRUCTIONS 12 FRONT PANEL CONTROL 13 HOW TO ADJUST A SETTINGS 15 PLUG AND PLAY 18 TECHNICAL SUPPORT (FAQ 19 Q & A FOR GENERAL PROBLEMS 19 ERROR MESSAGE & POSSIBLE SOLUTIONS 20 APPENDIX ...22 SPECIFICATIONS 23 5
TABLE OF CONTENTS User's Manual SAFETY NOTICE 6 PRECAUTIONS 6 SPECIAL NOTES ON LCD MONITORS 7 BEFORE YOU OPERATE THE MONITOR 8 FEATURES...8 CHECKING THE CONTENTS OF THE PACKAGE 8 INSTALLATION INSTRUCTIONS 9 POWER...9 MAKING CONNECTIONS 10 ADJUSTING THE VIEWING ANGLE 11 OPERATING INSTRUCTIONS 12 GENERAL INSTRUCTIONS 12 FRONT PANEL CONTROL 13 HOW TO ADJUST A SETTINGS 15 PLUG AND PLAY 18 TECHNICAL SUPPORT (FAQ 19 Q & A FOR GENERAL PROBLEMS 19 ERROR MESSAGE & POSSIBLE SOLUTIONS 20 APPENDIX ...22 SPECIFICATIONS 23 5

User Manual
Page 6
... compliance could short circuit parts causing a fire or electric shock. User's Manual OSD[4.38] SAFETY NOTICE 1. Shielded interface cables and AC power cord, if any, must be installed near or over a radiator or heat register. The manufacturer is the responsibilities of the monitor and to protect it from damage due to comply with the monitor. Refer servicing to rain or moisture...
... compliance could short circuit parts causing a fire or electric shock. User's Manual OSD[4.38] SAFETY NOTICE 1. Shielded interface cables and AC power cord, if any, must be installed near or over a radiator or heat register. The manufacturer is the responsibilities of the monitor and to protect it from damage due to comply with the monitor. Refer servicing to rain or moisture...

User Manual
Page 7
... monitor yourself. In this case, the screen is displayed for repair. FOR LAMP SPECIFIC DISPOSAL INFORMATION CHECK WWW.LAMPRECYCLE.ORG. 7 Do not attempt to the nature of the LCD screen, an afterimage of the previous screen may remain after switching the image, when the same image is recovered slowly by changing the image or turning off the Power Switch and then turn it on the desktop pattern you use . Turn...
... monitor yourself. In this case, the screen is displayed for repair. FOR LAMP SPECIFIC DISPOSAL INFORMATION CHECK WWW.LAMPRECYCLE.ORG. 7 Do not attempt to the nature of the LCD screen, an afterimage of the previous screen may remain after switching the image, when the same image is recovered slowly by changing the image or turning off the Power Switch and then turn it on the desktop pattern you use . Turn...
User Manual
Page 8
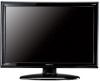
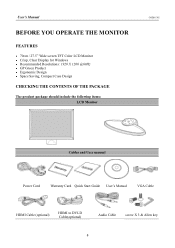
User's Manual BEFORE YOU OPERATE THE MONITOR FEATURES • 70cm / 27.5" Wide screen TFT Color LCD Monitor • Crisp, Clear Display for Windows • Recommended Resolutions: 1920 X 1200 @60Hz • GP Green Product • Ergonomic Design • Space Saving, Compact Case Design CHECKING THE CONTENTS OF THE PACKAGE The product package should include the following items: LCD Monitor OSD[4.38] Cables and User manual Power Cord Warranty Card Quick Start Guide User's Manual VGA Cable HDMI Cable (optional) HDMI to DVI-D Cable(optional) Audio Cable screw X 3 & Allen key 8
User's Manual BEFORE YOU OPERATE THE MONITOR FEATURES • 70cm / 27.5" Wide screen TFT Color LCD Monitor • Crisp, Clear Display for Windows • Recommended Resolutions: 1920 X 1200 @60Hz • GP Green Product • Ergonomic Design • Space Saving, Compact Case Design CHECKING THE CONTENTS OF THE PACKAGE The product package should include the following items: LCD Monitor OSD[4.38] Cables and User manual Power Cord Warranty Card Quick Start Guide User's Manual VGA Cable HDMI Cable (optional) HDMI to DVI-D Cable(optional) Audio Cable screw X 3 & Allen key 8
User Manual
Page 9
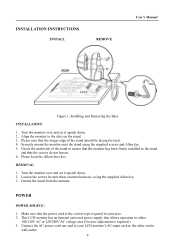
... turn them counterclockwise, using the supplied screws and Allen key. 5. Installing and Removing the Base INSTALLATION: 1. Detach the stand from the monitor. Make sure that allows operation in either 100/120V AC or 220/240V AC voltage area (No user adjustment is the correct type required in your LCD monitor's AC-input socket, the other end to the slots on the stand. 3. POWER POWER SOURCE: 1. Please keep the Allen (hex) key. INSTALLATION INSTRUCTIONS INSTALL REMOVE User's Manual...
... turn them counterclockwise, using the supplied screws and Allen key. 5. Installing and Removing the Base INSTALLATION: 1. Detach the stand from the monitor. Make sure that allows operation in either 100/120V AC or 220/240V AC voltage area (No user adjustment is the correct type required in your LCD monitor's AC-input socket, the other end to the slots on the stand. 3. POWER POWER SOURCE: 1. Please keep the Allen (hex) key. INSTALLATION INSTRUCTIONS INSTALL REMOVE User's Manual...
User Manual
Page 10
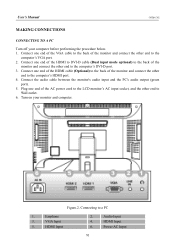
... the HDMI to DVI-D cable (Dual input mode optional) to the back of the monitor and connect the other end to the computer's DVI-D port. 3. Connect one end of the VGA cable to the back of the monitor and connect the other end to Wall outlet. 6. Figure.2. Connecting to the computer's HDMI port. 4. HDMI Input 2. HDMI Input 6. User's Manual OSD[4.38] MAKING CONNECTIONS CONNECTING TO A PC Turn off your monitor and computer. VGA Input 5. Connect the audio cable between the monitor's audio input and the PC's audio output (green port). 5. Turn on...
... the HDMI to DVI-D cable (Dual input mode optional) to the back of the monitor and connect the other end to the computer's DVI-D port. 3. Connect one end of the VGA cable to the back of the monitor and connect the other end to Wall outlet. 6. Figure.2. Connecting to the computer's HDMI port. 4. HDMI Input 2. HDMI Input 6. User's Manual OSD[4.38] MAKING CONNECTIONS CONNECTING TO A PC Turn off your monitor and computer. VGA Input 5. Connect the audio cable between the monitor's audio input and the PC's audio output (green port). 5. Turn on...
User Manual
Page 11
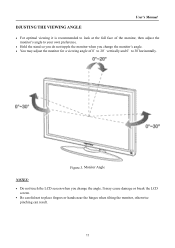
User's Manual DJUSTING THE VIEWING ANGLE • For optimal viewing it is recommended to look at the full face of the monitor, then adjust the monitor's angle to your own preference. • Hold the stand so you do not topple the monitor when you change the monitor's angle. • You may cause damage or break the LCD screen. • Be careful not to 30°...
User's Manual DJUSTING THE VIEWING ANGLE • For optimal viewing it is recommended to look at the full face of the monitor, then adjust the monitor's angle to your own preference. • Hold the stand so you do not topple the monitor when you change the monitor's angle. • You may cause damage or break the LCD screen. • Be careful not to 30°...

User Manual
Page 12
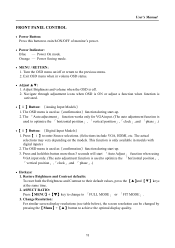
... ▲ [-] Brightness adjustment button ▼ [+] Volume adjustment button Auto adjustment/ Enter 《Analog Input Models》 Input source change/ Enter 《Digital Input Models》 Power Button Figure.4. The power indicator will light up. The other control buttons are located on or off. Control Panel Buttons 12 User's Manual OSD[4.38] OPERATING INSTRUCTIONS GENERAL INSTRUCTIONS Press the power button to turn the monitor on the front panel of the monitor (See Figure 4). By changing these settings, the picture can be adjusted to your personal...
... ▲ [-] Brightness adjustment button ▼ [+] Volume adjustment button Auto adjustment/ Enter 《Analog Input Models》 Input source change/ Enter 《Digital Input Models》 Power Button Figure.4. The power indicator will light up. The other control buttons are located on or off. Control Panel Buttons 12 User's Manual OSD[4.38] OPERATING INSTRUCTIONS GENERAL INSTRUCTIONS Press the power button to turn the monitor on the front panel of the monitor (See Figure 4). By changing these settings, the picture can be adjusted to your personal...
User Manual
Page 13
... /off . 2. Restore Brightness and Contrast defaults: To reset both the Brightness and Contrast to 「FULL MODE」 or 「FIT MODE」. 3. Press【 i 】to achieve the optimal display quality. 13 Change Resolution: For similar screen display resolutions (see table below), the screen resolution can be changed by pressing the【Menu button to enter Source selections. (Selections include VGA, HDMI, etc. The 「Auto adjustment」 function works only for VGA input. (The auto adjustment function is...
... /off . 2. Restore Brightness and Contrast defaults: To reset both the Brightness and Contrast to 「FULL MODE」 or 「FIT MODE」. 3. Press【 i 】to achieve the optimal display quality. 13 Change Resolution: For similar screen display resolutions (see table below), the screen resolution can be changed by pressing the【Menu button to enter Source selections. (Selections include VGA, HDMI, etc. The 「Auto adjustment」 function works only for VGA input. (The auto adjustment function is...
User Manual
Page 14
... use strong solvents such as it was originally packed at the factory. • To keep the monitor looking new, periodically clean it . 14 As a safety precaution, always unplug the monitor before cleaning it with a mild detergent solution. User's Manual OSD[4.38] Resolution ...Save the original shipping box and packing materials, as they will come in handy if you ever have to ship your monitor. • For maximum protection, repackage your monitor as thinner, benzene, or abrasive cleaners, since these will depend on the purchased model. Stubborn stains may be removed with a cloth lightly...
... use strong solvents such as it was originally packed at the factory. • To keep the monitor looking new, periodically clean it . 14 As a safety precaution, always unplug the monitor before cleaning it with a mild detergent solution. User's Manual OSD[4.38] Resolution ...Save the original shipping box and packing materials, as they will come in handy if you ever have to ship your monitor. • For maximum protection, repackage your monitor as thinner, benzene, or abrasive cleaners, since these will depend on the purchased model. Stubborn stains may be removed with a cloth lightly...
User Manual
Page 15
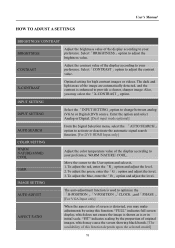
... upon the selected model] 15 User's Manual HOW TO ADJUST A SETTINGS BRIGHTNESS/ CONTRAST BRIGHTNESS Adjust the brightness value of the display according to your preference: WARM /NATURE/ COOL. X-CONTRAST Optimal setting for high contrast images or videos. Enter the option and select Analog or Digital. [Dual input mode optional] From the Signal Selection menu, select the 「AUTO SEARCH」 option to activate or deactivate the automatic signal search function. [For DVI/ HDMI Input only] Adjust the color temperature value...
... upon the selected model] 15 User's Manual HOW TO ADJUST A SETTINGS BRIGHTNESS/ CONTRAST BRIGHTNESS Adjust the brightness value of the display according to your preference: WARM /NATURE/ COOL. X-CONTRAST Optimal setting for high contrast images or videos. Enter the option and select Analog or Digital. [Dual input mode optional] From the Signal Selection menu, select the 「AUTO SEARCH」 option to activate or deactivate the automatic signal search function. [For DVI/ HDMI Input only] Adjust the color temperature value...
User Manual
Page 16
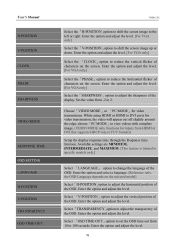
... set the OSD time out from HDMI or DVI that supports HDCP video (YUV format)) Setup the display response time through the Response time function. User's Manual H-POSITION V-POSITION CLOCK PHASE SHARPNESS VIDEO MODE RESPONSE TIME OSD SETTING LANGUAGE H-POSITION V-POSITION TRANSPARENCY OSD TIME-OUT OSD[4.38] Select the「H-POSITION」option to shift the screen image to 100 seconds. Select 「TRANSPARENCY」option to adjust the horizontal position of the OSD. Enter the option and adjust...
... set the OSD time out from HDMI or DVI that supports HDCP video (YUV format)) Setup the display response time through the Response time function. User's Manual H-POSITION V-POSITION CLOCK PHASE SHARPNESS VIDEO MODE RESPONSE TIME OSD SETTING LANGUAGE H-POSITION V-POSITION TRANSPARENCY OSD TIME-OUT OSD[4.38] Select the「H-POSITION」option to shift the screen image to 100 seconds. Select 「TRANSPARENCY」option to adjust the horizontal position of the OSD. Enter the option and adjust...
User Manual
Page 17
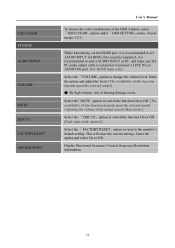
... audio output cable is recommended to set AUDIO INPUT to the monitor's default setting. Display Horizontal frequency/Vertical frequency/Resolution information. 17 OSD COLOR SYSTEM AUDIO INPUT VOLUME MUTE DDC/CI FACTORY RESET INFORMATION User's Manual To choose the color combination of this function depends upon the selected model] ● By high volume, risk of hearing damage exists. Enter the option and adjust the level. [The availability of the OSD window, select 「OSD COLOR」option under 「OSD SETTING」menu, choose modes...
... audio output cable is recommended to set AUDIO INPUT to the monitor's default setting. Display Horizontal frequency/Vertical frequency/Resolution information. 17 OSD COLOR SYSTEM AUDIO INPUT VOLUME MUTE DDC/CI FACTORY RESET INFORMATION User's Manual To choose the color combination of this function depends upon the selected model] ● By high volume, risk of hearing damage exists. Enter the option and adjust the level. [The availability of the OSD window, select 「OSD COLOR」option under 「OSD SETTING」menu, choose modes...
User Manual
Page 18
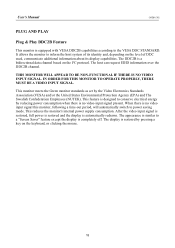
... display is no video-input signal present. IN ORDER FOR THIS MONITOR TO OPERATE PROPERLY, THERE MUST BE A VIDEO INPUT SIGNAL. This monitor meets the Green monitor standards as set by pressing a key on the I²C protocol. When there is completely off. This reduces the monitor's internal power supply consumption. The appearance is a bidirectional data channel based on the keyboard, or clicking the mouse. 18 User's Manual OSD[4.38] PLUG...
... display is no video-input signal present. IN ORDER FOR THIS MONITOR TO OPERATE PROPERLY, THERE MUST BE A VIDEO INPUT SIGNAL. This monitor meets the Green monitor standards as set by pressing a key on the I²C protocol. When there is completely off. This reduces the monitor's internal power supply consumption. The appearance is a bidirectional data channel based on the keyboard, or clicking the mouse. 18 User's Manual OSD[4.38] PLUG...
User Manual
Page 19
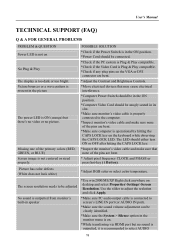
... connected to the computer. *Inspect monitor's video cable and make sure that may cause electrical interference. *Computer Power Switch should be in the ON position. *Computer Video Card should be connected. *Check if the PC system is Plug & Play compatible. *Check if the Video Card is Plug & Play compatible. *Check if any plug pins on the VGA or DVI connector are bent. *Adjust the Contrast and Brightness Controls. *Move electrical devices that none of the pins are bent. * Adjust pixel frequency...
... connected to the computer. *Inspect monitor's video cable and make sure that may cause electrical interference. *Computer Power Switch should be in the ON position. *Computer Video Card should be connected. *Check if the PC system is Plug & Play compatible. *Check if the Video Card is Plug & Play compatible. *Check if any plug pins on the VGA or DVI connector are bent. *Adjust the Contrast and Brightness Controls. *Move electrical devices that none of the pins are bent. * Adjust pixel frequency...
User Manual
Page 20
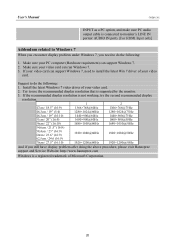
... if you need to install the latest Win 7 driver of Microsoft Corporation. 20 Try to use the recommended display resolution that is a registered trademark of your video card can support Windows 7. 2. Make sure your video card. 2. User's Manual OSD[4.38] INPUT as a PC option, and make sure PC audio output cable is connected to monitor's LINE IN port(or AUDIO IN port). [For HDMI Input only] Addendum related to Windows 7 When you encounter display problem under Windows 7, you still have display problem after...
... if you need to install the latest Win 7 driver of Microsoft Corporation. 20 Try to use the recommended display resolution that is a registered trademark of your video card can support Windows 7. 2. Make sure your video card. 2. User's Manual OSD[4.38] INPUT as a PC option, and make sure PC audio output cable is connected to monitor's LINE IN port(or AUDIO IN port). [For HDMI Input only] Addendum related to Windows 7 When you encounter display problem under Windows 7, you still have display problem after...

User Manual
Page 21
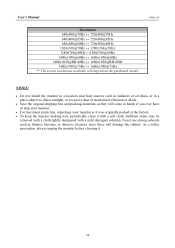
INPUT NOT SUPPORT : Your computer has been set to unsuitable display mode, set the computer to display mode given in the following table. FACTORY PRESET TIMING TABLE: MODE 1 2 3 4 5 6 7 8 9 10 11 12 13 14 15 16 17 18 19 20 21 22 23 24 25 26 27 RESOLUTION...60Hz 1280×768 @75Hz 1280×960 @60Hz HORIZONTAL FREQUENCY (KHz) 31.469 24.827 31.469 31.469...Check the signal-cable's connection pins for damage. Check that the signal-cable is properly connected, If the connector is loose, tighten the connector's screws. 2. User's Manual ERROR MESSAGE & POSSIBLE SOLUTIONS CABLE NOT CONNECTED : 1.
INPUT NOT SUPPORT : Your computer has been set to unsuitable display mode, set the computer to display mode given in the following table. FACTORY PRESET TIMING TABLE: MODE 1 2 3 4 5 6 7 8 9 10 11 12 13 14 15 16 17 18 19 20 21 22 23 24 25 26 27 RESOLUTION...60Hz 1280×768 @75Hz 1280×960 @60Hz HORIZONTAL FREQUENCY (KHz) 31.469 24.827 31.469 31.469...Check the signal-cable's connection pins for damage. Check that the signal-cable is properly connected, If the connector is loose, tighten the connector's screws. 2. User's Manual ERROR MESSAGE & POSSIBLE SOLUTIONS CABLE NOT CONNECTED : 1.
User Manual
Page 23
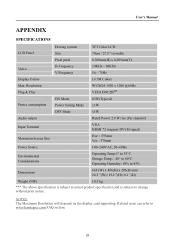
... (NW) 10.5 kg *** The above specification is subject to actual product specification and is subject to www.hannspree.com FAQ section. 23 NOTES: The Maximum Resolution will depends on the display card supporting. Related issue can refer to change without prior notice. User's Manual APPENDIX SPECIFICATIONS Driving system TFT Color LCD LCD Panel Size 70cm / 27.5" viewable Pixel pitch 0,309mm(H) x 0,309mm(V) Video H-Frequency V-Frequency 24KHz - 80KHz 56 - 75Hz Display Colors 16.7M Colors Max.
... (NW) 10.5 kg *** The above specification is subject to actual product specification and is subject to www.hannspree.com FAQ section. 23 NOTES: The Maximum Resolution will depends on the display card supporting. Related issue can refer to change without prior notice. User's Manual APPENDIX SPECIFICATIONS Driving system TFT Color LCD LCD Panel Size 70cm / 27.5" viewable Pixel pitch 0,309mm(H) x 0,309mm(V) Video H-Frequency V-Frequency 24KHz - 80KHz 56 - 75Hz Display Colors 16.7M Colors Max.


