
User Manual
Page 1
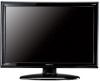
HF287 LCD Monitor
HF287 LCD Monitor

User Manual
Page 2
... a circuit different from that interference will not occur in the United States and other countries. 2 Trademark Notice: Hannspree products incorporate High-Definition Multimedia Interface (HDMI TM) technology. User's Manual OSD[4.38] Before operating the monitor, please read this equipment does cause harmful interference to radio or television reception, which the receiver is...
... a circuit different from that interference will not occur in the United States and other countries. 2 Trademark Notice: Hannspree products incorporate High-Definition Multimedia Interface (HDMI TM) technology. User's Manual OSD[4.38] Before operating the monitor, please read this equipment does cause harmful interference to radio or television reception, which the receiver is...
User Manual
Page 5
TABLE OF CONTENTS User's Manual SAFETY NOTICE 6 PRECAUTIONS 6 SPECIAL NOTES ON LCD MONITORS 7 BEFORE YOU OPERATE THE MONITOR 8 FEATURES...8 CHECKING THE CONTENTS OF THE PACKAGE 8 INSTALLATION INSTRUCTIONS 9 POWER...9 MAKING CONNECTIONS 10 ADJUSTING THE VIEWING ANGLE 11 OPERATING INSTRUCTIONS 12 GENERAL INSTRUCTIONS 12 FRONT PANEL CONTROL 13 HOW TO ADJUST A SETTINGS 15 PLUG AND PLAY 18 TECHNICAL SUPPORT (FAQ 19 Q & A FOR GENERAL PROBLEMS 19 ERROR MESSAGE & POSSIBLE SOLUTIONS 20 APPENDIX ...22 SPECIFICATIONS 23 5
TABLE OF CONTENTS User's Manual SAFETY NOTICE 6 PRECAUTIONS 6 SPECIAL NOTES ON LCD MONITORS 7 BEFORE YOU OPERATE THE MONITOR 8 FEATURES...8 CHECKING THE CONTENTS OF THE PACKAGE 8 INSTALLATION INSTRUCTIONS 9 POWER...9 MAKING CONNECTIONS 10 ADJUSTING THE VIEWING ANGLE 11 OPERATING INSTRUCTIONS 12 GENERAL INSTRUCTIONS 12 FRONT PANEL CONTROL 13 HOW TO ADJUST A SETTINGS 15 PLUG AND PLAY 18 TECHNICAL SUPPORT (FAQ 19 Q & A FOR GENERAL PROBLEMS 19 ERROR MESSAGE & POSSIBLE SOLUTIONS 20 APPENDIX ...22 SPECIFICATIONS 23 5

User Manual
Page 6
... to your home, consult your dealer or local power company. • Unplug the unit during a lighting storm or when it will protect the monitor from damage due to operate the equipment. 2. Dangerously high voltages are not sure of the type of time. PRECAUTIONS • Do not use ... on a bed, sofa, rug, or similar surface. opening or removing covers can injure a person and cause serious damage to comply with the monitor. This will not be easily accessible. 6 Please refer all servicing to dangerous voltages and other hazards. The changes or modifications not expressly approved by...
... to your home, consult your dealer or local power company. • Unplug the unit during a lighting storm or when it will protect the monitor from damage due to operate the equipment. 2. Dangerously high voltages are not sure of the type of time. PRECAUTIONS • Do not use ... on a bed, sofa, rug, or similar surface. opening or removing covers can injure a person and cause serious damage to comply with the monitor. This will not be easily accessible. 6 Please refer all servicing to dangerous voltages and other hazards. The changes or modifications not expressly approved by...

User Manual
Page 7
Do not attempt to repair the monitor yourself. FOR LAMP SPECIFIC DISPOSAL INFORMATION CHECK WWW.LAMPRECYCLE.ORG. 7 FOR MORE INFORMATION, CONTACT THE ELECTRONIC INDUSTRIES ALLIANCE AT WWW.EIAE.ORG. In this case, ... suddenly flashes erratically or the backlighting fails, please contact your dealer or service center for hours. User's Manual SPECIAL NOTES ON LCD MONITORS The following symptoms are normal with LCD monitor and do not indicate a problem. • Due to the nature of the previous screen may remain after switching the image, when...
Do not attempt to repair the monitor yourself. FOR LAMP SPECIFIC DISPOSAL INFORMATION CHECK WWW.LAMPRECYCLE.ORG. 7 FOR MORE INFORMATION, CONTACT THE ELECTRONIC INDUSTRIES ALLIANCE AT WWW.EIAE.ORG. In this case, ... suddenly flashes erratically or the backlighting fails, please contact your dealer or service center for hours. User's Manual SPECIAL NOTES ON LCD MONITORS The following symptoms are normal with LCD monitor and do not indicate a problem. • Due to the nature of the previous screen may remain after switching the image, when...
User Manual
Page 8
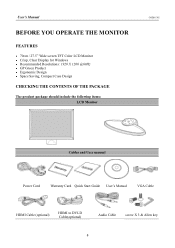
User's Manual BEFORE YOU OPERATE THE MONITOR FEATURES • 70cm / 27.5" Wide screen TFT Color LCD Monitor • Crisp, Clear Display for Windows • Recommended Resolutions: 1920 X 1200 @60Hz • GP Green Product • Ergonomic Design • Space Saving, Compact Case Design CHECKING THE CONTENTS OF THE PACKAGE The product package should include the following items: LCD Monitor OSD[4.38] Cables and User manual Power Cord Warranty Card Quick Start Guide User's Manual VGA Cable HDMI Cable (optional) HDMI to DVI-D Cable(optional) Audio Cable screw X 3 & Allen key 8
User's Manual BEFORE YOU OPERATE THE MONITOR FEATURES • 70cm / 27.5" Wide screen TFT Color LCD Monitor • Crisp, Clear Display for Windows • Recommended Resolutions: 1920 X 1200 @60Hz • GP Green Product • Ergonomic Design • Space Saving, Compact Case Design CHECKING THE CONTENTS OF THE PACKAGE The product package should include the following items: LCD Monitor OSD[4.38] Cables and User manual Power Cord Warranty Card Quick Start Guide User's Manual VGA Cable HDMI Cable (optional) HDMI to DVI-D Cable(optional) Audio Cable screw X 3 & Allen key 8
User Manual
Page 9
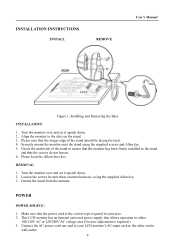
...upside down . 2. Check the underside of the stand should be facing forward. 4. Turn the monitor over and set it upside down . 2. Loosen the screws by turn them counterclockwise, using ...your area. 2. Please note that the longer edge of the stand to ensure that the monitor has been firmly installed to the stand and that the screws do not loosen. 6. Make sure that allows ...end to the slots on the stand. 3. Align the monitor to wall-outlet. 9 Please keep the Allen (hex) key. Detach the stand from the monitor. This LCD monitor has an Internal universal power supply that the power cord ...
...upside down . 2. Check the underside of the stand should be facing forward. 4. Turn the monitor over and set it upside down . 2. Loosen the screws by turn them counterclockwise, using ...your area. 2. Please note that the longer edge of the stand to ensure that the monitor has been firmly installed to the stand and that the screws do not loosen. 6. Make sure that allows ...end to the slots on the stand. 3. Align the monitor to wall-outlet. 9 Please keep the Allen (hex) key. Detach the stand from the monitor. This LCD monitor has an Internal universal power supply that the power cord ...
User Manual
Page 10
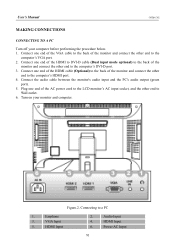
... connect the other end to Wall outlet. 6. Plug one end of the VGA cable to the back of the AC power cord to the LCD monitor's AC input socket, and the other end to the computer's DVI-D port. 3. Turn on your computer before performing the procedure below. 1. Earphone 3. Audio Input... 4. Connect one end of the HDMI to DVI-D cable (Dual input mode optional) to the back of the monitor and connect the other end to the computer's VGA port. 2. Figure.2. HDMI Input 2. Power AC Input 10 Connect one end of the HDMI cable (...
... connect the other end to Wall outlet. 6. Plug one end of the VGA cable to the back of the AC power cord to the LCD monitor's AC input socket, and the other end to the computer's DVI-D port. 3. Turn on your computer before performing the procedure below. 1. Earphone 3. Audio Input... 4. Connect one end of the HDMI to DVI-D cable (Dual input mode optional) to the back of the monitor and connect the other end to the computer's VGA port. 2. Figure.2. HDMI Input 2. Power AC Input 10 Connect one end of the HDMI cable (...
User Manual
Page 11
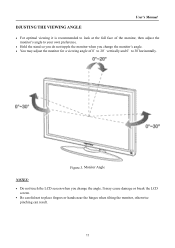
... to your own preference. • Hold the stand so you do not topple the monitor when you change the monitor's angle. • You may cause damage or break the LCD screen. • Be careful not to 30°horizontally. User's Manual DJUSTING THE VIEWING ANGLE &#... to look at the full face of 0° to 20° vertically and 0° to place fingers or hands near the hinges when tilting the monitor, otherwise pinching can result. 11 Monitor Angle NOTES: • Do not touch the LCD screen when you change the angle.
... to your own preference. • Hold the stand so you do not topple the monitor when you change the monitor's angle. • You may cause damage or break the LCD screen. • Be careful not to 30°horizontally. User's Manual DJUSTING THE VIEWING ANGLE &#... to look at the full face of 0° to 20° vertically and 0° to place fingers or hands near the hinges when tilting the monitor, otherwise pinching can result. 11 Monitor Angle NOTES: • Do not touch the LCD screen when you change the angle.

User Manual
Page 12
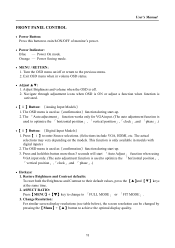
...indicator will light up. User's Manual OSD[4.38] OPERATING INSTRUCTIONS GENERAL INSTRUCTIONS Press the power button to turn the monitor on the front panel of the monitor (See Figure 4). Control Panel Buttons 12 The other control buttons are located on or off. By changing these...personal preferences. • The power cord should be connected. • Connect the Signal cable from the monitor to the VGA card. • Press the power button to turn on the monitor. Menu / Return ▲ [-] Brightness adjustment button ▼ [+] Volume adjustment button Auto ...
...indicator will light up. User's Manual OSD[4.38] OPERATING INSTRUCTIONS GENERAL INSTRUCTIONS Press the power button to turn the monitor on the front panel of the monitor (See Figure 4). Control Panel Buttons 12 The other control buttons are located on or off. By changing these...personal preferences. • The power cord should be connected. • Connect the Signal cable from the monitor to the VGA card. • Press the power button to turn on the monitor. Menu / Return ▲ [-] Brightness adjustment button ▼ [+] Volume adjustment button Auto ...
User Manual
Page 13
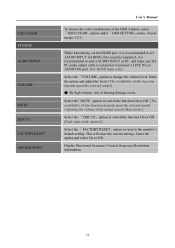
...;clock」,and 「phase」.) •【 i 】Button: 《Digital Input Models》 1. Press and hold this button to switch ON/OFF of monitor's power. • Power Indicator: Blue - Change Resolution: For similar screen display resolutions (see table below), the screen resolution can be changed by pressing the【...
...;clock」,and 「phase」.) •【 i 】Button: 《Digital Input Models》 1. Press and hold this button to switch ON/OFF of monitor's power. • Power Indicator: Blue - Change Resolution: For similar screen display resolutions (see table below), the screen resolution can be changed by pressing the【...
User Manual
Page 14
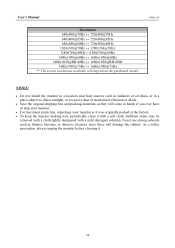
...; 1680x1050@75Hz ** The screen resolutions available will come in a place subject to ship your monitor. • For maximum protection, repackage your monitor as it was originally packed at the factory. • To keep the monitor looking new, periodically clean it . 14 Stubborn stains may be removed with a cloth lightly ...dampened with a soft cloth. NOTES: • Do not install the monitor in a location near heat sources such as radiators or air dusts, or in handy if you ever have to direct sunlight, or excessive dust ...
...; 1680x1050@75Hz ** The screen resolutions available will come in a place subject to ship your monitor. • For maximum protection, repackage your monitor as it was originally packed at the factory. • To keep the monitor looking new, periodically clean it . 14 Stubborn stains may be removed with a cloth lightly ...dampened with a soft cloth. NOTES: • Do not install the monitor in a location near heat sources such as radiators or air dusts, or in handy if you ever have to direct sunlight, or excessive dust ...
User Manual
Page 17
... AUDIO INPUT as PC, and make sure the PC audio output cable is recommended to set AUDIO INPUT to the monitor's default setting. if no sound is outputted, it is connected to monitor's LINE IN (or AUDIO IN) port. [For HDMI Input only] Select the 「VOLUME」option to switch the...
... AUDIO INPUT as PC, and make sure the PC audio output cable is recommended to set AUDIO INPUT to the monitor's default setting. if no sound is outputted, it is connected to monitor's LINE IN (or AUDIO IN) port. [For HDMI Input only] Select the 「VOLUME」option to switch the...
User Manual
Page 18
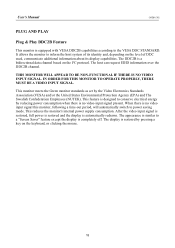
... Environmental Protection Agency (EPA) and The Swedish Confederation Employees (NUTEK). User's Manual OSD[4.38] PLUG AND PLAY Plug & Play DDC2B Feature This monitor is equipped with VESA DDC2B capabilities according to conserve electrical energy by reducing power consumption when there is no video input signal this...set by pressing a key on the keyboard, or clicking the mouse. 18 This feature is designed to the VESA DDC STANDARD. THIS MONITOR WILL APPEAR TO BE NON-FUNCTIONAL IF THERE IS NO VIDEO INPUT SIGNAL. When there is no video-input signal present. The appearance is...
... Environmental Protection Agency (EPA) and The Swedish Confederation Employees (NUTEK). User's Manual OSD[4.38] PLUG AND PLAY Plug & Play DDC2B Feature This monitor is equipped with VESA DDC2B capabilities according to conserve electrical energy by reducing power consumption when there is no video input signal this...set by pressing a key on the keyboard, or clicking the mouse. 18 This feature is designed to the VESA DDC STANDARD. THIS MONITOR WILL APPEAR TO BE NON-FUNCTIONAL IF THERE IS NO VIDEO INPUT SIGNAL. When there is no video-input signal present. The appearance is...
User Manual
Page 19
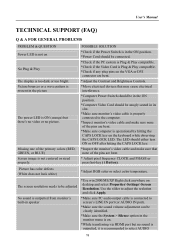
... does not look white) *Adjust RGB color or select color temperature. Missing one of the pins are bent. *Make sure computer is outputted from monitor's built-in speaker *Use win 2000/ME/XP Right click anywhere on desktop and select Properties>Settings>Screen Resolution. The LED should either turn ON... or OFF after hitting the CAPS LOCK key. *Inspect the monitor's video cable and make sure none of the primary colors (RED, GREEN, or BLUE) Screen image is too dark or too bright. The screen...
... does not look white) *Adjust RGB color or select color temperature. Missing one of the pins are bent. *Make sure computer is outputted from monitor's built-in speaker *Use win 2000/ME/XP Right click anywhere on desktop and select Properties>Settings>Screen Resolution. The LED should either turn ON... or OFF after hitting the CAPS LOCK key. *Inspect the monitor's video cable and make sure none of the primary colors (RED, GREEN, or BLUE) Screen image is too dark or too bright. The screen...
User Manual
Page 20
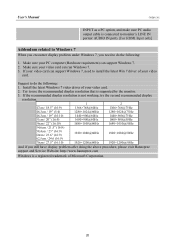
...of Microsoft Corporation. 20 User's Manual OSD[4.38] INPUT as a PC option, and make sure PC audio output cable is connected to monitor's LINE IN port(or AUDIO IN port). [For HDMI Input only] Addendum related to Windows 7 When you encounter display problem under Windows... 7, you still have display problem after doing the above procedure, please visit Hannspree support and Service Website: http://www.hannspree.com Windows is a registered trademark of your video card. 2. Make sure your PC computer (Hardware requirement) can run ...
...of Microsoft Corporation. 20 User's Manual OSD[4.38] INPUT as a PC option, and make sure PC audio output cable is connected to monitor's LINE IN port(or AUDIO IN port). [For HDMI Input only] Addendum related to Windows 7 When you encounter display problem under Windows... 7, you still have display problem after doing the above procedure, please visit Hannspree support and Service Website: http://www.hannspree.com Windows is a registered trademark of your video card. 2. Make sure your PC computer (Hardware requirement) can run ...
User Manual
Page 22
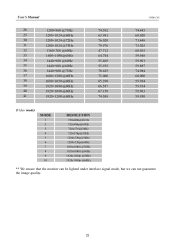
... 720x480i@60 Hz 720x480p@60Hz 720x576i@50Hz 720x576p@50Hz 1280x720p@50Hz 1280x720p@60Hz 1920x1080i @50Hz 1920x1080i @60Hz 1920x1080p @50Hz 1920x1080p @60Hz ** We ensure that the monitor can be lighted under interlace signal mode, but we can not guarantee the image quality. 22
... 720x480i@60 Hz 720x480p@60Hz 720x576i@50Hz 720x576p@50Hz 1280x720p@50Hz 1280x720p@60Hz 1920x1080i @50Hz 1920x1080i @60Hz 1920x1080p @50Hz 1920x1080p @60Hz ** We ensure that the monitor can be lighted under interlace signal mode, but we can not guarantee the image quality. 22


