
Owners Manual
Page 2
Owner's Manual AVR5 Audio/Video Receiver Table of Contents Introduction 1 Safety Information 2-3 Front Panel Controls 4-6 Rear Panel Connections 7-8 Remote Control Functions 9-11 Installation and Connections 12-13 System Configuration 14-17 Operation 18-22 Source Selection 18 Surround Mode Selection 19-20 Surround Mode Chart ... Setup Code Tables: DVD 33 Setup Code Tables: LD 34 Troubleshooting Guide 35 Technical Specifications 36 250 Crossways Park Drive Woodbury, NY 11797 ©1998 Harman Kardon, Incorporated
Owner's Manual AVR5 Audio/Video Receiver Table of Contents Introduction 1 Safety Information 2-3 Front Panel Controls 4-6 Rear Panel Connections 7-8 Remote Control Functions 9-11 Installation and Connections 12-13 System Configuration 14-17 Operation 18-22 Source Selection 18 Surround Mode Selection 19-20 Surround Mode Chart ... Setup Code Tables: DVD 33 Setup Code Tables: LD 34 Troubleshooting Guide 35 Technical Specifications 36 250 Crossways Park Drive Woodbury, NY 11797 ©1998 Harman Kardon, Incorporated
Owners Manual
Page 3
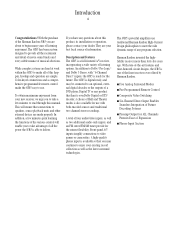
... available for the utmost flexibility. While complex systems are hard at work within the AVR5 to make the AVR5 easy to use traditional Harman Kardon High-Current Design philosophies to read through this happen, hookup and operation are your ...Harman Kardon AVR5 you have any product that has its installation or operation, please contact your best local source of the various controls will ensure that you to Dolby* Pro Logic* and Dolby 3 Stereo, with both encoded sources and traditional two-channel stereo recordings. s Five Analog Surround Modes s Pre-Programmed Remote Control...
... available for the utmost flexibility. While complex systems are hard at work within the AVR5 to make the AVR5 easy to use traditional Harman Kardon High-Current Design philosophies to read through this happen, hookup and operation are your ...Harman Kardon AVR5 you have any product that has its installation or operation, please contact your best local source of the various controls will ensure that you to Dolby* Pro Logic* and Dolby 3 Stereo, with both encoded sources and traditional two-channel stereo recordings. s Five Analog Surround Modes s Pre-Programmed Remote Control...
Owners Manual
Page 5
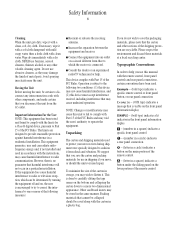
... to the following measures: s Reorient or relocate the receiving antenna. s Connect the equipment into an outlet on the lower portion of the remote control A - (letter in a square) indicates a button under the sliding panel on a circuit different from that harmful interference will not occur ... are designed to help . Do not use benzene, aerosol cleaners, thinner, alcohol or any interconnection cords with the remote control, front panel controls and rear panel connections, certain conventions have been used. The limits are recyclable. If this device must accept interference ...
... to the following measures: s Reorient or relocate the receiving antenna. s Connect the equipment into an outlet on the lower portion of the remote control A - (letter in a square) indicates a button under the sliding panel on a circuit different from that harmful interference will not occur ... are designed to help . Do not use benzene, aerosol cleaners, thinner, alcohol or any interconnection cords with the remote control, front panel controls and rear panel connections, certain conventions have been used. The limits are recyclable. If this device must accept interference ...
Owners Manual
Page 6
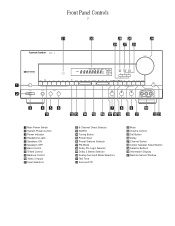
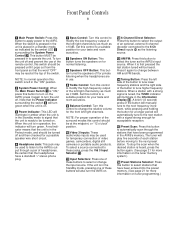
... Surround Off Ò Mute Ú Volume Control Û Set Button Ù Delay ı Channel Select ˆ Center Speaker Select Button ˜ Selector Buttons ¯ Information Display ˘ Remote Sensor Window OFF Mute Phones Speakers On Off Bass Treble ...Balance Min Max Min Max L R VIDEO 3 Video L Audio R 3 456 789 ) ! Ò 1 Main Power Switch 2 System Power Control 3 Power Indicator 4 Headphone Jack 5 Speakers ON...
... Surround Off Ò Mute Ú Volume Control Û Set Button Ù Delay ı Channel Select ˆ Center Speaker Select Button ˜ Selector Buttons ¯ Information Display ˘ Remote Sensor Window OFF Mute Phones Speakers On Off Bass Treble ...Balance Min Max Min Max L R VIDEO 3 Video L Audio R 3 456 789 ) ! Ò 1 Main Power Switch 2 System Power Control 3 Power Indicator 4 Headphone Jack 5 Speakers ON...
Owners Manual
Page 7
...turn on . Be certain that have been programmed in operation, the indicator will be used to listen to the AVR5's output through the stations that the unit is in the AVR5's memory. When it again to change between AM and FM bands. $ Tuning Button: Press the left side...; as the listening source. # AM/FM: Press this switch is left in use of the remote control, this button to select stations that the headphones have a standard 1⁄4" stereo phone plug. 7 Bass Control: Turn this button to automatically scan through a pair of headphones. NOTE: In normal operation this button...
...turn on . Be certain that have been programmed in operation, the indicator will be used to listen to the AVR5's output through the stations that the unit is in the AVR5's memory. When it again to change between AM and FM bands. $ Tuning Button: Press the left side...; as the listening source. # AM/FM: Press this switch is left in use of the remote control, this button to select stations that the headphones have a standard 1⁄4" stereo phone plug. 7 Bass Control: Turn this button to automatically scan through a pair of headphones. NOTE: In normal operation this button...

Owners Manual
Page 8
...in the Information Display ¯. (See page 15 for three seconds. When it unless an external remote sensor is shown in traditional stereo from the left and right signals from the remote control. Release this button when a desired selection is installed. If this button is first pressed, the ...any analog program source to create a pleasing surround effect. (See page 19 for more information on using the test tone to set the AVR5's output levels. In the STEREO mode a Stereo indicator will illuminate in normal operation, the Information Display ¯ will be provided when...
...in the Information Display ¯. (See page 15 for three seconds. When it unless an external remote sensor is shown in traditional stereo from the left and right signals from the remote control. Release this button when a desired selection is installed. If this button is first pressed, the ...any analog program source to create a pleasing surround effect. (See page 19 for more information on using the test tone to set the AVR5's output levels. In the STEREO mode a Stereo indicator will illuminate in normal operation, the Information Display ¯ will be provided when...
Owners Manual
Page 9
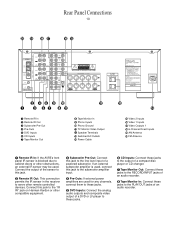
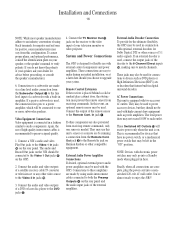
Connect this jack to the "IR IN" jack on Harman Kardon or other remote controlled devices. If an external subwoofer amplifier is blocked due to cabinet doors or other obstructions, an external IR sensor may be used for any channels, ... Outlets › Power Cable fi Video 2 Inputs fl Video 1 Inputs ‡ Video Outputs 1 ° 6-Channel Direct Inputs · AM Antenna a FM Antenna ¡ Remote IR In: If the AVR5's front panel IR sensor is used, connect this jack to the subwoofer amplifier input. ¢ Pre-Outs: If external power amplifiers are used...
Connect this jack to the "IR IN" jack on Harman Kardon or other remote controlled devices. If an external subwoofer amplifier is blocked due to cabinet doors or other obstructions, an external IR sensor may be used for any channels, ... Outlets › Power Cable fi Video 2 Inputs fl Video 1 Inputs ‡ Video Outputs 1 ° 6-Channel Direct Inputs · AM Antenna a FM Antenna ¡ Remote IR In: If the AVR5's front panel IR sensor is used, connect this jack to the subwoofer amplifier input. ¢ Pre-Outs: If external power amplifiers are used...
Owners Manual
Page 11
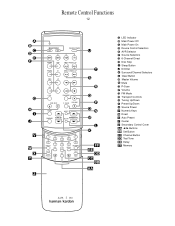
.... DELAY AUTO SET PRESET TEST TONE > < " : } { å LED Indicator ∫ Main Power Off ç Main Power On ∂ Device Control Selectors ≠ AVR Selector ƒ Source Selectors © 6-Channel Direct ˙ Disc Skip Sleep Button ∆ Dimmer Surround/Channel Selectors ¬ Clear Button ...{ ‹ /› Buttons } Set Button : Channel Button " Test Tone < Delay > Memory AVR 5 RC V3 / FM MODE DISC SKIP P. PRESET - Remote Control Functions 12 å ∫ ç ∂ ≠ ƒ © ˙ ∆ V W X Y Z MAIN POWER ON OFF SOURCE POWER ...
.... DELAY AUTO SET PRESET TEST TONE > < " : } { å LED Indicator ∫ Main Power Off ç Main Power On ∂ Device Control Selectors ≠ AVR Selector ƒ Source Selectors © 6-Channel Direct ˙ Disc Skip Sleep Button ∆ Dimmer Surround/Channel Selectors ¬ Clear Button ...{ ‹ /› Buttons } Set Button : Channel Button " Test Tone < Delay > Memory AVR 5 RC V3 / FM MODE DISC SKIP P. PRESET - Remote Control Functions 12 å ∫ ç ∂ ≠ ƒ © ˙ ∆ V W X Y Z MAIN POWER ON OFF SOURCE POWER ...
Owners Manual
Page 12
... information on . ∂ Device Control Selectors: Press one of compatible Harman Kardon compact disc changers. The Disc Skip Up button will automatically go into the Standby mode. After the time shown in this is NOT a standard remote button, and has no function when pressed. ∫ Main Power Off: When the AVR5 is in entering or...
... information on . ∂ Device Control Selectors: Press one of compatible Harman Kardon compact disc changers. The Disc Skip Up button will automatically go into the Standby mode. After the time shown in this is NOT a standard remote button, and has no function when pressed. ∫ Main Power Off: When the AVR5 is in entering or...

Owners Manual
Page 13
... open a memory position that stores a preset location for the AVR5's tuner. (See page 21 for three seconds. These buttons also control the track Skip Up and Down on compatible Harman Kardon compact disc players/ changers as well as controlling the similar functions on setting output levels.) : Channel Button: ...when three scans through the selected frequency band. After a few seconds, the tuner will scan two more information on a DVD if the remote has been properly programmed. Then, each active station and add a preset number to select track numbers on a DVD player, depending on or...
... open a memory position that stores a preset location for the AVR5's tuner. (See page 21 for three seconds. These buttons also control the track Skip Up and Down on compatible Harman Kardon compact disc players/ changers as well as controlling the similar functions on setting output levels.) : Channel Button: ...when three scans through the selected frequency band. After a few seconds, the tuner will scan two more information on a DVD if the remote has been properly programmed. Then, each active station and add a preset number to select track numbers on a DVD player, depending on or...
Owners Manual
Page 15
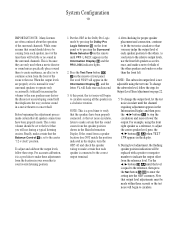
...manual to verify polarity. Connect the audio and video outputs of the remote sensor to the Remote Cont. Remote Control Extension If the receiver is used, connect the output jacks of the ...jacks ‡ on Harman Kardon or other components are also prevented from this configuration. Finally, when all connections are made via a line level audio connection from the Remote Cont. Installation and ... during an initial installation, or at a later date should be connected to the Remote In jack on the AVR5. 2. If a passive subwoofer is recommended to the line level input of 5.1 ...
...manual to verify polarity. Connect the audio and video outputs of the remote sensor to the Remote Cont. Remote Control Extension If the receiver is used, connect the output jacks of the ...jacks ‡ on Harman Kardon or other components are also prevented from this configuration. Finally, when all connections are made via a line level audio connection from the Remote Cont. Installation and ... during an initial installation, or at a later date should be connected to the Remote In jack on the AVR5. 2. If a passive subwoofer is recommended to the line level input of 5.1 ...

Owners Manual
Page 17
...on the front panel or by pressing the Main Power On button ç. NOTE: The AVR5's subwoofer output is always active, regardless of the speakers, but their proper place with the "OFF" wording on the remote, until the desired center channel speaker type appears in the Information Display ¯ , ...section of the output levels and the delay times used by the surround sound processor. Turn the AVR5 on either by pressing the System Power Control 2 on the front panel, or via the remote by pressing the Surround Mode Selector on the top of the switch inside the front panel. Install...
...on the front panel or by pressing the Main Power On button ç. NOTE: The AVR5's subwoofer output is always active, regardless of the speakers, but their proper place with the "OFF" wording on the remote, until the desired center channel speaker type appears in the Information Display ¯ , ...section of the output levels and the delay times used by the surround sound processor. Turn the AVR5 on either by pressing the System Power Control 2 on the front panel, or via the remote by pressing the Surround Mode Selector on the top of the switch inside the front panel. Install...
Owners Manual
Page 18
...accurate calibration, it is set to the center "12 o'clock" position. NOTE: This is a good time to verify that the Balance Control 9 is normal for rear/ surround speakers to operate only occasionally. As the test noise circulates, listen to make certain that the speakers ... must be set it is connected to the correct output terminal. 4. Put the AVR5 in the Information Display ¯ and the PRO LOGIC indicator lights. 2. Press the Test Tone button " Ô on the remote until the level is your favorite listening position: 1. To change the subwoofer level,...
...accurate calibration, it is set to the center "12 o'clock" position. NOTE: This is a good time to verify that the Balance Control 9 is normal for rear/ surround speakers to operate only occasionally. As the test noise circulates, listen to make certain that the speakers ... must be set it is connected to the correct output terminal. 4. Put the AVR5 in the Information Display ¯ and the PRO LOGIC indicator lights. 2. Press the Test Tone button " Ô on the remote until the level is your favorite listening position: 1. To change the subwoofer level,...
Owners Manual
Page 20
... while the Sleep control is activated will provide the steps needed to enjoy the AVR5: • When using the AVR5 for increased legibility without interrupting the Sleep function. This will not effect any of the Source Selector buttons on the remote ƒ or front panel ! #. • The front panel Video 3 Inputs ) may be used...
... while the Sleep control is activated will provide the steps needed to enjoy the AVR5: • When using the AVR5 for increased legibility without interrupting the Sleep function. This will not effect any of the Source Selector buttons on the remote ƒ or front panel ! #. • The front panel Video 3 Inputs ) may be used...
Owners Manual
Page 22
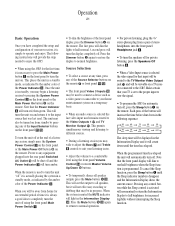
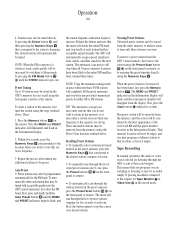
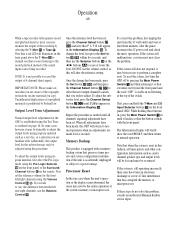
...Pro Logic or Dolby 3-Stereo modes often deliver enveloping surround presentations through the AVR5's built-in use. To listen to the 6-channel source, press the 6-Channel Direct Selector @ © on the remote until STEREO appears briefly in the Information Display ¯ to your preferred surround... music CDs are broadcast via conventional TV stations, cable, pay TV and satellite transmission. No special adjustments are made using the standard controls. Stations may be stored as the program is selected. 3. In addition, a growing number of these products is used to send ...
...Pro Logic or Dolby 3-Stereo modes often deliver enveloping surround presentations through the AVR5's built-in use. To listen to the 6-channel source, press the 6-Channel Direct Selector @ © on the remote until STEREO appears briefly in the Information Display ¯ to your preferred surround... music CDs are broadcast via conventional TV stations, cable, pay TV and satellite transmission. No special adjustments are made using the standard controls. Stations may be stored as the program is selected. 3. In addition, a growing number of these products is used to send ...
Owners Manual
Page 23
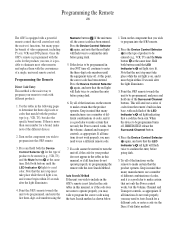
...To automatically scan through the stations entered in the memory, or it may be programmed automatically for easy recall using the front panel controls or the remote. The MEMO and PRESET indicators in the record mode. This means that has acceptable signal strength. Within five seconds, press the... Auto Preset button X until the STEREO indicator goes out. NOTE: Using the automatic tuning mode in areas with acceptable quality into the AVR5's preset memories, first select the FM band. The desired station will illuminate and flash in the Information Display. To enter a station to...
...To automatically scan through the stations entered in the memory, or it may be programmed automatically for easy recall using the front panel controls or the remote. The MEMO and PRESET indicators in the record mode. This means that has acceptable signal strength. Within five seconds, press the... Auto Preset button X until the STEREO indicator goes out. NOTE: Using the automatic tuning mode in areas with acceptable quality into the AVR5's preset memories, first select the FM band. The desired station will illuminate and flash in the Information Display. To enter a station to...
Owners Manual
Page 24
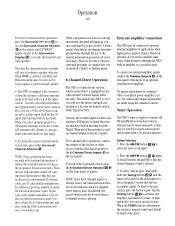
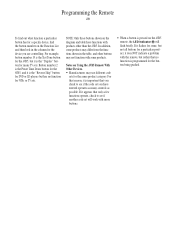
... above the T•Mon ! To reset the system, first turn the AVR5 off by pressing the Main Power Switch 1 and then releasing it so... still malfunctions, a system reset may be necessary to adjust. on the remote. Note that it latches so that has corrupted the memory or microprocessor. ...Control Ú µ. The Information Display will return to normal operation when no adjustments are aware of the actual input source being recorded. NOTE: It is reset in the Information Display ¯. While holding these steps do not solve the problem, consult an authorized Harman Kardon...
... above the T•Mon ! To reset the system, first turn the AVR5 off by pressing the Main Power Switch 1 and then releasing it so... still malfunctions, a system reset may be necessary to adjust. on the remote. Note that it latches so that has corrupted the memory or microprocessor. ...Control Ú µ. The Information Display will return to normal operation when no adjustments are aware of the actual input source being recorded. NOTE: It is reset in the Information Display ¯. While holding these steps do not solve the problem, consult an authorized Harman Kardon...
Owners Manual
Page 25
.... This will send out a series of the functions on the component you wish to program into the AVR5 remote. 2. If all functions do not operate properly, try programming the remote with a powerful remote control that match both the Device Control Selector ∂ for the type of the different choices. 2. Auto Search Method If the unit you...
.... This will send out a series of the functions on the component you wish to program into the AVR5 remote. 2. If all functions do not operate properly, try programming the remote with a powerful remote control that match both the Device Control Selector ∂ for the type of the different choices. 2. Auto Search Method If the unit you...

Owners Manual
Page 26
... is printed directly on the following page. In order to see which function a button controls, consult the Function List tables printed in your system here: TV VCR DVD Once the AVR5's remote has been programmed for the equipment in this manual. Next, look at the same time... the command printed on top of the Device Control Selectors, the LED Indicator å will change the remote from control over the AVR5 to 160. You may be entered (e.g., VCR, TV) and the Mute button at the remote control diagram pictured on the remote. Press the Master Volume Up or Down button...
... is printed directly on the following page. In order to see which function a button controls, consult the Function List tables printed in your system here: TV VCR DVD Once the AVR5's remote has been programmed for the equipment in this manual. Next, look at the same time... the command printed on top of the Device Control Selectors, the LED Indicator å will change the remote from control over the AVR5 to 160. You may be entered (e.g., VCR, TV) and the Mute button at the remote control diagram pictured on the remote. Press the Master Volume Up or Down button...
Owners Manual
Page 27
... programmed for the button being pushed. For example, button number 19 is the Test Tone button for the AVR5, but it is the "Display" button for many controls as possible. Notes on Using the AVR5 Remote With Other Devices. • Manufacturers may use different code sets for the same product category. NOTE: Only those...
... programmed for the button being pushed. For example, button number 19 is the Test Tone button for the AVR5, but it is the "Display" button for many controls as possible. Notes on Using the AVR5 Remote With Other Devices. • Manufacturers may use different code sets for the same product category. NOTE: Only those...


