
Owners Manual
Page 1
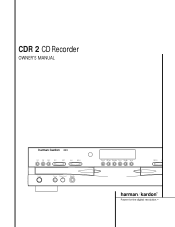
CDR 2 CD Recorder OWNER'S MANUAL ® Power for the digital revolution.™
CDR 2 CD Recorder OWNER'S MANUAL ® Power for the digital revolution.™
Owners Manual
Page 2
...Play 18 Programming Play Lists 18 Checking, Editing and Clearing Programmed Play Lists 18 Repeat Programmed Play 20 CD Recording 20 Disc Dubbing 21 CD Sync Recording 21 Recording from an External Source 22 Finalizing CD-R and CD-RW Discs 22 Unfinalizing and Erasing CD-RW Discs 22...a Single Track 23 Troubleshooting Guide and Error Messages 24 Technical Specifications 2 TABLE OF CONTENTS Typographical Conventions In order to help you use this manual with the remote control, front-panel controls and rear-panel connections, certain conventions have been used. EXAMPLE - (bold type) indicates a ...
...Play 18 Programming Play Lists 18 Checking, Editing and Clearing Programmed Play Lists 18 Repeat Programmed Play 20 CD Recording 20 Disc Dubbing 21 CD Sync Recording 21 Recording from an External Source 22 Finalizing CD-R and CD-RW Discs 22 Unfinalizing and Erasing CD-RW Discs 22...a Single Track 23 Troubleshooting Guide and Error Messages 24 Technical Specifications 2 TABLE OF CONTENTS Typographical Conventions In order to help you use this manual with the remote control, front-panel controls and rear-panel connections, certain conventions have been used. EXAMPLE - (bold type) indicates a ...
Owners Manual
Page 3
... to read through our Web site at the same time, for choosing Harman Kardon. s Once finalized, CD-R discs will play -only CD machines in this manual so that it is the world's first audio CD recorder with Portable Devices s Sample-Rate Convertor Allows Use of AKM digital-to...optical-digital outputs are fully acquainted with CD-RW discs. To make a copy using a recordable CD in the literature accompanying the appliance. You may also contact Harman Kardon via e-mail through this manual, please contact your time will pay special attention to the CDR 2's dual-tray design, ...
... to read through our Web site at the same time, for choosing Harman Kardon. s Once finalized, CD-R discs will play -only CD machines in this manual so that it is the world's first audio CD recorder with Portable Devices s Sample-Rate Convertor Allows Use of AKM digital-to...optical-digital outputs are fully acquainted with CD-RW discs. To make a copy using a recordable CD in the literature accompanying the appliance. You may also contact Harman Kardon via e-mail through this manual, please contact your time will pay special attention to the CDR 2's dual-tray design, ...
Owners Manual
Page 7
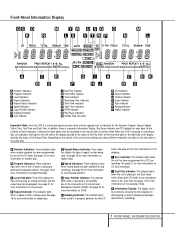
...Time and Track Time. See page 20 for more information on CD dubbing. C Level Indicators: These LEDs display the input level during an analog recording, and the output level during playback. See page 18 for more information on repeat status. F Speed Indicators: These indicators show which allows both...lights when a dub is not possible due to the intervention of the display describe to act as displaying messages about discs or recordings. 7 FRONT-PANEL INFORMATION DISPLAY G Copy-Prohibit Indicator: This indicator lights when a recording is in this manual with a common letter.
...Time and Track Time. See page 20 for more information on CD dubbing. C Level Indicators: These LEDs display the input level during an analog recording, and the output level during playback. See page 18 for more information on repeat status. F Speed Indicators: These indicators show which allows both...lights when a dub is not possible due to the intervention of the display describe to act as displaying messages about discs or recordings. 7 FRONT-PANEL INFORMATION DISPLAY G Copy-Prohibit Indicator: This indicator lights when a recording is in this manual with a common letter.

Owners Manual
Page 10
...press the CDP Select button d to use the remote to control the Play Deck, or press the CDR Select button 29 to control the Record Deck. Remote Control Functions a Power-On Button b Play (CDP)-Deck Display Control c Play (CDP)-Deck Open d Play (CDP)-Deck ... f Reverse Search g Single h Program Check i Previous-Track Skip j Play/Select k Random Play l Dub m Automatic/Manual Track Increment Selector n Track Increment o Finalize p Numeric Keys q A-B Repeat r Repeat s Speed Select t Record Button u Erase Button v Input Select w CD Sync x Stop y Pause z Next Track ` Dual Playback q28 Forward Search...
...press the CDP Select button d to use the remote to control the Play Deck, or press the CDR Select button 29 to control the Record Deck. Remote Control Functions a Power-On Button b Play (CDP)-Deck Display Control c Play (CDP)-Deck Open d Play (CDP)-Deck ... f Reverse Search g Single h Program Check i Previous-Track Skip j Play/Select k Random Play l Dub m Automatic/Manual Track Increment Selector n Track Increment o Finalize p Numeric Keys q A-B Repeat r Repeat s Speed Select t Record Button u Erase Button v Input Select w CD Sync x Stop y Pause z Next Track ` Dual Playback q28 Forward Search...

Owners Manual
Page 11
...See page 22 for more information on Finalization. s Speed Select: Press this button to select between automatic and manual track increments during recording, press this button to open the Play Deck 3. See page 20 for more information on selecting the proper ...page 17 for more information on programming the CDR 2. h Program Check: Press this button to begin a manual recording. o Finalize: Press this button when a recording is selected during a recording session. r Repeat: Press this button to cycle through the various time-display options for more information on...
...See page 22 for more information on Finalization. s Speed Select: Press this button to select between automatic and manual track increments during recording, press this button to open the Play Deck 3. See page 20 for more information on selecting the proper ...page 17 for more information on programming the CDR 2. h Program Check: Press this button to begin a manual recording. o Finalize: Press this button when a recording is selected during a recording session. r Repeat: Press this button to cycle through the various time-display options for more information on...
Owners Manual
Page 12
... CDR-Out jacks ™ to the jacks marked for details, as if your were connecting a standard CD player and a tape or cassette recorder, with the digital inputs. IMPORTANT NOTES ON DIGITAL CONNECTIONS: COAX CONNECTIONS: Although digital-coax connections use the frontpanel jack, simply turn off and...device. Connect the analog left/right CDP outputs ¡ to the digital outputs on your receiver or processor for a tape recorder. Consult the owner's manual on the receiver or processor to link the digital input to the "Tape" button or the specific input selector associated with ...
... CDR-Out jacks ™ to the jacks marked for details, as if your were connecting a standard CD player and a tape or cassette recorder, with the digital inputs. IMPORTANT NOTES ON DIGITAL CONNECTIONS: COAX CONNECTIONS: Although digital-coax connections use the frontpanel jack, simply turn off and...device. Connect the analog left/right CDP outputs ¡ to the digital outputs on your receiver or processor for a tape recorder. Consult the owner's manual on the receiver or processor to link the digital input to the "Tape" button or the specific input selector associated with ...
Owners Manual
Page 20
... will hear the playback at any compatible external digital source. • Recordings may damage your own personal use. Disc Dubbing The easiest way to make an analog copy of CD Recording. The dub will flash in progress. To manually stop a dubbing operation, press the Stop button x&¸ for either... CD-R or CD-RW discs, but this process the Dubbing Indicator H will light, the Record Indicator T will flash and a BUSY ...
... will hear the playback at any compatible external digital source. • Recordings may damage your own personal use. Disc Dubbing The easiest way to make an analog copy of CD Recording. The dub will flash in progress. To manually stop a dubbing operation, press the Stop button x&¸ for either... CD-R or CD-RW discs, but this process the Dubbing Indicator H will light, the Record Indicator T will flash and a BUSY ...
Owners Manual
Page 21
... track numbers must be added automatically. In that ALL appears in the Record Deck Information Display K. The Record Indicator T will flash, and the word BUSY will be increased manually or they will briefly appear in the Record Deck %. Note: If there is a digital copy or if it ... List before pressing the Select button j* to start the dub. At that the Record Indicator T will stop flashing and Information display will stop and must add track numbers manually by pressing the Auto/Manual button m once and note that it will light when the analog inputs are added...
... track numbers must be added automatically. In that ALL appears in the Record Deck Information Display K. The Record Indicator T will flash, and the word BUSY will be increased manually or they will briefly appear in the Record Deck %. Note: If there is a digital copy or if it ... List before pressing the Select button j* to start the dub. At that the Record Indicator T will stop flashing and Information display will stop and must add track numbers manually by pressing the Auto/Manual button m once and note that it will light when the analog inputs are added...
Quick Start Guide
Page 1
Step 2: Insert the source CD in the owner's manual. Step 8: Before you can make recordings using the CDR 2 CD Recorder 1. Next, press the Play/Select button on the display. ® Power for the track and time data to appear in the Record deck display. Dub a compilation or mix of one or ... in the display after the CDR 2 has read and identified each disc. The finalization process may take up to Make Recordings Using the Harman Kardon CDR 2 - A Quick Guide There are 4 ways you have turned your volume down to prevent possible damage to your CDR 2 to flash. This ...
Step 2: Insert the source CD in the owner's manual. Step 8: Before you can make recordings using the CDR 2 CD Recorder 1. Next, press the Play/Select button on the display. ® Power for the track and time data to appear in the Record deck display. Dub a compilation or mix of one or ... in the display after the CDR 2 has read and identified each disc. The finalization process may take up to Make Recordings Using the Harman Kardon CDR 2 - A Quick Guide There are 4 ways you have turned your volume down to prevent possible damage to your CDR 2 to flash. This ...
Quick Start Guide
Page 3
..., even though it permit you wish to flash. Step 7: Before you wish the CDR 2 to manually increment the track number for the Record deck reappears on the right-hand side of silence in another disc, then remove the source disc from the radio, a turntable, a cassette deck or other... Step 3 in Auto mode, the CDR 2 will get the best results by pressing the Auto/Manual button. You will NOT stop the recording after ten seconds of the display. Step 9: Before you can hear it by using manual track increment mode, remember to press the track increment button each new track. You will...
..., even though it permit you wish to flash. Step 7: Before you wish the CDR 2 to manually increment the track number for the Record deck reappears on the right-hand side of silence in another disc, then remove the source disc from the radio, a turntable, a cassette deck or other... Step 3 in Auto mode, the CDR 2 will get the best results by pressing the Auto/Manual button. You will NOT stop the recording after ten seconds of the display. Step 9: Before you can hear it by using manual track increment mode, remember to press the track increment button each new track. You will...

Quick Start Guide
Page 4
... be erased, even if the disc has not been finalized. To erase just the last track recorded on the CD-RW, press the Play/Select button on using your Harman Kardon CDR 2, please refer to your owner's manual, or see above), or one or more than one track, skip to Step 3 below . ...Wait until the Erase indicator goes out and the track and time display reappears before making a new recording. Wait until the Erase indicator ...
... be erased, even if the disc has not been finalized. To erase just the last track recorded on the CD-RW, press the Play/Select button on using your Harman Kardon CDR 2, please refer to your owner's manual, or see above), or one or more than one track, skip to Step 3 below . ...Wait until the Erase indicator goes out and the track and time display reappears before making a new recording. Wait until the Erase indicator ...


