Harman Kardon CH140 Support and Manuals
Get Help and Manuals for this Harman Kardon item

View All Support Options Below
Free Harman Kardon CH140 manuals!
Problems with Harman Kardon CH140?
Ask a Question
Free Harman Kardon CH140 manuals!
Problems with Harman Kardon CH140?
Ask a Question
Popular Harman Kardon CH140 Manual Pages
Owners Manual - Page 2
To fully understand the CH140's capability, please read this manual carefully and follow all of a Harman Kardon CH140 High Fidelity Cassette ... Noise Reduction This model is turned off F.F. The CH140 houses a complete full-featured unit. and REW operation.
■ Auto Replay at the tape end.
1 Congratulations on your purchase of the instructions regarding its use and installation.
Owners Manual - Page 4
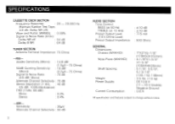
SPECIFICATIONS
CASSETTE DECK SECTION
Frequency Response
: 20 - 20,000 Hz
(Harman/Kardon Test Tape,
±3 dB, Dolby NR off
: 54 dB
Dolby B NR
: 64 dB
TUNER SECTION Antenna...-3/4" X1-3/8" (105X44X35mm)
: 5-1/8", 5-5/8", 5-13/16" (130, 142, 148mm)
: 3.5 lbs. (1.6 kg) : DC13.8 V
(11-16 V Usable), Negative Ground : 0.6 A
All specification and features subject to change without notice.
Owners Manual - Page 5
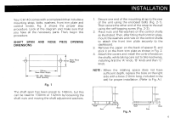
... nuts and flat washers on the right side with a complete kit that you have all the necessary parts.
A.)
Boss
150mm
20mm ]
f 15rom
II I 15mm
4
Remove the paper on the shafts, ...have sufficient depth, replace the boss on the control shafts as shown in the set) for proper installation. (Refer to Fig. Then, begin this can be reset to bite lead wires, installing first the "A"...
Owners Manual - Page 7
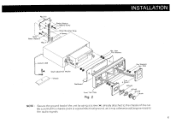
... of the unit by using a screw (*) already attached to the audio signals.
6 Fig. 2-2
Bolts Plastic Washers
Fig. 2 -1'
Spring Washer Tapping Screw
Metal Mounting Strap A Spacer
INSTALLATION
Hex. Nuts Flat Washers
Ground Lead
Shaft Adjustment Washer
Chassis
Dashboard
Front Trim Plate
Fig. 2
Spacers
Flat Washers Hex.
Owners Manual - Page 8
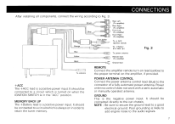
... The +ACC lead is a positive power input. be connected to Fig. 3.
NOTE : Be sure to secure the ground lead to the car chassis. CONNECTIONS
After installing all components, connect the wiring according to a circuit which is always on in the "ACC" position. Power antenna control does not work with a semi-automatic...
Owners Manual - Page 11
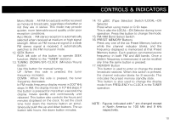
...pressed, the channel indicator blinks for 8 seconds. To set the clock time hold down the memory button an simultaneously push the up button sets hours, the down buttons. MEMORY Button This button is... : Figures indicated with * are in stereo. Auto Mode : FM stereo reception is pressed for manual tuning. This button also controls the hours and minutes displayed on the clock. In FM mode, ...
Owners Manual - Page 12
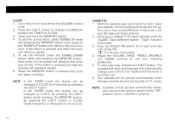
... ignition switch to the Tuner mode (when the tuner is off, and the tape will advance rapidly. 5. To set the minutes, press the TUNING DOWN button while still pressing the MEMORY button. To set the correct Hour, press TUNING UP while
still pressing the MEMORY button. By pressing the EJECT button in...
Owners Manual - Page 13

... song can be replayed automatically after the tape is automatically started . When the music is very soft, e.g., classical music which is automatically started .)
12
When parts of a conversation, etc., are recorded onto the tape in the designated direction. Lightly depress the other button (F.F. When the interval between songs.
4. NOTE : The tape...
Owners Manual - Page 14

..., BALANCE and FADER controls to suit your listening
pleasure.
13 Turn the tuner on by pushing the VOLUME control
knob. 2. The last manual (UP/DOWN) operation determines the seek direction. Manual Tuning 1. Turn the tuner on by pushing the VOLUME control
knob.
The frequency
changes until a broadcasted signal is tuned in, and...
Owners Manual - Page 15

...the need for 8 seconds. The CHANNEL display
wil l blink for auto or manual tuning.
OPERATIONS
Last Station Memory Function This function ""remembers"" the frequency last received....
14 This function also "remembers" the frequency of six AM and six FM broadcasts by using Auto
or Manual Tuning. 2. When changing the band from FM to AM and again to be tuned in. The button's number...
Owners Manual - Page 16
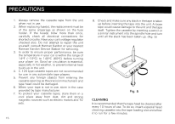
...Harman Kardon Service Station for a few minutes. consult Harman Kardon or your car's voltage regulator checked also. If the fuse(s) blow more than once, carefully check al l electrical connections for use , store in any foreign objects from dust, dirt and strong magnetic sources such as electric motors and TV sets...manufacturer.
7. When replacing fuse(s), the replacement must be of...
Owners Manual - Page 17
...parts using a special cleaning cassette.
• Use new cassette.
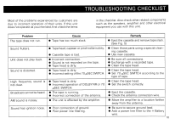
• Be sure all connections. • Exchange with this unit does not operate as the speakers, amplifier and other electrical equipment you intended, first check the items
in the checklist.
TROUBLESHOOTING CHECKLIST
Most of the problems...; Tape head is dirty. • Incorrect setting of the 70 µSEC SWITCH.
•...
Harman Kardon CH140 Reviews
We have not received any reviews for Harman Kardon yet.