
Owners Manual
Page 2
... DECK SECTION ■ Playback Frequency Response 20 - 20,000 Hz (±3dB) ■ Discrete Playback Amplifier Circuit ■ Dolby B Noise Reduction This model is turned off F.F. and REW operation. ■ Auto Replay at the tape end. 1 To fully understand the CH140's capability, please read this manual carefully and follow all of a Harman Kardon CH140 High Fidelity Cassette Deck/Tuner. The CH140 houses a complete full...
... DECK SECTION ■ Playback Frequency Response 20 - 20,000 Hz (±3dB) ■ Discrete Playback Amplifier Circuit ■ Dolby B Noise Reduction This model is turned off F.F. and REW operation. ■ Auto Replay at the tape end. 1 To fully understand the CH140's capability, please read this manual carefully and follow all of a Harman Kardon CH140 High Fidelity Cassette Deck/Tuner. The CH140 houses a complete full...

Owners Manual
Page 3
... Performance (Low Harmonic Distortion, Low Noise, Wide Stereo Separation) ■ Auto Tuner Monitor Allows monitoring tuner automatically during the fast forward or rewind modes. ■ Auto Separation & Soft Muting Control Adjusts stereo separation and soft muting automatical ly during FM stereo reception for removing Front Trim Cover Flat Washer (4 pcs.) Hex. PREAMP SECTION ■ All Discrete Circuitry ■ Separate Bass and Treble Controls ■ Fader Control ■ Amplifier Remote Turn-on, Power Antenna and Memory Back...
... Performance (Low Harmonic Distortion, Low Noise, Wide Stereo Separation) ■ Auto Tuner Monitor Allows monitoring tuner automatically during the fast forward or rewind modes. ■ Auto Separation & Soft Muting Control Adjusts stereo separation and soft muting automatical ly during FM stereo reception for removing Front Trim Cover Flat Washer (4 pcs.) Hex. PREAMP SECTION ■ All Discrete Circuitry ■ Separate Bass and Treble Controls ■ Fader Control ■ Amplifier Remote Turn-on, Power Antenna and Memory Back...
Owners Manual
Page 4
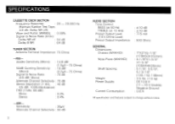
..., Mono) Alternate Channel Selectivity : 70 dB Stereo Separation (1 kHz, : 40 dB 65 dBf, 100% Modulation) THD (1 kHz, 65 dBf) Mono : 0.2% Stereo : 0.4% -AM- Usable Sensitivity (Mono) : 14.8 dBf (1.5µV-75 Ohms) 50dB Quieting Sensitivity : 18 dBf (Mono) (2.2µV-75 Ohms) Signal to change without notice. SPECIFICATIONS CASSETTE DECK SECTION Frequency Response : 20 - 20,000 Hz (Harman/Kardon Test Tape, ±3 dB, Dolby NR off) Wow...
..., Mono) Alternate Channel Selectivity : 70 dB Stereo Separation (1 kHz, : 40 dB 65 dBf, 100% Modulation) THD (1 kHz, 65 dBf) Mono : 0.2% Stereo : 0.4% -AM- Usable Sensitivity (Mono) : 14.8 dBf (1.5µV-75 Ohms) 50dB Quieting Sensitivity : 18 dBf (Mono) (2.2µV-75 Ohms) Signal to change without notice. SPECIFICATIONS CASSETTE DECK SECTION Frequency Response : 20 - 20,000 Hz (Harman/Kardon Test Tape, ±3 dB, Dolby NR off) Wow...
Owners Manual
Page 5
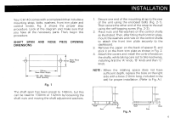
...shaft nuts and moving the shaft adjustment washers. A.) Boss 150mm 20mm ] f 15rom II I 15mm 4 Fig. 2 shows the proper step procedure. Then secure the other end of spacer B, and stick it on the control shafts as shown in the set) for proper installation. (Refer to Fig. Place ... 4. Attach the covers and install the control knobs on the right side with a complete kit that you have sufficient depth, replace the boss on the shafts, while taking care not to bite lead wires, installing first the "A" knob, "B" knob and then "C" knob. Look at the diagram and make sure that includes ...
...shaft nuts and moving the shaft adjustment washers. A.) Boss 150mm 20mm ] f 15rom II I 15mm 4 Fig. 2 shows the proper step procedure. Then secure the other end of spacer B, and stick it on the control shafts as shown in the set) for proper installation. (Refer to Fig. Place ... 4. Attach the covers and install the control knobs on the right side with a complete kit that you have sufficient depth, replace the boss on the shafts, while taking care not to bite lead wires, installing first the "A" knob, "B" knob and then "C" knob. Look at the diagram and make sure that includes ...

Owners Manual
Page 6
Tab Fig. Insert the tab firmly but softly into the holes under the front trim plate so as not to remove front trim covers 1. How to break the lugs on the panel. (Fig. B 5 This unit is designed to operate with any NEGATIVE GROUND 12 V (1 1-16 V usable) DC electrical system. B) 2. Bend the tab back and the trim cover wil l release.
Tab Fig. Insert the tab firmly but softly into the holes under the front trim plate so as not to remove front trim covers 1. How to break the lugs on the panel. (Fig. B 5 This unit is designed to operate with any NEGATIVE GROUND 12 V (1 1-16 V usable) DC electrical system. B) 2. Bend the tab back and the trim cover wil l release.
Owners Manual
Page 7
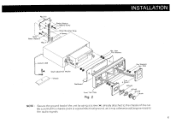
Be sure that this chassis point is a good electrical ground, as it may otherwise add engine noise to the chassis of the unit by using a screw (*) already attached to the audio signals. 6 Nuts Trim A Covers B1Cover A Knob B Knob C Knob NOTE : Secure the ground lead of the car. Nuts Flat Washers Ground Lead Shaft Adjustment Washer Chassis Dashboard Front Trim Plate Fig. 2 Spacers Flat Washers Hex. Fig. 2-2 Bolts Plastic Washers Fig. 2 -1' Spring Washer Tapping Screw Metal Mounting Strap A Spacer INSTALLATION Hex.
Be sure that this chassis point is a good electrical ground, as it may otherwise add engine noise to the chassis of the unit by using a screw (*) already attached to the audio signals. 6 Nuts Trim A Covers B1Cover A Knob B Knob C Knob NOTE : Secure the ground lead of the car. Nuts Flat Washers Ground Lead Shaft Adjustment Washer Chassis Dashboard Front Trim Plate Fig. 2 Spacers Flat Washers Hex. Fig. 2-2 Bolts Plastic Washers Fig. 2 -1' Spring Washer Tapping Screw Metal Mounting Strap A Spacer INSTALLATION Hex.
Owners Manual
Page 8
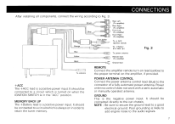
... The +Battery lead is the negative power input. CONNECTIONS After installing all components, connect the wiring according to the connector of a fully automatic power antenna. It should be connected to retain the tuner memory. POWER ANTENNA CONTROL Connect the power antenna control lead (blue) to Fig. 3. Power antenna control does not work with a semi-automatic or manually operated antenna. GROUND This is a positive power input. Poor grounding is in order to a circuit which is always on the amplifier, if...
... The +Battery lead is the negative power input. CONNECTIONS After installing all components, connect the wiring according to the connector of a fully automatic power antenna. It should be connected to retain the tuner memory. POWER ANTENNA CONTROL Connect the power antenna control lead (blue) to Fig. 3. Power antenna control does not work with a semi-automatic or manually operated antenna. GROUND This is a positive power input. Poor grounding is in order to a circuit which is always on the amplifier, if...

Owners Manual
Page 10
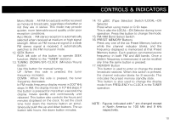
... button to indicate flat frequency response. 2. REW (Rewind) Button Press this knob to operate the Music Search function before pressing F.F. It has center click to indicate flat frequency response. 3 VOLUME Control/ON-OFF Switch (push)/ BALANCE Control (pull) Push this button to play a tape recorded with Dolby NR. 9. Tuner Frequency or Clock. BASS Control This knob controls the low frequency sounds. This also selects the display mode during the Tuner mode. Turn this button to decrease the rear level. To operate...
... button to indicate flat frequency response. 2. REW (Rewind) Button Press this knob to operate the Music Search function before pressing F.F. It has center click to indicate flat frequency response. 3 VOLUME Control/ON-OFF Switch (push)/ BALANCE Control (pull) Push this button to play a tape recorded with Dolby NR. 9. Tuner Frequency or Clock. BASS Control This knob controls the low frequency sounds. This also selects the display mode during the Tuner mode. Turn this button to decrease the rear level. To operate...
Owners Manual
Page 11
... side is automatically selected when received at that Preset Memory button. Press this side is pressed, the channel indicator blinks for 8 seconds. Once a station frequency is memorized, it automatically switches to change the preset broadcast stations. Auto Mode : FM stereo reception is pressed, the tuner frequency increases. In AM, the display moves in 200* kHz steps. SEEK Button Push left side of whether or not they are changed except in North...
... side is automatically selected when received at that Preset Memory button. Press this side is pressed, the channel indicator blinks for 8 seconds. Once a station frequency is memorized, it automatically switches to change the preset broadcast stations. Auto Mode : FM stereo reception is pressed, the tuner frequency increases. In AM, the display moves in 200* kHz steps. SEEK Button Push left side of whether or not they are changed except in North...
Owners Manual
Page 12
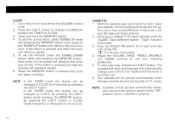
.... 4. Adjust the VOLUME, BASS, TREBLE, BALANCE and FADER controls to the Tuner mode (when the tuner is released the clock will advance the clock one hour. CLOCK 1 . Press and hold the MEMORY button. 4. Each press of the TUNING UP button will begin counting. When the MEMORY button is switched on by pressing the EJECT button while pressing the MEMORY button. By pressing the EJECT button in CLOCK mode, frequency is playing...
.... 4. Adjust the VOLUME, BASS, TREBLE, BALANCE and FADER controls to the Tuner mode (when the tuner is released the clock will advance the clock one hour. CLOCK 1 . Press and hold the MEMORY button. 4. Each press of the TUNING UP button will begin counting. When the MEMORY button is switched on by pressing the EJECT button while pressing the MEMORY button. By pressing the EJECT button in CLOCK mode, frequency is playing...

Owners Manual
Page 13
... started .) 12 system The Music Search is a system whereby the tape is rewound to bypass any number of a song: 1. When the interval between songs. 4. Music Search indicator illuminates. 2. Press the MUSIC SEARCH switch. Depress the F.F. MS (Music Search). Then press the REW button. (The tape is fast forwarded or rewound to stop at a very low recording level...
... started .) 12 system The Music Search is a system whereby the tape is rewound to bypass any number of a song: 1. When the interval between songs. 4. Music Search indicator illuminates. 2. Press the MUSIC SEARCH switch. Depress the F.F. MS (Music Search). Then press the REW button. (The tape is fast forwarded or rewound to stop at a very low recording level...

Owners Manual
Page 14
... is being received. 6. Select the desired station by pressing FM/AM Band Selector. 3. Remove the tape by pushing the VOLUME control knob. 2. The last manual (UP/DOWN) operation determines the seek direction. When in the auto mode (MONO indicator does not illuminate.), the stereo indicator will be displayed. 2. Adjust the VOLUME, BASS, TREBLE, BALANCE and FADER controls to suit your listening pleasure. 13 The frequency changes until a broadcasted...
... is being received. 6. Select the desired station by pressing FM/AM Band Selector. 3. Remove the tape by pushing the VOLUME control knob. 2. The last manual (UP/DOWN) operation determines the seek direction. When in the auto mode (MONO indicator does not illuminate.), the stereo indicator will be displayed. 2. Adjust the VOLUME, BASS, TREBLE, BALANCE and FADER controls to suit your listening pleasure. 13 The frequency changes until a broadcasted...

Owners Manual
Page 15
... pressing a PRESET button. OPERATIONS Last Station Memory Function This function ""remembers"" the frequency last received before changing bands (FM/AM). When changing the band from FM to AM and again to be tuned in. During this feature, broadcast frequencies must first be displayed and presetting of the station is completed. 3. When the power is turned on, the frequency of the station last received is displayed by using Auto or Manual Tuning. 2. In...
... pressing a PRESET button. OPERATIONS Last Station Memory Function This function ""remembers"" the frequency last received before changing bands (FM/AM). When changing the band from FM to AM and again to be tuned in. During this feature, broadcast frequencies must first be displayed and presetting of the station is completed. 3. When the power is turned on, the frequency of the station last received is displayed by using Auto or Manual Tuning. 2. In...
Owners Manual
Page 16
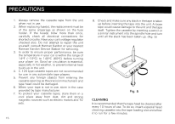
... build-up before turning your car is essential, especially in hot weather, to run for servicing. 3. consult Harman Kardon or your tape is not in a cool place away from dust, dirt and strong magnetic sources such as electric motors and TV sets. 15 8. Prevent any foreign objects from the unit when not in use , store in the...
... build-up before turning your car is essential, especially in hot weather, to run for servicing. 3. consult Harman Kardon or your tape is not in a cool place away from dust, dirt and strong magnetic sources such as electric motors and TV sets. 15 8. Prevent any foreign objects from the unit when not in use , store in the...
Owners Manual
Page 17
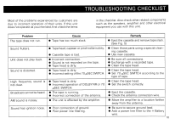
... head. • Set the switch correctly. • Eject the cassette. • Check the antenna connection wire. • Move the amplifier to a location farther away from the antenna. • Be sure to secure ground lead. • Add a power line filter to incorrect operation of the antenna. • The unit is distorted. Sound is effected by customers are due to the + Battery wire. 16 Broadcast cannot...
... head. • Set the switch correctly. • Eject the cassette. • Check the antenna connection wire. • Move the amplifier to a location farther away from the antenna. • Be sure to secure ground lead. • Add a power line filter to incorrect operation of the antenna. • The unit is distorted. Sound is effected by customers are due to the + Battery wire. 16 Broadcast cannot...


