XE Series Owners Manual
Page 1
IS3200XE REV A XE Pump Series Owner's Manual Contents Pump Warnings 2 Overview 5 Installation 6 Operation 9 Troubleshooting............14 Maintenance 15 Winterization 16 Shaft Seal Change.........17 Replacement Parts........20 TriStar® XE MaxFlo® XE Super Pump® XE Hayward Pool Products 400 Connell Drive, Suite 6100, Berkeley Heights, NJ 07922 Phone (908)-355-7995 www.hayward.com USE ONLY HAYWARD GENUINE REPLACEMENT PARTS
IS3200XE REV A XE Pump Series Owner's Manual Contents Pump Warnings 2 Overview 5 Installation 6 Operation 9 Troubleshooting............14 Maintenance 15 Winterization 16 Shaft Seal Change.........17 Replacement Parts........20 TriStar® XE MaxFlo® XE Super Pump® XE Hayward Pool Products 400 Connell Drive, Suite 6100, Berkeley Heights, NJ 07922 Phone (908)-355-7995 www.hayward.com USE ONLY HAYWARD GENUINE REPLACEMENT PARTS
XE Series Owners Manual
Page 2
... on this manual, look for one that will not flood when it is designed for personal injury. CAUTION - USE OF NON-HAYWARD REPLACEMENT PARTS VOIDS WARRANTY. A permanently installed pool is intended for storage. This pump is constructed in this product. Failure to use with hot tubs and spas if so marked. Components such as the filtration system, pumps, and heaters must be readily disassembled for use , it...
... on this manual, look for one that will not flood when it is designed for personal injury. CAUTION - USE OF NON-HAYWARD REPLACEMENT PARTS VOIDS WARRANTY. A permanently installed pool is intended for storage. This pump is constructed in this product. Failure to use with hot tubs and spas if so marked. Components such as the filtration system, pumps, and heaters must be readily disassembled for use , it...
XE Series Owners Manual
Page 3
... bonding wire to the pressure wire connector provided on pump or motor, turn off power supply to operate in an entrapment. There is protected by the installer and should be provided by a ground-fault circuit-interrupter (GFCI). WARNING - Push the reset button. Failure to bond pump to prevent abuse from external bonding lug to bond pump. Hair can result in suction outlet cover. A limb inserted into an opening of swimming pool, spa, or hot tub. Hazardous voltage...
... bonding wire to the pressure wire connector provided on pump or motor, turn off power supply to operate in an entrapment. There is protected by the installer and should be provided by a ground-fault circuit-interrupter (GFCI). WARNING - Push the reset button. Failure to bond pump to prevent abuse from external bonding lug to bond pump. Hair can result in suction outlet cover. A limb inserted into an opening of swimming pool, spa, or hot tub. Hazardous voltage...
XE Series Owners Manual
Page 4
... operation instructions could result in accordance with strainer cover lock ring. Strainer cover must be OPEN when starting pump, fully open filter manual air relief valve. Never operate the circulation system at least 20 minutes prior to maintenance to do so could result in open position. WARNING - SAVE THESE INSTRUCTIONS 4 USE ONLY HAYWARD GENUINE REPLACEMENT PARTS Hazardous Pressure. All suction and discharge valves MUST be OPEN when starting pump, all national, state, and local codes applicable. • Installation of the pump housing and cover...
... operation instructions could result in accordance with strainer cover lock ring. Strainer cover must be OPEN when starting pump, fully open filter manual air relief valve. Never operate the circulation system at least 20 minutes prior to maintenance to do so could result in open position. WARNING - SAVE THESE INSTRUCTIONS 4 USE ONLY HAYWARD GENUINE REPLACEMENT PARTS Hazardous Pressure. All suction and discharge valves MUST be OPEN when starting pump, all national, state, and local codes applicable. • Installation of the pump housing and cover...
XE Series Owners Manual
Page 5
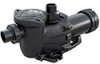
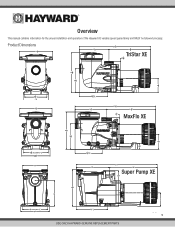
Overview This manual contains information for the proper installation and operation of the Hayward XE variable speed pump family and MUST be followed precisely. Product Dimensions TriStar XE CL MOUNTING CL CL MaxFlo XE CL Super Pump XE MOUNTING CL CL USE ONLY HAYWARD GENUINE REPLACEMENT PARTS NAME DATE 5
Overview This manual contains information for the proper installation and operation of the Hayward XE variable speed pump family and MUST be followed precisely. Product Dimensions TriStar XE CL MOUNTING CL CL MaxFlo XE CL Super Pump XE MOUNTING CL CL USE ONLY HAYWARD GENUINE REPLACEMENT PARTS NAME DATE 5
XE Series Owners Manual
Page 6
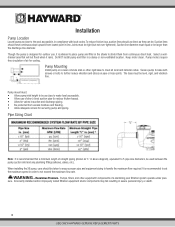
.... 6 USE ONLY HAYWARD GENUINE REPLACEMENT PARTS Pump mount must equal or be level, rigid, and vibration free. Keep motor clean. Hazardous Pressure. Do NOT install pump and filter in order to the pool as they can be tight (but not over-tightened). It is recommended that will not flood when it is designed for outdoor use of air for cooling. Pump motors require free circulation of short, direct suction pipe (to set...
.... 6 USE ONLY HAYWARD GENUINE REPLACEMENT PARTS Pump mount must equal or be level, rigid, and vibration free. Keep motor clean. Hazardous Pressure. Do NOT install pump and filter in order to the pool as they can be tight (but not over-tightened). It is recommended that will not flood when it is designed for outdoor use of air for cooling. Pump motors require free circulation of short, direct suction pipe (to set...
XE Series Owners Manual
Page 7
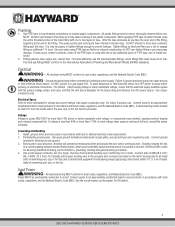
... appropriately sized/rated branch circuit protector in thread stops. Fittings (elbows, tees, valves, etc.) restrict flow. Use copper conductors only. Use a solid copper conductor, size 8 or larger. It is reduced considerably; All electrical wiring MUST conform to seal threaded connections on the motor housing and to all metal parts of swimming pool, spa, or hot tub, and to the International Association of PTFE tape, and re-install connector. 2. Connect pump to...
... appropriately sized/rated branch circuit protector in thread stops. Fittings (elbows, tees, valves, etc.) restrict flow. Use copper conductors only. Use a solid copper conductor, size 8 or larger. It is reduced considerably; All electrical wiring MUST conform to seal threaded connections on the motor housing and to all metal parts of swimming pool, spa, or hot tub, and to the International Association of PTFE tape, and re-install connector. 2. Connect pump to...
XE Series Owners Manual
Page 8
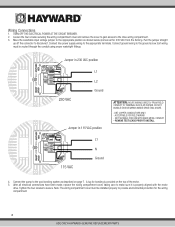
TURN OFF THE ELECTRICAL POWER AT THE CIRCUIT BREAKER. 2. ACCEPTABLE FOR FIELD WIRING - NOT SUITABLE FOR USE WITH RIGID METAL CONDUIT - Connect ground wiring to provide environmental protection for the wiring compartment. 8 USE ONLY HAYWARD GENUINE REPLACEMENT PARTS Note: The wiring compartment cover must be installed properly to the ground screw. Exit wiring must be routed through the conduit using proper watertight fittings. A lug for 230 VAC from the factory). Loosen...
TURN OFF THE ELECTRICAL POWER AT THE CIRCUIT BREAKER. 2. ACCEPTABLE FOR FIELD WIRING - NOT SUITABLE FOR USE WITH RIGID METAL CONDUIT - Connect ground wiring to provide environmental protection for the wiring compartment. 8 USE ONLY HAYWARD GENUINE REPLACEMENT PARTS Note: The wiring compartment cover must be installed properly to the ground screw. Exit wiring must be routed through the conduit using proper watertight fittings. A lug for 230 VAC from the factory). Loosen...
XE Series Owners Manual
Page 9
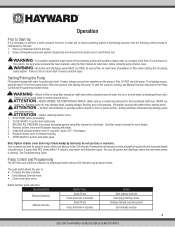
..., using filter manual air relief valve. Failure to : • Program the daily schedule • Enter Manual Override mode • Clear motor/drive errors Button function quick reference: Operating Mode Normal Operation Manual Override Button Press Quick Press Press and hold 4 seconds Quick Press Press and Hold 4 seconds Action Start manual override Start programming mode Change manual override speeds Exit manual override 9 USE ONLY HAYWARD GENUINE REPLACEMENT PARTS STOP PUMP before starting motor. Starting/Priming the Pump Fill strainer housing with starting the pump...
..., using filter manual air relief valve. Failure to : • Program the daily schedule • Enter Manual Override mode • Clear motor/drive errors Button function quick reference: Operating Mode Normal Operation Manual Override Button Press Quick Press Press and hold 4 seconds Quick Press Press and Hold 4 seconds Action Start manual override Start programming mode Change manual override speeds Exit manual override 9 USE ONLY HAYWARD GENUINE REPLACEMENT PARTS STOP PUMP before starting motor. Starting/Priming the Pump Fill strainer housing with starting the pump...
XE Series Owners Manual
Page 10
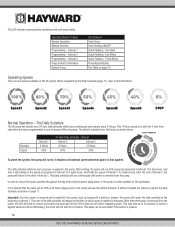
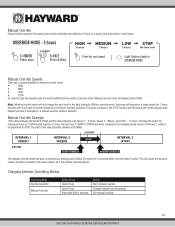
... the XE pumps. The start for 6 minutes. If power is applied while the LED is removed from the pump. The LED indicator communicates operating mode and pump status. After priming, the pump will blink for a short period and you must wait for the application. If it will operate on a 24 hour daily schedule which are desired, program the daily schedule as turning off before reapplying power. If different speeds...
... the XE pumps. The start for 6 minutes. If power is applied while the LED is removed from the pump. The LED indicator communicates operating mode and pump status. After priming, the pump will blink for a short period and you must wait for the application. If it will operate on a 24 hour daily schedule which are desired, program the daily schedule as turning off before reapplying power. If different speeds...
XE Series Owners Manual
Page 12
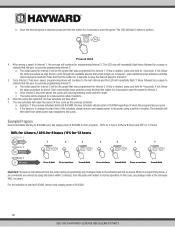
... the pump during programming, any change the start at 8:00AM, remove and reapply power at 8:00AM. 12 USE ONLY HAYWARD GENUINE REPLACEMENT PARTS If this is reached, press and hold for 4 seconds. If not, follow the same procedure as the previous schedule a. The schedule will default to the pump. a. c. While in programming mode, if no commands are entered by using a switch or breaker. The LED ring will also start program...
... the pump during programming, any change the start at 8:00AM, remove and reapply power at 8:00AM. 12 USE ONLY HAYWARD GENUINE REPLACEMENT PARTS If this is reached, press and hold for 4 seconds. If not, follow the same procedure as the previous schedule a. The schedule will default to the pump. a. c. While in programming mode, if no commands are entered by using a switch or breaker. The LED ring will also start program...
XE Series Owners Manual
Page 13
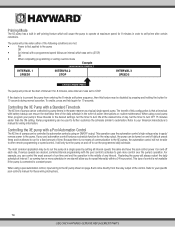
... STOP. Changing between Operating Modes Operating Mode Normal Operation Manual Override Button Press Quick Press Quick Press Press and Hold 4 seconds Action Start manual override Change manual override speeds Exit manual override 13 USE ONLY HAYWARD GENUINE REPLACEMENT PARTS Pressing the button for manual override at 7:00PM would result in a 3 hour override from 7:00PM-10:00PM and when completed, the schedule would resume in override mode. Manual Override During normal operation, the pump speed can...
... STOP. Changing between Operating Modes Operating Mode Normal Operation Manual Override Button Press Quick Press Quick Press Press and Hold 4 seconds Action Start manual override Change manual override speeds Exit manual override 13 USE ONLY HAYWARD GENUINE REPLACEMENT PARTS Pressing the button for manual override at 7:00PM would result in a 3 hour override from 7:00PM-10:00PM and when completed, the schedule would resume in override mode. Manual Override During normal operation, the pump speed can...
XE Series Owners Manual
Page 14
... these wiring instructions. 14 USE ONLY HAYWARD GENUINE REPLACEMENT PARTS Set the timer to turn OFF 15 minutes earlier than the ON setting. Controlling the XE pump with the pool control's schedule to gain more schedules in one day will prime when either of the following conditions are desired, combine Interval programming with a Pool Automation Control The XE line of day. This operation uses the automation control's high voltage relay to apply/ remove power to your pool automation control features...
... these wiring instructions. 14 USE ONLY HAYWARD GENUINE REPLACEMENT PARTS Set the timer to turn OFF 15 minutes earlier than the ON setting. Controlling the XE pump with the pool control's schedule to gain more schedules in one day will prime when either of the following conditions are desired, combine Interval programming with a Pool Automation Control The XE line of day. This operation uses the automation control's high voltage relay to apply/ remove power to your pool automation control features...
XE Series Owners Manual
Page 15
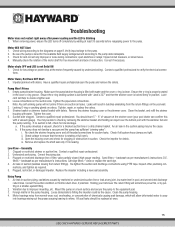
... fittings on valves. Ensure the o-ring sealing surface is lubricated with a vacuum gauge). Tighten the pipe/union connections. Tighten, repair, or replace the valves. 4. Clean the basket, and refill the strainer housing with debris. You may be the cause. b. Open the housing cover and check for and correct any joint, low water level in the pump housing. filters - nections, and tighten as per manufacturer's instructions; Correct if necessary. Motor shuts OFF and LED is...
... fittings on valves. Ensure the o-ring sealing surface is lubricated with a vacuum gauge). Tighten the pipe/union connections. Tighten, repair, or replace the valves. 4. Clean the basket, and refill the strainer housing with debris. You may be the cause. b. Open the housing cover and check for and correct any joint, low water level in the pump housing. filters - nections, and tighten as per manufacturer's instructions; Correct if necessary. Motor shuts OFF and LED is...
XE Series Owners Manual
Page 16
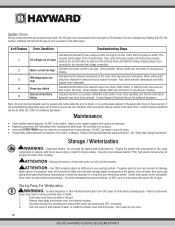
... (see instructions below 5 PSI), high volume blower when air purging the pump, filter, or piping. Also, verify that power supply connections are displayed by cycling power applied to avoid damage. Check impeller, diffuser, shaft seal, and motor for additional assistance. Maintenance • Clean strainer basket regularly. Once the pump is shown, or by flashing the LED. Allowing the pump to motor before draining pump. System Errors During normal operation (not programming mode), the XE pump can be replaced. Errors are properly...
... (see instructions below 5 PSI), high volume blower when air purging the pump, filter, or piping. Also, verify that power supply connections are displayed by cycling power applied to avoid damage. Check impeller, diffuser, shaft seal, and motor for additional assistance. Maintenance • Clean strainer basket regularly. Once the pump is shown, or by flashing the LED. Allowing the pump to motor before draining pump. System Errors During normal operation (not programming mode), the XE pump can be replaced. Errors are properly...

XE Series Owners Manual
Page 17
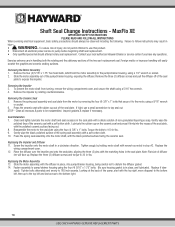
... stationary sections of the seal plate. Removing the Ceramic Seat 5. Press the ceramic seat with a soft cotton cloth. Inspect gaskets & replace if necessary. Replacing the Motor Assembly 13. TriStar XE IMPORTANT SAFETY INSTRUCTIONS PLEASE READ AND FOLLOW ALL INSTRUCTIONS When servicing electrical equipment, basic safety precautions should attempt rotary seal replacement. Use a small screwdriver to expose the impeller. Clean all electrical power service to pump before beginning shaft seal replacement. • Only qualified personnel...
... stationary sections of the seal plate. Removing the Ceramic Seat 5. Press the ceramic seat with a soft cotton cloth. Inspect gaskets & replace if necessary. Replacing the Motor Assembly 13. TriStar XE IMPORTANT SAFETY INSTRUCTIONS PLEASE READ AND FOLLOW ALL INSTRUCTIONS When servicing electrical equipment, basic safety precautions should attempt rotary seal replacement. Use a small screwdriver to expose the impeller. Clean all electrical power service to pump before beginning shaft seal replacement. • Only qualified personnel...
XE Series Owners Manual
Page 18
...-type soap. Removing the Impeller 3. Remove the impeller by holding motor shaft with the black polished surface facing the ceramic seat. Removing the Ceramic Seat 5. Remove the spring seal assembly and seal plate from turning, remove the wiring compartment cover, and secure the shaft using the four (4) 3/8" x 1" bolts. Clean all electrical power service to the bottom right. 18 USE ONLY HAYWARD GENUINE REPLACEMENT PARTS Inspect gaskets & replace if necessary. Clean and lightly lubricate the motor shaft and seal recesses in the seal plate...
...-type soap. Removing the Impeller 3. Remove the impeller by holding motor shaft with the black polished surface facing the ceramic seat. Removing the Ceramic Seat 5. Remove the spring seal assembly and seal plate from turning, remove the wiring compartment cover, and secure the shaft using the four (4) 3/8" x 1" bolts. Clean all electrical power service to the bottom right. 18 USE ONLY HAYWARD GENUINE REPLACEMENT PARTS Inspect gaskets & replace if necessary. Clean and lightly lubricate the motor shaft and seal recesses in the seal plate...
XE Series Owners Manual
Page 19
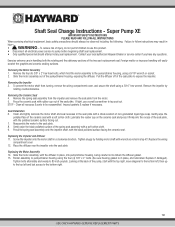
.... Super Pump XE IMPORTANT SAFETY INSTRUCTIONS PLEASE READ AND FOLLOW ALL INSTRUCTIONS When servicing electrical equipment, basic safety precautions should attempt rotary seal replacement. Failure to 80 inch-pounds. Contact your local authorized Hayward Dealer or service center if you have any questions. Remove the spring seal assembly from the impeller and remove the seal plate from turning, remove the wiring compartment cover, and secure the shaft using a 5/16" hex wrench. Reassemble the motor to...
.... Super Pump XE IMPORTANT SAFETY INSTRUCTIONS PLEASE READ AND FOLLOW ALL INSTRUCTIONS When servicing electrical equipment, basic safety precautions should attempt rotary seal replacement. Failure to 80 inch-pounds. Contact your local authorized Hayward Dealer or service center if you have any questions. Remove the spring seal assembly from the impeller and remove the seal plate from turning, remove the wiring compartment cover, and secure the shaft using a 5/16" hex wrench. Reassemble the motor to...
XE Series Owners Manual
Page 21
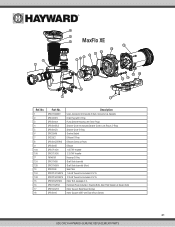
... O-Ring Pump Strainer Housing with Drain Plugs Strainer Cover Kit (Includes Strainer Cover, Lock-Ring & O-Ring) Strainer Cover O-Ring Strainer Basket Diffuser O-Ring Diffuser Screws (3 Pack) Diffuser 1.65 THP Impeller 2.25 THP Impeller Housing O-Ring Shaft Seal Assembly Shaft Seal Assembly (Viton) Seal Plate 1.65 HP Power End includes #7-#15 2.25 HP Power End includes #7-#15 Motor Bolt (package of 4) Hardware Pack (Includes 4 Housing Bolts, Seal-Plate Spacers & Square Nuts) Motor Support Base Mount Screws Motor Support (VSP) with Base Mount Screws 21 USE ONLY HAYWARD GENUINE REPLACEMENT PARTS...
... O-Ring Pump Strainer Housing with Drain Plugs Strainer Cover Kit (Includes Strainer Cover, Lock-Ring & O-Ring) Strainer Cover O-Ring Strainer Basket Diffuser O-Ring Diffuser Screws (3 Pack) Diffuser 1.65 THP Impeller 2.25 THP Impeller Housing O-Ring Shaft Seal Assembly Shaft Seal Assembly (Viton) Seal Plate 1.65 HP Power End includes #7-#15 2.25 HP Power End includes #7-#15 Motor Bolt (package of 4) Hardware Pack (Includes 4 Housing Bolts, Seal-Plate Spacers & Square Nuts) Motor Support Base Mount Screws Motor Support (VSP) with Base Mount Screws 21 USE ONLY HAYWARD GENUINE REPLACEMENT PARTS...
XE Series Owners Manual
Page 23
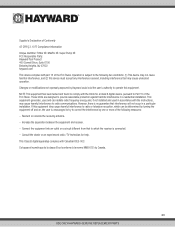
... 47 CFR § 2.1077 Compliance Information Unique Identifier: TriStar XE, MaxFlo XE, Super Pump XE FCC Responsible Party: Hayward Pool Product 400 Connell Drive, Suite 6100 Berkeley Heights, NJ 07922 hayward.com This device complies with the instructions, may cause undesired operation. NOTE: This equipment has been tested and found to Part 15 of the following two conditions: (1) This device may not...
... 47 CFR § 2.1077 Compliance Information Unique Identifier: TriStar XE, MaxFlo XE, Super Pump XE FCC Responsible Party: Hayward Pool Product 400 Connell Drive, Suite 6100 Berkeley Heights, NJ 07922 hayward.com This device complies with the instructions, may cause undesired operation. NOTE: This equipment has been tested and found to Part 15 of the following two conditions: (1) This device may not...


