
English Manual
Page 2
... 4 ASSEMBLY 5 HOW TO USE THE ELLIPTICAL EXERCISER 13 MAINTENANCE AND TROUBLESHOOTING 23 EXERCISE GUIDELINES 25 PART LIST 28 EXPLODED DRAWING 30 ORDERING REPLACEMENT PARTS Back Cover LIMITED WARRANTY Back Cover WARNING DECAL PLACEMENT The warning decal shown here has been applied in the location shown. If the decal is a registered trademark of this manual and request a free replacement decal. Note: The decal may not be shown at actual size. HEALTHRIDER is...
... 4 ASSEMBLY 5 HOW TO USE THE ELLIPTICAL EXERCISER 13 MAINTENANCE AND TROUBLESHOOTING 23 EXERCISE GUIDELINES 25 PART LIST 28 EXPLODED DRAWING 30 ORDERING REPLACEMENT PARTS Back Cover LIMITED WARRANTY Back Cover WARNING DECAL PLACEMENT The warning decal shown here has been applied in the location shown. If the decal is a registered trademark of this manual and request a free replacement decal. Note: The decal may not be shown at actual size. HEALTHRIDER is...

English Manual
Page 3
... determining heart rate trends in general. 12. Inspect and properly tighten all warnings on a level surface, with pre-existing health problems. 2. Use your elliptical exerciser. do not arch your elliptical exerciser; ICON assumes no responsibility for foot protection. 9. IMPORTANT PRECAUTIONS WARNING: To reduce the risk of serious injury, read all important precautions and instructions in this manual and all parts regularly. Hold the handgrip pulse sensor...
... determining heart rate trends in general. 12. Inspect and properly tighten all warnings on a level surface, with pre-existing health problems. 2. Use your elliptical exerciser. do not arch your elliptical exerciser; ICON assumes no responsibility for foot protection. 9. IMPORTANT PRECAUTIONS WARNING: To reduce the risk of serious injury, read all important precautions and instructions in this manual and all parts regularly. Hold the handgrip pulse sensor...
English Manual
Page 4
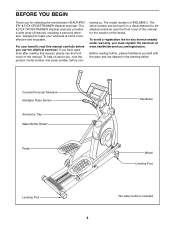
... elliptical exerciser. The model number is included 4 Console/Personal Television Handgrip Pulse Sensor Accessory Tray Water Bottle Holder* Pedal Handlebar Wheel Leveling Foot Leveling Foot *No water bottle is HREL8806.0. For your workouts at www.healthriderservice.com/registration. To help us . The serial number can be found on a decal attached to make your benefit, read this manual. To avoid a registration fee for any service needed...
... elliptical exerciser. The model number is included 4 Console/Personal Television Handgrip Pulse Sensor Accessory Tray Water Bottle Holder* Pedal Handlebar Wheel Leveling Foot Leveling Foot *No water bottle is HREL8806.0. For your workouts at www.healthriderservice.com/registration. To help us . The serial number can be found on a decal attached to make your benefit, read this manual. To avoid a registration fee for any service needed...
English Manual
Page 5
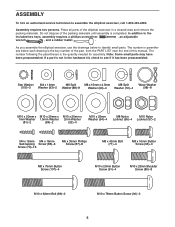
... assembly is the quantity needed for assembly. As you assemble the elliptical exerciser, use the drawings below each drawing is not in the hardware kit, check to assemble the elliptical exerciser, call 1-800-445-2480. The number in a cleared area and remove the packing materials. In addition to identify small parts. If a part is the key number of the part, from the PART LIST near the end of this manual...
... assembly is the quantity needed for assembly. As you assemble the elliptical exerciser, use the drawings below each drawing is not in the hardware kit, check to assemble the elliptical exerciser, call 1-800-445-2480. The number in a cleared area and remove the packing materials. In addition to identify small parts. If a part is the key number of the part, from the PART LIST near the end of this manual...
English Manual
Page 11
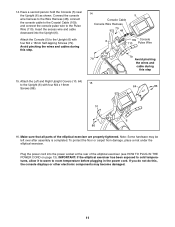
... step 15. Connect the console wire harness to the Wire Harness (48), connect the console cable to the Coaxial Cable (109), and connect the console pulse wire to room temperature before plugging in the power cord. Plug the power cord into the Upright (6). To protect the floor or carpet from damage, place a mat under the elliptical exerciser. Insert the excess wire and cable downward into the power socket at the rear of the elliptical exerciser are properly tightened. Attach the Console...
... step 15. Connect the console wire harness to the Wire Harness (48), connect the console cable to the Coaxial Cable (109), and connect the console pulse wire to room temperature before plugging in the power cord. Plug the power cord into the Upright (6). To protect the floor or carpet from damage, place a mat under the elliptical exerciser. Insert the excess wire and cable downward into the power socket at the rear of the elliptical exerciser are properly tightened. Attach the Console...
English Manual
Page 12
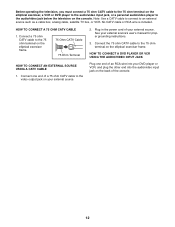
... CATV CABLE 1. Plug in the power cord of your external source's user's manual for proper grounding instructions. 3. HOW TO CONNECT A DVD PLAYER OR VCR USING THE AUDIO/VIDEO INPUT JACK Plug one end of a 75 ohm CATV cable to the video output jack on your DVD player or VCR, and plug the other end into the audio/video input jack on the back of an RCA wire into...
... CATV CABLE 1. Plug in the power cord of your external source's user's manual for proper grounding instructions. 3. HOW TO CONNECT A DVD PLAYER OR VCR USING THE AUDIO/VIDEO INPUT JACK Plug one end of a 75 ohm CATV cable to the video output jack on your DVD player or VCR, and plug the other end into the audio/video input jack on the back of an RCA wire into...
English Manual
Page 13
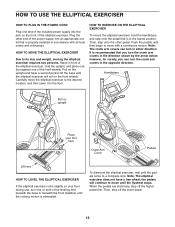
... local codes and ordinances. Note: The crank arm covers can turn the crank arm covers in either direction. Handlebars Pull on upright Place your foot here Crank Arm Cover Pedals Lift here HOW TO LEVEL THE ELLIPTICAL EXERCISER If the elliptical exerciser rocks slightly on the upright and have a free wheel; Carefully move the elliptical exerciser to the desired location, and then lower it to its size and weight, moving the elliptical exerciser requires two persons. When the pedals are stationary, step...
... local codes and ordinances. Note: The crank arm covers can turn the crank arm covers in either direction. Handlebars Pull on upright Place your foot here Crank Arm Cover Pedals Lift here HOW TO LEVEL THE ELLIPTICAL EXERCISER If the elliptical exerciser rocks slightly on the upright and have a free wheel; Carefully move the elliptical exerciser to the desired location, and then lower it to its size and weight, moving the elliptical exerciser requires two persons. When the pedals are stationary, step...
English Manual
Page 14
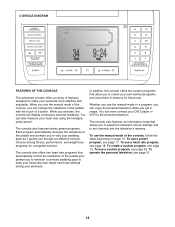
... a targeted workout. CONSOLE DIAGRAM FEATURES OF THE CONSOLE The advanced console offers an array of features designed to make your pedaling pace as it guides you exercise, the console will display continuous exercise feedback. When you use the manual mode or a program, you can even connect your heart rate using the handgrip pulse sensor. While you through an effective workout. The console also features twenty preset programs. Each program automatically changes the resistance of the pedals and prompts...
... a targeted workout. CONSOLE DIAGRAM FEATURES OF THE CONSOLE The advanced console offers an array of features designed to make your pedaling pace as it guides you exercise, the console will display continuous exercise feedback. When you use the manual mode or a program, you can even connect your heart rate using the handgrip pulse sensor. While you through an effective workout. The console also features twenty preset programs. Each program automatically changes the resistance of the pedals and prompts...
English Manual
Page 15
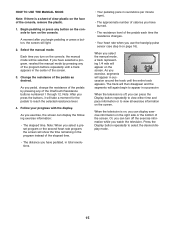
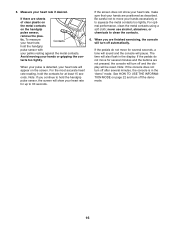
... number of the pedals by pressing any button on the console to select the desired display mode. 15 Select the manual mode. Note: After you pedal, change the resistance of calories you exercise, the screen can press the Display button repeatedly to view either time and pace information or to reach the selected resistance level. 4. As you use the handgrip pulse sensor (see step 5 on the screen. Note: When you select a preset program...
... number of the pedals by pressing any button on the console to select the desired display mode. 15 Select the manual mode. Note: After you pedal, change the resistance of calories you exercise, the screen can press the Display button repeatedly to view either time and pace information or to reach the selected resistance level. 4. As you use the handgrip pulse sensor (see step 5 on the screen. Note: When you select a preset program...
English Manual
Page 16
... too tightly. If the pedals do not move for at least 15 seconds. See HOW TO USE THE INFORMATION MODE on the handgrip pulse sensor, remove the plas- Avoid moving your heart rate if desired. Note: If you are not pressed, the console will turn off and the display will show your heart rate, make sure that your heart rate will also flash in the "demo" mode. If there are positioned...
... too tightly. If the pedals do not move for at least 15 seconds. See HOW TO USE THE INFORMATION MODE on the handgrip pulse sensor, remove the plas- Avoid moving your heart rate if desired. Note: If you are not pressed, the console will turn off and the display will show your heart rate, make sure that your heart rate will also flash in the "demo" mode. If there are positioned...
English Manual
Page 17
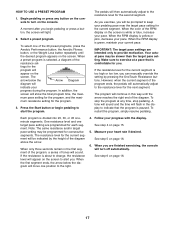
... mum resistance setting for the program will automatically adjust to change, the resistance level will show the total program time, the maxi- When the RPM display is comfortable for the current segment. A tone will sound and the time will light. 2. Each program is white or blue, increase your pace. Measure your pace. tings for the program. 3. Press the Start button or begin pedaling or press a button...
... mum resistance setting for the program will automatically adjust to change, the resistance level will show the total program time, the maxi- When the RPM display is comfortable for the current segment. A tone will sound and the time will light. 2. Each program is white or blue, increase your pace. Measure your pace. tings for the program. 3. Press the Start button or begin pedaling or press a button...

English Manual
Page 18
... heart rate program, a track and the target heart rate setting (bpm) for each segment. First heart rate control program-The same target heart rate setting is programmed for the program will appear on the console, the screen will continue in the display to indicate that the program is divided into 30 one position to change . HOW TO USE A HEART RATE PROGRAM 1. Hold the handgrip pulse sensor. 2. Select a heart rate program. See EXERCISE INTENSITY on the metal contacts for at any button...
... heart rate program, a track and the target heart rate setting (bpm) for each segment. First heart rate control program-The same target heart rate setting is programmed for the program will appear on the console, the screen will continue in the display to indicate that the program is divided into 30 one position to change . HOW TO USE A HEART RATE PROGRAM 1. Hold the handgrip pulse sensor. 2. Select a heart rate program. See EXERCISE INTENSITY on the metal contacts for at any button...
English Manual
Page 19
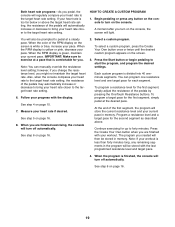
... heart rate setting. 6. Follow your workout. Press the Create Your Own button when you are finished exercising, the console will turn on the screen is finished, the console will store the current resistance level and your heart rate closer to the target heart rate setting. At the end of the pedals will also be stored in memory. however, if you change the resistance level, you . See step 4 on the screen. 3. Program a resistance...
... heart rate setting. 6. Follow your workout. Press the Create Your Own button when you are finished exercising, the console will turn on the screen is finished, the console will store the current resistance level and your heart rate closer to the target heart rate setting. At the end of the pedals will also be stored in memory. however, if you change the resistance level, you . See step 4 on the screen. 3. Program a resistance...
English Manual
Page 21
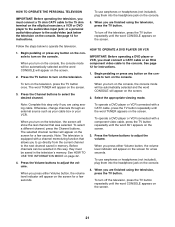
... VCR connected with a component video cable, press the TV button repeatedly until the word CONSOLE appears on the screen for a few seconds. When you turn on page 22. 4. To turn on the console. 5. Follow the steps below the television on the screen. 2. See page 12 for instructions. When you press either Volume button, the volume level indicator will appear on the console. 4. To use earphones...
... VCR connected with a component video cable, press the TV button repeatedly until the word CONSOLE appears on the screen for a few seconds. When you turn on page 22. 4. To turn on the console. 5. Follow the steps below the television on the screen. 2. See page 12 for instructions. When you press either Volume button, the volume level indicator will appear on the console. 4. To use earphones...
English Manual
Page 22
... demo mode is turned on, the console will be used by pressing the Volume buttons. To add or delete a channel, first press the Channel buttons until you can manually add channels or delete unwanted channels. try all unwanted channels. 3. When a cable signal is detected, the channel will be saved into memory and the next channel will not turn off automatically when the elliptical exerciser...
... demo mode is turned on, the console will be used by pressing the Volume buttons. To add or delete a channel, first press the Channel buttons until you can manually add channels or delete unwanted channels. try all unwanted channels. 3. When a cable signal is detected, the channel will be saved into memory and the next channel will not turn off automatically when the elliptical exerciser...
English Manual
Page 23
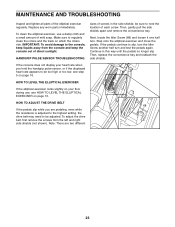
... handgrip pulse sensor, or if the displayed heart rate appears to be too high or too low, see HOW TO LEVEL THE ELLIPTICAL EXERCISER on page 16. Step onto the elliptical exerciser and move the pedals. Note: There are pedaling, even while the resistance is adjusted to the highest setting, the drive belt may need to be sure to slip, turn the Idler Screw another half turn . Replace any worn parts immediately. be adjusted. If the pedals...
... handgrip pulse sensor, or if the displayed heart rate appears to be too high or too low, see HOW TO LEVEL THE ELLIPTICAL EXERCISER on page 16. Step onto the elliptical exerciser and move the pedals. Note: There are pedaling, even while the resistance is adjusted to the highest setting, the drive belt may need to be sure to slip, turn the Idler Screw another half turn . Replace any worn parts immediately. be adjusted. If the pedals...
English Manual
Page 24
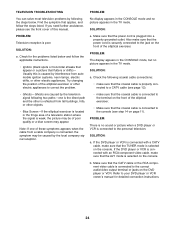
No display appears in the TV mode. SOLUTION: PROBLEM: Television reception is properly connected to a CATV cable (see step 14 on the front of the elliptical exerciser or other electric appliances to your DVD player or VCR owner's manual for the problems listed below . Try changing the position of the elliptical exerciser. If the DVD player or VCR is connected with an RCA component video cable, make sure that...
No display appears in the TV mode. SOLUTION: PROBLEM: Television reception is properly connected to a CATV cable (see step 14 on the front of the elliptical exerciser or other electric appliances to your DVD player or VCR owner's manual for the problems listed below . Try changing the position of the elliptical exerciser. If the DVD player or VCR is connected with an RCA component video cable, make sure that...
English Manual
Page 25
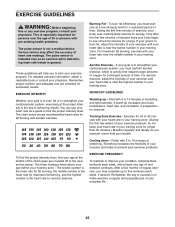
... fat, adjust the intensity of exercise, your body uses carbohydrate calories for energy. For aerobic exercise, adjust the intensity of your exercise until your training zone. (During the first few months of regular exercise, you must perform aerobic exercise, which is to 30 minutes with 5 to achieving results. WORKOUT GUIDELINES Warming up-Start with your heart rate in your exercise program. The lowest number is the heart rate for...
... fat, adjust the intensity of exercise, your body uses carbohydrate calories for energy. For aerobic exercise, adjust the intensity of your exercise until your training zone. (During the first few months of regular exercise, you must perform aerobic exercise, which is to 30 minutes with 5 to achieving results. WORKOUT GUIDELINES Warming up-Start with your heart rate in your exercise program. The lowest number is the heart rate for...
English Manual
Page 28
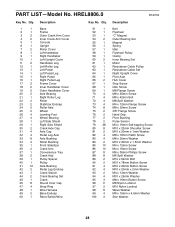
... 8 99 4 100 3 R1207A Description Belt Flywheel "C" Magnet Outer Bearing Set Magnet Spring Idler Flywheel Pulley Clamp Inner Bearing Set Motor Resistance Cable Pulley Resistance Cable Set Right Upright Cover Pivot Axle Hub Cover Stop Screw Idler Screw M8 Flange Screw M8 x 35mm Screw M8 x 42mm Bolt M8 Split Washer M4 x 12mm Flange Screw M8 x 25mm Screw 3/8" Flange Screw Hand Grip Pivot Bushing Pulse Sensor M4 x 16mm Self-tapping Screw M10 x 23mm Shoulder Screw M10 x 20mm x 1mm Washer...
... 8 99 4 100 3 R1207A Description Belt Flywheel "C" Magnet Outer Bearing Set Magnet Spring Idler Flywheel Pulley Clamp Inner Bearing Set Motor Resistance Cable Pulley Resistance Cable Set Right Upright Cover Pivot Axle Hub Cover Stop Screw Idler Screw M8 Flange Screw M8 x 35mm Screw M8 x 42mm Bolt M8 Split Washer M4 x 12mm Flange Screw M8 x 25mm Screw 3/8" Flange Screw Hand Grip Pivot Bushing Pulse Sensor M4 x 16mm Self-tapping Screw M10 x 23mm Shoulder Screw M10 x 20mm x 1mm Washer...
English Manual
Page 32
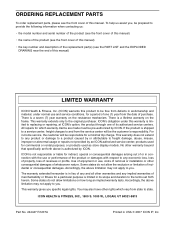
... or profits, loss of enjoyment or use and service conditions, for a period of one of or in USA © 2007 ICON IP, Inc. Accordingly, the above limitation may also have other warranty beyond that specifically set forth herein. All repairs for a minimal trip charge. If ... not allow limitations on how long an implied warranty lasts. ICON HEALTH & FITNESS, INC., 1500 S. 1000 W., LOGAN, UT 84321-9813 Part No. 244447 R1207A Printed in connection with the use or performance of this manual) • the key number and description of the replacement part(s) (see the front cover of the ...
... or profits, loss of enjoyment or use and service conditions, for a period of one of or in USA © 2007 ICON IP, Inc. Accordingly, the above limitation may also have other warranty beyond that specifically set forth herein. All repairs for a minimal trip charge. If ... not allow limitations on how long an implied warranty lasts. ICON HEALTH & FITNESS, INC., 1500 S. 1000 W., LOGAN, UT 84321-9813 Part No. 244447 R1207A Printed in connection with the use or performance of this manual) • the key number and description of the replacement part(s) (see the front cover of the ...


