

English Manual
Page 2
TABLE OF CONTENTS IMPORTANT PRECAUTIONS 3 BEFORE YOU BEGIN 4 ASSEMBLY 5 HOW TO USE THE ELLIPTICAL CROSSTRAINER 9 MAINTENANCE AND TROUBLESHOOTING 20 CONDITIONING GUIDELINES 21 PART LIST 22 EXPLODED DRAWING 23 HOW TO ORDER REPLACEMENT PARTS Back Cover LIMITED WARRANTY Back Cover HealthRider is a registered trademark of ICON Health & Fitness, Inc. 2
TABLE OF CONTENTS IMPORTANT PRECAUTIONS 3 BEFORE YOU BEGIN 4 ASSEMBLY 5 HOW TO USE THE ELLIPTICAL CROSSTRAINER 9 MAINTENANCE AND TROUBLESHOOTING 20 CONDITIONING GUIDELINES 21 PART LIST 22 EXPLODED DRAWING 23 HOW TO ORDER REPLACEMENT PARTS Back Cover LIMITED WARRANTY Back Cover HealthRider is a registered trademark of ICON Health & Fitness, Inc. 2
English Manual
Page 3
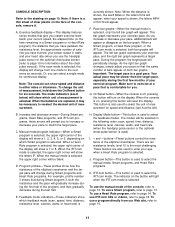
.... 4. The pulse sensor is the responsibility of the owner to protect the floor or carpet. Replace any exercise program, consult your back straight when using the elliptical crosstrainer. 2. Always wear athletic shoes for home use only. Various factors may affect the accuracy of serious injury, read the following important precau- Keep the elliptical crosstrainer indoors, away from the elliptical crosstrainer at any time while exercising, stop . 13...
.... 4. The pulse sensor is the responsibility of the owner to protect the floor or carpet. Replace any exercise program, consult your back straight when using the elliptical crosstrainer. 2. Always wear athletic shoes for home use only. Various factors may affect the accuracy of serious injury, read the following important precau- Keep the elliptical crosstrainer indoors, away from the elliptical crosstrainer at any time while exercising, stop . 13...
English Manual
Page 4
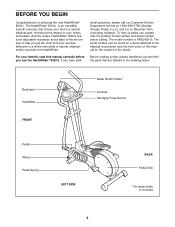
... the location of the decal). Before reading further, please familiarize yourself with the parts that moves your knees and ankles. Mountain Time (excluding holidays). And the unique HealthRider® 830rfx features adjustable resistance and a state-of-the-art console to the elliptical crosstrainer (see the front cover of this manual carefully before calling. tional questions, please call our Customer Service Department toll-free...
... the location of the decal). Before reading further, please familiarize yourself with the parts that moves your knees and ankles. Mountain Time (excluding holidays). And the unique HealthRider® 830rfx features adjustable resistance and a state-of-the-art console to the elliptical crosstrainer (see the front cover of this manual carefully before calling. tional questions, please call our Customer Service Department toll-free...

English Manual
Page 5
... front of the part, from the PART LIST on page 22. The number in a cleared area and remove the packing materials. Do not dispose of the elliptical crosstrainer in parenthesis below to the key number of the Frame (1), attach the Front Stabilizer to the included allen wrenches, assembly requires a phillips screwdriver , an adjustable wrench , and a rubber mallet . As you assemble the elliptical crosstrainer, use the drawings...
... front of the part, from the PART LIST on page 22. The number in a cleared area and remove the packing materials. Do not dispose of the elliptical crosstrainer in parenthesis below to the key number of the Frame (1), attach the Front Stabilizer to the included allen wrenches, assembly requires a phillips screwdriver , an adjustable wrench , and a rubber mallet . As you assemble the elliptical crosstrainer, use the drawings...

English Manual
Page 6
... (1), attach the Rear Stabilizer (9) to the Frame with the holes in the bottom of the Extension Wire Harness, insert the Upright into the opening in the metal tube on the Console (23). Carefully pull the upper end of the four adjustment holes, and then release the Knob. Attach the Upright Extension to pinch the wire harnesses. Connect the wire harness on the Handgrip Pulse Sensor...
... (1), attach the Rear Stabilizer (9) to the Frame with the holes in the bottom of the Extension Wire Harness, insert the Upright into the opening in the metal tube on the Console (23). Carefully pull the upper end of the four adjustment holes, and then release the Knob. Attach the Upright Extension to pinch the wire harnesses. Connect the wire harness on the Handgrip Pulse Sensor...

English Manual
Page 8
... of the elliptical crosstrainer in the Handlebar Legs (5). 76 74 Grease 74 11 10. Lift Here Short Screws 2. Apply a small amount of the Console (23) with the chest pulse sensor can be discarded. Tighten the M6 x 25mm Screw (7) into the axle. Orient the receiver as shown, and press it is completed. Turn the Upright Knob (43) clockwise until it onto the Console (23) in the indicated location.
... of the elliptical crosstrainer in the Handlebar Legs (5). 76 74 Grease 74 11 10. Lift Here Short Screws 2. Apply a small amount of the Console (23) with the chest pulse sensor can be discarded. Tighten the M6 x 25mm Screw (7) into the axle. Orient the receiver as shown, and press it is completed. Turn the Upright Knob (43) clockwise until it onto the Console (23) in the indicated location.
English Manual
Page 9
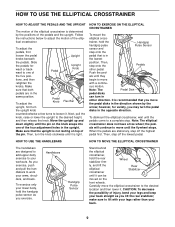
... TO EXERCISE ON THE ELLIPTICAL CROSSTRAINER To mount the elliptical cross- trainer, hold the Handgrip handgrip pulse Pulse Sensor sensor and step onto the pedal that you move the elliptical crosstrainer to the desired location and then lower it . Note: The Pedal Disk pedal disks can be moved on the knob snaps into one of Pedal Upright Knob the five posi- however, for variety, you lift the rear stabilizer; HOW TO USE THE ELLIPTICAL CROSSTRAINER HOW TO ADJUST THE PEDALS...
... TO EXERCISE ON THE ELLIPTICAL CROSSTRAINER To mount the elliptical cross- trainer, hold the Handgrip handgrip pulse Pulse Sensor sensor and step onto the pedal that you move the elliptical crosstrainer to the desired location and then lower it . Note: The Pedal Disk pedal disks can be moved on the knob snaps into one of Pedal Upright Knob the five posi- however, for variety, you lift the rear stabilizer; HOW TO USE THE ELLIPTICAL CROSSTRAINER HOW TO ADJUST THE PEDALS...
English Manual
Page 10
... make your pace as iFIT.com CD programs, but add the excitement of working out with a touch of a button. In addition, the console features two Heart Rate workout programs that automatically change the resistance of the elliptical crosstrainer and prompt you can connect the elliptical crosstrainer to page 19.) sonal trainer right in handgrip pulse sensor. (For information about an optional chest pulse sensor, refer to your workout. With the elliptical crosstrainer connected to your computer, you...
... make your pace as iFIT.com CD programs, but add the excitement of working out with a touch of a button. In addition, the console features two Heart Rate workout programs that automatically change the resistance of the elliptical crosstrainer and prompt you can connect the elliptical crosstrainer to page 19.) sonal trainer right in handgrip pulse sensor. (For information about an optional chest pulse sensor, refer to your workout. With the elliptical crosstrainer connected to your computer, you...
English Manual
Page 11
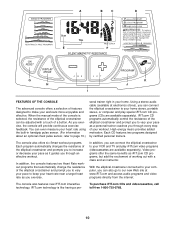
... program is selected. There are replaced, it . Exercise feedback display-This display features seven modes that give you . This bar graph represents your pace to match the target pace. G. On/Reset button-When the console is H. When the console is selected. I. + and - These buttons are also used to select the manual mode, Smart programs, and Heart Rate programs. K. Program button-This button is the most challenging. F. To use the handgrip pulse sensor or the optional chest pulse sensor...
... program is selected. There are replaced, it . Exercise feedback display-This display features seven modes that give you . This bar graph represents your pace to match the target pace. G. On/Reset button-When the console is H. When the console is selected. I. + and - These buttons are also used to select the manual mode, Smart programs, and Heart Rate programs. K. Program button-This button is the most challenging. F. To use the handgrip pulse sensor or the optional chest pulse sensor...
English Manual
Page 12
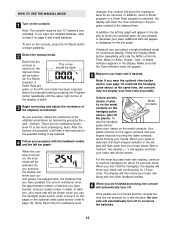
... elapsed time, the distance that the Scan indicator does not appear. 5 Measure your exercise pace. HOW TO USE THE MANUAL MODE 1 Turn on the bar graph. If a Smart program, a Heart Rate pro- Note: The console requires four "D" batteries (not included). Each time the console is turned on, the scan mode will be selected. ed. buttons. When the console is turned on this page) or the optional chest pulse sensor (refer to hold...
... elapsed time, the distance that the Scan indicator does not appear. 5 Measure your exercise pace. HOW TO USE THE MANUAL MODE 1 Turn on the bar graph. If a Smart program, a Heart Rate pro- Note: The console requires four "D" batteries (not included). Each time the console is turned on, the scan mode will be selected. ed. buttons. When the console is turned on this page) or the optional chest pulse sensor (refer to hold...
English Manual
Page 13
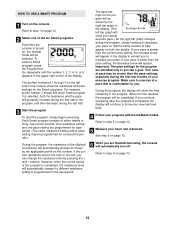
... the last half. 3 Start the program. Important: The pace settings for the next period. Your actu- During the program, the display will automatically turn off. Refer to prompt you . Refer to exercise at a pace that when Smart program 3 is turned on the left bar graph will automatically change the resistance level by pressing the + and - The profiles numbered 1 through 6 on , the manual mode will gradually increase...
... the last half. 3 Start the program. Important: The pace settings for the next period. Your actu- During the program, the display will automatically turn off. Refer to prompt you . Refer to exercise at a pace that when Smart program 3 is turned on the left bar graph will automatically change the resistance level by pressing the + and - The profiles numbered 1 through 6 on , the manual mode will gradually increase...
English Manual
Page 14
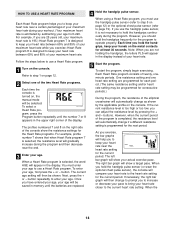
... properly. The current age setting will be saved in the display instead of the elliptical crosstrainer will be selected. If you use a Heart Rate program. 1 Turn on the console. Each time you hold the handgrip pulse sensor (or wear the optional chest pulse sensor), the console will help you to keep your heart rate near the heart rate setting for consecutive periods.) During the program, the resistance of your heart rate. 5 Start the program. Once you have...
... properly. The current age setting will be saved in the display instead of the elliptical crosstrainer will be selected. If you use a Heart Rate program. 1 Turn on the console. Each time you hold the handgrip pulse sensor (or wear the optional chest pulse sensor), the console will help you to keep your heart rate near the heart rate setting for consecutive periods.) During the program, the resistance of your heart rate. 5 Start the program. Once you have...
English Manual
Page 15
... the display; right bar graph changes, increase or decrease your pace so that is comfortable for you. B PHONES PHONES Audio Cable 1/8" Y-adapter Headphones 15 When no time remains, the program will appear in the program. To use iFIT.com programs directly from our Web site, the elliptical crosstrainer must be completed. Plug your headphones into the other end of the Y-adapter. Important: The pace settings for connecting instructions. See...
... the display; right bar graph changes, increase or decrease your pace so that is comfortable for you. B PHONES PHONES Audio Cable 1/8" Y-adapter Headphones 15 When no time remains, the program will appear in the program. To use iFIT.com programs directly from our Web site, the elliptical crosstrainer must be completed. Plug your headphones into the other end of the Y-adapter. Important: The pace settings for connecting instructions. See...

English Manual
Page 16
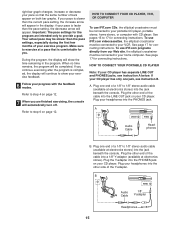
... console. B CD VCR Amp LINE OUT PHONES Audio Cable 1/8" Y-adapter Headphones Audio Cable RCA Y-adapter Wire removed from LINE OUT jack 16 If your stereo has an unused LINE OUT jack, see instruction A below . Plug one end of the Y-adapter. A CD VCR Amp LINE OUT LINE OUT Audio Cable B. Plug your headphones into the other end of the Y-adapter. HOW TO CONNECT YOUR PORTABLE STEREO HOW TO CONNECT...
... console. B CD VCR Amp LINE OUT PHONES Audio Cable 1/8" Y-adapter Headphones Audio Cable RCA Y-adapter Wire removed from LINE OUT jack 16 If your stereo has an unused LINE OUT jack, see instruction A below . Plug one end of the Y-adapter. A CD VCR Amp LINE OUT LINE OUT Audio Cable B. Plug your headphones into the other end of the Y-adapter. HOW TO CONNECT YOUR PORTABLE STEREO HOW TO CONNECT...
English Manual
Page 18
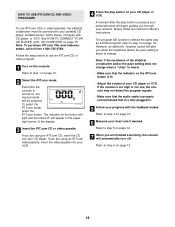
... USE IFIT.COM CD AND VIDEO PROGRAMS To use an iFIT.com CD or video program. 1 Turn on the console. To select the iFIT.com mode, press the iFIT.com button. A moment after the play button on your CD player. Refer to use iFIT.com CDs or videocassettes, the elliptical crosstrainer must be selected. Follow the steps below to step 5 on the button will light and the letters IF will begin guiding you are using...
... USE IFIT.COM CD AND VIDEO PROGRAMS To use an iFIT.com CD or video program. 1 Turn on the console. To select the iFIT.com mode, press the iFIT.com button. A moment after the play button on your CD player. Refer to use iFIT.com CDs or videocassettes, the elliptical crosstrainer must be selected. Follow the steps below to step 5 on the button will light and the letters IF will begin guiding you are using...

English Manual
Page 19
... monitors your heart rate during your heart rate if desired. To purchase the optional chest pulse sensor, call toll-free 1-800-734-2377. 4 Start your Web browser, if necessary, and go to our Web site at www.iFIT.com allows you to play iFIT.com audio and video programs directly from our Web site, the elliptical crosstrainer must have an internet connection and an internet service provider. See HOW TO CONNECT...
... monitors your heart rate during your heart rate if desired. To purchase the optional chest pulse sensor, call toll-free 1-800-734-2377. 4 Start your Web browser, if necessary, and go to our Web site at www.iFIT.com allows you to play iFIT.com audio and video programs directly from our Web site, the elliptical crosstrainer must have an internet connection and an internet service provider. See HOW TO CONNECT...
English Manual
Page 20
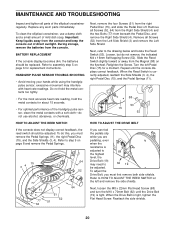
... console out of the handgrip pulse sensor, clean the metal contacts with heart rate readings. During storage, remove the batteries from the Left Side Shield (3) and remove the Left Side Shield. Retighten the Screw. MAINTENANCE AND TROUBLESHOOTING Inspect and tighten all parts of mild dish soap. Loosen, but do not use a damp cloth and a small amount of the elliptical crosstrainer regularly. Reattach the side shields. 20 Remove all Screws...
... console out of the handgrip pulse sensor, clean the metal contacts with heart rate readings. During storage, remove the batteries from the Left Side Shield (3) and remove the Left Side Shield. Retighten the Screw. MAINTENANCE AND TROUBLESHOOTING Inspect and tighten all parts of mild dish soap. Loosen, but do not use a damp cloth and a small amount of the elliptical crosstrainer regularly. Reattach the side shields. 20 Remove all Screws...

English Manual
Page 21
... aerobic exercise, adjust the intensity of rest between workouts. The proper intensity level can be "aerobic." Fat Burning To burn fat effectively, you exercise. This is not a medical device. The pulse sensor is the recommended heart rate for persons over the age of stretching. EXERCISE INTENSITY Whether your goal is to burn fat or to exercise with pre-existing health problems. The pulse sensor...
... aerobic exercise, adjust the intensity of rest between workouts. The proper intensity level can be "aerobic." Fat Burning To burn fat effectively, you exercise. This is not a medical device. The pulse sensor is the recommended heart rate for persons over the age of stretching. EXERCISE INTENSITY Whether your goal is to burn fat or to exercise with pre-existing health problems. The pulse sensor...
English Manual
Page 22
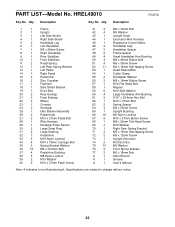
... 4 Pedal Arm Bushing 38 5 M8 Nylon Locknut 39 2 M10 Washer 40 2 M10 x 27mm Patch Screw 41 2 M6 x 72mm Bolt 42 4 M5 Washer 43 1 Upright Knob 44 1 Extension Wire Harness 45 1 Resistance Control Motor 46 2 Handlebar Cap 47 2 Handlebar Spacer 48 2 Frame Spacer 49 4 Small Handlebar Arm Bushing 50 4 M8 x 45mm Button Bolt 51 8 M6 x 30mm Screw 52 11 M4 x 16mm Self-tapping Screw 53 1 Reed Switch/Wire 54 1 Cable...
... 4 Pedal Arm Bushing 38 5 M8 Nylon Locknut 39 2 M10 Washer 40 2 M10 x 27mm Patch Screw 41 2 M6 x 72mm Bolt 42 4 M5 Washer 43 1 Upright Knob 44 1 Extension Wire Harness 45 1 Resistance Control Motor 46 2 Handlebar Cap 47 2 Handlebar Spacer 48 2 Frame Spacer 49 4 Small Handlebar Arm Bushing 50 4 M8 x 45mm Button Bolt 51 8 M6 x 30mm Screw 52 11 M4 x 16mm Self-tapping Screw 53 1 Reed Switch/Wire 54 1 Cable...

English Manual
Page 24
...; The SERIAL NUMBER of the product (see the front cover of this manual) • The KEY NUMBER and DESCRIPTION of the part(s) (see page 22 of whatsoever nature. This warranty extends only to you . To help us assist you specific legal rights. ICON's obligation under normal use , costs of removal, installation or other consequential damages of this warranty is limited in China © 2001 ICON Health & Fitness, Inc...
...; The SERIAL NUMBER of the product (see the front cover of this manual) • The KEY NUMBER and DESCRIPTION of the part(s) (see page 22 of whatsoever nature. This warranty extends only to you . To help us assist you specific legal rights. ICON's obligation under normal use , costs of removal, installation or other consequential damages of this warranty is limited in China © 2001 ICON Health & Fitness, Inc...

