
English Manual
Page 1
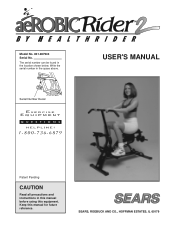
Keep this equipment. The serial number can be found in the space above. Write the serial number in the location shown below. SEARS, ROEBUCK AND CO., HOFFMAN ESTATES, IL 60179 Serial Number Decal USER'S MANUAL Patent Pending CAUTION Read all precautions and instructions in this manual before using this manual for future reference. Model No. 831.287943 Serial No.
Keep this equipment. The serial number can be found in the space above. Write the serial number in the location shown below. SEARS, ROEBUCK AND CO., HOFFMAN ESTATES, IL 60179 Serial Number Decal USER'S MANUAL Patent Pending CAUTION Read all precautions and instructions in this manual before using this manual for future reference. Model No. 831.287943 Serial No.
English Manual
Page 2
... under the age of 12 and pets away from the AEROBIC RIDER 2 at all instructions before using the HEALTHRIDER® AEROBIC RIDER 2. 1. TABLE OF CONTENTS IMPORTANT PRECAUTIONS 2 BEFORE YOU BEGIN 3 ASSEMBLY 4 ADJUSTMENT AND OPERATION 8 MAINTENANCE AND TROUBLE-SHOOTING 11 CONDITIONING GUIDELINES 12 PART LIST 14 EXPLODED DRAWING 15 ORDERING REPLACEMENT PARTS Back Cover FULL 90 DAY WARRANTY Back Cover IMPORTANT PRECAUTIONS WARNING: To reduce the risk of serious...
... under the age of 12 and pets away from the AEROBIC RIDER 2 at all instructions before using the HEALTHRIDER® AEROBIC RIDER 2. 1. TABLE OF CONTENTS IMPORTANT PRECAUTIONS 2 BEFORE YOU BEGIN 3 ASSEMBLY 4 ADJUSTMENT AND OPERATION 8 MAINTENANCE AND TROUBLE-SHOOTING 11 CONDITIONING GUIDELINES 12 PART LIST 14 EXPLODED DRAWING 15 ORDERING REPLACEMENT PARTS Back Cover FULL 90 DAY WARRANTY Back Cover IMPORTANT PRECAUTIONS WARNING: To reduce the risk of serious...

English Manual
Page 3
... Post Monitor Upper Pedals Lower Pedal Padded Seat Seat Knob (Behind Sideshield) Weight Collar Weight Tube Weight 3 Before reading further, please review the drawing below and familiarize yourself with the parts that uses both the upper body and the lower body for selecting the new HEALTHRIDER® AEROBIC RIDER 2. For your benefit, please read this manual). The serial number can be found on a decal attached to the AEROBIC RIDER 2 (see the front cover of low-impact exercise...
... Post Monitor Upper Pedals Lower Pedal Padded Seat Seat Knob (Behind Sideshield) Weight Collar Weight Tube Weight 3 Before reading further, please review the drawing below and familiarize yourself with the parts that uses both the upper body and the lower body for selecting the new HEALTHRIDER® AEROBIC RIDER 2. For your benefit, please read this manual). The serial number can be found on a decal attached to the AEROBIC RIDER 2 (see the front cover of low-impact exercise...
English Manual
Page 4
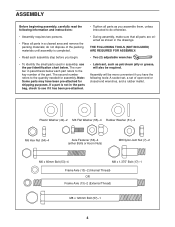
... ASSEMBLY: • Two (2) adjustable wrenches • Lubricant, such as shown in a cleared area and remove the packing materials; The number in parenthesis below . Assembly will be more convenient if you assemble them, unless instructed to the key number of the part. Note: Some parts may have the following information and instructions: • Assembly requires two persons. • Place all parts as you have been pre-attached for assembly...
... ASSEMBLY: • Two (2) adjustable wrenches • Lubricant, such as shown in a cleared area and remove the packing materials; The number in parenthesis below . Assembly will be more convenient if you assemble them, unless instructed to the key number of the part. Note: Some parts may have the following information and instructions: • Assembly requires two persons. • Place all parts as you have been pre-attached for assembly...

English Manual
Page 5
Before beginning assembly, make sure that you 1 have read and understand the information on page 4). 4 Lubricate-13 56 51 5 51 56 1 5 First, insert the Fastener Bases through the Cover Panel and into the hole in each Fastener Base until it is flush with two M6 x 60mm Bolts (53), two... M6 Flat Washers (55), and two M6 Hex Nuts (54). 31 55 53 2 54 1 3. Lubricate an Frame Axle (13). Attach one of the Frame Axles (13) are externally threaded, the Axle Fasteners will be acorn nuts (see the PART IDENTIFICATION CHART on page 4. Attach the Handlebar Swing Arm ...
Before beginning assembly, make sure that you 1 have read and understand the information on page 4). 4 Lubricate-13 56 51 5 51 56 1 5 First, insert the Fastener Bases through the Cover Panel and into the hole in each Fastener Base until it is flush with two M6 x 60mm Bolts (53), two... M6 Flat Washers (55), and two M6 Hex Nuts (54). 31 55 53 2 54 1 3. Lubricate an Frame Axle (13). Attach one of the Frame Axles (13) are externally threaded, the Axle Fasteners will be acorn nuts (see the PART IDENTIFICATION CHART on page 4. Attach the Handlebar Swing Arm ...
English Manual
Page 6
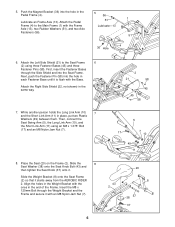
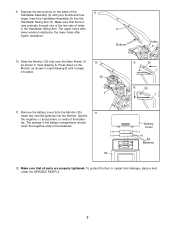
... (45) and three Fastener Pins (58). Lubricate an Frame Axle (13). Attach the Pedal Frame (4) to the Seat Frame 6 (2) using an M8 x 1.375" Bolt (17) and an M8 Nylon Jam Nut (7). 8. Place the Seat (20) on the Frame (2). Slide the 8 Seat Washer (38) onto the Seat Knob Bolt (43) and then tighten the Seat Knob (37) onto it slants away from the AEROBIC RIDER 2. Align the holes...
... (45) and three Fastener Pins (58). Lubricate an Frame Axle (13). Attach the Pedal Frame (4) to the Seat Frame 6 (2) using an M8 x 1.375" Bolt (17) and an M8 Nylon Jam Nut (7). 8. Place the Seat (20) on the Frame (2). Slide the 8 Seat Washer (38) onto the Seat Knob Bolt (43) and then tighten the Seat Knob (37) onto it slants away from the AEROBIC RIDER 2. Align the holes...
English Manual
Page 7
... negative ends of the 9 Handlebar Assembly (6) with your thumb and fore- Slide the Monitor (35) fully onto the Main Frame (1) as shown in the Handlebar Swing Arm. the lower holes offer higher resistance. 6 Buttons Holes 5 10. Make sure that all parts are properly tightened. finger. Press down on the sides of the batteries. (+) (-) 35 Battery Cover (-) (+) AA Batteries 12. 9. Identify the negative (-) and...
... negative ends of the 9 Handlebar Assembly (6) with your thumb and fore- Slide the Monitor (35) fully onto the Main Frame (1) as shown in the Handlebar Swing Arm. the lower holes offer higher resistance. 6 Buttons Holes 5 10. Make sure that all parts are properly tightened. finger. Press down on the sides of the batteries. (+) (-) 35 Battery Cover (-) (+) AA Batteries 12. 9. Identify the negative (-) and...
English Manual
Page 8
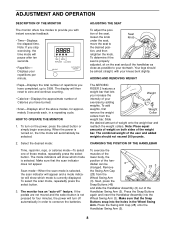
... weights, first Weight remove the weight Collar collars from the Wheel Swing Arm (3). CHANGING THE POSITION OF THE HANDLEBAR To exercise the muscles of the lower body, the position of weight onto the weight bar and reattach the weight collars. Press the Swing Arm Cap (28) onto the Handlebar Swing Arm (5). 8 If the pedals are not moved and the select button is properly adjusted, sit on both sides of the seat, Seat...
... weights, first Weight remove the weight Collar collars from the Wheel Swing Arm (3). CHANGING THE POSITION OF THE HANDLEBAR To exercise the muscles of the lower body, the position of weight onto the weight bar and reattach the weight collars. Press the Swing Arm Cap (28) onto the Handlebar Swing Arm (5). 8 If the pedals are not moved and the select button is properly adjusted, sit on both sides of the seat, Seat...
English Manual
Page 9
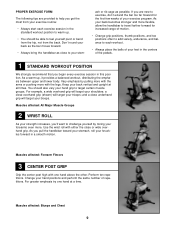
..., endurance, and balance to each exercise session in a smooth motion. Keep your exercise program. Change your hand positions and perform the same number of your back vertical and upright at a time. Don't round your knuckles forward in the standard workout position to warm up , it provides a balanced workout, distributing the emphasis between upper and lower body. Muscles affected: All Major...
..., endurance, and balance to each exercise session in a smooth motion. Keep your exercise program. Change your hand positions and perform the same number of your back vertical and upright at a time. Don't round your knuckles forward in the standard workout position to warm up , it provides a balanced workout, distributing the emphasis between upper and lower body. Muscles affected: All Major...

English Manual
Page 10
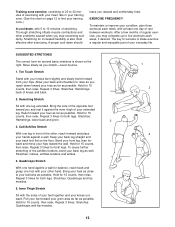
...TURNED The direction which toe position you toes out and open your knees to tone your kneecap in the middle of each workout. If your workout. 4 TOES STRAIGHT Place the ball of each foot in line with your toes. This tones the lower legs. Muscles affected: Arms, Upper Back, and Chest 7 LOWER BODY...are turned slightly in . Start with just a few minutes per session and gradually increase with toes up and heels down. Muscles affected: Calves and Thighs 6 UPPER BODY EMPHASIS Place your feet on the stomach, tighten your toes are turned slightly out while pointing and flexing, ...
...TURNED The direction which toe position you toes out and open your knees to tone your kneecap in the middle of each workout. If your workout. 4 TOES STRAIGHT Place the ball of each foot in line with your toes. This tones the lower legs. Muscles affected: Arms, Upper Back, and Chest 7 LOWER BODY...are turned slightly in . Start with just a few minutes per session and gradually increase with toes up and heels down. Muscles affected: Calves and Thighs 6 UPPER BODY EMPHASIS Place your feet on the stomach, tighten your toes are turned slightly out while pointing and flexing, ...

English Manual
Page 11
... to the AEROBIC RIDER 2. MAINTENANCE AND TROUBLE-SHOOTING Inspect and tighten all parts of the batteries. The AEROBIC RIDER 2 can be applied to both sides of the monitor becomes dim, the AA batteries should be cleaned with a soft, damp cloth; do not use solvents. HOW TO REPLACE THE BATTERIES If the display of the AEROBIC RIDER 2. Monitor Apply Oil 11 Remove the battery cover from the monitor. Insert two new batteries into the...
... to the AEROBIC RIDER 2. MAINTENANCE AND TROUBLE-SHOOTING Inspect and tighten all parts of the batteries. The AEROBIC RIDER 2 can be applied to both sides of the monitor becomes dim, the AA batteries should be cleaned with a soft, damp cloth; do not use solvents. HOW TO REPLACE THE BATTERIES If the display of the AEROBIC RIDER 2. Monitor Apply Oil 11 Remove the battery cover from the monitor. Insert two new batteries into the...
English Manual
Page 12
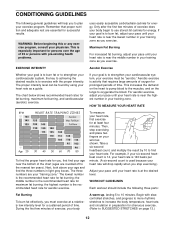
... cardiovascular (aerobic) exercise. Begin with slow, controlled stretches, and progress to more rhythmic stretches to increase the body temperature, heart rate, and circulation in your exercise program. EXERCISE INTENSITY Aerobic Exercise Whether your goal is the recommended heart rate for energy. HOW TO MEASURE YOUR HEART RATE To find your age near the middle number in preparation for strenuous exercise. (Refer to exercise with pre-existing health problems. uses easily accessible...
... cardiovascular (aerobic) exercise. Begin with slow, controlled stretches, and progress to more rhythmic stretches to increase the body temperature, heart rate, and circulation in your exercise program. EXERCISE INTENSITY Aerobic Exercise Whether your goal is the recommended heart rate for energy. HOW TO MEASURE YOUR HEART RATE To find your age near the middle number in preparation for strenuous exercise. (Refer to exercise with pre-existing health problems. uses easily accessible...
English Manual
Page 13
... and grasp one leg in your training zone. (See the chart on the floor. Thorough stretching offsets muscle contractions and other , reach forward and place your hands against a wall. Quadriceps Stretch With one leg extended. Training zone exercise, consisting of 20 to 30 minutes of exercising with your heart rate in front of the other problems caused when you stop exercising suddenly.
... and grasp one leg in your training zone. (See the chart on the floor. Thorough stretching offsets muscle contractions and other , reach forward and place your hands against a wall. Quadriceps Stretch With one leg extended. Training zone exercise, consisting of 20 to 30 minutes of exercising with your heart rate in front of the other problems caused when you stop exercising suddenly.

English Manual
Page 14
.... Specifications are subject to the back cover of this manual. 14 PART LIST-Model No. 831.287943 Key No. Weight 53 4 M6 x 60mm Bolt 54 4 M6 Hex Nut 55 4 M6 Flat Washer 56 4 Axle Fastener 57 1 M8 x 120mm Bolt 58 10 Fastener Pin # 1 User's Manual Note: "#" indicates a non-illustrated part. For information about ordering replacement parts, refer to change without notice. Description Key No. Description 1 1 Main Frame 23 2 Left Pedal 2 1 Seat...
.... Specifications are subject to the back cover of this manual. 14 PART LIST-Model No. 831.287943 Key No. Weight 53 4 M6 x 60mm Bolt 54 4 M6 Hex Nut 55 4 M6 Flat Washer 56 4 Axle Fastener 57 1 M8 x 120mm Bolt 58 10 Fastener Pin # 1 User's Manual Note: "#" indicates a non-illustrated part. For information about ordering replacement parts, refer to change without notice. Description Key No. Description 1 1 Main Frame 23 2 Left Pedal 2 1 Seat...

English Manual
Page 15
EXPLODED DRAWING-Model No. 831.287943 R1100A 15 6 58 33 33 46 35 32 41 42 24 36 41 29 42 24 40 29 7 4 11 30 30 49 18 58 45 34 58 45 56 51 29 13 56 51 13 39 40 39 23 23 47 42 51 41 25 55 53 45 22 45 7 50 40 20 47 51 2 28 5 29 19 38 37 26 15 25 21 51 47 45 3 7 45 58 48 8 49 29 7 17 27 7 49 16 49 10 18 30 30 51 56 56 25 1 14 54 51 47 54 53 55 9 31 31 25 25 43 12 44 57 52 48
EXPLODED DRAWING-Model No. 831.287943 R1100A 15 6 58 33 33 46 35 32 41 42 24 36 41 29 42 24 40 29 7 4 11 30 30 49 18 58 45 34 58 45 56 51 29 13 56 51 13 39 40 39 23 23 47 42 51 41 25 55 53 45 22 45 7 50 40 20 47 51 2 28 5 29 19 38 37 26 15 25 21 51 47 45 3 7 45 58 48 8 49 29 7 17 27 7 49 16 49 10 18 30 30 51 56 56 25 1 14 54 51 47 54 53 55 9 31 31 25 25 43 12 44 57 52 48
English Manual
Page 16
... of the product (HEALTHRIDER® AEROBIC RIDER 2) • The PART NUMBER of the PART (see pages 14 and 15 of this SEARS EXERCISER, contact the nearest SEARS Service Center throughout the United States and SEARS will repair or replace the EXERCISER, free of the decal. Part No. 159053 R1100A Printed in this manual) • The DESCRIPTION of the PART (see pages 14 and 15 of ICON Health & Fitness, Inc. To request...
... of the product (HEALTHRIDER® AEROBIC RIDER 2) • The PART NUMBER of the PART (see pages 14 and 15 of this SEARS EXERCISER, contact the nearest SEARS Service Center throughout the United States and SEARS will repair or replace the EXERCISER, free of the decal. Part No. 159053 R1100A Printed in this manual) • The DESCRIPTION of the PART (see pages 14 and 15 of ICON Health & Fitness, Inc. To request...


