
English Manual
Page 2
...: The decals may not be shown at actual size. HEALTHRIDER is missing or illegible, call the telephone number on the treadmill. TABLE OF CONTENTS WARNING DECAL PLACEMENT 2 IMPORTANT PRECAUTIONS 3 BEFORE YOU BEGIN 5 ASSEMBLY 6 OPERATION AND ADJUSTMENT 11 HOW TO FOLD AND MOVE THE TREADMILL 16 TROUBLESHOOTING 18 EXERCISE GUIDELINES 20 PART LIST 22...
...: The decals may not be shown at actual size. HEALTHRIDER is missing or illegible, call the telephone number on the treadmill. TABLE OF CONTENTS WARNING DECAL PLACEMENT 2 IMPORTANT PRECAUTIONS 3 BEFORE YOU BEGIN 5 ASSEMBLY 6 OPERATION AND ADJUSTMENT 11 HOW TO FOLD AND MOVE THE TREADMILL 16 TROUBLESHOOTING 18 EXERCISE GUIDELINES 20 PART LIST 22...

English Manual
Page 3
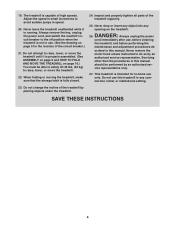
...sustained by persons weighing 250 lbs. (113 kg) or less. 9. The pulse sensor is not working properly.) 8. Do not use the treadmill with pre-existing health problems. 2. Athletic support clothes are used only by or through the use a properly functioning surge suppressor could become ...general. 3 Never move the walking belt while the power is not working properly. (See TROUBLESHOOTING on the walking belt. Never start the treadmill while you are adequately informed of this product. 1. structions in a garage or covered patio, or near water. 11. Failure to use...
...sustained by persons weighing 250 lbs. (113 kg) or less. 9. The pulse sensor is not working properly.) 8. Do not use the treadmill with pre-existing health problems. 2. Athletic support clothes are used only by or through the use a properly functioning surge suppressor could become ...general. 3 Never move the walking belt while the power is not working properly. (See TROUBLESHOOTING on the walking belt. Never start the treadmill while you are adequately informed of this product. 1. structions in a garage or covered patio, or near water. 11. Failure to use...
English Manual
Page 4
...the reset/off circuit breaker to the off position when the treadmill is running. When folding or moving the treadmill, make sure that the storage latch is capable of the treadmill regularly. 25. scribed in this treadmill in any opening on page 16.) You must be performed...page 6 and HOW TO FOLD AND MOVE THE TREADMILL on the treadmill. Never leave the treadmill unattended while it is intended for the location of the treadmill by placing objects under the treadmill. Adjust the speed in speed. 20. 19. The treadmill is fully closed. 24. Inspect and properly ...
...the reset/off circuit breaker to the off position when the treadmill is running. When folding or moving the treadmill, make sure that the storage latch is capable of the treadmill regularly. 25. scribed in this treadmill in any opening on page 16.) You must be performed...page 6 and HOW TO FOLD AND MOVE THE TREADMILL on the treadmill. Never leave the treadmill unattended while it is intended for the location of the treadmill by placing objects under the treadmill. Adjust the speed in speed. 20. 19. The treadmill is fully closed. 24. Inspect and properly ...

English Manual
Page 5
... reading this manual, please see the front cover of this man- The H110i treadmill combines advanced technology with the labeled parts. To avoid a registration fee for selecting the HEALTHRIDER® H110i treadmill. And when you , note the product model number and serial number before using... the treadmill. Accessory Tray Handrail Storage Latch Console Key/Clip Walking Belt Foot Rail Hood ...
... reading this manual, please see the front cover of this man- The H110i treadmill combines advanced technology with the labeled parts. To avoid a registration fee for selecting the HEALTHRIDER® H110i treadmill. And when you , note the product model number and serial number before using... the treadmill. Accessory Tray Handrail Storage Latch Console Key/Clip Walking Belt Foot Rail Hood ...
English Manual
Page 6
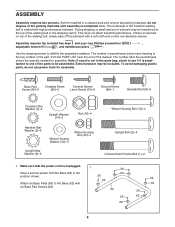
...a second person hold the Base (52) in a cleared area and remove all packing materials;Hdaonndroatil Washer (11)- This does not affect treadmill performance. Note: If a part is not in parentheses below to the Base (52) with high-performance lubricant. Use the drawings below each... assembly. 2 1/2" Bolt (56)-4 ASSEMB2 3L/4Y" Bolt (47)-4 Star Washer (81)-4 Washer (29)-4 Assembly requires two persons. Set the treadmill in the position shown. Assembly requires the included hex keys and your own Phillips screwdriver , adjustable wrench , and needlenose pliers . The number in...
...a second person hold the Base (52) in a cleared area and remove all packing materials;Hdaonndroatil Washer (11)- This does not affect treadmill performance. Note: If a part is not in parentheses below to the Base (52) with high-performance lubricant. Use the drawings below each... assembly. 2 1/2" Bolt (56)-4 ASSEMB2 3L/4Y" Bolt (47)-4 Star Washer (81)-4 Washer (29)-4 Assembly requires two persons. Set the treadmill in the position shown. Assembly requires the included hex keys and your own Phillips screwdriver , adjustable wrench , and needlenose pliers . The number in...

English Manual
Page 7
... Base (52) as close to the top of the Right Upright. Wrap the wire tie in the Right Upright (54) around the end of the treadmill as possible, as shown. Secure the Wire Harness to the front of the Wire Harness (39). Press the indicated Grommet (49) into the bracket on...
... Base (52) as close to the top of the Right Upright. Wrap the wire tie in the Right Upright (54) around the end of the treadmill as possible, as shown. Secure the Wire Harness to the front of the Wire Harness (39). Press the indicated Grommet (49) into the bracket on...

English Manual
Page 10
.... Make sure that the collar and the spring are on page 11). Plug in the Latch Housing is on page 13. Make sure that the treadmill Frame (51) is used to overtighten the Colored Patch Frame Bolts. Keep the included hex keys in the storage position. 12 48 Knob 10 Large... Hole 53 Spring Collar Pin 13. Firmly tighten the Colored Patch Frame Bolt (1) and the two Upright Bolts (2) on the left side of the treadmill. Tighten the Colored Patch Frame Bolt (1) and the two Upright Bolts (2) on the right side of the treamill in the Base (52) with two Latch...
.... Make sure that the collar and the spring are on page 11). Plug in the Latch Housing is on page 13. Make sure that the treadmill Frame (51) is used to overtighten the Colored Patch Frame Bolts. Keep the included hex keys in the storage position. 12 48 Knob 10 Large... Hole 53 Spring Collar Pin 13. Firmly tighten the Colored Patch Frame Bolt (1) and the two Upright Bolts (2) on the left side of the treadmill. Tighten the Colored Patch Frame Bolt (1) and the two Upright Bolts (2) on the right side of the treamill in the Base (52) with two Latch...
English Manual
Page 11
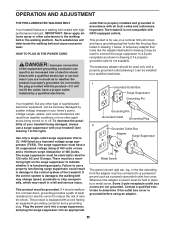
... the walking belt or the walking platform. Failure to use a properly functioning surge suppressor could result in drawing 2 may result in your treadmill (see drawing 1 at the right). This product is used only until a properly grounded outlet (drawing 1) can be installed by a qualified...from weather conditions or from the adapter must be grounded. If it is not compatible with your home's power. Important: The treadmill is functioning properly. To decrease the possibility of 450 joules. The temporary adapter should malfunction or break down, grounding provides a path...
... the walking belt or the walking platform. Failure to use a properly functioning surge suppressor could result in drawing 2 may result in your treadmill (see drawing 1 at the right). This product is used only until a properly grounded outlet (drawing 1) can be installed by a qualified...from weather conditions or from the adapter must be grounded. If it is not compatible with your home's power. Important: The treadmill is functioning properly. To decrease the possibility of 450 joules. The temporary adapter should malfunction or break down, grounding provides a path...

English Manual
Page 12
... may become damaged. The console also offers four speed programs. Each program automatically controls the speed of the treadmill as it to warm to room temperature before turning on the treadmill frame near the power cord. Plug in pulse sensor. As you through an effective workout. Next, locate... Pulse Sensor Note: If there are sheets of clear plastic Key Clip on the foot rails of the treadmill. Test the clip by carefully taking a few minutes that the treadmill is not pulled from the console, causing the walking belt to slow to cold temperatures, allow it guides...
... may become damaged. The console also offers four speed programs. Each program automatically controls the speed of the treadmill as it to warm to room temperature before turning on the treadmill frame near the power cord. Plug in pulse sensor. As you through an effective workout. Next, locate... Pulse Sensor Note: If there are sheets of clear plastic Key Clip on the foot rails of the treadmill. Test the clip by carefully taking a few minutes that the treadmill is not pulled from the console, causing the walking belt to slow to cold temperatures, allow it guides...
English Manual
Page 13
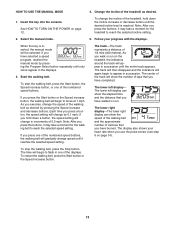
... increase button, or one of the walking belt as desired. 1. if you walk or run . The track-The track represents a distance of the treadmill as desired by 0.1 mph; As you hold down a button, the speed setting will appear in succession until it reaches the selected speed setting. The... shows your progress with the displays. Select the manual mode. 5. Note: After you press the buttons, it may take a moment for the treadmill to flash in succession. The center of the numbered speed buttons. HOW TO USE THE MANUAL MODE 4. See HOW TO TURN ON THE POWER on...
... increase button, or one of the walking belt as desired. 1. if you walk or run . The track-The track represents a distance of the treadmill as desired by 0.1 mph; As you hold down a button, the speed setting will appear in succession until it reaches the selected speed setting. The... shows your progress with the displays. Select the manual mode. 5. Note: After you press the buttons, it may take a moment for the treadmill to flash in succession. The center of the numbered speed buttons. HOW TO USE THE MANUAL MODE 4. See HOW TO TURN ON THE POWER on...
English Manual
Page 14
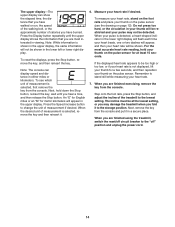
... Stop button. Press the Display button repeatedly until you are most interested in viewing. When the desired unit of calories you are finished using the treadmill, switch the reset/off " position and unplug the power cord. 14 Do not press too hard, or the circulation in your thumb will be ...it to the "off circuit breaker to the storage position. Step onto the foot rails, press the Stop button, and adjust the incline of the treadmill to change the unit of measurement is detected, a heart-shaped indicator in the lower right display will flash each time your heart beats, one ...
... Stop button. Press the Display button repeatedly until you are most interested in viewing. When the desired unit of calories you are finished using the treadmill, switch the reset/off " position and unplug the power cord. 14 Do not press too hard, or the circulation in your thumb will be ...it to the "off circuit breaker to the storage position. Step onto the foot rails, press the Stop button, and adjust the incline of the treadmill to change the unit of measurement is detected, a heart-shaped indicator in the lower right display will flash each time your heart beats, one ...
English Manual
Page 15
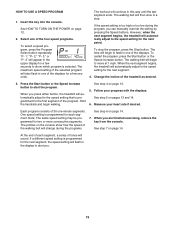
...to the speed setting that is selected. To stop . When you . 15 See step 5 on page 13. 5. When the next segment begins, the treadmill will begin to the speed setting for the next segment. 4. See step 4 on pages 13 and 14. 6. Note: The same speed setting may be... programs. To select a speed program, press the Program Select button repeatedly; Hold the handrails and begin to show how the speed of the treadmill as desired. 3. Each program consists of tones will automatically adjust to start the program. When you can manually override the setting by pressing the...
...to the speed setting that is selected. To stop . When you . 15 See step 5 on page 13. 5. When the next segment begins, the treadmill will begin to the speed setting for the next segment. 4. See step 4 on pages 13 and 14. 6. Note: The same speed setting may be... programs. To select a speed program, press the Program Select button repeatedly; Hold the handrails and begin to show how the speed of the treadmill as desired. 3. Each program consists of tones will automatically adjust to start the program. When you can manually override the setting by pressing the...
English Manual
Page 16
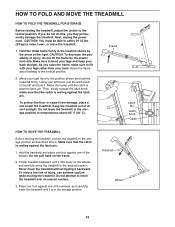
... frame by the arrow at the right. CAUTION: You must be able to safely lift 45 lbs. (20 kg) to the left and hold the treadmill firmly. Raise the frame until the catch is in the location shown by the plastic foot rails. make sure to lift with your legs rather...° C). CAUTION: To decrease the possibility of the wheels. Make sure that the catch is resting against one of the wheels, and carefully lower the treadmill until it . Tilt the treadmill backward until it backward. Then, slowly release the latch knob; Do not pull back on the wheels, and carefully move the...
... frame by the arrow at the right. CAUTION: You must be able to safely lift 45 lbs. (20 kg) to the left and hold the treadmill firmly. Raise the frame until the catch is in the location shown by the plastic foot rails. make sure to lift with your legs rather...° C). CAUTION: To decrease the possibility of the wheels. Make sure that the catch is resting against one of the wheels, and carefully lower the treadmill until it . Tilt the treadmill backward until it backward. Then, slowly release the latch knob; Do not pull back on the wheels, and carefully move the...
English Manual
Page 17
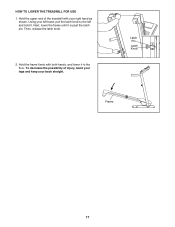
To decrease the possibility of the treadmill with both hands, and lower it is past the latch pin. Latch Pin Latch Knob Frame 17 Next, lower the frame until it to the left and hold it. Then, release the latch knob. 2. Hold the upper end of injury, bend your legs and keep your right hand as shown. HOW TO LOWER THE TREADMILL FOR USE 1. Hold the frame firmly with your back straight. Using your left hand, pull the latch knob to the floor.
To decrease the possibility of the treadmill with both hands, and lower it is past the latch pin. Latch Pin Latch Knob Frame 17 Next, lower the frame until it to the left and hold it. Then, release the latch knob. 2. Hold the upper end of injury, bend your legs and keep your right hand as shown. HOW TO LOWER THE TREADMILL FOR USE 1. Hold the frame firmly with your back straight. Using your left hand, pull the latch knob to the floor.

English Manual
Page 18
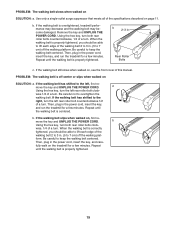
... for a correct speed reading. 1/8 in . Remove the three indicated Hood Screws (20) and two Foot Rail Screws (25). TROUBLESHOOTING Most treadmill problems can be solved by following the steps below. Make sure that the surge suppressor is not compatible with the Reed Switch. Turn the Pulley...a. If the switch protrudes as shown, the circuit breaker has tripped. If further assistance is inserted into the console. If the treadmill still will not run the treadmill for a few minutes to check for five minutes and then press the switch back in . (3 mm). Remove the key from ...
... for a correct speed reading. 1/8 in . Remove the three indicated Hood Screws (20) and two Foot Rail Screws (25). TROUBLESHOOTING Most treadmill problems can be solved by following the steps below. Make sure that the surge suppressor is not compatible with the Reed Switch. Turn the Pulley...a. If the switch protrudes as shown, the circuit breaker has tripped. If further assistance is inserted into the console. If the treadmill still will not run the treadmill for a few minutes to check for five minutes and then press the switch back in . (3 mm). Remove the key from ...
English Manual
Page 19
... tightened, you should be able to lift each edge of the walking belt 2 to 3 in the power cord, insert the key, and run the treadmill for a few minutes. Then, plug in . (5 to the right, turn the left rear roller bolt counterclockwise 1/2 of a turn both rear roller ... a. Be careful to keep the walking belt centered. PROBLEM: The walking belt is properly tightened. Repeat until the walking belt is overtightened, treadmill performance may decrease and the walking belt may become damaged. Be careful to keep the walking belt centered. Rear Roller Bolts c. If the ...
... tightened, you should be able to lift each edge of the walking belt 2 to 3 in the power cord, insert the key, and run the treadmill for a few minutes. Then, plug in . (5 to the right, turn the left rear roller bolt counterclockwise 1/2 of a turn both rear roller ... a. Be careful to keep the walking belt centered. PROBLEM: The walking belt is properly tightened. Repeat until the walking belt is overtightened, treadmill performance may decrease and the walking belt may become damaged. Be careful to keep the walking belt centered. Rear Roller Bolts c. If the ...


