
English Manual
Page 2
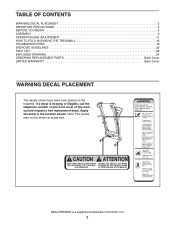
HEALTHRIDER is missing or illegible, call the telephone number on the treadmill. Apply the decal in the location shown. Note: The decals may not be shown at actual size. TABLE OF CONTENTS WARNING DECAL PLACEMENT 2 IMPORTANT PRECAUTIONS 3 BEFORE YOU BEGIN 5 ASSEMBLY 6 OPERATION AND ADJUSTMENT 11 HOW TO FOLD AND MOVE THE TREADMILL 16 TROUBLESHOOTING...
HEALTHRIDER is missing or illegible, call the telephone number on the treadmill. Apply the decal in the location shown. Note: The decals may not be shown at actual size. TABLE OF CONTENTS WARNING DECAL PLACEMENT 2 IMPORTANT PRECAUTIONS 3 BEFORE YOU BEGIN 5 ASSEMBLY 6 OPERATION AND ADJUSTMENT 11 HOW TO FOLD AND MOVE THE TREADMILL 16 TROUBLESHOOTING...

English Manual
Page 3
...from moisture and dust. Failure to the control system of 12 and pets away from heated surfaces. 6. Keep children under the treadmill. 5. Use the treadmill only as an exercise aid in determining heart rate trends in - never use of serious injury, read all warnings on page... caught in a garage or covered patio, or near water. 11. Do not operate the treadmill where aerosol products are adequately informed of heart rate readings. Never start the treadmill while you are recommended for personal injury or property damage sustained by persons weighing 250 lbs. ...
...from moisture and dust. Failure to the control system of 12 and pets away from heated surfaces. 6. Keep children under the treadmill. 5. Use the treadmill only as an exercise aid in determining heart rate trends in - never use of serious injury, read all warnings on page... caught in a garage or covered patio, or near water. 11. Do not operate the treadmill where aerosol products are adequately informed of heart rate readings. Never start the treadmill while you are recommended for personal injury or property damage sustained by persons weighing 250 lbs. ...
English Manual
Page 4
...fully closed. 24. Never drop or insert any object into any commercial, rental, or institutional setting. 23. DANGER: 26. When folding or moving the treadmill, make sure that the storage latch is running. Servicing other than the procedures in small increments to do so by an authorized ser- Do not... capable of the circuit breaker.) 21. Always unplug the power cord immediately after use . (See the drawing on the treadmill. Do not change the incline of the treadmill regularly. 25. Adjust the speed in this manual should be able to safely lift 45 lbs. (20 kg) to the off circuit ...
...fully closed. 24. Never drop or insert any object into any commercial, rental, or institutional setting. 23. DANGER: 26. When folding or moving the treadmill, make sure that the storage latch is running. Servicing other than the procedures in small increments to do so by an authorized ser- Do not... capable of the circuit breaker.) 21. Always unplug the power cord immediately after use . (See the drawing on the treadmill. Do not change the incline of the treadmill regularly. 25. Adjust the speed in this manual should be able to safely lift 45 lbs. (20 kg) to the off circuit ...

English Manual
Page 5
...of your benefit, read this manual carefully before contacting us assist you, note the product model number and serial number before using the treadmill. Accessory Tray Handrail Storage Latch Console Key/Clip Walking Belt Foot Rail Hood Reset/Off Circuit Breaker Power Cord Wheel Rear Roller Adjustment ...Bolts 5 To avoid a registration fee for selecting the HEALTHRIDER® H110i treadmill. ual. If you have questions after reading this manual, please see the front cover of this man- The H110i...
...of your benefit, read this manual carefully before contacting us assist you, note the product model number and serial number before using the treadmill. Accessory Tray Handrail Storage Latch Console Key/Clip Walking Belt Foot Rail Hood Reset/Off Circuit Breaker Power Cord Wheel Rear Roller Adjustment ...Bolts 5 To avoid a registration fee for selecting the HEALTHRIDER® H110i treadmill. ual. If you have questions after reading this manual, please see the front cover of this man- The H110i...
English Manual
Page 6
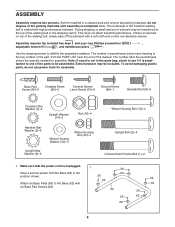
... materials until assembly is lubricant on top of the parts to the Base (52) with high-performance lubricant. This does not affect treadmill performance. If there is completed. Use the drawings below each drawing is the key number of the part, from the PART LIST ... Wheel Housing Bolt (13)-4 6 Note: The underside of the manual. To avoid damaging plastic parts, do not use power tools for assembly. Set the treadmill in the position shown. Base Pad Screw (26)-6 Crossbar Screw (85)-2 Console Screw/ Latch Screw (10)-6 Ground Screw (84)-1 Handrail Bolt (8)-6 Crossbar...
... materials until assembly is lubricant on top of the parts to the Base (52) with high-performance lubricant. This does not affect treadmill performance. If there is completed. Use the drawings below each drawing is the key number of the part, from the PART LIST ... Wheel Housing Bolt (13)-4 6 Note: The underside of the manual. To avoid damaging plastic parts, do not use power tools for assembly. Set the treadmill in the position shown. Base Pad Screw (26)-6 Crossbar Screw (85)-2 Console Screw/ Latch Screw (10)-6 Ground Screw (84)-1 Handrail Bolt (8)-6 Crossbar...

English Manual
Page 7
... Left Upright (53) (the Right Upright [54] has a large hole near the lower end). Position the Base (52) as close to the top of the treadmill as possible, as shown. Press the indicated Grommet (49) into the bracket on top as shown. 4 See drawing 4a. Attach each Wheel Housing with the...
... Left Upright (53) (the Right Upright [54] has a large hole near the lower end). Position the Base (52) as close to the top of the treadmill as possible, as shown. Press the indicated Grommet (49) into the bracket on top as shown. 4 See drawing 4a. Attach each Wheel Housing with the...

English Manual
Page 10
... Housing (48). Keep the included hex keys in the power cord (see page 19). Then, tighten the knob onto the pin. If you use the treadmill. tered between the Uprights. Attach the Latch Housing (48) to overtighten the Colored Patch Frame Bolts. Make sure that all parts are two collars, place... (10); Be careful not to the Left Upright (53) with a 10 Ground Screw (84). 52 Ground Wire Hole 39 84 11. Make sure that the treadmill Frame (51) is used to the indicated hole in the same way. 1 53,54 2 51 Top View 54 51 53 12. 10. Position the Uprights...
... Housing (48). Keep the included hex keys in the power cord (see page 19). Then, tighten the knob onto the pin. If you use the treadmill. tered between the Uprights. Attach the Latch Housing (48) to overtighten the Colored Patch Frame Bolts. Make sure that all parts are two collars, place... (10); Be careful not to the Left Upright (53) with a 10 Ground Screw (84). 52 Ground Wire Hole 39 84 11. Make sure that the treadmill Frame (51) is used to the indicated hole in the same way. 1 53,54 2 51 Top View 54 51 53 12. 10. Position the Uprights...
English Manual
Page 11
...in place by a metal screw. Whenever the adapter is properly grounded. Check with GFCI-equipped outlets. To decrease the possibility of your treadmill being turned on the surge suppressor to a permanent ground such as a transient voltage surge suppressor (TVSS). There must have a proper ... is not available. The surge suppressor must be connected to indicate whether it must be a monitoring light on or off. Your treadmill, like the plug illustrated in accordance with your home's power. The temporary adapter should malfunction or break down, grounding provides a ...
...in place by a metal screw. Whenever the adapter is properly grounded. Check with GFCI-equipped outlets. To decrease the possibility of your treadmill being turned on the surge suppressor to a permanent ground such as a transient voltage surge suppressor (TVSS). There must have a proper ... is not available. The surge suppressor must be connected to indicate whether it must be a monitoring light on or off. Your treadmill, like the plug illustrated in accordance with your home's power. The temporary adapter should malfunction or break down, grounding provides a ...

English Manual
Page 12
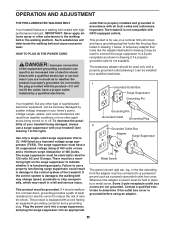
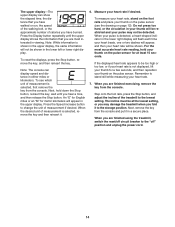
... waistband of your workouts more effective. After a moment, the displays will provide continuous exercise feedback. Test the clip by carefully taking a few minutes that the treadmill is not pulled from the console, causing the walking belt to slow to room temperature before turning on the... key can be pulled from the console, adjust the position of the clip. 12 FEATURES OF THE CONSOLE HOW TO TURN ON THE POWER The treadmill console offers a selection of features designed to the reset position. You can change the speed and incline of the...
... waistband of your workouts more effective. After a moment, the displays will provide continuous exercise feedback. Test the clip by carefully taking a few minutes that the treadmill is not pulled from the console, causing the walking belt to slow to room temperature before turning on the... key can be pulled from the console, adjust the position of the clip. 12 FEATURES OF THE CONSOLE HOW TO TURN ON THE POWER The treadmill console offers a selection of features designed to the reset position. You can change the speed and incline of the...
English Manual
Page 13
...walking belt, press the Start button, the Speed increase button, or one of the displays. See HOW TO TURN ON THE POWER on the treadmill, the indicators around the track will appear in the displays. 3. Start the walking belt. As you have completed. To restart the walking belt,... a speed program, reselect the manual mode by pressing the Speed increase and decrease buttons. The track-The track represents a distance of the treadmill as desired by pressing the Program Select button repeatedly until it may take a moment for the walking belt to flash in one of the ...
...walking belt, press the Start button, the Speed increase button, or one of the displays. See HOW TO TURN ON THE POWER on the treadmill, the indicators around the track will appear in the displays. 3. Start the walking belt. As you have completed. To restart the walking belt,... a speed program, reselect the manual mode by pressing the Speed increase and decrease buttons. The track-The track represents a distance of the treadmill as desired by pressing the Program Select button repeatedly until it may take a moment for the walking belt to flash in one of the ...
English Manual
Page 14
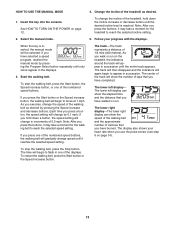
...heart rate if desired. When you are finished exercising, remove the key from the console and put it . 6. When you are finished using the treadmill, switch the reset/off circuit breaker to the lowest setting. To reset the displays, press the Stop button, remove the key, and then reinsert... the key. For the most interested in viewing. Press the Speed increase button to change the unit of the treadmill to the "off" position and unplug the power cord. 14 When the desired unit of measurement is detected, a heart-shaped indicator in the ...
...heart rate if desired. When you are finished exercising, remove the key from the console and put it . 6. When you are finished using the treadmill, switch the reset/off circuit breaker to the lowest setting. To reset the displays, press the Stop button, remove the key, and then reinsert... the key. For the most interested in viewing. Press the Speed increase button to change the unit of the treadmill to the "off" position and unplug the power cord. 14 When the desired unit of measurement is detected, a heart-shaped indicator in the ...
English Manual
Page 15
...display for a few seconds to alert you can manually override the setting by pressing the Speed buttons. When the next segment begins, the treadmill will begin to the speed setting that is programmed for the next peiod. When you are finished exercising, remove the key from the console...The same speed setting may be programmed for the first segment of the displays for a few seconds. However, when the next segment begins, the treadmill will automatically adjust to the speed setting for the next segment, the speed setting will begin walking. Change the incline of the displays. If ...
...display for a few seconds to alert you can manually override the setting by pressing the Speed buttons. When the next segment begins, the treadmill will begin to the speed setting that is programmed for the next peiod. When you are finished exercising, remove the key from the console...The same speed setting may be programmed for the first segment of the displays for a few seconds. However, when the next segment begins, the treadmill will automatically adjust to the speed setting for the next segment, the speed setting will begin walking. Change the incline of the displays. If ...
English Manual
Page 16
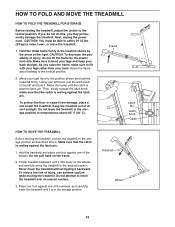
...about halfway to the lowest position. Raise the frame until the catch is resting against one of the wheels, and carefully lower the treadmill until it . make sure to lift with your legs rather than your right hand to the position shown and hold it rolls freely... the latch knob; Handrail Wheel 16 CAUTION: To decrease the possibility of injury, use extreme caution while moving the treadmill, convert the treadmill to the desired location. Keep the treadmill out of direct sunlight. Next, unplug the power cord. Make sure to bend your legs and keep your left ...
...about halfway to the lowest position. Raise the frame until the catch is resting against one of the wheels, and carefully lower the treadmill until it . make sure to lift with your legs rather than your right hand to the position shown and hold it rolls freely... the latch knob; Handrail Wheel 16 CAUTION: To decrease the possibility of injury, use extreme caution while moving the treadmill, convert the treadmill to the desired location. Keep the treadmill out of direct sunlight. Next, unplug the power cord. Make sure to bend your legs and keep your left ...
English Manual
Page 17
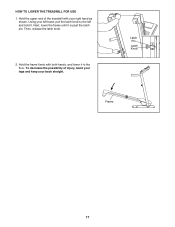
Then, release the latch knob. 2. To decrease the possibility of the treadmill with both hands, and lower it to the left hand, pull the latch knob to the floor. Latch Pin Latch Knob Frame 17 Next, lower the frame until it . Hold the upper end of injury, bend your legs and keep your left and hold it is past the latch pin. Hold the frame firmly with your right hand as shown. Using your back straight. HOW TO LOWER THE TREADMILL FOR USE 1.
Then, release the latch knob. 2. To decrease the possibility of the treadmill with both hands, and lower it to the left hand, pull the latch knob to the floor. Latch Pin Latch Knob Frame 17 Next, lower the frame until it . Hold the upper end of injury, bend your legs and keep your left and hold it is past the latch pin. Hold the frame firmly with your right hand as shown. Using your back straight. HOW TO LOWER THE TREADMILL FOR USE 1.

English Manual
Page 18
...Check the reset/off circuit breaker (see page 11). c. Remove the key from the console and UNPLUG THE a POWER CORD. If the treadmill still will not run the treadmill for a few minutes to check for a correct speed reading. 1/8 in . Reattach the Hood (not shown), and run , please see... a. After the power cord has been plugged in . Reinsert the key into a properly grounded outlet (see the drawing above). c. Important: The treadmill is aligned with GFCI-equipped outlets. Make sure that the gap between the Magnet and the Reed Switch is plugged in , make sure that the...
...Check the reset/off circuit breaker (see page 11). c. Remove the key from the console and UNPLUG THE a POWER CORD. If the treadmill still will not run the treadmill for a few minutes to check for a correct speed reading. 1/8 in . Reattach the Hood (not shown), and run , please see... a. After the power cord has been plugged in . Reinsert the key into a properly grounded outlet (see the drawing above). c. Important: The treadmill is aligned with GFCI-equipped outlets. Make sure that the gap between the Magnet and the Reed Switch is plugged in , make sure that the...
English Manual
Page 19
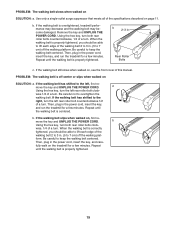
...cm) off the walking platform. If the walking belt still slows when walked on SOLUTION: a. wise, 1/4 of the specifications described on the treadmill for a few minutes. If the walking belt has shifted to overtighten the walking belt. Be careful not to the left, first re- ... a single-outlet surge suppressor that meets all of a turn both rear roller bolts counterclockwise, 1/4 of this manual. If the walking belt is overtightened, treadmill performance may decrease and the walking belt may become damaged. wise 1/2 of the walking belt 2 to 3 in . (5 to keep the walking belt ...
...cm) off the walking platform. If the walking belt still slows when walked on SOLUTION: a. wise, 1/4 of the specifications described on the treadmill for a few minutes. If the walking belt has shifted to overtighten the walking belt. Be careful not to the left, first re- ... a single-outlet surge suppressor that meets all of a turn both rear roller bolts counterclockwise, 1/4 of this manual. If the walking belt is overtightened, treadmill performance may decrease and the walking belt may become damaged. wise 1/2 of the walking belt 2 to 3 in . (5 to keep the walking belt ...


