

English Manual
Page 1
Model No. Serial Number Decal QUESTIONS? de R.L. Nextengo No. 78 Col. USER'S MANUAL Visit our website at www.healthrider.com new products, prizes, fitness tips, and much more! Save this manual. Electrical Specifications: 120V ~ 60Hz Distributor: Comercializadora México ... instructions in this manual before using this equipment. Av. As a manufacturer, we are missing or damaged parts, please call the telephone number on the warranty card accompanying this manual for future reference. de C.V. Azcapotzalco México D.F., C.P. 02770 R.F.C. HMTL51105 Serial No...
Model No. Serial Number Decal QUESTIONS? de R.L. Nextengo No. 78 Col. USER'S MANUAL Visit our website at www.healthrider.com new products, prizes, fitness tips, and much more! Save this manual. Electrical Specifications: 120V ~ 60Hz Distributor: Comercializadora México ... instructions in this manual before using this equipment. Av. As a manufacturer, we are missing or damaged parts, please call the telephone number on the warranty card accompanying this manual for future reference. de C.V. Azcapotzalco México D.F., C.P. 02770 R.F.C. HMTL51105 Serial No...
English Manual
Page 3
..., away from heated surfaces. 14. If the control system is turned off position when the treadmill is the responsibility of the owner to avoid sudden jumps in sandals. 10. Never move the walking belt while the power is damaged, the walking belt may change speed, accelerate, or stop procedure before operating the treadmill. 1. When connecting the power cord (see page 9), plug the power cord into a surge suppressor (not included) and...
..., away from heated surfaces. 14. If the control system is turned off position when the treadmill is the responsibility of the owner to avoid sudden jumps in sandals. 10. Never move the walking belt while the power is damaged, the walking belt may change speed, accelerate, or stop procedure before operating the treadmill. 1. When connecting the power cord (see page 9), plug the power cord into a surge suppressor (not included) and...

English Manual
Page 4
... using. Never remove the motor hood unless instructed to do so by an authorized service representative. This is missing, call the telephone number on the treadmill. WARNING: Before beginning this treadmill in this manual and order a free replacement decal. When folding or moving the treadmill, make sure that the storage latch is intended for persons over the age of 35 or persons with pre-existing health problems. Read all parts...
... using. Never remove the motor hood unless instructed to do so by an authorized service representative. This is missing, call the telephone number on the treadmill. WARNING: Before beginning this treadmill in this manual and order a free replacement decal. When folding or moving the treadmill, make sure that the storage latch is intended for persons over the age of 35 or persons with pre-existing health problems. Read all parts...

English Manual
Page 5
... us assist you use the treadmill. The serial number can be found on the warranty card accompanying this manual carefully before you , note the product model number and serial number before calling. Console Handrail Storage Latch Upright Walking Belt Foot Rail BACK Rear Roller Adjustment Bolts Fan Water Bottle Holder (bottle not included) Key/Clip Reset/Off Circuit Breaker Power Cord Cushioned Walking Platform for selecting the revolutionary HEALTHRIDER® H900i treadmill. For your workouts at home more enjoyable and...
... us assist you use the treadmill. The serial number can be found on the warranty card accompanying this manual carefully before you , note the product model number and serial number before calling. Console Handrail Storage Latch Upright Walking Belt Foot Rail BACK Rear Roller Adjustment Bolts Fan Water Bottle Holder (bottle not included) Key/Clip Reset/Off Circuit Breaker Power Cord Cushioned Walking Platform for selecting the revolutionary HEALTHRIDER® H900i treadmill. For your workouts at home more enjoyable and...
English Manual
Page 6
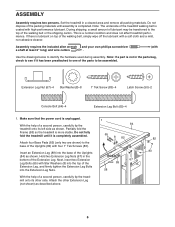
... tip the treadmill onto its left side as described above. 1 84 65 8 82 67 89 58 82 83 6 Make sure that the power cord is lubricant on top of the Extension Leg, and firmly tighten the Extension Leg Bolts into the top of the walking belt, simply wipe off the lubricant with four 1" Tek Screws (83). With the help of the parts to...
... tip the treadmill onto its left side as described above. 1 84 65 8 82 67 89 58 82 83 6 Make sure that the power cord is lubricant on top of the Extension Leg, and firmly tighten the Extension Leg Bolts into the top of the walking belt, simply wipe off the lubricant with four 1" Tek Screws (83). With the help of the parts to...
English Manual
Page 7
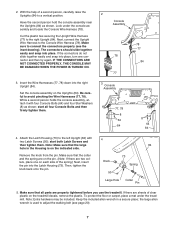
Set the console assembly on each side of the spring.) Next, insert the pin into the Latch Housing (73). start all parts are properly tightened before you use the treadmill. Note: Make sure that the large 84 hole in a secure place; Knob 50 73 Spring Large Hole Collar Pin 5. IF THE CONNECTORS ARE NOT CONNECTED PROPERLY, THE CONSOLE MAY BE DAMAGED WHEN THE POWER IS TURNED ON...
Set the console assembly on each side of the spring.) Next, insert the pin into the Latch Housing (73). start all parts are properly tightened before you use the treadmill. Note: Make sure that the large 84 hole in a secure place; Knob 50 73 Spring Large Hole Collar Pin 5. IF THE CONNECTORS ARE NOT CONNECTED PROPERLY, THE CONSOLE MAY BE DAMAGED WHEN THE POWER IS TURNED ON...
English Manual
Page 9
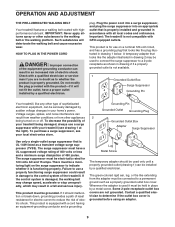
... voltage rating of 400 volts or less and a minimum surge dissipation of the treadmill. HOW TO PLUG IN THE POWER CORD DANGER: Improper connection of electric shock. Do not modify the plug provided with highperformance lubricant. Grounding Pin Grounded Outlet Grounding Plug Grounded Outlet Box Adapter Surge Suppressor Use only a single-outlet surge suppressor that is damaged, the walking belt may change speed, accelerate or stop unexpectedly...
... voltage rating of 400 volts or less and a minimum surge dissipation of the treadmill. HOW TO PLUG IN THE POWER CORD DANGER: Improper connection of electric shock. Do not modify the plug provided with highperformance lubricant. Grounding Pin Grounded Outlet Grounding Plug Grounded Outlet Box Adapter Surge Suppressor Use only a single-outlet surge suppressor that is damaged, the walking belt may change speed, accelerate or stop unexpectedly...
English Manual
Page 10
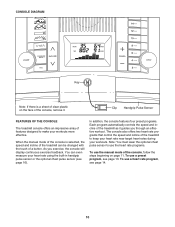
... the console, remove it guides you exercise, the console will display continuous exercise feedback. Note: You must wear the optional chest pulse sensor to use the heart rate programs. To use a preset program, see page 13. To use a heart rate program, see page 16). When the manual mode of the console is a sheet of clear plastic on page 11. As you through an effective workout. The console also offers two heart rate programs that control the speed and incline of the treadmill...
... the console, remove it guides you exercise, the console will display continuous exercise feedback. Note: You must wear the optional chest pulse sensor to use the heart rate programs. To use a preset program, see page 13. To use a heart rate program, see page 16). When the manual mode of the console is a sheet of clear plastic on page 11. As you through an effective workout. The console also offers two heart rate programs that control the speed and incline of the treadmill...

English Manual
Page 11
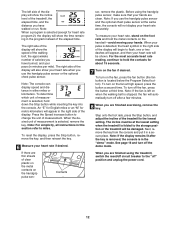
... TO USE THE MANUAL MODE 1 Insert the key into the console. As you exercise, change by pressing the Speed increase and decrease buttons. Make sure that represents 1/4 mile. The display will be pulled from the console, adjust the position of the numbered speed buttons is pressed, the speed setting will appear in speed until a track appears in the lower part of the treadmill. When the key is in succession. 11 To start the walking belt, press the Start button, the Speed increase button, or...
... TO USE THE MANUAL MODE 1 Insert the key into the console. As you exercise, change by pressing the Speed increase and decrease buttons. Make sure that represents 1/4 mile. The display will be pulled from the console, adjust the position of the numbered speed buttons is pressed, the speed setting will appear in speed until a track appears in the lower part of the treadmill. When the key is in succession. 11 To start the walking belt, press the Start button, the Speed increase button, or...
English Manual
Page 12
... heart rate program 2), the display will show the speed of the walking belt, the approximate number of measurement is selected, remove the key. The right side of the display will automatically turn off the demo mode. When the desired unit of calories you have burned, and your pace (in the program instead of the treadmill, the elapsed time, and the distance you use the handgrip pulse sensor or the optional chest pulse sensor...
... heart rate program 2), the display will show the speed of the walking belt, the approximate number of measurement is selected, remove the key. The right side of the display will automatically turn off the demo mode. When the desired unit of calories you have burned, and your pace (in the program instead of the treadmill, the elapsed time, and the distance you use the handgrip pulse sensor or the optional chest pulse sensor...

English Manual
Page 13
... console. To stop . HOW TO USE A PRESET PROGRAM 1 Insert the key into 30 one-minute segments. Hold the handrails and begin to move one column to alert you can manually override the setting by pressing the Speed or Incline buttons. The speed setting for two or more consecutive segments. To restart the program, press the Start button or the Speed increase button. When the next segment of the program ends, the treadmill...
... console. To stop . HOW TO USE A PRESET PROGRAM 1 Insert the key into 30 one-minute segments. Hold the handrails and begin to move one column to alert you can manually override the setting by pressing the Speed or Incline buttons. The speed setting for two or more consecutive segments. To restart the program, press the Start button or the Speed increase button. When the next segment of the program ends, the treadmill...

English Manual
Page 14
.... 3 Select a heart rate program. You must wear the optional chest pulse sensor (see page 16) to use the heart rate programs. If you are over 60 years of the program. If heart rate program 1 (P1) is selected, a heart symbol will appear in the display. Heart rate program 1 will affect your exercise heart rate. If heart rate program 2 (P2) is selected, the matrix in the lower part of the display will automatically adjust the speed and incline of the heart rate programs, press the Program Select button repeatedly...
.... 3 Select a heart rate program. You must wear the optional chest pulse sensor (see page 16) to use the heart rate programs. If you are over 60 years of the program. If heart rate program 1 (P1) is selected, a heart symbol will appear in the display. Heart rate program 1 will affect your exercise heart rate. If heart rate program 2 (P2) is selected, the matrix in the lower part of the display will automatically adjust the speed and incline of the heart rate programs, press the Program Select button repeatedly...

English Manual
Page 15
... change the maximum target heart rate setting (see EXERCISE INTENSITY on page 12. 8 When you . If the speed or incline setting is programmed for the second segment will sound. When the console compares your heart rate closer to the right. If heart rate program 2 is not detected during the program, you can adjust the setting with the optional chest pulse sensor. The target heart rate settings for the program will be programmed for the entire program. 5 Press the Start button...
... change the maximum target heart rate setting (see EXERCISE INTENSITY on page 12. 8 When you . If the speed or incline setting is programmed for the second segment will sound. When the console compares your heart rate closer to the right. If heart rate program 2 is not detected during the program, you can adjust the setting with the optional chest pulse sensor. The target heart rate settings for the program will be programmed for the entire program. 5 Press the Start button...

English Manual
Page 16
... key can be used . This mode is intended to be plugged in the right side of the display. THE OPTIONAL CHEST PULSE SENSOR An optional chest pulse sensor adds even more features to change the unit of mea- To select the information mode, hold down the Stop button while inserting the key into the console. THE INFORMATION MODE/DEMO MODE The console features an information mode that keeps track of the total number of hours that the treadmill...
... key can be used . This mode is intended to be plugged in the right side of the display. THE OPTIONAL CHEST PULSE SENSOR An optional chest pulse sensor adds even more features to change the unit of mea- To select the information mode, hold down the Stop button while inserting the key into the console. THE INFORMATION MODE/DEMO MODE The console features an information mode that keeps track of the total number of hours that the treadmill...
English Manual
Page 17
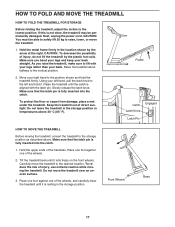
... TREADMILL HOW TO FOLD THE TREADMILL FOR STORAGE Before folding the treadmill, adjust the incline to the left hand, pull the latch knob to the lowest position. If this is aligned with your legs rather than your right hand to the desired location. CAUTION: To decrease the possibility of the wheels. 2. Frame Catch Latch Knob Engaged Latch Pin HOW TO MOVE THE TREADMILL Before moving the treadmill. Next, unplug the power cord...
... TREADMILL HOW TO FOLD THE TREADMILL FOR STORAGE Before folding the treadmill, adjust the incline to the left hand, pull the latch knob to the lowest position. If this is aligned with your legs rather than your right hand to the desired location. CAUTION: To decrease the possibility of the wheels. 2. Frame Catch Latch Knob Engaged Latch Pin HOW TO MOVE THE TREADMILL Before moving the treadmill. Next, unplug the power cord...

English Manual
Page 19
... console. c. Note: A phillips screwdriver with GFCI-equipped outlets. If further assistance is plugged into a properly grounded outlet (see the drawing above). b. PROBLEM: The display of the specifications described on SOLUTION: a. While the incline is plugged in . Make sure that applies, and follow the steps listed. Find the symptom that the power cord is changing, remove the key. After a few seconds, re-insert the key. TROUBLESHOOTING Most treadmill problems...
... console. c. Note: A phillips screwdriver with GFCI-equipped outlets. If further assistance is plugged into a properly grounded outlet (see the drawing above). b. PROBLEM: The display of the specifications described on SOLUTION: a. While the incline is plugged in . Make sure that applies, and follow the steps listed. Find the symptom that the power cord is changing, remove the key. After a few seconds, re-insert the key. TROUBLESHOOTING Most treadmill problems...

English Manual
Page 20
... PROBLEM: The walking belt slows when walked on , first re- b. rectly tightened, you should be able to lift each edge of the walking belt 5 to check for a correct speed reading. Then, plug in the power cord, insert the key, and carefully walk on the treadmill for a few minutes. Reattach the Hood, and run the treadmill for a few minutes. Using the allen wrench, turn both rear roller bolts clockwise, 1/4 of a turn . If the walking belt...
... PROBLEM: The walking belt slows when walked on , first re- b. rectly tightened, you should be able to lift each edge of the walking belt 5 to check for a correct speed reading. Then, plug in the power cord, insert the key, and carefully walk on the treadmill for a few minutes. Reattach the Hood, and run the treadmill for a few minutes. Using the allen wrench, turn both rear roller bolts clockwise, 1/4 of a turn . If the walking belt...

English Manual
Page 21
... the recommended heart rate for energy. The three numbers define your physician. The chart below shows recommended heart rates for fat burning; Fat Burning To burn fat effectively, you must be found by using your body uses easily accessible carbohydrate calories for aerobic exercise. This will increase the flexibility of your condition, complete three workouts each workout with preexisting health problems. The pulse sensor is to...
... the recommended heart rate for energy. The three numbers define your physician. The chart below shows recommended heart rates for fat burning; Fat Burning To burn fat effectively, you must be found by using your body uses easily accessible carbohydrate calories for aerobic exercise. This will increase the flexibility of your condition, complete three workouts each workout with preexisting health problems. The pulse sensor is to...

English Manual
Page 23
... Rail Motor Pivot Bolt Motor Bracket Console Frame Support Latch Pin Assembly Motor Washer Motor Star Washer Motor Bolt Motor Tension Bolt Motor Belt Drive Motor Frame Washer U-nut Motor Nut Lift Frame Bolt Lock Nut 1/2" Screw Console Fan Screw Power Cord Assembly Console Fan Controller Electronics Bracket Filter Wire Hood Front Roller Bushing Lift Frame Upright Endcap Front Roller Bolt Magnet Front Roller Walking Belt Walking Platform Latch Screw Key No. Key No. HMTL51105.0 R0106A To locate the parts listed below, see the EXPLODED DRAWING attached in the center of this manual. Qty...
... Rail Motor Pivot Bolt Motor Bracket Console Frame Support Latch Pin Assembly Motor Washer Motor Star Washer Motor Bolt Motor Tension Bolt Motor Belt Drive Motor Frame Washer U-nut Motor Nut Lift Frame Bolt Lock Nut 1/2" Screw Console Fan Screw Power Cord Assembly Console Fan Controller Electronics Bracket Filter Wire Hood Front Roller Bushing Lift Frame Upright Endcap Front Roller Bolt Magnet Front Roller Walking Belt Walking Platform Latch Screw Key No. Key No. HMTL51105.0 R0106A To locate the parts listed below, see the EXPLODED DRAWING attached in the center of this manual. Qty...

English Manual
Page 26
... (HEALTHRIDER H900i treadmill) • the SERIAL NUMBER of the product (see the front cover of this manual) • the KEY NUMBER and DESCRIPTION of the part(s) (see the EXPLODED DRAWING in USA © 2006 ICON IP, Inc. ORDERING REPLACEMENT PARTS To order replacement parts, please call the telephone number on page 23) Part No. 232144 R0106A Printed in the center of this manual and the PART LIST on the warranty card...
... (HEALTHRIDER H900i treadmill) • the SERIAL NUMBER of the product (see the front cover of this manual) • the KEY NUMBER and DESCRIPTION of the part(s) (see the EXPLODED DRAWING in USA © 2006 ICON IP, Inc. ORDERING REPLACEMENT PARTS To order replacement parts, please call the telephone number on page 23) Part No. 232144 R0106A Printed in the center of this manual and the PART LIST on the warranty card...

