
English Manual
Page 1
..., DO NOT CONTACT THE STORE; please contact Customer Care. Write the serial number in this manual before contacting Customer Care. Keep this equipment. CALL TOLL-FREE: 1-888-922-4222 Mon.-Fri., 6 a.m.-6 p.m. Serial Number Decal QUESTIONS? IMPORTANT: Please register this product (see the limited warranty on the back cover of this manual) before using this manual for reference. www.healthrider.com Model No. HREX53409.2 Serial No.
..., DO NOT CONTACT THE STORE; please contact Customer Care. Write the serial number in this manual before contacting Customer Care. Keep this equipment. CALL TOLL-FREE: 1-888-922-4222 Mon.-Fri., 6 a.m.-6 p.m. Serial Number Decal QUESTIONS? IMPORTANT: Please register this product (see the limited warranty on the back cover of this manual) before using this manual for reference. www.healthrider.com Model No. HREX53409.2 Serial No.
English Manual
Page 2
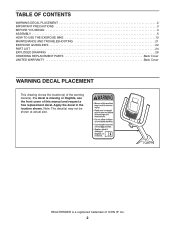
... the front cover of this manual and request a free replacement decal. Apply the decal in the location shown. If a decal is a registered trademark of the warning decal(s). TABLE OF CONTENTS WARNING DECAL PLACEMENT 2 IMPORTANT PRECAUTIONS 3 BEFORE YOU BEGIN 4 ASSEMBLY 5 HOW TO USE THE EXERCISE BIKE 13 MAINTENANCE AND TROUBLESHOOTING 21 EXERCISE GUIDELINES 22 PART LIST 24 EXPLODED DRAWING 26 ORDERING REPLACEMENT PARTS Back Cover LIMITED WARRANTY Back Cover WARNING DECAL...
... the front cover of this manual and request a free replacement decal. Apply the decal in the location shown. If a decal is a registered trademark of the warning decal(s). TABLE OF CONTENTS WARNING DECAL PLACEMENT 2 IMPORTANT PRECAUTIONS 3 BEFORE YOU BEGIN 4 ASSEMBLY 5 HOW TO USE THE EXERCISE BIKE 13 MAINTENANCE AND TROUBLESHOOTING 21 EXERCISE GUIDELINES 22 PART LIST 24 EXPLODED DRAWING 26 ORDERING REPLACEMENT PARTS Back Cover LIMITED WARRANTY Back Cover WARNING DECAL...
English Manual
Page 3
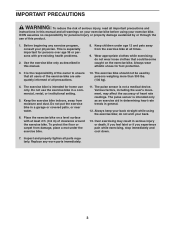
... heart rate trends in a garage or covered patio, or near water. 6. Wear appropriate clothes while exercising; Do not put the exercise bike in general. 12. Always keep your back straight while using your exercise bike before using the exercise bike; Inspect and properly tighten all times. 9. Keep the exercise bike indoors, away from the exercise bike at least 2 ft. (0.6 m) of heart rate readings. The pulse sensor is especially important for home use the exercise bike...
... heart rate trends in a garage or covered patio, or near water. 6. Wear appropriate clothes while exercising; Do not put the exercise bike in general. 12. Always keep your back straight while using your exercise bike before using the exercise bike; Inspect and properly tighten all times. 9. Keep the exercise bike indoors, away from the exercise bike at least 2 ft. (0.6 m) of heart rate readings. The pulse sensor is especially important for home use the exercise bike...
English Manual
Page 4
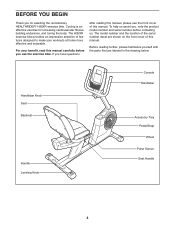
... questions after reading this manual, please see the front cover of this manual carefully before contacting us. BEFORE YOU BEGIN Thank you , note the product model number and serial number before you use the exercise bike. For your workouts at home more effective and enjoyable. Handlebar Knob Seat Backrest Handle Leveling Knob Console Handlebar Accessory Tray Pedal/Strap Wheel Pulse Sensor Seat Handle 4 The model number and the location of the serial number decal are labeled...
... questions after reading this manual, please see the front cover of this manual carefully before contacting us. BEFORE YOU BEGIN Thank you , note the product model number and serial number before you use the exercise bike. For your workouts at home more effective and enjoyable. Handlebar Knob Seat Backrest Handle Leveling Knob Console Handlebar Accessory Tray Pedal/Strap Wheel Pulse Sensor Seat Handle 4 The model number and the location of the serial number decal are labeled...
English Manual
Page 5
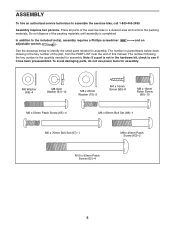
... (70)-2 M4 x 16mm Screw (98)-8 M8 x 16mm Patch Screw (60)-10 M6 x 50mm Patch Screw (65)-4 M6 x 60mm Bolt Set (68)-1 M6 x 70mm Bolt Set (67)-1 M8 x 45mm Patch Screw (63)-2 M10 x 95mm Patch Screw (62)-4 5 Place all parts of the exercise bike in parentheses below to assemble the exercise bike, call 1-800-445-2480. The number following the key number is the quantity needed for assembly. In addition to...
... (70)-2 M4 x 16mm Screw (98)-8 M8 x 16mm Patch Screw (60)-10 M6 x 50mm Patch Screw (65)-4 M6 x 60mm Bolt Set (68)-1 M6 x 70mm Bolt Set (67)-1 M8 x 45mm Patch Screw (63)-2 M10 x 95mm Patch Screw (62)-4 5 Place all parts of the exercise bike in parentheses below to assemble the exercise bike, call 1-800-445-2480. The number following the key number is the quantity needed for assembly. In addition to...
English Manual
Page 10
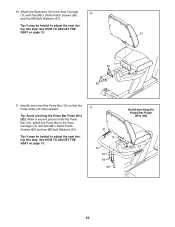
... the Pulse Bar Pulse Wire (92) 41 10 Tip: It may be helpful to adjust the seat during this step. Tip: Avoid pinching the Pulse Bar Pulse Wire (92). See HOW TO ADJUST THE SEAT on page 13. 13 11 61 60 11. ing this step. 10. While a second person holds the Pulse Bar (12), attach the Pulse Bar to the Seat Carriage (11) with two M8 x 45mm Patch Screws (63...
... the Pulse Bar Pulse Wire (92) 41 10 Tip: It may be helpful to adjust the seat during this step. Tip: Avoid pinching the Pulse Bar Pulse Wire (92). See HOW TO ADJUST THE SEAT on page 13. 13 11 61 60 11. ing this step. 10. While a second person holds the Pulse Bar (12), attach the Pulse Bar to the Seat Carriage (11) with two M8 x 45mm Patch Screws (63...
English Manual
Page 11
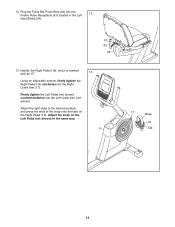
... with an "R." 13 Using an adjustable wrench, firmly tighten the Right Pedal (16) clockwise into the Left Crank Arm (not shown). Plug the Pulse Bar Pulse Wire (92) into the Frame Pulse Receptacle (91) located in the same way. 5 17 Strap 16 Tab 11 12. Adjust the strap on the Right Pedal (16). Adjust the right strap to the desired position, and press the ends of the strap onto the tabs...
... with an "R." 13 Using an adjustable wrench, firmly tighten the Right Pedal (16) clockwise into the Left Crank Arm (not shown). Plug the Pulse Bar Pulse Wire (92) into the Frame Pulse Receptacle (91) located in the same way. 5 17 Strap 16 Tab 11 12. Adjust the strap on the Right Pedal (16). Adjust the right strap to the desired position, and press the ends of the strap onto the tabs...
English Manual
Page 12
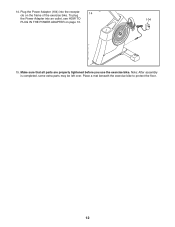
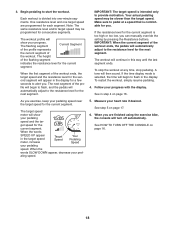
Make sure that all parts are properly tightened before you use the exercise bike. Plug the Power Adapter (104) into an outlet, see HOW TO 104 PLUG IN THE POWER ADAPTER on the frame of the exercise bike. 14. Note: After assembly is completed, some extra parts may be left over. To plug 14 the Power Adapter into the receptacle on page 13. 15. Place a mat beneath the exercise bike to protect the floor. 12
Make sure that all parts are properly tightened before you use the exercise bike. Plug the Power Adapter (104) into an outlet, see HOW TO 104 PLUG IN THE POWER ADAPTER on the frame of the exercise bike. 14. Note: After assembly is completed, some extra parts may be left over. To plug 14 the Power Adapter into the receptacle on page 13. 15. Place a mat beneath the exercise bike to protect the floor. 12
English Manual
Page 13
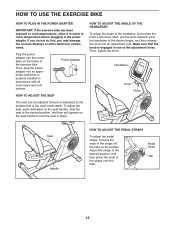
... USE THE EXERCISE BIKE HOW TO PLUG IN THE POWER ADAPTER IMPORTANT: If the exercise bike has been exposed to cold temperatures, allow it to warm to the desired angle, and then release the knob into an appropriate outlet that is properly installed in accordance with all local codes and ordinances. If you do not do this, you may damage the console displays...
... USE THE EXERCISE BIKE HOW TO PLUG IN THE POWER ADAPTER IMPORTANT: If the exercise bike has been exposed to cold temperatures, allow it to warm to the desired angle, and then release the knob into an appropriate outlet that is properly installed in accordance with all local codes and ordinances. If you do not do this, you may damage the console displays...
English Manual
Page 15
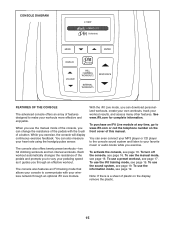
... pedaling speed as it guides you through an optional iFit Live module. You can even connect your MP3 player or CD player to the console sound system and listen to make your workouts more effective and enjoyable. Each workout automatically changes the resistance of features designed to your favorite music or audio books while you can download personalized workouts, create your own workouts, track your heart rate using...
... pedaling speed as it guides you through an optional iFit Live module. You can even connect your MP3 player or CD player to the console sound system and listen to make your workouts more effective and enjoyable. Each workout automatically changes the resistance of features designed to your favorite music or audio books while you can download personalized workouts, create your own workouts, track your heart rate using...
English Manual
Page 16
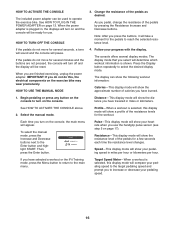
... pedaling speed in miles per hour or kilometers per hour. Change the resistance of the pedals by pressing the Resistance Increase and Decrease buttons. Distance-This display mode will be reset. Then, press the Enter button. If you do not do not move for a few seconds each time the resistance level changes. When you use . Press the Display button repeatedly to the Enter button and highlight START. Each time you have selected a workout or the iFit Training mode, press...
... pedaling speed in miles per hour or kilometers per hour. Change the resistance of the pedals by pressing the Resistance Increase and Decrease buttons. Distance-This display mode will be reset. Then, press the Enter button. If you do not do not move for a few seconds each time the resistance level changes. When you use . Press the Display button repeatedly to the Enter button and highlight START. Each time you have selected a workout or the iFit Training mode, press...
English Manual
Page 17
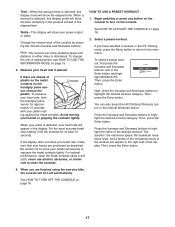
... move your hands or gripping the contacts tightly. Select a preset workout. Then, press the Enter button. 6. When you have selected a workout or the iFit Training mode, press the Menu button to return to turn off automatically. Note: The console can also press the Hill Climbing Workouts button or the Interval Workouts button. For optimal performance, clean the metal contacts using the exercise bike, the console will appear in either miles or kilometers. Press...
... move your hands or gripping the contacts tightly. Select a preset workout. Then, press the Enter button. 6. When you have selected a workout or the iFit Training mode, press the Menu button to return to turn off automatically. Note: The console can also press the Hill Climbing Workouts button or the Interval Workouts button. For optimal performance, clean the metal contacts using the exercise bike, the console will appear in either miles or kilometers. Press...
English Manual
Page 18
... the display. See step 5 on page 16. 18 Each workout is too high or too low, you are finished using the exercise bike, the console will automatically adjust to pedal at any time, stop pedaling. When the first segment of the workout ends, the pedals will turn off automatically. If the time display mode is intended only to start the workout. Measure your pedaling speed. See HOW TO TURN OFF THE CONSOLE...
... the display. See step 5 on page 16. 18 Each workout is too high or too low, you are finished using the exercise bike, the console will automatically adjust to pedal at any time, stop pedaling. When the first segment of the workout ends, the pedals will turn off automatically. If the time display mode is intended only to start the workout. Measure your pedaling speed. See HOW TO TURN OFF THE CONSOLE...
English Manual
Page 19
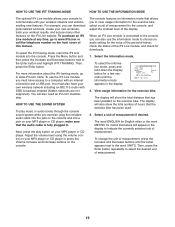
... an internet connection and a USB port. Select the information mode. To select the information mode, press and hold down the Display button for the console, and adjust the contrast level of the display. Select a unit of measurement, press the Increase and Decrease buttons until the information mode appears in . Note: To use the information mode to the Enter button and highlight IFIT TRAINING. make sure that allows you exercise, plug the included audio cable into...
... an internet connection and a USB port. Select the information mode. To select the information mode, press and hold down the Display button for the console, and adjust the contrast level of the display. Select a unit of measurement, press the Increase and Decrease buttons until the information mode appears in . Note: To use the information mode to the Enter button and highlight IFIT TRAINING. make sure that allows you exercise, plug the included audio cable into...

English Manual
Page 20
... Decrease buttons repeatedly to exit the information mode. To exit this display, press and hold down the Display button for iFit Live workouts and firmware downloads. 6. The currently selected contrast level will show the words WIFI STATUS or USB STATUS. 8. If an iFit Live module is connected to the word CONTRAST. Adjust the contrast level of the iFit Live module if desired. To change the audio setting, press the...
... Decrease buttons repeatedly to exit the information mode. To exit this display, press and hold down the Display button for iFit Live workouts and firmware downloads. 6. The currently selected contrast level will show the words WIFI STATUS or USB STATUS. 8. If an iFit Live module is connected to the word CONTRAST. Adjust the contrast level of the iFit Live module if desired. To change the audio setting, press the...
English Manual
Page 21
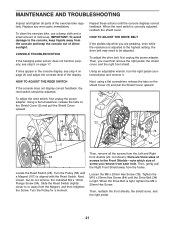
... 58 Locate the Reed Switch (46). Then, you are three sizes of the exercise bike regularly. Using an adjustable wrench, turn the right pedal counterclockwise and remove it. Then, remove all parts of screws in the console display, see step 5 on page 20 and adjust the contrast level of mild soap. there are pedaling, even while the resistance is adjusted to the highest setting, the drive belt may need to be adjusted. CONSOLE TROUBLESHOOTING If the handgrip pulse sensor does...
... 58 Locate the Reed Switch (46). Then, you are three sizes of the exercise bike regularly. Using an adjustable wrench, turn the right pedal counterclockwise and remove it. Then, remove all parts of screws in the console display, see step 5 on page 20 and adjust the contrast level of mild soap. there are pedaling, even while the resistance is adjusted to the highest setting, the drive belt may need to be adjusted. CONSOLE TROUBLESHOOTING If the handgrip pulse sensor does...
English Manual
Page 22
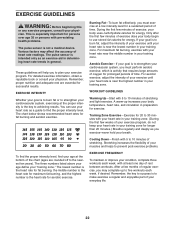
... your heart rate as a guide to five workouts each week, with 5 to success is intended only as you must perform aerobic exercise, which is not a medical device. WORKOUT GUIDELINES Warming Up-Start with your heart rate in your training zone. (During the first few minutes of exercise does your breath. The three numbers listed above your age define your physician. Remember, the key to...
... your heart rate as a guide to five workouts each week, with 5 to success is intended only as you must perform aerobic exercise, which is not a medical device. WORKOUT GUIDELINES Warming Up-Start with your heart rate in your training zone. (During the first few minutes of exercise does your breath. The three numbers listed above your age define your physician. Remember, the key to...
English Manual
Page 24
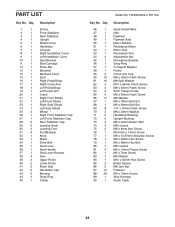
... Stabilizer Rear Stabilizer Upright Shield Cover Handlebar Console Right Handlebar Cover Left Handlebar Cover Seat Bracket Seat Carriage Pulse Bar Backrest Backrest Cover Seat Right Pedal/Strap Right Crank Arm Left Pedal/Strap Left Crank Arm Crank Right Front Shield Left Front Shield Right Seat Shield Left Seat Shield Wheel Right Front Stabilizer Cap Left Front Stabilizer Cap Rear Stabilizer Cap Leveling Knob Leveling Foot Foot/Bumper Knob Brake Drive Belt Seat Lever Seat Handle Seat Lever Bracket Axle Upper Roller Lower Roller Pulse Grip...
... Stabilizer Rear Stabilizer Upright Shield Cover Handlebar Console Right Handlebar Cover Left Handlebar Cover Seat Bracket Seat Carriage Pulse Bar Backrest Backrest Cover Seat Right Pedal/Strap Right Crank Arm Left Pedal/Strap Left Crank Arm Crank Right Front Shield Left Front Shield Right Seat Shield Left Seat Shield Wheel Right Front Stabilizer Cap Left Front Stabilizer Cap Rear Stabilizer Cap Leveling Knob Leveling Foot Foot/Bumper Knob Brake Drive Belt Seat Lever Seat Handle Seat Lever Bracket Axle Upper Roller Lower Roller Pulse Grip...
English Manual
Page 25
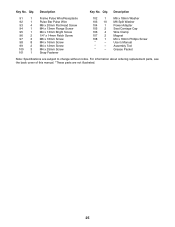
... Power Adapter Seat Carriage Cap Wire Clamp Magnet M4 x 16mm Phillips Screw Userʼs Manual Assembly Tool Grease Packet Note: Specifications are not illustrated. 25 Qty. For information about ordering replacement parts, see the back cover of this manual. *These parts are subject to change without notice. Description Key No. Description 91 1 Frame Pulse Wire/Receptacle 92 1 Pulse Bar Pulse Wire 93 4 M6 x 20mm Flat Head Screw 94 1 M4 x 13mm Flange Screw 95 1 M4 x 13mm Bright Screw...
... Power Adapter Seat Carriage Cap Wire Clamp Magnet M4 x 16mm Phillips Screw Userʼs Manual Assembly Tool Grease Packet Note: Specifications are not illustrated. 25 Qty. For information about ordering replacement parts, see the back cover of this manual. *These parts are subject to change without notice. Description Key No. Description 91 1 Frame Pulse Wire/Receptacle 92 1 Pulse Bar Pulse Wire 93 4 M6 x 20mm Flat Head Screw 94 1 M4 x 13mm Flange Screw 95 1 M4 x 13mm Bright Screw...

English Manual
Page 28
... do not allow limitations on how long an implied warranty lasts. This warranty gives you . To help us assist you, be free from state to you. ICON Health & Fitness, Inc. (ICON) warrants this product to be prepared to provide the following information when contacting us: • the model number and serial number of the product (see the front cover of this manual) • the name...
... do not allow limitations on how long an implied warranty lasts. This warranty gives you . To help us assist you, be free from state to you. ICON Health & Fitness, Inc. (ICON) warrants this product to be prepared to provide the following information when contacting us: • the model number and serial number of the product (see the front cover of this manual) • the name...


