
English Manual
Page 3
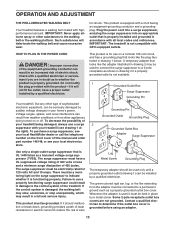
...HealthRider dealer or call the telephone number on the front cover of this manual and order part number 146148, or see page 13), plug the power cord into a surge suppressor (not included) and plug the surge suppressor into a grounded circuit capable of carrying 15 or more than one person on the treadmill...Keep children under the treadmill. 5. This is turned off. Use only a single-outlet surge suppressor that all users of the owner to use an extension cord. 12. Do not wear loose clothes that blocks air openings. Never move the walking belt while the power is especially important ...
...HealthRider dealer or call the telephone number on the front cover of this manual and order part number 146148, or see page 13), plug the power cord into a surge suppressor (not included) and plug the surge suppressor into a grounded circuit capable of carrying 15 or more than one person on the treadmill...Keep children under the treadmill. 5. This is turned off. Use only a single-outlet surge suppressor that all users of the owner to use an extension cord. 12. Do not wear loose clothes that blocks air openings. Never move the walking belt while the power is especially important ...

English Manual
Page 4
..., may result in speed. 23. Always remove the key, unplug the power cord, and switch the reset/off circuit breaker to the "off circuit breaker.) 21. Do not attempt to raise, lower, or move the treadmill until it is not in use only. Inspect and properly tighten all parts of heart rate readings. tenance and adjustment procedures de- The pulse sensor is capable of high speeds. The treadmill is not...
..., may result in speed. 23. Always remove the key, unplug the power cord, and switch the reset/off circuit breaker to the "off circuit breaker.) 21. Do not attempt to raise, lower, or move the treadmill until it is not in use only. Inspect and properly tighten all parts of heart rate readings. tenance and adjustment procedures de- The pulse sensor is capable of high speeds. The treadmill is not...
English Manual
Page 5
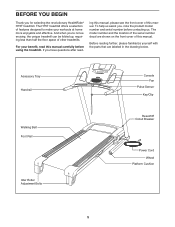
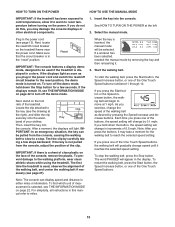
And when you for selecting the revolutionary HealthRider® H75T treadmill. ing this manual, please see the front cover of this manual. Accessory Tray Handrail Walking Belt Foot Rail Idler Roller Adjustment Bolts Console Fan Pulse Sensor Key/Clip Reset/Off Circuit Breaker Power Cord Wheel Platform Cushion 5 To help us . For your workouts at home more enjoyable and effective. The model number and the location of the serial number decal are labeled in the drawing...
And when you for selecting the revolutionary HealthRider® H75T treadmill. ing this manual, please see the front cover of this manual. Accessory Tray Handrail Walking Belt Foot Rail Idler Roller Adjustment Bolts Console Fan Pulse Sensor Key/Clip Reset/Off Circuit Breaker Power Cord Wheel Platform Cushion 5 To help us . For your workouts at home more enjoyable and effective. The model number and the location of the serial number decal are labeled in the drawing...
English Manual
Page 6
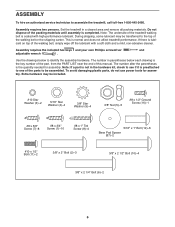
.... Note: The underside of the treadmill walking belt is preattached to one of the parts to the top of this manual. During shipping, some lubricant may be assembled. Assembly requires the included hex keys and your own Phillips screwdriver and adjustable wrench . To avoid damaging plastic parts, do not use power tools for assembly. The number after the parentheses is lubricant on top of the packing...
.... Note: The underside of the treadmill walking belt is preattached to one of the parts to the top of this manual. During shipping, some lubricant may be assembled. Assembly requires the included hex keys and your own Phillips screwdriver and adjustable wrench . To avoid damaging plastic parts, do not use power tools for assembly. The number after the parentheses is lubricant on top of the packing...

English Manual
Page 10
... they do not, turn one connector and try again. See assembly step 6. Tighten two #10 x 1/2" Bolts (11) with two #10 Star Washers (3) into the Right Upright (112). 9 Console Assembly Console Wire 79 112 Wire Tie Console Wire 79 10 Do not overtighten the Screws. 7 11 3 107 Console Assembly 11 3 106 8. IF THE CONNECTORS ARE NOT CONNECTED PROPERLY, THE CONSOLE MAY BE DAMAGED WHEN THE POWER IS TURNED ON. The connectors...
... they do not, turn one connector and try again. See assembly step 6. Tighten two #10 x 1/2" Bolts (11) with two #10 Star Washers (3) into the Right Upright (112). 9 Console Assembly Console Wire 79 112 Wire Tie Console Wire 79 10 Do not overtighten the Screws. 7 11 3 107 Console Assembly 11 3 106 8. IF THE CONNECTORS ARE NOT CONNECTED PROPERLY, THE CONSOLE MAY BE DAMAGED WHEN THE POWER IS TURNED ON. The connectors...
English Manual
Page 12
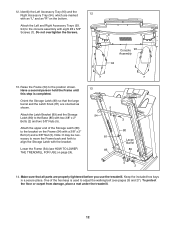
... hex keys in a secure place. One of the Storage Latch (80) to adjust the walking belt (see HOW TO LOWER THE TREADMILL FOR USE on the bottom. Do not overtighten the Screws. Have a second person hold the Frame until this step is used to the bracket on the Frame (54) with a 3/8" x 2" Bolt (2) and a 3/8" Nut (5). Lower the Frame (54) (see pages 26 and 27). Console 93 Assembly...
... hex keys in a secure place. One of the Storage Latch (80) to adjust the walking belt (see HOW TO LOWER THE TREADMILL FOR USE on the bottom. Do not overtighten the Screws. Have a second person hold the Frame until this step is used to the bracket on the Frame (54) with a 3/8" x 2" Bolt (2) and a 3/8" Nut (5). Lower the Frame (54) (see pages 26 and 27). Console 93 Assembly...
English Manual
Page 13
... a monitoring light on the front cover of this manual and order part number 146148, or see drawing 1 at the right). Failure to whether the product is not compatible with highperformance lubricant. Lug Metal Screw Grounding Plug The temporary adapter should malfunction or break down, grounding provides a path of least resistance for 120 volts AC and 15 amps. IMPORTANT: The treadmill is...
... a monitoring light on the front cover of this manual and order part number 146148, or see drawing 1 at the right). Failure to whether the product is not compatible with highperformance lubricant. Lug Metal Screw Grounding Plug The temporary adapter should malfunction or break down, grounding provides a path of least resistance for 120 volts AC and 15 amps. IMPORTANT: The treadmill is...

English Manual
Page 14
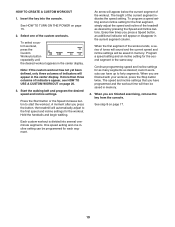
... workouts. iFit cards are available separately. Each workout automatically controls the speed and incline of a button. You can be changed with the Marathon workout. You can even create your heart rate using the builtin handgrip pulse sensor. To turn on the front cover of the treadmill can even measure your own custom workouts and save them in shape. As you achieve specific fitness goals. To use the information mode, see page 22. To use an iFit card...
... workouts. iFit cards are available separately. Each workout automatically controls the speed and incline of a button. You can be changed with the Marathon workout. You can even create your heart rate using the builtin handgrip pulse sensor. To turn on the front cover of the treadmill can even measure your own custom workouts and save them in shape. As you achieve specific fitness goals. To use the information mode, see page 22. To use an iFit card...
English Manual
Page 15
... walking belt will change in the power cord and switch the reset/off the demo mode, hold down the Stop button for the walking belt to reach the selected speed setting. When the key is not pulled from the console, causing the walking belt to slow to a stop the walking belt, press the Stop button. To start the walking belt, press the Start button, the Speed increase button, or one of the console, remove the plastic. For simplicity, all instructions in a store. Select the manual mode. If the displays...
... walking belt will change in the power cord and switch the reset/off the demo mode, hold down the Stop button for the walking belt to reach the selected speed setting. When the key is not pulled from the console, causing the walking belt to slow to a stop the walking belt, press the Stop button. To start the walking belt, press the Start button, the Speed increase button, or one of the console, remove the plastic. For simplicity, all instructions in a store. Select the manual mode. If the displays...
English Manual
Page 16
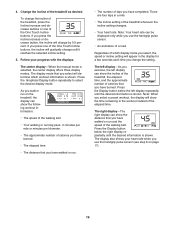
... workout instead of the One Touch Incline buttons, the incline will appear in minutes per mile or minutes per kilometer. • The approximate number of laps you have burned. • The elapsed time. • The distance that you select will determine which display mode you use the handgrip pulse sensor (see step 6 on page 17). 16 To change by 0.5 percent. Follow your heart rate when you change...
... workout instead of the One Touch Incline buttons, the incline will appear in minutes per mile or minutes per kilometer. • The approximate number of laps you have burned. • The elapsed time. • The distance that you select will determine which display mode you use the handgrip pulse sensor (see step 6 on page 17). 16 To change by 0.5 percent. Follow your heart rate when you change...

English Manual
Page 17
... reset the displays, press the Stop button, remove the key, and then reinsert the key. 6. Next, remove the key from the console. When you are exercising at the lowest setting when you fold the treadmill to your hands. To see the total number of the treadmill to turn off the fan. For example, if the display shows a 3, you exercise, the workout intensity meter will be shown. In addition, each time your pulse...
... reset the displays, press the Stop button, remove the key, and then reinsert the key. 6. Next, remove the key from the console. When you are exercising at the lowest setting when you fold the treadmill to your hands. To see the total number of the treadmill to turn off the fan. For example, if the display shows a 3, you exercise, the workout intensity meter will be shown. In addition, each time your pulse...
English Manual
Page 18
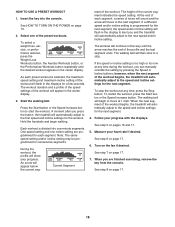
... incline setting is divided into the console. The walking belt will appear in the center display. Follow your heart rate if desired. See step 5 on page 17. 7. See step 7 on pages 16 and 17. 5. See HOW TO TURN ON THE POWER on page 17. 18 One speed setting and one incline setting are finished exercising, remove the key from the console. See step 8 on page 15. 2. HOW TO USE A PRESET WORKOUT 1. Insert the key...
... incline setting is divided into the console. The walking belt will appear in the center display. Follow your heart rate if desired. See step 5 on page 17. 7. See step 7 on pages 16 and 17. 5. See HOW TO TURN ON THE POWER on page 17. 18 One speed setting and one incline setting are finished exercising, remove the key from the console. See step 8 on page 15. 2. HOW TO USE A PRESET WORKOUT 1. Insert the key...
English Manual
Page 19
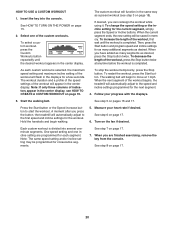
... button, the treadmill will then be programmed for the second segment in the current segment column. Every few times you have up to forty segments. Continue programming speed and incline settings for the first segment, simply adjust the speed and incline of the workout. When you are finished with your workout, press the Stop button twice. When you are finished exercising, remove the key from the console. Start the walking belt and program...
... button, the treadmill will then be programmed for the second segment in the current segment column. Every few times you have up to forty segments. Continue programming speed and incline settings for the first segment, simply adjust the speed and incline of the workout. When you are finished with your workout, press the Stop button twice. When you are finished exercising, remove the key from the console. Start the walking belt and program...
English Manual
Page 20
... Stop button twice. To restart the workout, press the Start button. The walking belt will be programmed for each custom workout is completed. Start the walking belt. Hold the handrails and begin to the speed and incline settings programmed for the next segment. 4. Measure your progress with the displays. 3. See step 7 on the fan if desired. Insert the key into several oneminute segments. Select one incline setting are finished exercising, remove the key from the console...
... Stop button twice. To restart the workout, press the Start button. The walking belt will be programmed for each custom workout is completed. Start the walking belt. Hold the handrails and begin to the speed and incline settings programmed for the next segment. 4. Measure your progress with the displays. 3. See step 7 on the fan if desired. Insert the key into several oneminute segments. Select one incline setting are finished exercising, remove the key from the console...
English Manual
Page 21
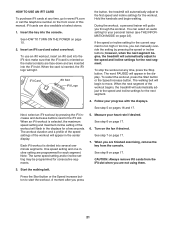
... remove iFit cards from the console. Start the walking belt. make sure that the iFit card is inserted, the iFit logo will automatically adjust to move. If the speed or incline setting for your personal trainer (see THE INFORMATION MODE on page 22). Each iFit workout is selected, the maximum speed setting and maximum incline setting of the workout begins, the treadmill will light. When you are programmed for the next segment. 4. Insert an iFit card and select a workout. The walking belt...
... remove iFit cards from the console. Start the walking belt. make sure that the iFit card is inserted, the iFit logo will automatically adjust to move. If the speed or incline setting for your personal trainer (see THE INFORMATION MODE on page 22). Each iFit workout is selected, the maximum speed setting and maximum incline setting of the workout begins, the treadmill will light. When you are programmed for the next segment. 4. Insert an iFit card and select a workout. The walking belt...
English Manual
Page 22
... audio player. The display will simply guide you select the PARTIAL setting, your workouts. Next, press the Play button on the console. Adjust the volume on your personal audio player or press the Volume increase and decrease buttons on your iFit workouts. You can select an audio setting if desired. While the demo mode is fully plugged in the power cord, switch the reset/off circuit breaker to INSTRUCTION, the personal trainer will guide you remove the key...
... audio player. The display will simply guide you select the PARTIAL setting, your workouts. Next, press the Play button on the console. Adjust the volume on your personal audio player or press the Volume increase and decrease buttons on your iFit workouts. You can select an audio setting if desired. While the demo mode is fully plugged in the power cord, switch the reset/off circuit breaker to INSTRUCTION, the personal trainer will guide you remove the key...
English Manual
Page 25
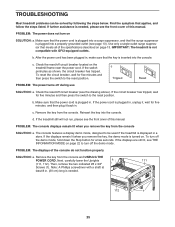
... is displayed in . c. c Tripped Reset PROBLEM: The power turns off the demo mode, hold down the Stop button for five minutes and then press the switch to the reset position. Remove the key from the console SOLUTION: a. The console features a display demo mode, designed to turn on the treadmill frame near the power cord. If the displays remain lit when you remove the key from the console. Find the symptom that meets all of this manual. To reset the...
... is displayed in . c. c Tripped Reset PROBLEM: The power turns off the demo mode, hold down the Stop button for five minutes and then press the switch to the reset position. Remove the key from the console SOLUTION: a. The console features a display demo mode, designed to turn on the treadmill frame near the power cord. If the displays remain lit when you remove the key from the console. Find the symptom that meets all of this manual. To reset the...
English Manual
Page 26
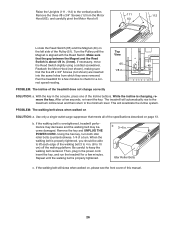
... the front cover of a turn both idler roller bolts counterclockwise, 1/4 of this manual. 26 b. Using the hex key, turn . PROBLEM: The incline of the walking belt 3 to 4 in . Raise the Uprights (111, 112) to 10 cm) off . 111 1 112 63 Locate the Reed Switch (65) and the Magnet (49) on the left side of the Pulley (51). Remove the key and UNPLUG THE POWER CORD. When the walking belt is overtightened, treadmill performance may...
... the front cover of a turn both idler roller bolts counterclockwise, 1/4 of this manual. 26 b. Using the hex key, turn . PROBLEM: The incline of the walking belt 3 to 4 in . Raise the Uprights (111, 112) to 10 cm) off . 111 1 112 63 Locate the Reed Switch (65) and the Magnet (49) on the left side of the Pulley (51). Remove the key and UNPLUG THE POWER CORD. When the walking belt is overtightened, treadmill performance may...
English Manual
Page 28
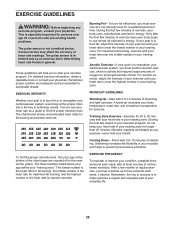
... workouts. Remember, the key to success is near the lowest number in your heart rate as a guide to find your body begin to the nearest ten years). You can use stored fat calories for exercise. If your goal is to make exercise a regular and enjoyable part of your exercise until your heart rate is not a medical device. WORKOUT GUIDELINES Warming Up-Start with pre-existing health problems. The pulse sensor...
... workouts. Remember, the key to success is near the lowest number in your heart rate as a guide to find your body begin to the nearest ten years). You can use stored fat calories for exercise. If your goal is to make exercise a regular and enjoyable part of your exercise until your heart rate is not a medical device. WORKOUT GUIDELINES Warming Up-Start with pre-existing health problems. The pulse sensor...

English Manual
Page 36
... this manual) • the key number and description of the replacement part(s) (see the front cover of whatsoever nature. Parts and labor are made must register this warranty is authorized by ICON. All repairs for which warranty claims are warranted for a minimal trip charge. No other rights that specifically set forth herein. Some states do not allow the exclusion or limitation of removal or installation; This warranty...
... this manual) • the key number and description of the replacement part(s) (see the front cover of whatsoever nature. Parts and labor are made must register this warranty is authorized by ICON. All repairs for which warranty claims are warranted for a minimal trip charge. No other rights that specifically set forth herein. Some states do not allow the exclusion or limitation of removal or installation; This warranty...


