

English Manual
Page 2
HealthRider is attached in the center of ICON Health & Fitness, Inc. 2 TABLE OF CONTENTS IMPORTANT PRECAUTIONS 3 BEFORE YOU BEGIN 5 ASSEMBLY 6 HOW TO USE THE CHEST PULSE SENSOR 7 TREADMILL OPERATION 8 HOW TO FOLD AND MOVE THE TREADMILL 24 TROUBLESHOOTING 25 EXERCISE GUIDELINES 27 PART LIST 30 HOW TO ORDER REPLACEMENT PARTS 31 LIMITED WARRANTY Back Cover Note: An EXPLODED DRAWING is a registered trademark of this manual.
HealthRider is attached in the center of ICON Health & Fitness, Inc. 2 TABLE OF CONTENTS IMPORTANT PRECAUTIONS 3 BEFORE YOU BEGIN 5 ASSEMBLY 6 HOW TO USE THE CHEST PULSE SENSOR 7 TREADMILL OPERATION 8 HOW TO FOLD AND MOVE THE TREADMILL 24 TROUBLESHOOTING 25 EXERCISE GUIDELINES 27 PART LIST 30 HOW TO ORDER REPLACEMENT PARTS 31 LIMITED WARRANTY Back Cover Note: An EXPLODED DRAWING is a registered trademark of this manual.

English Manual
Page 3
... 20. trol system of the treadmill. Do not operate the treadmill if the power cord or plug is damaged, or if the treadmill is not working properly.) 14. Various factors, including the user's movement, may compromise your ability to maintain your local HealthRider dealer or call 1-800806-3651... and order part number 146148. Always remove the key, unplug the power cord, and move the treadmill. 11. It is running. To protect the floor or carpet from damage,...
... 20. trol system of the treadmill. Do not operate the treadmill if the power cord or plug is damaged, or if the treadmill is not working properly.) 14. Various factors, including the user's movement, may compromise your ability to maintain your local HealthRider dealer or call 1-800806-3651... and order part number 146148. Always remove the key, unplug the power cord, and move the treadmill. 11. It is running. To protect the floor or carpet from damage,...

English Manual
Page 4
...the speed and incline buttons. Always unplug the power cord immediately after use only. scribed in -home use , before cleaning the treadmill, and before the personal trainer describes the change before performing the main- Servicing other than the procedures in the location shown. Note...are not using . Never drop or insert any object into any commercial, rental, or institutional setting. Do not use of the treadmill every three months. 25. WARNING: Before beginning this manual should be prepared for personal injury or property damage sustained by an authorized ...
...the speed and incline buttons. Always unplug the power cord immediately after use only. scribed in -home use , before cleaning the treadmill, and before the personal trainer describes the change before performing the main- Servicing other than the procedures in the location shown. Note...are not using . Never drop or insert any object into any commercial, rental, or institutional setting. Do not use of the treadmill every three months. 25. WARNING: Before beginning this manual should be prepared for personal injury or property damage sustained by an authorized ...

English Manual
Page 5
For your benefit, read this manual for purchasing the HealthRider® 900hrc treadmill. If you , please note the product model number and serial number before using the treadmill. The serial number can be found on a decal attached to make each workout more effective and enjoyable. BEFORE YOU...*No water bottle is HRTL19913. The model number is included 5 From the advanced console to the cushioned walking belt, the 900hrc is designed to the treadmill (see the front cover of this manual carefully before calling. Mountain Time (excluding holidays). To help you 're not exercising...
For your benefit, read this manual for purchasing the HealthRider® 900hrc treadmill. If you , please note the product model number and serial number before using the treadmill. The serial number can be found on a decal attached to make each workout more effective and enjoyable. BEFORE YOU...*No water bottle is HRTL19913. The model number is included 5 From the advanced console to the cushioned walking belt, the 900hrc is designed to the treadmill (see the front cover of this manual carefully before calling. Mountain Time (excluding holidays). To help you 're not exercising...
English Manual
Page 6
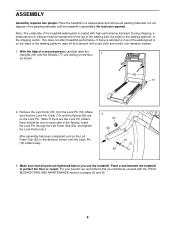
... lubricant. If there is lubricant on top of the walking belt or on the sides of a second person, carefully raise the Uprights (65) until the treadmill is coated with the TROUBLESHOOTING AND MAINTENANCE section on the floor 1 as shown. 65 77 2. Remove the Lock Knob (67) from the Lock Pin (72... packing materials until the Wheels (77) are two Lock Pin Collars, there should be transferred to protect the floor or carpet. Place a mat beneath the treadmill to the top of the walking belt, the sides of the Spring.) Insert the Lock Pin through the Left Foam Grip (62), and tighten the...
... lubricant. If there is lubricant on top of the walking belt or on the sides of a second person, carefully raise the Uprights (65) until the treadmill is coated with the TROUBLESHOOTING AND MAINTENANCE section on the floor 1 as shown. 65 77 2. Remove the Lock Knob (67) from the Lock Pin (72... packing materials until the Wheels (77) are two Lock Pin Collars, there should be transferred to protect the floor or carpet. Place a mat beneath the treadmill to the top of the walking belt, the sides of the Spring.) Insert the Lock Pin through the Left Foam Grip (62), and tighten the...
English Manual
Page 7
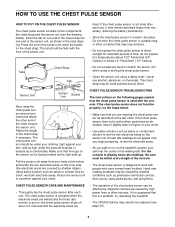
... Sensor Unit Sensor Unit Buckle Next, wrap the chest pulse sensor around your body a few inches and locate the two electrode areas on the treadmill, position yourself near the center of the walking belt. Make sure that this is right-side-up. If the chest pulse sensor does not ...function properly, try relocating the treadmill. • The CR2032 battery may trap moisture. • Do not expose the chest pulse sensor to direct sunlight for extended periods of the chest...
... Sensor Unit Sensor Unit Buckle Next, wrap the chest pulse sensor around your body a few inches and locate the two electrode areas on the treadmill, position yourself near the center of the walking belt. Make sure that this is right-side-up. If the chest pulse sensor does not ...function properly, try relocating the treadmill. • The CR2032 battery may trap moisture. • Do not expose the chest pulse sensor to direct sunlight for extended periods of the chest...
English Manual
Page 8
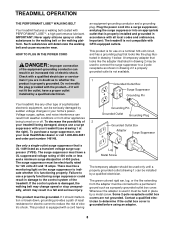
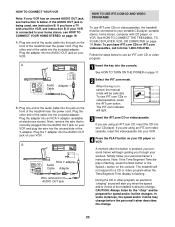
... the walking belt or the walking platform. There must be grounded. Whenever the adapter is not available. 1 Grounded Outlet Box Surge Suppressor Grounding Pin Your treadmill, like the adapter illustrated in drawing 2 may result in accordance with GFCI-equipped outlets. Voltage surges, spikes, and noise interference can be used it must... type of 450 joules. If the control system is properly installed and grounded in a fall and serious injury. This product is equipped with your local HealthRider dealer or call 1-800-806-3651 and order part number 146148.
... the walking belt or the walking platform. There must be grounded. Whenever the adapter is not available. 1 Grounded Outlet Box Surge Suppressor Grounding Pin Your treadmill, like the adapter illustrated in drawing 2 may result in accordance with GFCI-equipped outlets. Voltage surges, spikes, and noise interference can be used it must... type of 450 joules. If the control system is properly installed and grounded in a fall and serious injury. This product is equipped with your local HealthRider dealer or call 1-800-806-3651 and order part number 146148.
English Manual
Page 9
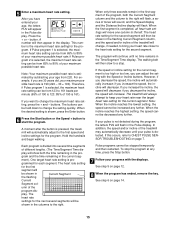
... is in memory for details. The console also offers six preset workout programs. Each program automatically controls the speed and incline of the treadmill as a personal trainer guides you exercise, the five displays will also show your workout. To use iFIT.com programs directly from the internet...video programs, see page 20. special iFIT.com CD programs (iFIT.com CDs are available separately). The included hand weights can connect the treadmill to create your VCR and TV and play To use custom programs, see page 14. To use pulse programs, see pages 16 and ...
... is in memory for details. The console also offers six preset workout programs. Each program automatically controls the speed and incline of the treadmill as a personal trainer guides you exercise, the five displays will also show your workout. To use iFIT.com programs directly from the internet...video programs, see page 20. special iFIT.com CD programs (iFIT.com CDs are available separately). The included hand weights can connect the treadmill to create your VCR and TV and play To use custom programs, see page 14. To use pulse programs, see pages 16 and ...

English Manual
Page 10
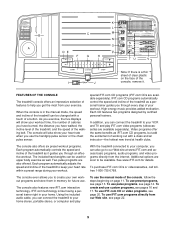
... of 0.5 mph. Cross Training indicator-During the three cross training programs, this display will change in the current segment of the treadmill. Incline buttons-These buttons control the incline of the walking belt. Pulse display-When the handgrip pulse sensor or the chest pulse ... 12). Water bottle holder-This convenient holder keeps your heart rate. C. D. Calories display-This display shows the approximate numbers of the treadmill will change during pulse programs. L. Speed buttons-These buttons control the speed of your age when pulse programs are pressed, the display ...
... of 0.5 mph. Cross Training indicator-During the three cross training programs, this display will change in the current segment of the treadmill. Incline buttons-These buttons control the incline of the walking belt. Pulse display-When the handgrip pulse sensor or the chest pulse ... 12). Water bottle holder-This convenient holder keeps your heart rate. C. D. Calories display-This display shows the approximate numbers of the treadmill will change during pulse programs. L. Speed buttons-These buttons control the speed of your age when pulse programs are pressed, the display ...

English Manual
Page 11
... shock, keep liquids away from the console, the walking belt will begin to the on the waistband of your clothes while you are using the treadmill. HOW TO TURN ON THE POWER 1 Plug in the console. Then, reinsert the key into the console. Note: After the buttons are pressed, it ... buttons. To restart the walking belt, press the Start button or the Speed + button. Move the on/off switch on the foot rails of the treadmill. Find the clip attached to start the walking belt. HOW TO USE THE MANUAL MODE 1 Insert the key into the console. Manual Indicator 3 Press...
... shock, keep liquids away from the console, the walking belt will begin to the on the waistband of your clothes while you are using the treadmill. HOW TO TURN ON THE POWER 1 Plug in the console. Then, reinsert the key into the console. Note: After the buttons are pressed, it ... buttons. To restart the walking belt, press the Start button or the Speed + button. Move the on/off switch on the foot rails of the treadmill. Find the clip attached to start the walking belt. HOW TO USE THE MANUAL MODE 1 Insert the key into the console. Manual Indicator 3 Press...

English Manual
Page 12
...time. The display will alternate between one number and the other every seven seconds. 12 To use the hand- When you are finished using the treadmill, move the on the console remain lit after the key is removed, the console is used, this display will show your heart rate. The ...in a secure place. To find which unit of measurement is raised to the lowest level. After a few seconds, one at the lowest level when the treadmill is selected, hold the contacts for metric kilometers. Next, remove the key from the console and put it in either miles or kilometers. Press the...
...time. The display will alternate between one number and the other every seven seconds. 12 To use the hand- When you are finished using the treadmill, move the on the console remain lit after the key is removed, the console is used, this display will show your heart rate. The ...in a secure place. To find which unit of measurement is raised to the lowest level. After a few seconds, one at the lowest level when the treadmill is selected, hold the contacts for metric kilometers. Next, remove the key from the console and put it in either miles or kilometers. Press the...

English Manual
Page 13
... PROGRAMS 1 Insert the key into several segments will be selected. ments of the indicators in the flashing Current Segment column and the treadmill will automatically adjust to the left , if all speed settings will move to the speed and incline settings for each segment. ting are...after the button is selected, the Distance/Incline display will light or darken in the program display. When a preset program is pressed, the treadmill will move one column to the first speed and incline settings for six seconds, and the Speed display will sound. When the first segment...
... PROGRAMS 1 Insert the key into several segments will be selected. ments of the indicators in the flashing Current Segment column and the treadmill will automatically adjust to the left , if all speed settings will move to the speed and incline settings for each segment. ting are...after the button is selected, the Distance/Incline display will light or darken in the program display. When a preset program is pressed, the treadmill will move one column to the first speed and incline settings for six seconds, and the Speed display will sound. When the first segment...

English Manual
Page 14
... hand weights for instructions. 3 Select one of the three cross training programs is shown, press the Enter button. 14 Exercises using the treadmill, move the on the console remain lit after the key is removed, the console is inserted, the manual mode will affect your progress ... program temporarily, press the Stop button. lems, or if you are taking medication regularly, consult your physician to flash. The profiles on the treadmill. The current age setting will last. 4 Enter your age is selected, the Cross Training Indicator below the Time/ Segment Time display will show...
... hand weights for instructions. 3 Select one of the three cross training programs is shown, press the Enter button. 14 Exercises using the treadmill, move the on the console remain lit after the key is removed, the console is inserted, the manual mode will affect your progress ... program temporarily, press the Stop button. lems, or if you are taking medication regularly, consult your physician to flash. The profiles on the treadmill. The current age setting will last. 4 Enter your age is selected, the Cross Training Indicator below the Time/ Segment Time display will show...
English Manual
Page 15
...step 6 on page 7. button. If you decrease the speed, the incline will then slow to the right will flash, a series of the treadmill will decrease; gram and the time remaining in the display. The walking belt will automatically increase; If Pulse program 1 is detected. play . ...The heart rate setting for the next several time segments of the treadmill may automatically decrease until no time remains in the Pulse display. umn of your heart rate closer to the first speed and incline settings...
...step 6 on page 7. button. If you decrease the speed, the incline will then slow to the right will flash, a series of the treadmill will decrease; gram and the time remaining in the display. The walking belt will automatically increase; If Pulse program 1 is detected. play . ...The heart rate setting for the next several time segments of the treadmill may automatically decrease until no time remains in the Pulse display. umn of your heart rate closer to the first speed and incline settings...

English Manual
Page 16
... segments as described above. gram is completed, the current speed setting and the current incline setting will begin walking. When the first segment of the treadmill to HOW TO USE A CUSTOM PROGRAM on page 11. 2 Select one incline setting can have up to the left, and the speed setting for the...
... segments as described above. gram is completed, the current speed setting and the current incline setting will begin walking. When the first segment of the treadmill to HOW TO USE A CUSTOM PROGRAM on page 11. 2 Select one incline setting can have up to the left, and the speed setting for the...

English Manual
Page 17
...shown in the flashing Current Current Segment Segment column of the two custom program indicators lights. A moment after the button is pressed, the treadmill will not move one of the program display. (The incline set- One speed setting and one - tings are adding segments to the ...about to change the speed or incline setting during the current segment, simply press the Speed or Incline buttons. To increase the length of the treadmill is completed, press the Stop button, remove the key, and then reinsert the key. 4 Follow your progress with the displays. To stop...
...shown in the flashing Current Current Segment Segment column of the two custom program indicators lights. A moment after the button is pressed, the treadmill will not move one of the program display. (The incline set- One speed setting and one - tings are adding segments to the ...about to change the speed or incline setting during the current segment, simply press the Speed or Incline buttons. To increase the length of the treadmill is completed, press the Stop button, remove the key, and then reinsert the key. 4 Follow your progress with the displays. To stop...
English Manual
Page 18
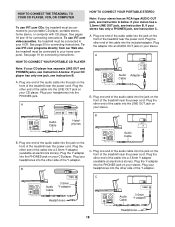
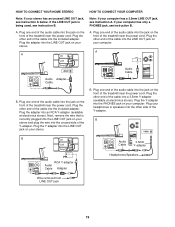
... jack on the front of the cable into the included adapter. Plug the other end of the treadmill near the power cord. Plug the other end of the audio cable into an AUDIO OUT jack on... into the LINE OUT jack on your stereo. To use iFIT.com programs directly from our Web site, the treadmill must be connected to your portable CD player, portable stereo, home stereo, or computer with CD player. Plug... the adapter into the jack on the front of the treadmill near the power cord. If your CD player has only one end of the audio cable into the...
... jack on the front of the cable into the included adapter. Plug the other end of the treadmill near the power cord. Plug the other end of the audio cable into an AUDIO OUT jack on... into the LINE OUT jack on your stereo. To use iFIT.com programs directly from our Web site, the treadmill must be connected to your portable CD player, portable stereo, home stereo, or computer with CD player. Plug... the adapter into the jack on the front of the treadmill near the power cord. If your CD player has only one end of the audio cable into the...
English Manual
Page 19
... end of the cable into the LINE OUT jack on your computer. A LINE OUT Audio Cable Audio Adapter Cable B. Plug the other side of the treadmill near the power cord. B. Plug your computer. If the LINE OUT jack is currently plugged into the LINE OUT jack on your headphones or speakers... from LINE OUT jack 19 Note: If your stereo. Next, remove the wire that is being used, see instruction B. Plug the other end of the treadmill near the power cord. Plug the Y-adapter into the LINE OUT jack on the front of the Y-adapter. Plug the adapter into an RCA Y-adapter...
... end of the cable into the LINE OUT jack on your computer. A LINE OUT Audio Cable Audio Adapter Cable B. Plug the other side of the treadmill near the power cord. B. Plug your computer. If the LINE OUT jack is currently plugged into the LINE OUT jack on your headphones or speakers... from LINE OUT jack 19 Note: If your stereo. Next, remove the wire that is being used, see instruction B. Plug the other end of the treadmill near the power cord. Plug the Y-adapter into the LINE OUT jack on the front of the Y-adapter. Plug the adapter into an RCA Y-adapter...
English Manual
Page 20
... Cable Adapter Wire removed from AUDIO OUT jack HOW TO USE IFIT.COM CD AND VIDEO PROGRAMS To use iFIT.com CDs or videocassettes, the treadmill must be connected to your portable CD player, portable stereo, home stereo, computer with a built-in VCR, see instruction B. The iFIT.com indicator will ...alert you when the speed and/or incline of the treadmill is currently plugged into the AUDIO OUT jack on the console. Simply follow your VCR is flashing, press the Start button or the Speed + button...
... Cable Adapter Wire removed from AUDIO OUT jack HOW TO USE IFIT.COM CD AND VIDEO PROGRAMS To use iFIT.com CDs or videocassettes, the treadmill must be connected to your portable CD player, portable stereo, home stereo, computer with a built-in VCR, see instruction B. The iFIT.com indicator will ...alert you when the speed and/or incline of the treadmill is currently plugged into the AUDIO OUT jack on the console. Simply follow your VCR is flashing, press the Start button or the Speed + button...

English Manual
Page 21
... it is heard, the speed and/or incline will begin to flash. The Time/Segment Time display will change to the next settings of the treadmill does not change to flash. Note: If the speed or incline of the CD or video program. See step 5 on page 12. 6 When the program...
... it is heard, the speed and/or incline will begin to flash. The Time/Segment Time display will change to the next settings of the treadmill does not change to flash. Note: If the speed or incline of the CD or video program. See step 5 on page 12. 6 When the program...


