
Limited Warranty and Support Guide (Refurbished Desktops)
Page 5
... Replacement Warranty Service (Displays ONLY) Your HP Limited Warranty may involve performing routine diagnostic procedures, installing software updates or patches, removing third party options and/or substituting options. On receiving the replacement unit you purchased the HP Option. Standard office hours are available at its reasonable security requirements, provide HP with sufficient, free, and safe access to and use of additional support and service coverage for most HP-branded options (HP Options) are as serial numbers...
... Replacement Warranty Service (Displays ONLY) Your HP Limited Warranty may involve performing routine diagnostic procedures, installing software updates or patches, removing third party options and/or substituting options. On receiving the replacement unit you purchased the HP Option. Standard office hours are available at its reasonable security requirements, provide HP with sufficient, free, and safe access to and use of additional support and service coverage for most HP-branded options (HP Options) are as serial numbers...

Start Here Guide
Page 4
... desktop on a TV screen 49 Adjusting the screen resolution 49 Connecting more than one display 50 Using the Windows Media Center Setup for Optional Setup of Your TV Display...........50 Disabling the TV-out Option 51 Disconnecting the TV 51 Connecting to a Monitor or High-Definition TV 52 Choosing the AV connection to use 52 Connecting an HDMI device 54 Connecting a DVI device 55 Connecting to a Standard TV 56 Connecting to component video 56 Connecting to S-video 57 iv Start...
... desktop on a TV screen 49 Adjusting the screen resolution 49 Connecting more than one display 50 Using the Windows Media Center Setup for Optional Setup of Your TV Display...........50 Disabling the TV-out Option 51 Disconnecting the TV 51 Connecting to a Monitor or High-Definition TV 52 Choosing the AV connection to use 52 Connecting an HDMI device 54 Connecting a DVI device 55 Connecting to a Standard TV 56 Connecting to component video 56 Connecting to S-video 57 iv Start...

Start Here Guide
Page 20
... Network and Sharing Center window. 6 Click Add a device to the network and follow any onscreen instructions. The most common security levels are Wi-Fi Protected Access Personal (WPA-Personal) and Wired Equivalent Privacy (WEP). For more information about setting up a wireless network: Click the Windows Start Button on the taskbar, click Help and Support, and then type Setting up wireless security features, go to: http://www.hp.com/go /techcenter/wireless Using wireless...
... Network and Sharing Center window. 6 Click Add a device to the network and follow any onscreen instructions. The most common security levels are Wi-Fi Protected Access Personal (WPA-Personal) and Wired Equivalent Privacy (WEP). For more information about setting up a wireless network: Click the Windows Start Button on the taskbar, click Help and Support, and then type Setting up wireless security features, go to: http://www.hp.com/go /techcenter/wireless Using wireless...

Start Here Guide
Page 26
...) Audio Speakers" Two front speakers, two "Connecting 5.1 (Five Speakers and a rear speakers, a center Subwoofer) Audio Speakers" speaker, and a subwoofer. 20 Start Here Connecting a Microphone Your computer comes with one microphone connector works at a time, and the back connector is ready to use. For computers with your speaker system to the computer, and then configure the audio software for the following supported configurations: Name Headphones 2 (stereo) 2.1 4.1 6/5.1 Speaker system See None, muted. Speakers are included with the monitor...
...) Audio Speakers" Two front speakers, two "Connecting 5.1 (Five Speakers and a rear speakers, a center Subwoofer) Audio Speakers" speaker, and a subwoofer. 20 Start Here Connecting a Microphone Your computer comes with one microphone connector works at a time, and the back connector is ready to use. For computers with your speaker system to the computer, and then configure the audio software for the following supported configurations: Name Headphones 2 (stereo) 2.1 4.1 6/5.1 Speaker system See None, muted. Speakers are included with the monitor...

Getting Started Guide
Page 4
... 43 Using passwords 44 Using antivirus software 45 Using firewall software 46 Installing critical security updates 46 Turning On Your Computer for the First Time 47 Turning Off Your Computer 47 Using Shut Down 48 Using Lock ...48 Using sleep mode 48 Using hibernate mode 49 Automatic sleep, hibernate, or away mode 50 Restarting the Computer 50 Connecting to the Internet 51 Signing Up for Software Updates 52 Setting Up User Accounts on Your New Computer...
... 43 Using passwords 44 Using antivirus software 45 Using firewall software 46 Installing critical security updates 46 Turning On Your Computer for the First Time 47 Turning Off Your Computer 47 Using Shut Down 48 Using Lock ...48 Using sleep mode 48 Using hibernate mode 49 Automatic sleep, hibernate, or away mode 50 Restarting the Computer 50 Connecting to the Internet 51 Signing Up for Software Updates 52 Setting Up User Accounts on Your New Computer...

Getting Started Guide
Page 5
... Switching Mouse Button Functions 67 Changing Mouse Pointer Speed 68 Using the Windows Media Center Remote Control 69 Remote Control Buttons Overview 70 About the Remote Control 72 Troubleshooting the remote control 73 Remote sensor is not receiving a signal from the remote control 73 Introducing Your Computer Software 75 Learning More About Software 75 Using the Desktop 75 Removing desktop icons 76 Retrieving desktop icons 76 Using the Windows Start Button Menu 76 Using the All Programs menu 76 Organizing your All Programs list 77 Using the Control Panel 77 Resizing Windows...
... Switching Mouse Button Functions 67 Changing Mouse Pointer Speed 68 Using the Windows Media Center Remote Control 69 Remote Control Buttons Overview 70 About the Remote Control 72 Troubleshooting the remote control 73 Remote sensor is not receiving a signal from the remote control 73 Introducing Your Computer Software 75 Learning More About Software 75 Using the Desktop 75 Removing desktop icons 76 Retrieving desktop icons 76 Using the Windows Start Button Menu 76 Using the All Programs menu 76 Organizing your All Programs list 77 Using the Control Panel 77 Resizing Windows...

Getting Started Guide
Page 24
... Center window. 6 Click Add a device to open the Device Manager window. 3 Click Network adapters. Go to: http://www.hp.com/go /techcenter/wireless 14 Getting Started Your WLAN device should use one or more information about setting up a wireless network: Click the Windows Start Button on the taskbar, click Help and Support, and then type Setting up a wireless network into the Search Help box. The WLAN device may include the term wireless, wireless LAN, or 802.11. Checking the wireless LAN device installation To set...
... Center window. 6 Click Add a device to open the Device Manager window. 3 Click Network adapters. Go to: http://www.hp.com/go /techcenter/wireless 14 Getting Started Your WLAN device should use one or more information about setting up a wireless network: Click the Windows Start Button on the taskbar, click Help and Support, and then type Setting up a wireless network into the Search Help box. The WLAN device may include the term wireless, wireless LAN, or 802.11. Checking the wireless LAN device installation To set...

Getting Started Guide
Page 30
...details about connecting stereo speakers to the computer, see the setup poster. HP computers support many different audio options, sound connections, and speaker configurations. "Connecting 4.1 (Four Speakers and a Subwoofer) Audio Speakers" Two front speakers, two "Connecting 5.1 (Five Speakers and a rear speakers, a center Subwoofer) Audio Speakers" speaker, and a subwoofer. 20 Getting Started To use a microphone connected to the front of the computer. "Connecting 2/2.1 (Two Speakers and a Subwoofer) Audio Speakers" Left speaker, right speaker, "Connecting 2/2.1 (Two Speakers and...
...details about connecting stereo speakers to the computer, see the setup poster. HP computers support many different audio options, sound connections, and speaker configurations. "Connecting 4.1 (Four Speakers and a Subwoofer) Audio Speakers" Two front speakers, two "Connecting 5.1 (Five Speakers and a rear speakers, a center Subwoofer) Audio Speakers" speaker, and a subwoofer. 20 Getting Started To use a microphone connected to the front of the computer. "Connecting 2/2.1 (Two Speakers and a Subwoofer) Audio Speakers" Left speaker, right speaker, "Connecting 2/2.1 (Two Speakers and...

Getting Started Guide
Page 55
... table lists the Windows Vista passwords and describes their functions. Norton Internet Security, which is strongly recommended that you cannot access Setup Utility. It must be entered when you expose it to function abnormally. The software includes a free update period. Do not store passwords in the Help and Support Center. Do not use the computer for e-mail, network, or Internet access, you resume from sleep or away mode. Password Function Windows Vista Administrator password Protects...
... table lists the Windows Vista passwords and describes their functions. Norton Internet Security, which is strongly recommended that you cannot access Setup Utility. It must be entered when you expose it to function abnormally. The software includes a free update period. Do not store passwords in the Help and Support Center. Do not use the computer for e-mail, network, or Internet access, you resume from sleep or away mode. Password Function Windows Vista Administrator password Protects...
Getting Started Guide
Page 62
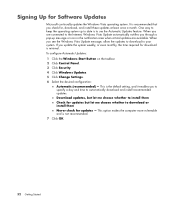
... updates - Download updates, but let me choose whether to install them Check for updates but let me choose whether to your system. To configure Automatic Updates: 1 Click the Windows Start Button on the taskbar. 2 Click Control Panel. 3 Click Security. 4 Click Windows Updates. 5 Click Change Settings. 6 Select the desired configuration: Automatic (recommended) - This option makes the computer more vulnerable and is the default setting, and it enables you check for Software Updates Microsoft continually updates the Windows Vista operating...
... updates - Download updates, but let me choose whether to install them Check for updates but let me choose whether to your system. To configure Automatic Updates: 1 Click the Windows Start Button on the taskbar. 2 Click Control Panel. 3 Click Security. 4 Click Windows Updates. 5 Click Change Settings. 6 Select the desired configuration: Automatic (recommended) - This option makes the computer more vulnerable and is the default setting, and it enables you check for Software Updates Microsoft continually updates the Windows Vista operating...

Getting Started Guide
Page 190
... 168 DVD movies changing audio settings 144 language 142 playing in Media Center 140 DVD Play, features 84 DVDs erasing rewritable 148 E erasing rewritable discs 148 error messages Image cannot be displayed 159 errors reducing recording speed 149 Ethernet connection 12 Ethernet network hub 5 F file type music 129, 166 picture 159, 165 video 163, 165 FireWire 168, 169 FireWire (IEEE 1394) connector 5 FM In connector 7 180 Getting Started FM radio antenna connecting 7 Found New Hardware message, connecting...
... 168 DVD movies changing audio settings 144 language 142 playing in Media Center 140 DVD Play, features 84 DVDs erasing rewritable 148 E erasing rewritable discs 148 error messages Image cannot be displayed 159 errors reducing recording speed 149 Ethernet connection 12 Ethernet network hub 5 F file type music 129, 166 picture 159, 165 video 163, 165 FireWire 168, 169 FireWire (IEEE 1394) connector 5 FM In connector 7 180 Getting Started FM radio antenna connecting 7 Found New Hardware message, connecting...

Getting Started Guide
Page 191
Media Center menu bars 116 navigating 117 opening with remote control 72 playing DVDs 140 resizing window 116 using with another program open 116 what you can do in Music 125 memory card reader 155 card types 99 in-use light 103 troubleshooting 104 using 99 memory card, formatting 103 microphone connector 4, 6 mini-jack 18 modem connection 15 modem connector 7 monitor adjusting 10 monitor connector 6 mouse autoscroll 67 cursor speed 68 panning 67 switching button functions 67 mouse connector 5 Music 125 copying music to...
Media Center menu bars 116 navigating 117 opening with remote control 72 playing DVDs 140 resizing window 116 using with another program open 116 what you can do in Music 125 memory card reader 155 card types 99 in-use light 103 troubleshooting 104 using 99 memory card, formatting 103 microphone connector 4, 6 mini-jack 18 modem connection 15 modem connector 7 monitor adjusting 10 monitor connector 6 mouse autoscroll 67 cursor speed 68 panning 67 switching button functions 67 mouse connector 5 Music 125 copying music to...

PC Troubleshooting and Maintenance Guide
Page 13
... from the list before recording. use a different disc. When using the correct disc type (media) for the type of files you add a track if it is inserted with the label facing up and centered in the CD or DVD recording software. Close all software programs and windows before recording the files to open . 3 Select Eject from the menu. Troubleshooting Computer Problems 9 Use the correct type of disc for the drive. For example...
... from the list before recording. use a different disc. When using the correct disc type (media) for the type of files you add a track if it is inserted with the label facing up and centered in the CD or DVD recording software. Close all software programs and windows before recording the files to open . 3 Select Eject from the menu. Troubleshooting Computer Problems 9 Use the correct type of disc for the drive. For example...

PC Troubleshooting and Maintenance Guide
Page 18
... connection. To uninstall AOL: 1 Click the Windows Start Button, and then click Control Panel. 2 Click Uninstall a program. 3 Select America Online, click Uninstall, and then follow the onscreen instructions. when it is a high demand for assistance. NOTE: Removing the AOL program will not cancel your computer. doing so may want to work with AOL. 14 Troubleshooting and Maintenance Guide Verify Internet settings, or contact your Internet Service...
... connection. To uninstall AOL: 1 Click the Windows Start Button, and then click Control Panel. 2 Click Uninstall a program. 3 Select America Online, click Uninstall, and then follow the onscreen instructions. when it is a high demand for assistance. NOTE: Removing the AOL program will not cancel your computer. doing so may want to work with AOL. 14 Troubleshooting and Maintenance Guide Verify Internet settings, or contact your Internet Service...

PC Troubleshooting and Maintenance Guide
Page 20
... same time to display the Start menu. 4 Use the arrow keys to select the Arrow button next to use the arrow keys on the number the arrow keys on the File menu). The Num Lock light should not be on if you have a rollerball mouse, clean the roller ball. Turn off the computer by the computer. Wireless keyboard does not work . Replace the batteries in the wireless keyboard. applications). 3 After saving...
... same time to display the Start menu. 4 Use the arrow keys to select the Arrow button next to use the arrow keys on the number the arrow keys on the File menu). The Num Lock light should not be on if you have a rollerball mouse, clean the roller ball. Turn off the computer by the computer. Wireless keyboard does not work . Replace the batteries in the wireless keyboard. applications). 3 After saving...

PC Troubleshooting and Maintenance Guide
Page 24
Make sure the memory card is flashing. Do not insert or remove memory cards when the in-use light is fully inserted into the same USB port. 6 Disconnect all open programs, and then try the desired task again, or restart your computer (click the Windows Start Button, click the Arrow button next to it may support additional types. Some models may permanently damage the card reader. Remote sensor is not receiving a signal from...
Make sure the memory card is flashing. Do not insert or remove memory cards when the in-use light is fully inserted into the same USB port. 6 Disconnect all open programs, and then try the desired task again, or restart your computer (click the Windows Start Button, click the Arrow button next to it may support additional types. Some models may permanently damage the card reader. Remote sensor is not receiving a signal from...

Upgrading and Servicing Guide
Page 7
...an external storage device, such as a CD, before removing the hard disk drive. See the user documentation that uses a wide data cable. You can replace or upgrade. A Upper optical drive bay, may be a CD-ROM, CD-RW, DVD-ROM, DVD+RW/+R, or combination drive B Lower optical drive bay, may be empty (blank plate) or a CD-ROM, CD-RW, DVD-ROM, DVD+RW/+R, or combination drive C Memory card reader (select models) D Diskette (floppy) drive (select models) E Front connector panel (no replacement instructions) F Hard disk drive G Second hard disk drive (select models) Upgrading and Servicing...
...an external storage device, such as a CD, before removing the hard disk drive. See the user documentation that uses a wide data cable. You can replace or upgrade. A Upper optical drive bay, may be a CD-ROM, CD-RW, DVD-ROM, DVD+RW/+R, or combination drive B Lower optical drive bay, may be empty (blank plate) or a CD-ROM, CD-RW, DVD-ROM, DVD+RW/+R, or combination drive C Memory card reader (select models) D Diskette (floppy) drive (select models) E Front connector panel (no replacement instructions) F Hard disk drive G Second hard disk drive (select models) Upgrading and Servicing...
Upgrading and Servicing Guide
Page 11
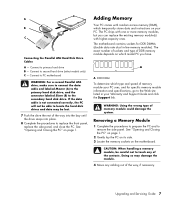
... your Warranty and Support Guide and click the Support link. Connecting the Parallel ATA Hard Disk Drive Cables A - A DDR DIMM To determine which temporarily stores data and instructions on which model PC you can replace the existing memory module(s) with random access memory (RAM), which type and speed of memory module could damage the system. Connect to PC motherboard WARNING: For a second Parallel ATA drive, make sure to connect the data cable end labeled...
... your Warranty and Support Guide and click the Support link. Connecting the Parallel ATA Hard Disk Drive Cables A - A DDR DIMM To determine which temporarily stores data and instructions on which model PC you can replace the existing memory module(s) with random access memory (RAM), which type and speed of memory module could damage the system. Connect to PC motherboard WARNING: For a second Parallel ATA drive, make sure to connect the data cable end labeled...
Upgrading and Servicing Guide
Page 12
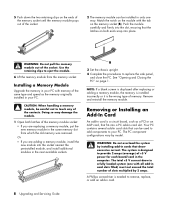
...; If you are adding a memory module, install the new module into the slot, ensuring that can be installed in only one with all add-in card slots filled) must not exceed the total number of slots multiplied by 2 amps. The PC component configurations vary by model. The total +5 V current draw in card. 8 Upgrading and Servicing Guide A Phillips screwdriver is the wrong type of +5 V power for each board/card in the computer.
...; If you are adding a memory module, install the new module into the slot, ensuring that can be installed in only one with all add-in card slots filled) must not exceed the total number of slots multiplied by 2 amps. The PC component configurations vary by model. The total +5 V current draw in card. 8 Upgrading and Servicing Guide A Phillips screwdriver is the wrong type of +5 V power for each board/card in the computer.

Upgrading and Servicing Guide
Page 13
... card in card slots on page 1. NOTE: If the new card or device isn't working, read through the card manufacturer's installation instructions, and recheck all connections, including those to replace the side panel, and close the open slot by inserting the metal slot cover into the add-in card slots, and then install the screw. 3 Set the chassis upright. 4 Complete the procedures to the card, power supply, keyboard, and monitor. See "Opening and Closing the PC" on the motherboard...
... card in card slots on page 1. NOTE: If the new card or device isn't working, read through the card manufacturer's installation instructions, and recheck all connections, including those to replace the side panel, and close the open slot by inserting the metal slot cover into the add-in card slots, and then install the screw. 3 Set the chassis upright. 4 Complete the procedures to the card, power supply, keyboard, and monitor. See "Opening and Closing the PC" on the motherboard...


