Maintenance and Service Guide
Page 2
.... To access the latest user guides, go to http://www.hp.com/support, and follow the instructions to find your sole remedy is a trademark of Google LLC. Then select Manuals. Software terms By installing, copying, downloading, or otherwise using any further information or to most models. Intel is to return the entire unused product (hardware and software) within 14 days for HP products and services are...
.... To access the latest user guides, go to http://www.hp.com/support, and follow the instructions to find your sole remedy is a trademark of Google LLC. Then select Manuals. Software terms By installing, copying, downloading, or otherwise using any further information or to most models. Intel is to return the entire unused product (hardware and software) within 14 days for HP products and services are...
Maintenance and Service Guide
Page 4
... your computer ...20 Enabling HP Easy Clean (select products only) ...20 Removing dirt and debris from your computer...20 Cleaning your computer with a disinfectant ...21 Caring for wood veneer (select products only) ...22 Packaging and transporting guidelines ...22 Accessing support information ...22 5 Removal and replacement procedures for authorized service provider parts 25 Component replacement procedures...25 Preparation for disassembly ...25 iv
... your computer ...20 Enabling HP Easy Clean (select products only) ...20 Removing dirt and debris from your computer...20 Cleaning your computer with a disinfectant ...21 Caring for wood veneer (select products only) ...22 Packaging and transporting guidelines ...22 Accessing support information ...22 5 Removal and replacement procedures for authorized service provider parts 25 Component replacement procedures...25 Preparation for disassembly ...25 iv

Maintenance and Service Guide
Page 5
... panel (without removing the display) ...25 Bottom cover ...27 Battery ...28 WLAN module ...30 Solid-state drive ...31 Touchpad ...33 Speakers ...34 I/O board ...35 Heat sink ...36 System board...37 Display assembly...40 Top cover with keyboard...44 6 Backing up, resetting, and recovering ...46 Backing up ...46 Resetting...46 Recovering ...46 Option 1: Recovering using an internet connection 47 Option 2: Installing the Chromebook Recovery Utility 47 Creating recovery media...47 Recovering the Chrome operating system with recovery media 48 Setting up your computer after a reset or recovery...
... panel (without removing the display) ...25 Bottom cover ...27 Battery ...28 WLAN module ...30 Solid-state drive ...31 Touchpad ...33 Speakers ...34 I/O board ...35 Heat sink ...36 System board...37 Display assembly...40 Top cover with keyboard...44 6 Backing up, resetting, and recovering ...46 Backing up ...46 Resetting...46 Recovering ...46 Option 1: Recovering using an internet connection 47 Option 2: Installing the Chromebook Recovery Utility 47 Creating recovery media...47 Recovering the Chrome operating system with recovery media 48 Setting up your computer after a reset or recovery...
Maintenance and Service Guide
Page 6
... Graphics Internal graphics MediaTek Integrated Graphics Display 13.3 in (33.8 cm), white light-emitting diode (WLED), antiglare, touch screen, narrow bezel Full high definition (FHD) (1920 × 1080), ultra wide viewing angle (UWVA), 45% NTSC, embedded DisplayPort (eDP) 1.2 without panel self-refresh (PSR), 250 nits Memory Integrated, not customer accessible or upgradeable supporting up to 8 GB of RAM LPDDR4X-4266 dual-channel support Supports...
... Graphics Internal graphics MediaTek Integrated Graphics Display 13.3 in (33.8 cm), white light-emitting diode (WLED), antiglare, touch screen, narrow bezel Full high definition (FHD) (1920 × 1080), ultra wide viewing angle (UWVA), 45% NTSC, embedded DisplayPort (eDP) 1.2 without panel self-refresh (PSR), 250 nits Memory Integrated, not customer accessible or upgradeable supporting up to 8 GB of RAM LPDDR4X-4266 dual-channel support Supports...

Maintenance and Service Guide
Page 9
... their descriptions Component (1) Memory card reader (2) AC adapter and battery light Description Reads optional memory cards that store, manage, share, or access information. To remove a card: ● Press in on the card until it from the memory card reader. ● White: The AC adapter is connected and the battery is fully charged. ● Amber: The AC adapter is connected and the battery is charging. ● Blinking amber: The battery has an error. ● Off: The battery is firmly seated...
... their descriptions Component (1) Memory card reader (2) AC adapter and battery light Description Reads optional memory cards that store, manage, share, or access information. To remove a card: ● Press in on the card until it from the memory card reader. ● White: The AC adapter is connected and the battery is fully charged. ● Amber: The AC adapter is connected and the battery is charging. ● Blinking amber: The battery has an error. ● Off: The battery is firmly seated...

Maintenance and Service Guide
Page 10
...Gbps port supplying power to identify the components on the left side of personal injury, adjust the volume before putting on or in Connects optional powered stereo speakers, headphones, (microphone) combo jack earbuds, a headset, or a television audio cable. NOTE: Use a standard USB Type-C charging cable or cable adapter (purchased separately) when charging a small external device. (4) Audio-out (headphone)/Audio-in Sleep mode. NOTE: Use a standard USB Type-A charging cable or cable adapter (purchased separately) when charging a small external device. WARNING! This jack does...
...Gbps port supplying power to identify the components on the left side of personal injury, adjust the volume before putting on or in Connects optional powered stereo speakers, headphones, (microphone) combo jack earbuds, a headset, or a television audio cable. NOTE: Use a standard USB Type-C charging cable or cable adapter (purchased separately) when charging a small external device. (4) Audio-out (headphone)/Audio-in Sleep mode. NOTE: Use a standard USB Type-A charging cable or cable adapter (purchased separately) when charging a small external device. WARNING! This jack does...

Maintenance and Service Guide
Page 11
... exit Hibernation. Display Use the illustration and table to the computer and, if needed, charging the computer battery. - NOTE: Use a standard USB Type-C charging cable or cable adapter (purchased separately) when charging a small external device. (3) AC adapter and battery light ● White: The AC adapter is connected and the battery is fully charged. ● Amber: The AC adapter is connected and the battery is charging. (4) Power button ● Blinking amber: The battery has an error. ● Off: The battery is not charging. ●...
... exit Hibernation. Display Use the illustration and table to the computer and, if needed, charging the computer battery. - NOTE: Use a standard USB Type-C charging cable or cable adapter (purchased separately) when charging a small external device. (3) AC adapter and battery light ● White: The AC adapter is connected and the battery is fully charged. ● Amber: The AC adapter is connected and the battery is charging. (4) Power button ● Blinking amber: The battery has an error. ● Off: The battery is not charging. ●...

Maintenance and Service Guide
Page 25
... such as the keyboard, touch screen, and touchpad for a preset amount of harmful bacteria and viruses. Start HP Easy Clean in the taskbar. - Turn off your computer with a disinfectant on page 21 for wood veneer (select products only) on your computer. Remove any installed batteries from your computer. See Cleaning your device and unplug the power cord and other connected external devices. Enabling HP Easy Clean (select...
... such as the keyboard, touch screen, and touchpad for a preset amount of harmful bacteria and viruses. Start HP Easy Clean in the taskbar. - Turn off your computer with a disinfectant on page 21 for wood veneer (select products only) on your computer. Remove any installed batteries from your computer. See Cleaning your device and unplug the power cord and other connected external devices. Enabling HP Easy Clean (select...

Maintenance and Service Guide
Page 26
...HP's cleaning guidelines is turned on page 22, or both, you remove the gloves. Cleaning your HP product, it can cause damage to the bottom. Remove any flexible cables, like power cord, keyboard cable, and USB cables. 6. The cloth should be moist, but not dripping wet. Do not spray liquids directly on your device and unplug the power cord and other connected external devices... towels. 4. If liquid makes its way inside your computer with a mixture of the display to the product. Do not use any of harmful bacteria and viruses. Start with water. Wipe carefully ...
...HP's cleaning guidelines is turned on page 22, or both, you remove the gloves. Cleaning your HP product, it can cause damage to the bottom. Remove any flexible cables, like power cord, keyboard cable, and USB cables. 6. The cloth should be moist, but not dripping wet. Do not spray liquids directly on your device and unplug the power cord and other connected external devices... towels. 4. If liquid makes its way inside your computer with a mixture of the display to the product. Do not use any of harmful bacteria and viruses. Start with water. Wipe carefully ...

Maintenance and Service Guide
Page 27
... cables, like power cord, keyboard cable, and USB cables. 6. Because of the nature of natural wood, you remove the gloves. Do not use aerosol sprays, solvents, abrasives, or cleaners containing hydrogen peroxide or bleach that might feature high-quality wood veneer. Start with a disinfectant. Be sure that you can also clean the surfaces with the display (if applicable). After you remove...
... cables, like power cord, keyboard cable, and USB cables. 6. Because of the nature of natural wood, you remove the gloves. Do not use aerosol sprays, solvents, abrasives, or cleaners containing hydrogen peroxide or bleach that might feature high-quality wood veneer. Start with a disinfectant. Be sure that you can also clean the surfaces with the display (if applicable). After you remove...
Maintenance and Service Guide
Page 28
... to open. 2. Turn on the computer and allow the operating system to access information Records of reported failure incidents stored on the computer Windows: Preoperating system failures are logged in the BIOS Event Log. Type Event Viewer, and then press enter. 4. Select the log from the left panel. Chrome: 1. Select Support & Troubleshooting. 4. To locate repair professionals: 1. Select Authorized service providers. Press f10 to www.hp...
... to open. 2. Turn on the computer and allow the operating system to access information Records of reported failure incidents stored on the computer Windows: Preoperating system failures are logged in the BIOS Event Log. Type Event Viewer, and then press enter. 4. Select the log from the left panel. Chrome: 1. Select Support & Troubleshooting. 4. To locate repair professionals: 1. Select Authorized service providers. Press f10 to www.hp...

Maintenance and Service Guide
Page 30
... -screen instructions. Component replacement procedures To remove and replace computer components, use the procedures described in this chapter. Disconnect all external devices from the computer. 3. Table 5-1 Display panel descriptions and part numbers Description Spare part number Display panel N24444-001 Before removing the display panel, follow the on the service tag at the bottom of your computer, including model, serial number, product key, and length of each screw size and location during removal and replacement. Remove the bottom cover...
... -screen instructions. Component replacement procedures To remove and replace computer components, use the procedures described in this chapter. Disconnect all external devices from the computer. 3. Table 5-1 Display panel descriptions and part numbers Description Spare part number Display panel N24444-001 Before removing the display panel, follow the on the service tag at the bottom of your computer, including model, serial number, product key, and length of each screw size and location during removal and replacement. Remove the bottom cover...
Maintenance and Service Guide
Page 35
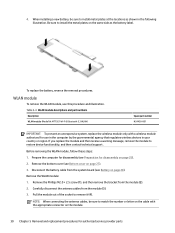
... (4). Disconnect the battery cable from the system board (see Battery on page 27). 3. Remove the WLAN module: 1. WLAN module To remove the WLAN module, use in the computer by the governmental agency that regulates wireless devices in the following illustration. 4. When installing a new battery, be sure to restore device functionality, and then contact technical support. Table 5-4 WLAN module descriptions and part numbers Description WLAN module (MediaTek MT7921 Wi-Fi 6 Bluetooth 5.3 WLAN) Spare part number N24438-001...
... (4). Disconnect the battery cable from the system board (see Battery on page 27). 3. Remove the WLAN module: 1. WLAN module To remove the WLAN module, use in the computer by the governmental agency that regulates wireless devices in the following illustration. 4. When installing a new battery, be sure to restore device functionality, and then contact technical support. Table 5-4 WLAN module descriptions and part numbers Description WLAN module (MediaTek MT7921 Wi-Fi 6 Bluetooth 5.3 WLAN) Spare part number N24438-001...

Maintenance and Service Guide
Page 43
...; Keyboard cable (ZIF) (7) ● Touchpad cable (ZIF) (8) ● Right speaker cable (9) 2. Remove the heat sink (see Battery on page 30). Disconnect the following cables from the bracket, and then remove the bracket (2). 3. Remove the battery (see Heat sink on page 27). 3. Remove the WLAN module (see Preparation for authorized service provider parts Prepare the computer for disassembly (see WLAN module on page 28). 4. Remove the system board: 1. Before removing the...
...; Keyboard cable (ZIF) (7) ● Touchpad cable (ZIF) (8) ● Right speaker cable (9) 2. Remove the heat sink (see Battery on page 30). Disconnect the following cables from the bracket, and then remove the bracket (2). 3. Remove the battery (see Heat sink on page 27). 3. Remove the WLAN module (see Preparation for authorized service provider parts Prepare the computer for disassembly (see WLAN module on page 28). 4. Remove the system board: 1. Before removing the...
Maintenance and Service Guide
Page 51
... memory card or through Google Drive. To reset your files at these locations. Follow the on your computer hard drive, including files in the following circumstances: ● You see the message "Reset this Chrome device." ● You are having problems with your user profile or settings. ● You restarted your computer, and it still doesn't work properly, you reset your computer. A recovery reinstalls the operating system, software...
... memory card or through Google Drive. To reset your files at these locations. Follow the on your computer hard drive, including files in the following circumstances: ● You see the message "Reset this Chrome device." ● You are having problems with your user profile or settings. ● You restarted your computer, and it still doesn't work properly, you reset your computer. A recovery reinstalls the operating system, software...

Maintenance and Service Guide
Page 52
... already displayed: - Creating recovery media You can install this message is erased from this option if you begin . ● A computer with internet access. The computer restarts, and the screen shows the "ChromeOS is complete" message appears, reboot your downloaded files. To install the Chromebook Recovery Utility: ■ Open the Chrome Web Store, search for chrome recovery, select Chromebook Recovery Utility from the device before you need the following prerequisites: ● A USB flash drive or SD memory card...
... already displayed: - Creating recovery media You can install this message is erased from this option if you begin . ● A computer with internet access. The computer restarts, and the screen shows the "ChromeOS is complete" message appears, reboot your downloaded files. To install the Chromebook Recovery Utility: ■ Open the Chrome Web Store, search for chrome recovery, select Chromebook Recovery Utility from the device before you need the following prerequisites: ● A USB flash drive or SD memory card...
Maintenance and Service Guide
Page 53
... Chrome Recovery Utility again or use the Chromebook Recovery Utility to http://www.support.google.com. After recovery, you create recovery media, the USB flash drive or SD memory card is complete" message appears, remove the recovery media. To enter recovery mode, press and hold the power button until the process is complete. When the "ChromeOS is displayed, you created. 1. Turn on a computer that you might need to create the recovery media. Follow the on your recovery media will be deleted. Disconnect any external devices connected...
... Chrome Recovery Utility again or use the Chromebook Recovery Utility to http://www.support.google.com. After recovery, you create recovery media, the USB flash drive or SD memory card is complete" message appears, remove the recovery media. To enter recovery mode, press and hold the power button until the process is complete. When the "ChromeOS is displayed, you created. 1. Turn on a computer that you might need to create the recovery media. Follow the on your recovery media will be deleted. Disconnect any external devices connected...
Maintenance and Service Guide
Page 56
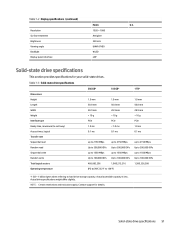
... Up to 100,000 IOPs Total logical sectors Operating temperature 468,883,296 1,000,215,216 0&#...hard drive storage capacity. NOTE: Certain restrictions and exclusions apply. Table 7-2 Display specifications (continued) Metric U.S. Contact support for your solid-state drives. Actual accessible capacity is less. Resolution 1920 × 1080 Surface treatment Antiglare Brightness 250 nits Viewing angle UWVA (FHD) Backlight WLED Display panel interface eDP Solid-state drive specifications This section provides specifications for details. Solid-state drive specifications...
... Up to 100,000 IOPs Total logical sectors Operating temperature 468,883,296 1,000,215,216 0&#...hard drive storage capacity. NOTE: Certain restrictions and exclusions apply. Table 7-2 Display specifications (continued) Metric U.S. Contact support for your solid-state drives. Actual accessible capacity is less. Resolution 1920 × 1080 Surface treatment Antiglare Brightness 250 nits Viewing angle UWVA (FHD) Backlight WLED Display panel interface eDP Solid-state drive specifications This section provides specifications for details. Solid-state drive specifications...
Maintenance and Service Guide
Page 60
... headphone (audio-out) jack 5 heat sink illustrated 13 removal and replacement 36 spare part numbers 13, 36 hinge illustrated 14 spare part numbers 14 hinge cover rubber inserts 14, 43 hinge covers illustrated 14 removal and replacement 43 spare part numbers 14, 43 I I/O board illustrated 13 removal and replacement 35 spare part numbers 13, 35 illustrated parts catalog 12 internal microphones, identifying 7 J jack (audio) 5 K keyboard product description 2 keyboard country codes 44 keys esc 8 lock 9 search 9 L labels Bluetooth 10 regulatory 10 serial number 10 service 10 wireless certification...
... headphone (audio-out) jack 5 heat sink illustrated 13 removal and replacement 36 spare part numbers 13, 36 hinge illustrated 14 spare part numbers 14 hinge cover rubber inserts 14, 43 hinge covers illustrated 14 removal and replacement 43 spare part numbers 14, 43 I I/O board illustrated 13 removal and replacement 35 spare part numbers 13, 35 illustrated parts catalog 12 internal microphones, identifying 7 J jack (audio) 5 K keyboard product description 2 keyboard country codes 44 keys esc 8 lock 9 search 9 L labels Bluetooth 10 regulatory 10 serial number 10 service 10 wireless certification...
Maintenance and Service Guide
Page 61
... SuperSpeed port with HP Sleep and Charge 5 USB Type-C power connector and SuperSpeed port 5, 6 power button, identifying 6 power connector identifying 5, 6 power cord requirements for all countries 52 requirements for specific countries and regions 52 set requirements 52 power cords, spare part numbers 15 power requirements, product description 2 primary storage product description 1 processor product description 1 product description audio 2 display panel 1 graphics 1 hard drive 1 keyboard 2 media card reader 2 memory module 1 microphone 2 operating system 3 pointing device 2 ports 2 power...
... SuperSpeed port with HP Sleep and Charge 5 USB Type-C power connector and SuperSpeed port 5, 6 power button, identifying 6 power connector identifying 5, 6 power cord requirements for all countries 52 requirements for specific countries and regions 52 set requirements 52 power cords, spare part numbers 15 power requirements, product description 2 primary storage product description 1 processor product description 1 product description audio 2 display panel 1 graphics 1 hard drive 1 keyboard 2 media card reader 2 memory module 1 microphone 2 operating system 3 pointing device 2 ports 2 power...

