
User Guide
Page 5
...Features HP LCD Monitors ...1-1 Features ...1-1 2 Safety and Maintenance Guidelines Important Safety Information ...2-1 Safety Precautions ...2-1 Maintenance Guidelines...2-2 Cleaning the Monitor ...2-2 3 Setting Up the Monitor Unpacking the Monitor...3-1 Installing the Monitor ...3-1 Preparing the monitor for desktop use 3-1 Preparing the monitor ... Cable Management...3-9 Adjusting the Tilt...3-9 Adjusting the Swivel...3-10 Keyboard Parking...3-10 4 Operating the Monitor CD Software and Utilities ...4-1 Installing Drivers...4-1 Downloading updated drivers from the Internet 4-1 Using the ...
...Features HP LCD Monitors ...1-1 Features ...1-1 2 Safety and Maintenance Guidelines Important Safety Information ...2-1 Safety Precautions ...2-1 Maintenance Guidelines...2-2 Cleaning the Monitor ...2-2 3 Setting Up the Monitor Unpacking the Monitor...3-1 Installing the Monitor ...3-1 Preparing the monitor for desktop use 3-1 Preparing the monitor ... Cable Management...3-9 Adjusting the Tilt...3-9 Adjusting the Swivel...3-10 Keyboard Parking...3-10 4 Operating the Monitor CD Software and Utilities ...4-1 Installing Drivers...4-1 Downloading updated drivers from the Internet 4-1 Using the ...
User Guide
Page 6
... ...A-3 Preparing to Call Technical Support...A-3 Locating the Rating Label...A-3 B Technical Specifications HP LCD Monitors ...B-1 Preset Video and High-Definition Modes B-4 LCD Monitor Quality and Pixel Policy...B-6 Power Cord Set Requirements ...B-6 C Agency Regulatory Notices Federal Communications Commission Notice C-1 Modifications...C-1 Cables ...C-1... C-3 Japanese Notice ...C-3 Japanese Power Cord Notice...C-3 Japanese Material Content Declaration C-3 Korean Notice ...C-3 EPA ENERGY STAR Compliance ...C-4 HP Recycling Program...C-4 Republic of Turkey EEE Regulation ...C-4 D Index
... ...A-3 Preparing to Call Technical Support...A-3 Locating the Rating Label...A-3 B Technical Specifications HP LCD Monitors ...B-1 Preset Video and High-Definition Modes B-4 LCD Monitor Quality and Pixel Policy...B-6 Power Cord Set Requirements ...B-6 C Agency Regulatory Notices Federal Communications Commission Notice C-1 Modifications...C-1 Cables ...C-1... C-3 Japanese Notice ...C-3 Japanese Power Cord Notice...C-3 Japanese Material Content Declaration C-3 Korean Notice ...C-3 EPA ENERGY STAR Compliance ...C-4 HP Recycling Program...C-4 Republic of Turkey EEE Regulation ...C-4 D Index

User Guide
Page 7
..., providing better experience for gaming and graphics ■ Easy viewing from a sitting or standing position, or while moving from one side of the monitor to the other ■ Tilt adjustment ■ Swivel adjustment ■ Removable pedestal and Video Electronics Standards Association (VESA) standard mounting holes for... ■ Power Saver to reduce energy consumption ■ Quick View settings display ■ Ambient Light Sensor (select models only) 1 Product Features HP LCD Monitors The HP LCD (liquid crystal display) monitors have an active matrix, thin-film transistor (TFT) screen.
..., providing better experience for gaming and graphics ■ Easy viewing from a sitting or standing position, or while moving from one side of the monitor to the other ■ Tilt adjustment ■ Swivel adjustment ■ Removable pedestal and Video Electronics Standards Association (VESA) standard mounting holes for... ■ Power Saver to reduce energy consumption ■ Quick View settings display ■ Ambient Light Sensor (select models only) 1 Product Features HP LCD Monitors The HP LCD (liquid crystal display) monitors have an active matrix, thin-film transistor (TFT) screen.
User Guide
Page 9
... power cord is designed for use only a power source and connection compatible with this ability. To use a different cord, use with your monitor, the computer, and other equipment to the equipment as possible. Never pull on the cord. Safety Precautions ■ Use only a power ...rating of electric shock or damage to a surge protection device such as a power strip with this monitor, as having this monitor. WARNING: Always connect your monitor. CAUTION: To protect your monitor, as well as your safety, be specifically labeled as indicated on the power cord. Do not walk...
... power cord is designed for use only a power source and connection compatible with this ability. To use a different cord, use with your monitor, the computer, and other equipment to the equipment as possible. Never pull on the cord. Safety Precautions ■ Use only a power ...rating of electric shock or damage to a surge protection device such as a power strip with this monitor, as having this monitor. WARNING: Always connect your monitor. CAUTION: To protect your monitor, as well as your safety, be specifically labeled as indicated on the power cord. Do not walk...
User Guide
Page 10
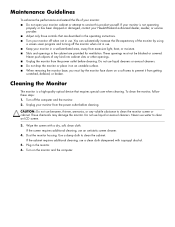
... volatile substance to service this product yourself. CAUTION: Do not use . Wipe the screen with isopropyl alcohol. 5. Plug in the monitor. 6. To clean the monitor, follow these steps: 1. Never use liquid or aerosol cleaners. Use a damp cloth to prevent it from excessive light, heat, ... requires special care when cleaning. Turn on a soft area to clean the cabinet. Turn off the monitor when not in use an antistatic screen cleaner. 4. If your monitor is a high-quality optical device that are provided for ventilation. If the screen requires additional cleaning, ...
... volatile substance to service this product yourself. CAUTION: Do not use . Wipe the screen with isopropyl alcohol. 5. Plug in the monitor. 6. To clean the monitor, follow these steps: 1. Never use liquid or aerosol cleaners. Use a damp cloth to prevent it from excessive light, heat, ... requires special care when cleaning. Turn on a soft area to clean the cabinet. Turn off the monitor when not in use an antistatic screen cleaner. 4. If your monitor is a high-quality optical device that are provided for ventilation. If the screen requires additional cleaning, ...

User Guide
Page 11
... touching or applying pressure to assemble the monitor. Unpack the monitor. 3 Setting Up the Monitor Unpacking the Monitor 1. Determine whether the monitor will be desktop mounted or wall-mounted. Connect the monitor cables after you have installed the monitor. Unfolding the monitor 2. Store the packing box. 2. Preparing the monitor for installation. 5. Unfold the monitor by lifting it . You need a flat...
... touching or applying pressure to assemble the monitor. Unpack the monitor. 3 Setting Up the Monitor Unpacking the Monitor 1. Determine whether the monitor will be desktop mounted or wall-mounted. Connect the monitor cables after you have installed the monitor. Unfolding the monitor 2. Store the packing box. 2. Preparing the monitor for installation. 5. Unfold the monitor by lifting it . You need a flat...

User Guide
Page 12
...equipment, check that the wall-mounting fixture is capable of supporting the monitor. 1. Monitor in upright position Preparing the monitor for wall-mounting WARNING: To reduce the risk of personal injury or of screws securing base to the monitor. Refer to an upright position and place on a flat, protected... surface. 3. Place the monitor face down on a flat, stable surface. Lift the monitor to the instructions supplied with the wall-mounting fixture and check ...
...equipment, check that the wall-mounting fixture is capable of supporting the monitor. 1. Monitor in upright position Preparing the monitor for wall-mounting WARNING: To reduce the risk of personal injury or of screws securing base to the monitor. Refer to an upright position and place on a flat, protected... surface. 3. Place the monitor face down on a flat, stable surface. Lift the monitor to the instructions supplied with the wall-mounting fixture and check ...
User Guide
Page 13
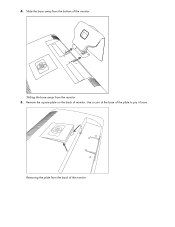
Remove the square plate on the back of the plate to pry it loose. Slide the base away from the back of the monitor. Removing the plate from the bottom of the monitor Use a coin at the base of monitor. 4. Sliding the base away from the monitor 5.
Remove the square plate on the back of the plate to pry it loose. Slide the base away from the back of the monitor. Removing the plate from the bottom of the monitor Use a coin at the base of monitor. 4. Sliding the base away from the monitor 5.

User Guide
Page 14
... 6. Some models will need to ensure that are on your model). You will include mounting screws in the mounting holes. The threaded holes that the monitor is safely attached. Four or six threaded holes are compliant with the mounting fixture to remove the screws, position the mounting device, then re-install... the screws. 100 x 100mm Threaded holes for attaching wall mount 100 x 200mm Threaded holes for mounting flat-panel monitors. 7. These holes are for screws to the back of the panel are exposed (depending on the back of the...
... 6. Some models will need to ensure that are on your model). You will include mounting screws in the mounting holes. The threaded holes that the monitor is safely attached. Four or six threaded holes are compliant with the mounting fixture to remove the screws, position the mounting device, then re-install... the screws. 100 x 100mm Threaded holes for attaching wall mount 100 x 200mm Threaded holes for mounting flat-panel monitors. 7. These holes are for screws to the back of the panel are exposed (depending on the back of the...
User Guide
Page 15
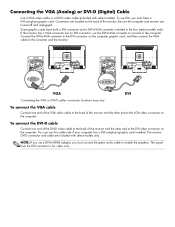
... a VGA connector but no DVI connector, use a DVI-to-HDMI adapter, you must connect the green audio cable to the converter and the monitor. You can use DVI, you must have both a DVI connector and a DVI-to the DVI video connector on the computer graphic card, and then connect ... or DVI-D cable-connector locations may vary To connect the VGA cable Connect one end of the DVI-D video cable to the back of the monitor. Connecting the VGA (Analog) or DVI-D (Digital) Cable Use a VGA video cable or a DVI-D video cable (provided with select models only. Be sure the computer...
... a VGA connector but no DVI connector, use a DVI-to-HDMI adapter, you must connect the green audio cable to the converter and the monitor. You can use DVI, you must have both a DVI connector and a DVI-to the DVI video connector on the computer graphic card, and then connect ... or DVI-D cable-connector locations may vary To connect the VGA cable Connect one end of the DVI-D video cable to the back of the monitor. Connecting the VGA (Analog) or DVI-D (Digital) Cable Use a VGA video cable or a DVI-D video cable (provided with select models only. Be sure the computer...
User Guide
Page 16
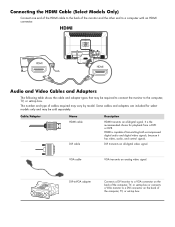
...an all -digital video signal. Some cables and adapters are included for playback from a DVD or DVR. DVI-to-VGA adapter Connects a DVI monitor to a VGA connector on the back of transmitting both uncompressed digital audio and digital video signals, because it has video, audio, and control signals.... DVI transmits an all -digital signal. The number and type of the monitor and the other end to a computer with an HDMI connector. Audio and Video Cables and Adapters The following table shows the cable and adapter...
...an all -digital video signal. Some cables and adapters are included for playback from a DVD or DVR. DVI-to-VGA adapter Connects a DVI monitor to a VGA connector on the back of transmitting both uncompressed digital audio and digital video signals, because it has video, audio, and control signals.... DVI transmits an all -digital signal. The number and type of the monitor and the other end to a computer with an HDMI connector. Audio and Video Cables and Adapters The following table shows the cable and adapter...

User Guide
Page 17
... locations may see a black screen or a lower resolution picture when playing high-definition protected content. If you do not have an HDCP-enabled monitor, you must connect your monitor supports HDCP, it can convert both support HDCP to a DVI connector on the back of the computer, TV, or set-top box. NOTE... an HDMI connector on the back of the computer, TV, or set-top box or connects an HDMI monitor to display protected content. Your computer graphic card and monitor must connect the green audio cable to a DVI connector on the back of the computer, TV, or set-top box. A separate audio ...
... locations may see a black screen or a lower resolution picture when playing high-definition protected content. If you do not have an HDCP-enabled monitor, you must connect your monitor supports HDCP, it can convert both support HDCP to a DVI connector on the back of the computer, TV, or set-top box. NOTE... an HDMI connector on the back of the computer, TV, or set-top box or connects an HDMI monitor to display protected content. Your computer graphic card and monitor must connect the green audio cable to a DVI connector on the back of the computer, TV, or set-top box. A separate audio ...

User Guide
Page 18
... grounding plug is an important safety feature. See "Technical Specifications" (Appendix B) for additional information. WARNING: To reduce the risk of the power cable to the monitor and the other end to your equipment: ■ Do not disable the power cord grounding plug.
... grounding plug is an important safety feature. See "Technical Specifications" (Appendix B) for additional information. WARNING: To reduce the risk of the power cable to the monitor and the other end to your equipment: ■ Do not disable the power cord grounding plug.

User Guide
Page 19
Face the front of the monitor either toward or away from the front. . Adjusting the Tilt For optimal viewing, adjust the screen tilt to your own preference, as follows: 1. Cables can be easily routed through the square hole in the base and are partially hidden when viewed from you do not topple the monitor while changing the tilt. 2. Adjust the tilt by moving the top edge of the monitor and hold the base so that you , without touching the screen. Cable Management The HP LCD monitors have cable management.
Face the front of the monitor either toward or away from the front. . Adjusting the Tilt For optimal viewing, adjust the screen tilt to your own preference, as follows: 1. Cables can be easily routed through the square hole in the base and are partially hidden when viewed from you do not topple the monitor while changing the tilt. 2. Adjust the tilt by moving the top edge of the monitor and hold the base so that you , without touching the screen. Cable Management The HP LCD monitors have cable management.

User Guide
Page 20
Adjusting the Swivel The HP LCD monitor allows a usable range of motion with the swivel feature. Keyboard Parking If you need more space on your desktop, place the keyboard under the monitor when not in use. CAUTION: To avoid breakage or other damage, avoid applying pressure to the LCD screen while swiveling it or changing the tilt.
Adjusting the Swivel The HP LCD monitor allows a usable range of motion with the swivel feature. Keyboard Parking If you need more space on your desktop, place the keyboard under the monitor when not in use. CAUTION: To avoid breakage or other damage, avoid applying pressure to the LCD screen while swiveling it or changing the tilt.
User Guide
Page 21
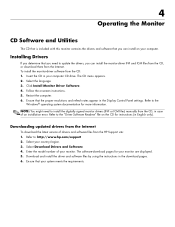
...appears. 2. Enter the model number of drivers and software files from the HP Support site: 1. Ensure that your computer CD drive. To install the monitor-driver software from the CD, in English only). Click Install Monitor Driver Software. 4. Restart the computer. 6. NOTE: You might need ... If you need to the "Driver Software Readme" file on your country/region. 3. Refer to : http://www.hp.com/support 2. Refer to install the digitally signed monitor drivers (INF or ICM files) manually from the CD: 1. Select your computer. The software-download pages for instructions...
...appears. 2. Enter the model number of drivers and software files from the HP Support site: 1. Ensure that your computer CD drive. To install the monitor-driver software from the CD, in English only). Click Install Monitor Driver Software. 4. Restart the computer. 6. NOTE: You might need ... If you need to the "Driver Software Readme" file on your country/region. 3. Refer to : http://www.hp.com/support 2. Refer to install the digitally signed monitor drivers (INF or ICM files) manually from the CD: 1. Select your computer. The software-download pages for instructions...
User Guide
Page 22
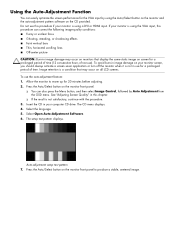
...9632; Off-center picture CAUTION: Burn-in image damage may occur on your monitor is not in this chapter. ❏ If the result is a condition that may occur on monitors that display the same static image on the monitor front panel to warm up for a prolonged period of non-use). Allow the... monitor to produce a stable, centered image. Insert the CD in image damage on all LCD...
...9632; Off-center picture CAUTION: Burn-in image damage may occur on your monitor is not in this chapter. ❏ If the result is a condition that may occur on monitors that display the same static image on the monitor front panel to warm up for a prolonged period of non-use). Allow the... monitor to produce a stable, centered image. Insert the CD in image damage on all LCD...
User Guide
Page 23
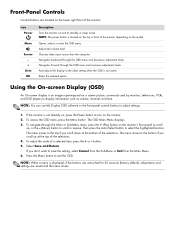
... top if you don't want to the ideal setting when the OSD is not already on, press the Power button to turn on the monitor's front panel to scroll up at the bottom of the selections. Navigates backward through the OSD menu and increases adjustment levels. Enters the selected...the buttons are untouched for 30 seconds (factory default), adjustments and settings are located on the lower right front of the monitor: Icon Power Menu Source - + Auto OK Description Turns the monitor on and to adjust settings. 1. NOTE: When a menu is an image superimposed on the model. Front-Panel Controls...
... top if you don't want to the ideal setting when the OSD is not already on, press the Power button to turn on the monitor's front panel to scroll up at the bottom of the selections. Navigates backward through the OSD menu and increases adjustment levels. Enters the selected...the buttons are untouched for 30 seconds (factory default), adjustments and settings are located on the lower right front of the monitor: Icon Power Menu Source - + Auto OK Description Turns the monitor on and to adjust settings. 1. NOTE: When a menu is an image superimposed on the model. Front-Panel Controls...

User Guide
Page 24
... slightly reddish white. Icon Main Menu Options Submenu Options Switch Video Input (select models only) Brightness Description Switches the video input signal source when the monitor is English.
... slightly reddish white. Icon Main Menu Options Submenu Options Switch Video Input (select models only) Brightness Description Switches the video input signal source when the monitor is English.
User Guide
Page 25
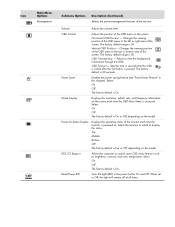
...seconds that the OSD is visible after the last button is powered on the screen each time the monitor is pressed. Power-On Status Display Displays the operating status of the monitor. DDC/CI Support Allows the computer to Off, the light will remain off at all times.... Icon Main Menu Options Management Submenu Options Description (Continued) Selects the power-management features of the monitor each time the OSD Main Menu is On or Off, depending on the screen. Volume Adjusts the volume level. Adjust to the top ...
...seconds that the OSD is visible after the last button is powered on the screen each time the monitor is pressed. Power-On Status Display Displays the operating status of the monitor. DDC/CI Support Allows the computer to Off, the light will remain off at all times.... Icon Main Menu Options Management Submenu Options Description (Continued) Selects the power-management features of the monitor each time the OSD Main Menu is On or Off, depending on the screen. Volume Adjusts the volume level. Adjust to the top ...


