
User Guide
Page 2
... other countries. First Edition: January 2021 Document part number: M42747-001 Some features may not be available on your product. HDMI, the HDMI Logo and High-Definition Multimedia Interface are registered trademarks of HDMI Licensing LLC. To access the latest user guide, go to http://www.hp.com/support, and follow the instructions to find your product. DisplayPort™, the...
... other countries. First Edition: January 2021 Document part number: M42747-001 Some features may not be available on your product. HDMI, the HDMI Logo and High-Definition Multimedia Interface are registered trademarks of HDMI Licensing LLC. To access the latest user guide, go to http://www.hp.com/support, and follow the instructions to find your product. DisplayPort™, the...
User Guide
Page 5
... the serial number and product number 7 Setting up the monitor ...7 Attaching the monitor stand ...8 Routing the cables ...8 Connecting the cables ...9 Connecting USB devices (select products only 12 Adjusting the monitor ...12 Installing a security cable ...13 Turning on the monitor ...13 HP watermark and image retention policy 14 2 Using the monitor ...15 Downloading software and utilities ...15 The Information file ...15 The Image Color Matching file ...15 Using the OSD menu ...15 Using the OSD function buttons ...16 Reassigning the function buttons ...17 Changing the Power Mode setting...
... the serial number and product number 7 Setting up the monitor ...7 Attaching the monitor stand ...8 Routing the cables ...8 Connecting the cables ...9 Connecting USB devices (select products only 12 Adjusting the monitor ...12 Installing a security cable ...13 Turning on the monitor ...13 HP watermark and image retention policy 14 2 Using the monitor ...15 Downloading software and utilities ...15 The Information file ...15 The Image Color Matching file ...15 Using the OSD menu ...15 Using the OSD function buttons ...16 Reassigning the function buttons ...17 Changing the Power Mode setting...
User Guide
Page 6
Button lockouts ...20 Using the auto-adjustment function (analog input 20 Optimizing image performance (analog input 21 4 Maintaining the monitor ...23 Maintenance guidelines ...23 Cleaning the monitor ...23 Shipping the monitor ...24 Appendix A Technical specifications ...25 Technical specifications 54.6 cm (21.5 in) model 25 Technical specifications 60.5 cm (23.8 in) model 25 Technical specifications 68.6 cm (27 in) model 26 Technical specifications 80.0 cm (31.5 in) model 27 Preset display resolutions ...27 FHD Preset display and timing...
Button lockouts ...20 Using the auto-adjustment function (analog input 20 Optimizing image performance (analog input 21 4 Maintaining the monitor ...23 Maintenance guidelines ...23 Cleaning the monitor ...23 Shipping the monitor ...24 Appendix A Technical specifications ...25 Technical specifications 54.6 cm (21.5 in) model 25 Technical specifications 60.5 cm (23.8 in) model 25 Technical specifications 68.6 cm (27 in) model 26 Technical specifications 80.0 cm (31.5 in) model 27 Preset display resolutions ...27 FHD Preset display and timing...
User Guide
Page 9
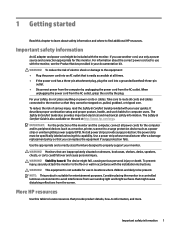
... the Product Notices provided in your user guides. Consider placing the monitor in a controlled luminous environment to be included with the installation instructions. 1 Getting started Read this monitor. Important safety information An AC adapter and power cord might cause disturbing reflections from the screen. To prevent injury, securely attach the monitor to the floor or wall in locations where children are inappropriately situated on...
... the Product Notices provided in your user guides. Consider placing the monitor in a controlled luminous environment to be included with the installation instructions. 1 Getting started Read this monitor. Important safety information An AC adapter and power cord might cause disturbing reflections from the screen. To prevent injury, securely attach the monitor to the floor or wall in locations where children are inappropriately situated on...
User Guide
Page 10
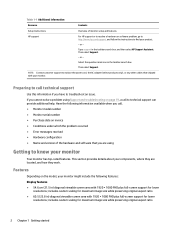
... of monitor setup and features HP support For HP support or to resolve a hardware or software problem, go to http://www.hp.com/support, and follow the instructions to find your monitor. Features Depending on page 19, a call technical support Use this information if you cannot solve a problem using Getting to replace the power cord, the AC adapter (select products only), or any other cables that you are using Support and troubleshooting on the model...
... of monitor setup and features HP support For HP support or to resolve a hardware or software problem, go to http://www.hp.com/support, and follow the instructions to find your monitor. Features Depending on page 19, a call technical support Use this information if you cannot solve a problem using Getting to replace the power cord, the AC adapter (select products only), or any other cables that you are using Support and troubleshooting on the model...

User Guide
Page 11
... maximum image size while preserving original aspect ratio ● Liquid crystal display (LCD) with active matrix and in-plane switching (IPS) ● Wide color gamut to provide coverage of sRGB color spaces ● Nonglare panel with an LED backlight ● Wide viewing angle to allow viewing from a sitting or standing position, or moving from side to side ● Tilt adjustment capability ● Four on-screen display (OSD) buttons, three that connect to downstream USB...
... maximum image size while preserving original aspect ratio ● Liquid crystal display (LCD) with active matrix and in-plane switching (IPS) ● Wide color gamut to provide coverage of sRGB color spaces ● Nonglare panel with an LED backlight ● Wide viewing angle to allow viewing from a sitting or standing position, or moving from side to side ● Tilt adjustment capability ● Four on-screen display (OSD) buttons, three that connect to downstream USB...
User Guide
Page 15
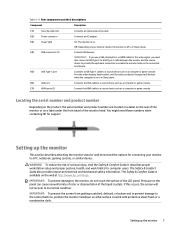
... the control buttons, position the monitor facedown on the web at http://www.hp.com/ergo. The Safety & Comfort Guide is available on a flat surface covered with protective sheet foam or a nonabrasive cloth. IMPORTANT: If you use a VGA, DisplayPort, or HDMI cable for connecting your monitor model, the monitor is off or in Sleep state. (6) VGA port Connects the VGA cable to a source device such as a computer or game console. (7) HDMI ports (2) Connect the HDMI cable to a source device...
... the control buttons, position the monitor facedown on the web at http://www.hp.com/ergo. The Safety & Comfort Guide is available on a flat surface covered with protective sheet foam or a nonabrasive cloth. IMPORTANT: If you use a VGA, DisplayPort, or HDMI cable for connecting your monitor model, the monitor is off or in Sleep state. (6) VGA port Connects the VGA cable to a source device such as a computer or game console. (7) HDMI ports (2) Connect the HDMI cable to a source device...
User Guide
Page 17
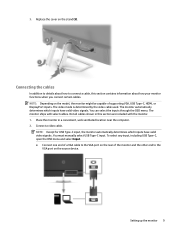
... USB Type-C, open the OSD menu and select Input. ● Connect one end of a VGA cable to the VGA port on the rear of the monitor and the other end to the VGA port on the model, the monitor might be capable of supporting VGA, USB Type-C, HDMI, or DisplayPort inputs. The monitor ships with the monitor. 1. Connect a video cable. 3. NOTE: Depending on the source device. You must manually select USB Type-C input. The monitor automatically determines which inputs have valid video signals...
... USB Type-C, open the OSD menu and select Input. ● Connect one end of a VGA cable to the VGA port on the rear of the monitor and the other end to the VGA port on the model, the monitor might be capable of supporting VGA, USB Type-C, HDMI, or DisplayPort inputs. The monitor ships with the monitor. 1. Connect a video cable. 3. NOTE: Depending on the source device. You must manually select USB Type-C input. The monitor automatically determines which inputs have valid video signals...

User Guide
Page 19
If you use a VGA, DisplayPort, or HDMI cable for the video signal, you must also connect a USB Type-C to the equipment: Do not disable the power cord grounding plug. Then connect the AC adapter to the power connector on a cord or cable. Do not pull on the monitor (3). WARNING! Arrange them so that is easily accessible at all times. Setting up to 65 W). To reduce the risk of electric shock or...
If you use a VGA, DisplayPort, or HDMI cable for the video signal, you must also connect a USB Type-C to the equipment: Do not disable the power cord grounding plug. Then connect the AC adapter to the power connector on a cord or cable. Do not pull on the monitor (3). WARNING! Arrange them so that is easily accessible at all times. Setting up to 65 W). To reduce the risk of electric shock or...

User Guide
Page 21
... the monitor power button for 12 or more hours. Press the Menu button to open the OSD, select Power, select Power LED, and then select Off. ▲ Press the power button on the monitor to turn off the monitor when it on. Image retention is available from HP. Burn-in image damage, you can secure the monitor to a fixed object with the optional security cable to your monitor, startup indicators, and troubleshooting information. Use...
... the monitor power button for 12 or more hours. Press the Menu button to open the OSD, select Power, select Power LED, and then select Off. ▲ Press the power button on the monitor to turn off the monitor when it on. Image retention is available from HP. Burn-in image damage, you can secure the monitor to a fixed object with the optional security cable to your monitor, startup indicators, and troubleshooting information. Use...
User Guide
Page 22
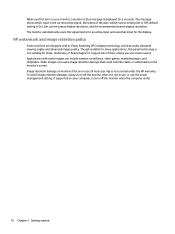
... not covered under the HP warranty. HP watermark and image retention policy Some monitors are in use, or use the power management setting, if supported on the monitor's screen. Static images can include camera surveillance, video games, marketing logos, and templates. Though suitable for many applications, this panel technology is not suitable for static, stationary, or fixed images for long periods of the auto-switch source setting (On or Off; Image retention...
... not covered under the HP warranty. HP watermark and image retention policy Some monitors are in use, or use the power management setting, if supported on the monitor's screen. Static images can include camera surveillance, video games, marketing logos, and templates. Though suitable for many applications, this panel technology is not suitable for static, stationary, or fixed images for long periods of the auto-switch source setting (On or Off; Image retention...
User Guide
Page 23
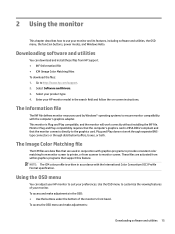
... adapter. Enter your HP monitor model in conjunction with the International Color Consortium (ICC) Profile Format specification. This monitor is Plug and Play compatible, and the monitor will work through separate BNCtype connectors or through distribution buffers, boxes, or both. Monitor Plug and Play compatibility requires that the monitor connects directly to the graphics card. Use the OSD menu to customize the viewing features of the monitor's front bezel. To access and make adjustments: Downloading software and...
... adapter. Enter your HP monitor model in conjunction with the International Color Consortium (ICC) Profile Format specification. This monitor is Plug and Play compatible, and the monitor will work through separate BNCtype connectors or through distribution buffers, boxes, or both. Monitor Plug and Play compatibility requires that the monitor connects directly to the graphics card. Use the OSD menu to customize the viewing features of the monitor's front bezel. To access and make adjustments: Downloading software and...
User Guide
Page 24
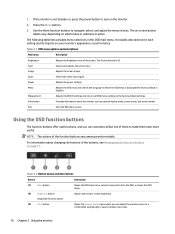
... as optimal display mode, power mode, and serial number. The factory default is English). Input Selects the video input signal. Table 2-2 Button names and descriptions Button Description (1) Menu button Opens the OSD main menu, selects a menu item from the OSD, or closes the OSD menu. (2) Brightness button Assignable function button Adjusts the monitor screen brightness. (3) Color button Opens the Viewing Modes menu where you can adjust the monitor screen to navigate, select, and adjust the menu choices. Use the three function buttons to a comfortable viewing light or...
... as optimal display mode, power mode, and serial number. The factory default is English). Input Selects the video input signal. Table 2-2 Button names and descriptions Button Description (1) Menu button Opens the OSD main menu, selects a menu item from the OSD, or closes the OSD menu. (2) Brightness button Assignable function button Adjusts the monitor screen brightness. (3) Color button Opens the Viewing Modes menu where you can adjust the monitor screen to navigate, select, and adjust the menu choices. Use the three function buttons to a comfortable viewing light or...
User Guide
Page 25
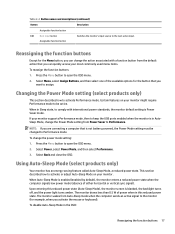
... quickly access your monitor supports Performance mode, then to keep the USB ports enabled when the monitor is not battery powered, the Power Mode setting must be active. This section describes how to activate or adjust Auto-Sleep Mode on your monitor. When in AutoSleep Mode, change the power mode setting: 1. Using Auto-Sleep Mode (select products only) Your monitor has an energy-saving feature called Auto-Sleep Mode, a reduced power state. Select Menu, select Assign Buttons, and then select one of either horizontal or vertical sync signal). Changing...
... quickly access your monitor supports Performance mode, then to keep the USB ports enabled when the monitor is not battery powered, the Power Mode setting must be active. This section describes how to activate or adjust Auto-Sleep Mode on your monitor. When in AutoSleep Mode, change the power mode setting: 1. Using Auto-Sleep Mode (select products only) Your monitor has an energy-saving feature called Auto-Sleep Mode, a reduced power state. Select Menu, select Assign Buttons, and then select one of either horizontal or vertical sync signal). Changing...
User Guide
Page 27
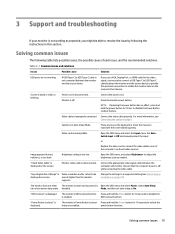
.... Open the OSD menu and select the Input menu. Brightness setting is improperly connected. "Check Video Cable" is displayed. Mode, and then set higher than the monitor supports. Solving common issues The following the instructions in Auto-Sleep Mode. Press any key on the connected host device. or Replace the video card or connect the video cable to unlock the feature is in this section. Change the settings to inactivate the screen blanking utility. power button function. Connect the appropriate video signal cable between the monitor and the source...
.... Open the OSD menu and select the Input menu. Brightness setting is improperly connected. "Check Video Cable" is displayed. Mode, and then set higher than the monitor supports. Solving common issues The following the instructions in Auto-Sleep Mode. Press any key on the connected host device. or Replace the video card or connect the video cable to unlock the feature is in this section. Change the settings to inactivate the screen blanking utility. power button function. Connect the appropriate video signal cable between the monitor and the source...
User Guide
Page 28
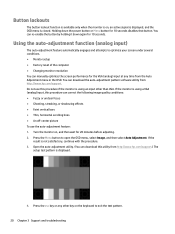
... troubleshooting Turn the monitor on , an active signal is displayed, and the OSD menu is closed. Open the auto-adjustment utility. (You can download this procedure can manually optimize the screen performance for 10 seconds. Holding down again for the VGA (analog) input at any other than VGA. If the monitor is using an input other key on the keyboard to optimize your screen under several conditions. ● Monitor setup ● Factory reset of the computer ● Changing monitor resolution...
... troubleshooting Turn the monitor on , an active signal is displayed, and the OSD menu is closed. Open the auto-adjustment utility. (You can download this procedure can manually optimize the screen performance for 10 seconds. Holding down again for the VGA (analog) input at any other than VGA. If the monitor is using an input other key on the keyboard to optimize your screen under several conditions. ● Monitor setup ● Factory reset of the computer ● Changing monitor resolution...
User Guide
Page 29
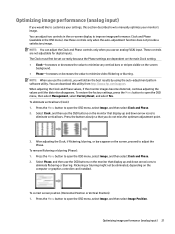
... value to open the OSD menu, select Image, and then select Image Position. Select Clock, and then use the OSD buttons on the computer or graphics controller card installed. NOTE: You can download this section describes how to open the OSD menu, then select Management, select Factory Reset, and select Yes. Press the Menu button to manually optimize your settings, this utility from http://www.hp.com/support. Optimizing image performance (analog input) If you use an analog (VGA) input. These controls are dependent...
... value to open the OSD menu, select Image, and then select Image Position. Select Clock, and then use the OSD buttons on the computer or graphics controller card installed. NOTE: You can download this section describes how to open the OSD menu, then select Management, select Factory Reset, and select Yes. Press the Menu button to manually optimize your settings, this utility from http://www.hp.com/support. Optimizing image performance (analog input) If you use an analog (VGA) input. These controls are dependent...
User Guide
Page 31
... monitor. ● Do not open the monitor cabinet or attempt to the cord does not exceed the rating of the cabinet or push objects into them. Turn off when it on the cord. ● Keep the monitor in the best condition. IMPORTANT: Do not use cleaners that are covered in image on the power cord. NOTE: A burned-in the operating instructions. Dust the monitor by grasping the plug...
... monitor. ● Do not open the monitor cabinet or attempt to the cord does not exceed the rating of the cabinet or push objects into them. Turn off when it on the cord. ● Keep the monitor in the best condition. IMPORTANT: Do not use cleaners that are covered in image on the power cord. NOTE: A burned-in the operating instructions. Dust the monitor by grasping the plug...
User Guide
Page 35
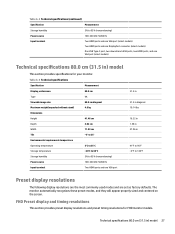
...;C 5% to 140°F Preset display resolutions The following display resolutions are the most commonly used modes and are set as factory defaults. Table A-3 Technical specifications (continued) Specification Measurement Storage humidity 5% to 95% (noncondensing) Power source 100-240 VAC 50/60 Hz Input terminal Two HDMI ports and one VGA port (select models) Two HDMI ports and one DisplayPort connector (select models) One USB Type-C port, two downstream USB ports, two HDMI ports, and one VGA port 31.5 in 31.5 in diagonal...
...;C 5% to 140°F Preset display resolutions The following display resolutions are the most commonly used modes and are set as factory defaults. Table A-3 Technical specifications (continued) Specification Measurement Storage humidity 5% to 95% (noncondensing) Power source 100-240 VAC 50/60 Hz Input terminal Two HDMI ports and one VGA port (select models) Two HDMI ports and one DisplayPort connector (select models) One USB Type-C port, two downstream USB ports, two HDMI ports, and one VGA port 31.5 in 31.5 in diagonal...
User Guide
Page 38
... time. When the monitor Sleep Timer utility initiates the reduced power state, the power light blinks amber. 30 Appendix A Technical specifications Upon detecting the absence of these signals, the monitor screen is blank, the backlight is initiated if the monitor detects the absence of power. In the reduced power state, the monitor uses < 0.5 W of either the horizontal sync signal or the vertical sync signal. The reduced power state is turned off, and the power light turns amber.
... time. When the monitor Sleep Timer utility initiates the reduced power state, the power light blinks amber. 30 Appendix A Technical specifications Upon detecting the absence of these signals, the monitor screen is blank, the backlight is initiated if the monitor detects the absence of power. In the reduced power state, the monitor uses < 0.5 W of either the horizontal sync signal or the vertical sync signal. The reduced power state is turned off, and the power light turns amber.


