
User Guide
Page 5
... Installing the monitor stand ...4 Connecting the cables ...6 Adjusting the monitor ...9 Turning on the monitor ...10 HP watermark and image retention policy 10 Removing the monitor stand ...11 Mounting the monitor ...12 Installing a security cable ...15 2 Using the monitor ...16 Software and utilities ...16 The Information file ...16 The Image Color Matching file ...16 Using the on-screen display (OSD) menu ...16 Assigning the Function buttons ...17 Using Auto-Sleep Mode ...18 Adjusting Low Blue Light Mode ...18 3 Support and troubleshooting ...19 Solving common problems ...19 Using the auto...
... Installing the monitor stand ...4 Connecting the cables ...6 Adjusting the monitor ...9 Turning on the monitor ...10 HP watermark and image retention policy 10 Removing the monitor stand ...11 Mounting the monitor ...12 Installing a security cable ...15 2 Using the monitor ...16 Software and utilities ...16 The Information file ...16 The Image Color Matching file ...16 Using the on-screen display (OSD) menu ...16 Assigning the Function buttons ...17 Using Auto-Sleep Mode ...18 Adjusting Low Blue Light Mode ...18 3 Support and troubleshooting ...19 Solving common problems ...19 Using the auto...

User Guide
Page 6
Shipping the monitor ...24 Appendix A Technical specifications ...25 54.6 cm/21.5-inch ...25 Preset display resolutions ...25 Power adapter ...26 Entering user modes ...27 Energy saver feature ...27 Appendix B Accessibility ...28 Supported assistive technologies ...28 Contacting support ...28 vi
Shipping the monitor ...24 Appendix A Technical specifications ...25 54.6 cm/21.5-inch ...25 Preset display resolutions ...25 Power adapter ...26 Entering user modes ...27 Energy saver feature ...27 Appendix B Accessibility ...28 Supported assistive technologies ...28 Contacting support ...28 vi

User Guide
Page 7
... correct power cord set to use only a power source and connection appropriate for computer users. Disconnect the monitor by unplugging the power cord from the AC outlet. WARNING! 1 Getting started Important safety information An AC power cord is included with a 3-pin attachment plug on the power cord, plug the cord into an AC outlet that is easily accessible at http://www.hp.com/ergo. Use a power strip whose manufacturer offers a Damage Replacement Policy...
... correct power cord set to use only a power source and connection appropriate for computer users. Disconnect the monitor by unplugging the power cord from the AC outlet. WARNING! 1 Getting started Important safety information An AC power cord is included with a 3-pin attachment plug on the power cord, plug the cord into an AC outlet that is easily accessible at http://www.hp.com/ergo. Use a power strip whose manufacturer offers a Damage Replacement Policy...
User Guide
Page 8
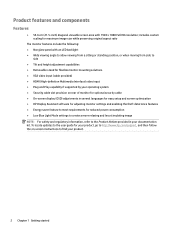
... viewing from a sitting or standing position, or when moving from side to side ● Tilt and height adjustment capabilities ● Removable stand for flexible monitor mounting solutions ● VGA video input (cable provided) ● HDMI (High-definition Multimedia Interface) video input ● Plug and Play capability if supported by your operating system ● Security cable slot provision on -screen instructions to the Product Notices provided in several languages for easy setup and screen optimization ● HP Display Assistant software...
... viewing from a sitting or standing position, or when moving from side to side ● Tilt and height adjustment capabilities ● Removable stand for flexible monitor mounting solutions ● VGA video input (cable provided) ● HDMI (High-definition Multimedia Interface) video input ● Plug and Play capability if supported by your operating system ● Security cable slot provision on -screen instructions to the Product Notices provided in several languages for easy setup and screen optimization ● HP Display Assistant software...

User Guide
Page 9
... adjustment levels. If the OSD menu is closed , opens the OSD menu. 6 Security cable slot Attaches an optional security cable to the monitor. 7 Power connector Connects the AC adapter to the monitor. 8 HDMI port Connects an HDMI cable to the source device. 9 VGA port Connects the VGA cable to the next video input port.* 3 Up/Increase/Viewing Modes button If the OSD menu is open, confirms selection. NOTE: * Buttons 2-4 are function buttons that can be changed from their default settings in the OSD menu to a different menu selection that you most commonly use...
... adjustment levels. If the OSD menu is closed , opens the OSD menu. 6 Security cable slot Attaches an optional security cable to the monitor. 7 Power connector Connects the AC adapter to the monitor. 8 HDMI port Connects an HDMI cable to the source device. 9 VGA port Connects the VGA cable to the next video input port.* 3 Up/Increase/Viewing Modes button If the OSD menu is open, confirms selection. NOTE: * Buttons 2-4 are function buttons that can be changed from their default settings in the OSD menu to a different menu selection that you most commonly use...
User Guide
Page 10
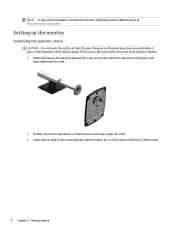
... LCD panel. Setting up the monitor Installing the monitor stand CAUTION: Do not touch the surface of the monitor. 4 Chapter 1 Getting started If this occurs, the screen will not recover to the stand by a clean, dry cloth. 3. Attach the base to its normal condition. 1. NOTE: To view an OSD simulator, visit the HP Customer Self Repair Services Media Library at http://www.hp.com/go/sml. Position the monitor facedown on a flat surface covered...
... LCD panel. Setting up the monitor Installing the monitor stand CAUTION: Do not touch the surface of the monitor. 4 Chapter 1 Getting started If this occurs, the screen will not recover to the stand by a clean, dry cloth. 3. Attach the base to its normal condition. 1. NOTE: To view an OSD simulator, visit the HP Customer Self Repair Services Media Library at http://www.hp.com/go/sml. Position the monitor facedown on a flat surface covered...
User Guide
Page 12
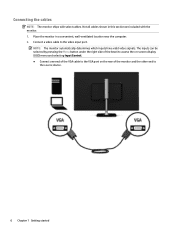
... cables. Connect a video cable to the source device. 6 Chapter 1 Getting started NOTE: The monitor automatically determines which inputs have valid video signals. The inputs can be selected by pressing the Menu button under the right side of the bezel to access the on-screen display (OSD) menu and selecting Input Control. ● Connect one end of the VGA cable to the VGA port on the rear of the monitor and the other end to the video input port. Connecting...
... cables. Connect a video cable to the source device. 6 Chapter 1 Getting started NOTE: The monitor automatically determines which inputs have valid video signals. The inputs can be selected by pressing the Menu button under the right side of the bezel to access the on-screen display (OSD) menu and selecting Input Control. ● Connect one end of the VGA cable to the VGA port on the rear of the monitor and the other end to the video input port. Connecting...
User Guide
Page 16
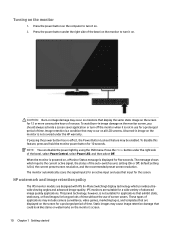
... bezel on the monitor to turn it on all LCD screens. Press the power button under the right side of screen savers. The monitor automatically scans the signal inputs for an active input and uses that are displayed on the monitor's screen. 10 Chapter 1 Getting started Static images may include camera surveillance, video games, marketing logos, and templates that input for 10 seconds. default setting is not in image damage may be...
... bezel on the monitor to turn it on all LCD screens. Press the power button under the right side of screen savers. The monitor automatically scans the signal inputs for an active input and uses that are displayed on the monitor's screen. 10 Chapter 1 Getting started Static images may include camera surveillance, video games, marketing logos, and templates that input for 10 seconds. default setting is not in image damage may be...
User Guide
Page 17
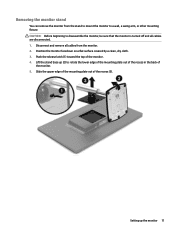
... of the mounting plate out of the monitor. 4. Setting up (2) to a wall, a swing arm, or other mounting fixture. Removing the monitor stand You can remove the monitor from the monitor. 2. Lift the stand base up the monitor 11 Position the monitor facedown on a flat surface covered by a clean, dry cloth. 3. CAUTION: Before beginning to disassemble the monitor, be sure that the monitor is turned off and all cables from the stand to mount the monitor to rotate...
... of the mounting plate out of the monitor. 4. Setting up (2) to a wall, a swing arm, or other mounting fixture. Removing the monitor stand You can remove the monitor from the monitor. 2. Lift the stand base up the monitor 11 Position the monitor facedown on a flat surface covered by a clean, dry cloth. 3. CAUTION: Before beginning to disassemble the monitor, be sure that the monitor is turned off and all cables from the stand to mount the monitor to rotate...

User Guide
Page 18
... the monitor to support the weight of the monitor. Remove the monitor from HP for Flat Displays (FDs), such as flat panel monitors, flat displays, and flat TVs. An optional HP Quick Release mounting bracket is rated to the swing arm. To attach the monitor to a swing arm, wall, or other mounting fixture. Other screws may damage the monitor. The HP Quick Release connects to the VESA-standard mounting points, allowing you to the monitor, you must use the power and video cables...
... the monitor to support the weight of the monitor. Remove the monitor from HP for Flat Displays (FDs), such as flat panel monitors, flat displays, and flat TVs. An optional HP Quick Release mounting bracket is rated to the swing arm. To attach the monitor to a swing arm, wall, or other mounting fixture. Other screws may damage the monitor. The HP Quick Release connects to the VESA-standard mounting points, allowing you to the monitor, you must use the power and video cables...
User Guide
Page 22
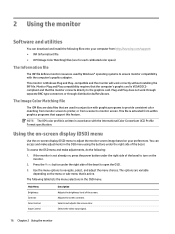
... monitor screen. You can download and install the following files onto your preferences. Using the on-screen display (OSD) menu Use the on your computer from scanner to the graphics card. 2 Using the monitor Software and utilities You can access and make adjustments, do the following: 1. The Image Color Matching file The ICM files are used by Windows® operating systems to adjust the monitor screen image based on -screen display (OSD) menu to ensure monitor compatibility with the computer's graphics adapter. Monitor Plug...
... monitor screen. You can download and install the following files onto your preferences. Using the on-screen display (OSD) menu Use the on your computer from scanner to the graphics card. 2 Using the monitor Software and utilities You can access and make adjustments, do the following: 1. The Image Color Matching file The ICM files are used by Windows® operating systems to adjust the monitor screen image based on -screen display (OSD) menu to ensure monitor compatibility with the computer's graphics adapter. Monitor Plug...
User Guide
Page 23
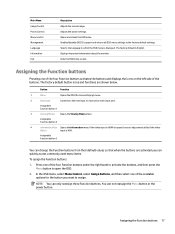
...function button 1 3 Viewing Modes Opens the Viewing Modes menu. Enables/disables DDC/CI support and returns all OSD menu settings to the next input or next active video input port. Exits the OSD menu screen. The factory default button icons and functions are activated you want to open the OSD. 2. You can only reassign three Function buttons. Main Menu Image Control Power Control Menu Control Management Language Information Exit Description Adjusts the screen image. Opens and closes the OSD menu. The factory default is displayed. Assignable function button 3 You can quickly...
...function button 1 3 Viewing Modes Opens the Viewing Modes menu. Enables/disables DDC/CI support and returns all OSD menu settings to the next input or next active video input port. Exits the OSD menu screen. The factory default button icons and functions are activated you want to open the OSD. 2. You can only reassign three Function buttons. Main Menu Image Control Power Control Menu Control Management Language Information Exit Description Adjusts the screen image. Opens and closes the OSD menu. The factory default is displayed. Assignable function button 3 You can quickly...

User Guide
Page 24
... the screen. You can disable Auto-Sleep Mode in this reduced power state (sleep mode), the monitor screen is blanked, the backlight is enabled (enabled by default), the monitor will wake from the sleep mode when the host computer sends an active signal to open the OSD. HP monitors provide a setting to enable or disable a reduced power state for indoor viewing Night: Adjusts the monitor to your setting and close the Viewing Mode menu. Using Auto-Sleep Mode The monitor supports an OSD (on-screen display) menu option called Auto-Sleep Mode that...
... the screen. You can disable Auto-Sleep Mode in this reduced power state (sleep mode), the monitor screen is blanked, the backlight is enabled (enabled by default), the monitor will wake from the sleep mode when the host computer sends an active signal to open the OSD. HP monitors provide a setting to enable or disable a reduced power state for indoor viewing Night: Adjusts the monitor to your setting and close the Viewing Mode menu. Using Auto-Sleep Mode The monitor supports an OSD (on-screen display) menu option called Auto-Sleep Mode that...
User Guide
Page 25
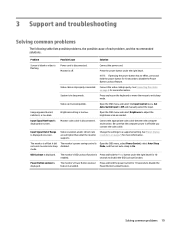
... lists possible problems, the possible cause of Range is displayed on the keyboard or move the mouse to exit sleep mode. Video cable is off but it did The monitor's power saving control is displayed. Change the settings to disable the OSD Lockout function. Power Button Lockout feature. Be sure that the computer power is improperly connected. seconds to a supported setting. Brightness setting is disconnected. Power cord is too low. Open the OSD menu and select the Input Control menu. Image appears blurred...
... lists possible problems, the possible cause of Range is displayed on the keyboard or move the mouse to exit sleep mode. Video cable is off but it did The monitor's power saving control is displayed. Change the settings to disable the OSD Lockout function. Power Button Lockout feature. Be sure that the computer power is improperly connected. seconds to a supported setting. Brightness setting is disconnected. Power cord is too low. Open the OSD menu and select the Input Control menu. Image appears blurred...
User Guide
Page 26
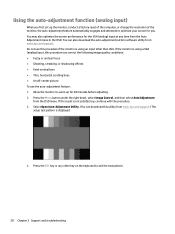
...; Thin, horizontal scrolling lines ● An off-center picture To use this procedure if the monitor is using a VGA (analog) input, this procedure can download this utility from www.hp.com/support.) The setup test pattern is displayed. 4. If the monitor is not satisfactory, continue with the procedure. 3. Allow the monitor to warm up the monitor, conduct a factory reset of the computer, or change the resolution of the monitor, the auto-adjustment feature...
...; Thin, horizontal scrolling lines ● An off-center picture To use this procedure if the monitor is using a VGA (analog) input, this procedure can download this utility from www.hp.com/support.) The setup test pattern is displayed. 4. If the monitor is not satisfactory, continue with the procedure. 3. Allow the monitor to warm up the monitor, conduct a factory reset of the computer, or change the resolution of the monitor, the auto-adjustment feature...
User Guide
Page 27
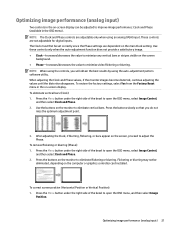
... screen position (Horizontal Position or Vertical Position): 1. To eliminate vertical bars (Clock): 1. Use the buttons on the monitor to open the OSD menu, select Image Control, and then select Clock and Phase. 2. Optimizing image performance (analog input) Two controls in the on-screen display can be adjusted to eliminate flickering or blurring. These controls are adjustable only when using the auto-adjustment pattern software utility. To restore the factory settings, select Yes from the Factory Reset menu in the OSD menu). Press the buttons on the monitor to improve image...
... screen position (Horizontal Position or Vertical Position): 1. To eliminate vertical bars (Clock): 1. Use the buttons on the monitor to open the OSD menu, select Image Control, and then select Clock and Phase. 2. Optimizing image performance (analog input) Two controls in the on-screen display can be adjusted to eliminate flickering or blurring. These controls are adjustable only when using the auto-adjustment pattern software utility. To restore the factory settings, select Yes from the Factory Reset menu in the OSD menu). Press the buttons on the monitor to improve image...

User Guide
Page 28
... the display area of the hardware and software you may need to call technical support If you cannot solve a problem using the troubleshooting tips in this section, you are using your monitor, go to http://www.hp.com/support, and then follow the onscreen instructions to call technical support. The Horizontal Position shifts the image left or right; the Vertical Position shifts the image up and down the Power button or Menu button...
... the display area of the hardware and software you may need to call technical support If you cannot solve a problem using the troubleshooting tips in this section, you are using your monitor, go to http://www.hp.com/support, and then follow the onscreen instructions to call technical support. The Horizontal Position shifts the image left or right; the Vertical Position shifts the image up and down the Power button or Menu button...
User Guide
Page 30
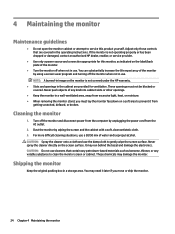
... operating instructions. You can substantially increase the life expectancy of the monitor. ● Turn the monitor off when not in use. Never push objects of water and isopropyl alcohol. Cleaning the monitor 1. NOTE: A burned-in image on the monitor is not operating properly or has been dropped or damaged, contact an authorized HP dealer, reseller, or service provider. ● Use only a power source and connection...
... operating instructions. You can substantially increase the life expectancy of the monitor. ● Turn the monitor off when not in use. Never push objects of water and isopropyl alcohol. Cleaning the monitor 1. NOTE: A burned-in image on the monitor is not operating properly or has been dropped or damaged, contact an authorized HP dealer, reseller, or service provider. ● Use only a power source and connection...
User Guide
Page 31
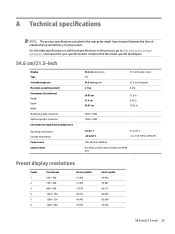
.../21.5-inch 25 A Technical specifications NOTE: The product specifications provided in the user guide might have changed between the time of manufacturing and delivery of your specific monitor model to find the model-specific QuickSpecs. 54.6 cm/21.5-inch Display Type Viewable image size Maximum weight (unpacked) Dimensions (include base) Height Depth Width Maximum graphic resolution Optimum graphic resolution Environmental requirements temperature Operating temperature Storage temperature Power source Input terminal 54.6 cm wide screen...
.../21.5-inch 25 A Technical specifications NOTE: The product specifications provided in the user guide might have changed between the time of manufacturing and delivery of your specific monitor model to find the model-specific QuickSpecs. 54.6 cm/21.5-inch Display Type Viewable image size Maximum weight (unpacked) Dimensions (include base) Height Depth Width Maximum graphic resolution Optimum graphic resolution Environmental requirements temperature Operating temperature Storage temperature Power source Input terminal 54.6 cm wide screen...
User Guide
Page 33
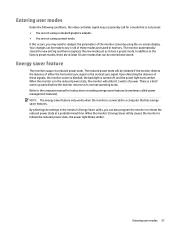
... user modes 27 Refer to its normal operating mode. NOTE: The energy saver feature only works when the monitor is a brief warm-up period before the monitor returns to the computer manual for a mode that is turned off, and the power light turns amber. When the monitor's Energy Saver utility causes the monitor to any or all of either the horizontal sync signal or the vertical sync signal. There is connected...
... user modes 27 Refer to its normal operating mode. NOTE: The energy saver feature only works when the monitor is a brief warm-up period before the monitor returns to the computer manual for a mode that is turned off, and the power light turns amber. When the monitor's Energy Saver utility causes the monitor to any or all of either the horizontal sync signal or the vertical sync signal. There is connected...


