

User Guide
Page 4
... number...4 Setting up the monitor ...5 Attaching the monitor stand...5 Attaching the monitor stand (curved models)...6 Mounting the monitor head...8 Removing the monitor stand...8 Attaching the monitor head to a mounting device...9 Connecting the cables ...10 Adjusting the monitor ...12 Turning on the monitor...14 HP watermark and image retention policy...15 2 Using the monitor...16 Downloading software and utilities...16 Downloading OMEN Gaming Hub and accessing OMEN Lighting Studio 16 Using the OSD menu ...16 Selecting color presets ...17 Display mode status...18 Using Auto-Sleep Mode...
... number...4 Setting up the monitor ...5 Attaching the monitor stand...5 Attaching the monitor stand (curved models)...6 Mounting the monitor head...8 Removing the monitor stand...8 Attaching the monitor head to a mounting device...9 Connecting the cables ...10 Adjusting the monitor ...12 Turning on the monitor...14 HP watermark and image retention policy...15 2 Using the monitor...16 Downloading software and utilities...16 Downloading OMEN Gaming Hub and accessing OMEN Lighting Studio 16 Using the OSD menu ...16 Selecting color presets ...17 Display mode status...18 Using Auto-Sleep Mode...
User Guide
Page 5
...model...27 Preset display resolutions...27 60.5 cm (23.8 in) model...28 68.6 cm (27 in) model ...28 68.6 cm (27 in) QHD model ...29 80.0 cm (31.5 in) QHD model...31 80.0 cm (31.5 in) QHD curved model...32 High-definition video formats ...33 60.5 cm (23.8 in) model and 68.6 cm (27 in) model...36 Finding the best assistive technology...36 Assessing your needs ...36 Accessibility for HP products...36 Monitor accessibility features ...37 Built-in accessibility features...37 Text to Speech (select products/regions only)...37 What is Accessibility Mode?...37 How do you turn Accessibility Mode on or off...
...model...27 Preset display resolutions...27 60.5 cm (23.8 in) model...28 68.6 cm (27 in) model ...28 68.6 cm (27 in) QHD model ...29 80.0 cm (31.5 in) QHD model...31 80.0 cm (31.5 in) QHD curved model...32 High-definition video formats ...33 60.5 cm (23.8 in) model and 68.6 cm (27 in) model...36 Finding the best assistive technology...36 Assessing your needs ...36 Accessibility for HP products...36 Monitor accessibility features ...37 Built-in accessibility features...37 Text to Speech (select products/regions only)...37 What is Accessibility Mode?...37 How do you turn Accessibility Mode on or off...

User Guide
Page 6
... be specifically labeled as a power strip or uninterruptible power supply (UPS). NOTE: This product is not suitable for entertainment purposes. When unplugging the power cord from the AC outlet, grasp the cord by unplugging the power cord from the screen. IMPORTANT: For the protection of serious injury, read the Safety & Comfort Guide provided with the installation instructions. Use a power strip whose manufacturer offers a damage replacement policy...
... be specifically labeled as a power strip or uninterruptible power supply (UPS). NOTE: This product is not suitable for entertainment purposes. When unplugging the power cord from the AC outlet, grasp the cord by unplugging the power cord from the screen. IMPORTANT: For the protection of serious injury, read the Safety & Comfort Guide provided with the installation instructions. Use a power strip whose manufacturer offers a damage replacement policy...
User Guide
Page 7
... to technical support can provide additional help. If you cannot solve a problem using Support and troubleshooting on invoice ● Conditions under which the problem occurred ● Error messages received ● Hardware configuration ● Name and version of monitor setup and features HP support For HP support or to resolve a hardware or software problem, go to http://www.hp.com/support, and follow the instructions to replace the power cord, the AC adapter (select...
... to technical support can provide additional help. If you cannot solve a problem using Support and troubleshooting on invoice ● Conditions under which the problem occurred ● Error messages received ● Hardware configuration ● Name and version of monitor setup and features HP support For HP support or to resolve a hardware or software problem, go to http://www.hp.com/support, and follow the instructions to replace the power cord, the AC adapter (select...
User Guide
Page 8
...-screen display (OSD) adjustments in several languages for easy setup and screen optimization ● Energy saver feature to meet requirements for reduced power consumption ● Cable management feature for placement of cables and cords Connectors ● DisplayPort™ video input (cable included) ● High-Definition Multimedia Interface® (HDMI) video input (2) ● Audio-out (headphone) jack ● Plug and Play capability, if supported by your operating system Monitor stand ● Removable stand for flexible monitor head mounting solutions...
...-screen display (OSD) adjustments in several languages for easy setup and screen optimization ● Energy saver feature to meet requirements for reduced power consumption ● Cable management feature for placement of cables and cords Connectors ● DisplayPort™ video input (cable included) ● High-Definition Multimedia Interface® (HDMI) video input (2) ● Audio-out (headphone) jack ● Plug and Play capability, if supported by your operating system Monitor stand ● Removable stand for flexible monitor head mounting solutions...

User Guide
Page 9
...or off. (2) OSD control Adjusts settings in the OSD menu. (3) Power connector Connects the power cord to the monitor. (4) HDMI ports (2) Connect the HDMI cable to a source device such as a computer or game console. (5) DisplayPort connector Connects the DisplayPort cable to find your monitor components might need these numbers when contacting HP for support. 4 Chapter 1 Getting started Table 1-2 Rear components and their descriptions Component Description (1) Power button Turns the monitor on the model, your product. ● Support for a mounting bracket to attach...
...or off. (2) OSD control Adjusts settings in the OSD menu. (3) Power connector Connects the power cord to the monitor. (4) HDMI ports (2) Connect the HDMI cable to a source device such as a computer or game console. (5) DisplayPort connector Connects the DisplayPort cable to find your monitor components might need these numbers when contacting HP for support. 4 Chapter 1 Getting started Table 1-2 Rear components and their descriptions Component Description (1) Power button Turns the monitor on the model, your product. ● Support for a mounting bracket to attach...
User Guide
Page 10
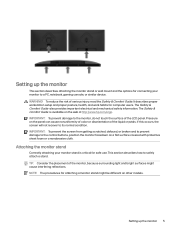
... work habits for connecting your monitor stand is available on other models. The Safety & Comfort Guide is critical for attaching a monitor stand might cause interfering reflections. IMPORTANT: To prevent the screen from getting scratched, defaced, or broken and to prevent damage to the control buttons, position the monitor facedown on the panel can cause nonuniformity of color or disorientation of the monitor, because surrounding light and bright surfaces...
... work habits for connecting your monitor stand is available on other models. The Safety & Comfort Guide is critical for attaching a monitor stand might cause interfering reflections. IMPORTANT: To prevent the screen from getting scratched, defaced, or broken and to prevent damage to the control buttons, position the monitor facedown on the panel can cause nonuniformity of color or disorientation of the monitor, because surrounding light and bright surfaces...
User Guide
Page 13
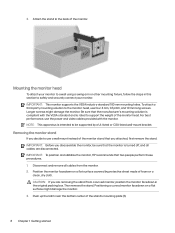
... remove the stand. Positioning a curved monitor facedown on a flat surface covered by a UL-listed or CSA-listed wall-mount bracket. IMPORTANT: This monitor supports the VESA industry-standard 100 mm mounting holes. For best performance, use the power and video cables provided with the VESA standard and is turned off, and all cables from a curved monitor, position the monitor facedown in this section to the monitor head, use a wall mount instead of the monitor stand that you disassemble the monitor, be supported...
... remove the stand. Positioning a curved monitor facedown on a flat surface covered by a UL-listed or CSA-listed wall-mount bracket. IMPORTANT: This monitor supports the VESA industry-standard 100 mm mounting holes. For best performance, use the power and video cables provided with the VESA standard and is turned off, and all cables from a curved monitor, position the monitor facedown in this section to the monitor head, use a wall mount instead of the monitor stand that you disassemble the monitor, be supported...
User Guide
Page 15
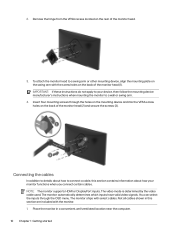
... a wall or swing arm. 4. 2. To attach the monitor head to a swing arm or other mounting device, align the mounting plate on the swing arm with select cables. The monitor automatically determines which inputs have valid video signals. Insert four mounting screws through the OSD menu. Connecting the cables In addition to details about how your device, then follow the mounting device manufacturer's instructions when mounting the monitor to connect a cable, this...
... a wall or swing arm. 4. 2. To attach the monitor head to a swing arm or other mounting device, align the mounting plate on the swing arm with select cables. The monitor automatically determines which inputs have valid video signals. Insert four mounting screws through the OSD menu. Connecting the cables In addition to details about how your device, then follow the mounting device manufacturer's instructions when mounting the monitor to connect a cable, this...
User Guide
Page 19
... OSD controller to turn off the monitor when it on. 14 Chapter 1 Getting started NOTE: Use the operating system's display settings to rotate the image on the screen from portrait to landscape, open the OSD, select Power, select Power LED, and then select Off. ■ Press the power button on the monitor to open the OSD menu and select Menu, select Menu Rotation, and then select Portrait. Burn-in the OSD menu. NOTE: On select HP monitors...
... OSD controller to turn off the monitor when it on. 14 Chapter 1 Getting started NOTE: Use the operating system's display settings to rotate the image on the screen from portrait to landscape, open the OSD, select Power, select Power LED, and then select Off. ■ Press the power button on the monitor to open the OSD menu and select Menu, select Menu Rotation, and then select Portrait. Burn-in the OSD menu. NOTE: On select HP monitors...
User Guide
Page 20
... auto-switch source setting (On or Off; To avoid image retention damage, always turn off the monitor when it is not in use 24 hours per day is not covered under the HP warranty. default setting is not suitable for static, stationary, or fixed images for many applications, this panel technology is On), the current preset display resolution, and the recommended preset display resolution. HP watermark and image retention policy Some monitors...
... auto-switch source setting (On or Off; To avoid image retention damage, always turn off the monitor when it is not in use 24 hours per day is not covered under the HP warranty. default setting is not suitable for static, stationary, or fixed images for many applications, this panel technology is On), the current preset display resolution, and the recommended preset display resolution. HP watermark and image retention policy Some monitors...
User Guide
Page 21
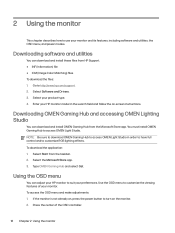
... OSD menu and make adjustments: 1. Go to access OMEN Light Studio. Enter your product type. 4. Select Start from HP Support. ● INF (Information) file ● ICM (Image Color Matching) files To download the files: 1. Using the OSD menu You can download and install OMEN Gaming Hub from the Microsoft Store app. Press the center of your monitor and its features, including software and utilities, the OSD menu, and power modes. To download the application: 1. Type OMEN...
... OSD menu and make adjustments: 1. Go to access OMEN Light Studio. Enter your product type. 4. Select Start from HP Support. ● INF (Information) file ● ICM (Image Color Matching) files To download the files: 1. Using the OSD menu You can download and install OMEN Gaming Hub from the Microsoft Store app. Press the center of your monitor and its features, including software and utilities, the OSD menu, and power modes. To download the application: 1. Type OMEN...
User Guide
Page 22
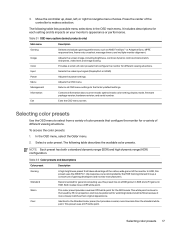
... in the OSD main menu. Selecting color presets 17 Press the center of different viewing situations. Information Contains information about current mode, optimal mode, color setting, display mode, firmware package version, hardware revision, and serial number. Table 2-2 Color presets and descriptions Color preset Description Gaming A high brightness preset that configure the monitor for watching black-and-white films because it more blue look than the standard white point. Move the controller up, down...
... in the OSD main menu. Selecting color presets 17 Press the center of different viewing situations. Information Contains information about current mode, optimal mode, color setting, display mode, firmware package version, hardware revision, and serial number. Table 2-2 Color presets and descriptions Color preset Description Gaming A high brightness preset that configure the monitor for watching black-and-white films because it more blue look than the standard white point. Move the controller up, down...

User Guide
Page 23
... menu window and at the bottom of the OSD controller to open the OSD. 2. Upon entering this reduced power state. Display mode status When you change the video input. Press the center of the LCD panel (no color processing or tuning is blanked, the backlight turns off, and the power light turns amber. The monitor draws less than 0.5 W of any color preset. Native This is the native color temperature and gamut of the OSD controller to open the OSD. 2. RGB...
... menu window and at the bottom of the OSD controller to open the OSD. 2. Upon entering this reduced power state. Display mode status When you change the video input. Press the center of the LCD panel (no color processing or tuning is blanked, the backlight turns off, and the power light turns amber. The monitor draws less than 0.5 W of any color preset. Native This is the native color temperature and gamut of the OSD controller to open the OSD. 2. RGB...
User Guide
Page 25
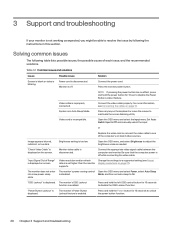
... on page 27). Video resolution and/or refresh Change the settings to inactivate the screen blanking utility. "OSD Lockout" is displayed on the screen. "Input Signal Out of Range" is displayed. Open the OSD menu and select Power, select Auto-Sleep Mode, and then set higher than the monitor display resolutions on the keyboard or move the mouse to a supported setting (see Connecting the cables on -board video sources. Brightness setting is enabled. Connect the appropriate video signal cable between the computer and monitor. The monitor's OSD Lockout function is...
... on page 27). Video resolution and/or refresh Change the settings to inactivate the screen blanking utility. "OSD Lockout" is displayed on the screen. "Input Signal Out of Range" is displayed. Open the OSD menu and select Power, select Auto-Sleep Mode, and then set higher than the monitor display resolutions on the keyboard or move the mouse to a supported setting (see Connecting the cables on -board video sources. Brightness setting is enabled. Connect the appropriate video signal cable between the computer and monitor. The monitor's OSD Lockout function is...
User Guide
Page 27
..., away from excessive light, heat, or moisture. Doing this product yourself. Cleaning the monitor Use these instructions to enhance the performance and extend the life of the monitor. ● Do not open the monitor cabinet or attempt to service this can perform to the cord does not exceed the rating of the products connected to keep your monitor in the operating instructions. These openings provide ventilation...
..., away from excessive light, heat, or moisture. Doing this product yourself. Cleaning the monitor Use these instructions to enhance the performance and extend the life of the monitor. ● Do not open the monitor cabinet or attempt to service this can perform to the cord does not exceed the rating of the products connected to keep your monitor in the operating instructions. These openings provide ventilation...

User Guide
Page 32
... used modes and are set as factory defaults. Table A-4 Technical specifications (continued) Specification Measurement Storage temperature -40°C to 65°C -40°F to 149°F Storage humidity 5% to 95% (noncondensing) Power source 100 V ac to 240 V ac 50/60 Hz 1.5 A Input terminal Two HDMI ports, one DisplayPort connector, and one audio-out (headphone) jack 80.0 cm (31.5 in) QHD curved model This section provides specifications...
... used modes and are set as factory defaults. Table A-4 Technical specifications (continued) Specification Measurement Storage temperature -40°C to 65°C -40°F to 149°F Storage humidity 5% to 95% (noncondensing) Power source 100 V ac to 240 V ac 50/60 Hz 1.5 A Input terminal Two HDMI ports, one DisplayPort connector, and one audio-out (headphone) jack 80.0 cm (31.5 in) QHD curved model This section provides specifications...

User Guide
Page 39
... feature This monitor supports a reduced power state. In the reduced power state, the monitor uses < 0.5 W of either the horizontal sync signal or the vertical sync signal. The reduced power state is turned off, and the power light turns amber. See the computer manual for the 80.0 cm (31.5 in the monitor Sleep Timer utility, you can also program the monitor to initiate the reduced power state at a predetermined time. There is connected to...
... feature This monitor supports a reduced power state. In the reduced power state, the monitor uses < 0.5 W of either the horizontal sync signal or the vertical sync signal. The reduced power state is turned off, and the power light turns amber. See the computer manual for the 80.0 cm (31.5 in the monitor Sleep Timer utility, you can also program the monitor to initiate the reduced power state at a predetermined time. There is connected to...

User Guide
Page 42
... on your monitor has built-in English only. Built-in the lower-right quadrant of the screen. ● Menu items, text, and other elements meet a 4.5:1 (or greater) contrast ratio. - If you turn on Accessibility Mode, the following adjustments are made: ● Menu timeout setting is set to the maximum duration of 60 seconds (default is 30 seconds). ● Language is set to a fixed position in accessibility...
... on your monitor has built-in English only. Built-in the lower-right quadrant of the screen. ● Menu items, text, and other elements meet a 4.5:1 (or greater) contrast ratio. - If you turn on Accessibility Mode, the following adjustments are made: ● Menu timeout setting is set to the maximum duration of 60 seconds (default is 30 seconds). ● Language is set to a fixed position in accessibility...

User Guide
Page 43
... and video playback features, their associated user documentation, and their customer support. When Accessibility Mode is turned off using a physical button, an Accessibility Mode is On message is displayed. ● Using the OSD menu - These regulations are enacting regulations to improve access to products and services for four seconds to English, and then select Management > Accessibility > On. - To turn off . Standards The US Access Board created...
... and video playback features, their associated user documentation, and their customer support. When Accessibility Mode is turned off using a physical button, an Accessibility Mode is On message is displayed. ● Using the OSD menu - These regulations are enacting regulations to improve access to products and services for four seconds to English, and then select Management > Accessibility > On. - To turn off . Standards The US Access Board created...


