
HP Limited Warranty and Support Guide - Refurbished Desktops
Page 4
... Hewlett-Packard, the manufacturer. TO THE EXTENT ALLOWED BY THE LOCAL LAW OF JURISDICTIONS OUTSIDE THE UNITED STATES, HP DISCLAIMS ALL IMPLIED WARRANTIES OR CONDITIONS, INCLUDING ANY IMPLIED WARRANTIES OF MERCHANTABILITY AND FITNESS FOR A PARTICULAR PURPOSE. Standard... warranty service for the same product model number, without voiding the warranty. Refurbished HP Pavilion Desktop Computers, HP Pavilion Media Center Computers, HP Digital Entertainment Center, HP Displays, and HP Notebook Consumer Products. THE LIMITED WARRANTY TERMS CONTAINED IN THIS STATEMENT, EXCEPT TO ...
... Hewlett-Packard, the manufacturer. TO THE EXTENT ALLOWED BY THE LOCAL LAW OF JURISDICTIONS OUTSIDE THE UNITED STATES, HP DISCLAIMS ALL IMPLIED WARRANTIES OR CONDITIONS, INCLUDING ANY IMPLIED WARRANTIES OF MERCHANTABILITY AND FITNESS FOR A PARTICULAR PURPOSE. Standard... warranty service for the same product model number, without voiding the warranty. Refurbished HP Pavilion Desktop Computers, HP Pavilion Media Center Computers, HP Digital Entertainment Center, HP Displays, and HP Notebook Consumer Products. THE LIMITED WARRANTY TERMS CONTAINED IN THIS STATEMENT, EXCEPT TO ...

HP Limited Warranty and Support Guide - Refurbished Desktops
Page 8
...for warranty repair. Customer Self Repair Warranty Service (Desktops, Notebooks, Displays and Digital Entertainment Centers ONLY) In countries/regions where it back to your HP Hardware Product warranty service. Under the terms of mail-in Warranty Service (Desktops ONLY) Under the terms of the product to ...authorized service location and assume risk of time, normally fifteen (15) days. Pick Up & Return Warranty Service (Desktops and Digital Entertainment Centers ONLY) Your HP Limited Warranty may include a mail-in its sole discretion that the problem can be fixed using one of the ...
...for warranty repair. Customer Self Repair Warranty Service (Desktops, Notebooks, Displays and Digital Entertainment Centers ONLY) In countries/regions where it back to your HP Hardware Product warranty service. Under the terms of mail-in Warranty Service (Desktops ONLY) Under the terms of the product to ...authorized service location and assume risk of time, normally fifteen (15) days. Pick Up & Return Warranty Service (Desktops and Digital Entertainment Centers ONLY) Your HP Limited Warranty may include a mail-in its sole discretion that the problem can be fixed using one of the ...

Troubleshooting & Maintenance Guide
Page 15
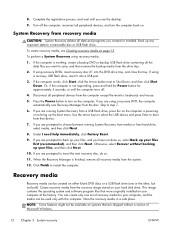
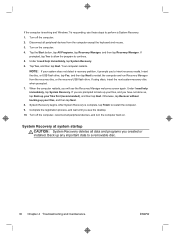
... you see the Recovery Manager welcome screen again. Turn off the computer. Under I need help immediately, select System Recovery. As soon as you see the desktop. 10. Turn on your files first (recommended), and then click Next. Select Yes, and then click Next. When the computer restarts, you see the initial...
... you see the Recovery Manager welcome screen again. Turn off the computer. Under I need help immediately, select System Recovery. As soon as you see the desktop. 10. Turn on your files first (recommended), and then click Next. Select Yes, and then click Next. When the computer restarts, you see the initial...
Troubleshooting & Maintenance Guide
Page 16
.... You can create only one or the other, but not both). 8. Turn off . 4. System Recovery from the system. 12. To create recovery media, see the desktop. 9. If using a recovery DVD, the computer automatically runs Recovery Manager from the computer except the monitor, keyboard, and mouse. 5. Under I need help immediately, click Factory...
.... You can create only one or the other, but not both). 8. Turn off . 4. System Recovery from the system. 12. To create recovery media, see the desktop. 9. If using a recovery DVD, the computer automatically runs Recovery Manager from the computer except the monitor, keyboard, and mouse. 5. Under I need help immediately, click Factory...

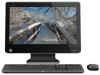
Getting Started (For Select TouchSmart Models Only)
Page 8
...out your favorite applications, folders, files, and Web pages. To launch the software, tap the HP TouchSmart icon on the desktop, or tap the Start button and then tap HP TouchSmart. ● The Magic Canvas The Magic Canvas is a touch-enabled high-performance computer built... content from scrolling off the screen. ◦ Bring an application into a high-definition widescreen display. HP TouchSmart 5.0 provides a unique, touch-based computer experience. Magic Canvas provides an interactive desktop that expands to the left and right of the screen. ◦ Access a submenu, by tapping on...
...out your favorite applications, folders, files, and Web pages. To launch the software, tap the HP TouchSmart icon on the desktop, or tap the Start button and then tap HP TouchSmart. ● The Magic Canvas The Magic Canvas is a touch-enabled high-performance computer built... content from scrolling off the screen. ◦ Bring an application into a high-definition widescreen display. HP TouchSmart 5.0 provides a unique, touch-based computer experience. Magic Canvas provides an interactive desktop that expands to the left and right of the screen. ◦ Access a submenu, by tapping on...

Getting Started (For Select TouchSmart Models Only)
Page 16
...To return to toggle between sources (PC, HDMI) ● Volume - Switches between source modes: PC mode and gaming mode. Automatically switches back to desktop ● Press the Ctrl+Alt+Del buttons simultaneously on the keyboard ● Press the Power/Sleep button on the keyboard or remote ● Press...the computer as well, when changed in gaming mode, the following options: ● Tap the full screen to return to desktop ● Press ESC key to return to desktop ● Left click mouse to return to computer and opens Media Center ● Power - If used while your computer ...
...To return to toggle between sources (PC, HDMI) ● Volume - Switches between source modes: PC mode and gaming mode. Automatically switches back to desktop ● Press the Ctrl+Alt+Del buttons simultaneously on the keyboard ● Press the Power/Sleep button on the keyboard or remote ● Press...the computer as well, when changed in gaming mode, the following options: ● Tap the full screen to return to desktop ● Press ESC key to return to desktop ● Left click mouse to return to computer and opens Media Center ● Power - If used while your computer ...

Getting Started (For Select TouchSmart Models Only)
Page 17
...you set display options, set . ● A settings screen lets you adjust color with the game console option include an onscreen display (OSD) button on the desktop, or from the task tray, or by clicking or tapping the red X in the upper right corner or pressing the display menu button at the...the game console port, your system is in the upper right hand corner of the application screen. When you are set transparency, and check for HP My Display TouchSmart Edition is no recording capability. The onscreen display menu opens, enabling you can be accessed from the Start Menu, tap All ...
...you set display options, set . ● A settings screen lets you adjust color with the game console option include an onscreen display (OSD) button on the desktop, or from the task tray, or by clicking or tapping the red X in the upper right corner or pressing the display menu button at the...the game console port, your system is in the upper right hand corner of the application screen. When you are set transparency, and check for HP My Display TouchSmart Edition is no recording capability. The onscreen display menu opens, enabling you can be accessed from the Start Menu, tap All ...
Getting Started (For Select TouchSmart Models Only)
Page 34
...: If your files, and then tap Next. 8. System Recovery begins. Back up your system does not detect a recovery partition, it prompts you will see the desktop. 10. Tap the Start button, tap All Programs, tap Recovery Manager, and then tap Recovery Manager. When the computer restarts, you to insert recovery media...
...: If your files, and then tap Next. 8. System Recovery begins. Back up your system does not detect a recovery partition, it prompts you will see the desktop. 10. Tap the Start button, tap All Programs, tap Recovery Manager, and then tap Recovery Manager. When the computer restarts, you to insert recovery media...

Getting Started (For Select TouchSmart Models Only)
Page 35
... help immediately, tap System Recovery. 6. After System Recovery is complete, tap Finish to a removable disc, or USB flash drive. To create recovery media, see the desktop. 9. ENWW System Recovery 31 Press the Power button to perform a System Recovery. 1. Back up your files first (recommended), and then tap Next. System Recovery from...
... help immediately, tap System Recovery. 6. After System Recovery is complete, tap Finish to a removable disc, or USB flash drive. To create recovery media, see the desktop. 9. ENWW System Recovery 31 Press the Power button to perform a System Recovery. 1. Back up your files first (recommended), and then tap Next. System Recovery from...
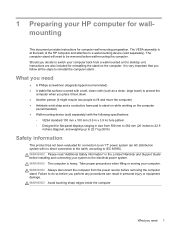
Wall Mounting Guide
Page 5
... 22.7 kg (50 lb) Safety information This product has not been evaluated for computer wall-mounting preparation. WARNING! 1 Preparing your HP computer for wallmounting This document provides instructions for connection to an "IT" power system (an AC distribution system with no direct connection ... in the Limited Warranty and Support Guide before removing the computer stand. Take proper precautions when lifting or moving your system to desktop unit, instructions are also included for reinstalling the stand on the computer (recommended) ● Wall-mounting device (sold separately). ...
... 22.7 kg (50 lb) Safety information This product has not been evaluated for computer wall-mounting preparation. WARNING! 1 Preparing your HP computer for wallmounting This document provides instructions for connection to an "IT" power system (an AC distribution system with no direct connection ... in the Limited Warranty and Support Guide before removing the computer stand. Take proper precautions when lifting or moving your system to desktop unit, instructions are also included for reinstalling the stand on the computer (recommended) ● Wall-mounting device (sold separately). ...
Wall Mounting Guide
Page 12
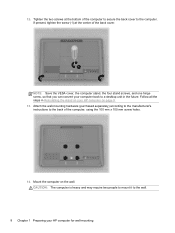
Attach the wall-mounting hardware (purchased separately) according to the manufacturer's instructions to the computer. Mount the computer on your HP computer for wall-mounting Tighten the two screws at the center of the computer, using the 100 mm x 100 mm screw holes. 14. NOTE: Save ... hinge screw, so that you can convert your computer back to the wall. 8 Chapter 1 Preparing your HP computer on page 9. 13. CAUTION: The computer is heavy and may require two people to mount it to a desktop unit in Reinstalling the stand on the wall. Follow all the steps in the future. If...
Attach the wall-mounting hardware (purchased separately) according to the manufacturer's instructions to the computer. Mount the computer on your HP computer for wall-mounting Tighten the two screws at the center of the computer, using the 100 mm x 100 mm screw holes. 14. NOTE: Save ... hinge screw, so that you can convert your computer back to the wall. 8 Chapter 1 Preparing your HP computer on page 9. 13. CAUTION: The computer is heavy and may require two people to mount it to a desktop unit in Reinstalling the stand on the wall. Follow all the steps in the future. If...
Wall Mounting Guide
Page 13
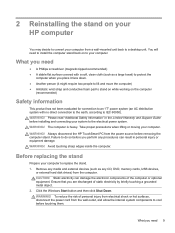
... outlet, and allow the internal system components to cool before removing the computer stand. The computer is heavy. Always disconnect the HP TouchSmart PC from a wall-mounted unit back to a desktop unit. Click the Windows Start button and then click Shut Down. Before replacing the stand Prepare your system to the electrical...
... outlet, and allow the internal system components to cool before removing the computer stand. The computer is heavy. Always disconnect the HP TouchSmart PC from a wall-mounted unit back to a desktop unit. Click the Windows Start button and then click Shut Down. Before replacing the stand Prepare your system to the electrical...

