
User Guide
Page 4
... and components...2 Features...2 17-inch model Rear connector components 3 19.5-inch model Rear connector components 4 17-inch model Front bezel controls ...5 19.5-inch model Back bezel controls...6 Setting up the monitor...7 Installing the monitor stand...7 Using the Mini PC by HP Desktop Mini Security Dual VESA... ...13 Adjusting the monitor...15 Turning on the monitor ...16 HP Watermark and Image Retention Policy 16 2 Using the Monitor 17 Downloading the monitor drivers...17 Using the On-Screen Display (OSD) menu 17 Assigning the Function buttons...18 Adjusting to Low Blue Light Mode...
... and components...2 Features...2 17-inch model Rear connector components 3 19.5-inch model Rear connector components 4 17-inch model Front bezel controls ...5 19.5-inch model Back bezel controls...6 Setting up the monitor...7 Installing the monitor stand...7 Using the Mini PC by HP Desktop Mini Security Dual VESA... ...13 Adjusting the monitor...15 Turning on the monitor ...16 HP Watermark and Image Retention Policy 16 2 Using the Monitor 17 Downloading the monitor drivers...17 Using the On-Screen Display (OSD) menu 17 Assigning the Function buttons...18 Adjusting to Low Blue Light Mode...

User Guide
Page 5
... and product number 23 4 Maintaining the monitor 24 Maintenance guidelines...24 Cleaning the monitor ...24 Shipping the monitor...24 A Technical specifications 25 17-inch model technical specifications and Preset display resolutions 25 19.5-inch model technical specifications and Preset display resolutions 26 Entering user modes ...27 Energy... commitment...28 International Association of Accessibility Professionals (IAAP 28 Finding the best assistive technology 29 Assessing your needs ...29 Accessibility for HP products ...29 Standards and legislation ...30 Standards...30 Mandate 376 -
... and product number 23 4 Maintaining the monitor 24 Maintenance guidelines...24 Cleaning the monitor ...24 Shipping the monitor...24 A Technical specifications 25 17-inch model technical specifications and Preset display resolutions 25 19.5-inch model technical specifications and Preset display resolutions 26 Entering user modes ...27 Energy... commitment...28 International Association of Accessibility Professionals (IAAP 28 Finding the best assistive technology 29 Assessing your needs ...29 Accessibility for HP products ...29 Standards and legislation ...30 Standards...30 Mandate 376 -

User Guide
Page 8
... angle to allow viewing from a sitting or standing position, or when moving from side to side • Tilt capability • VGA video inputs (17-inch model only) • DisplayPort video inputs (19.5-inch model only) • HDMI (High-Definition Multimedia Interface) video input (19.5-inch model ... and drivers, go to http://www.hp.com/support and follow the instructions to the Product Notices provided in your product. 2 Product features and components Features The monitors include the following features: • 43.2 cm (17-inch) diagonal viewable screen area with 1280 x 1024 resolution, ...
... angle to allow viewing from a sitting or standing position, or when moving from side to side • Tilt capability • VGA video inputs (17-inch model only) • DisplayPort video inputs (19.5-inch model only) • HDMI (High-Definition Multimedia Interface) video input (19.5-inch model ... and drivers, go to http://www.hp.com/support and follow the instructions to the Product Notices provided in your product. 2 Product features and components Features The monitors include the following features: • 43.2 cm (17-inch) diagonal viewable screen area with 1280 x 1024 resolution, ...
User Guide
Page 9
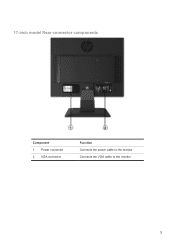
17-inch model Rear connector components Component 1 Power connector 2 VGA connector Function Connects the power cable to the monitor Connects the VGA cable to the monitor 3
17-inch model Rear connector components Component 1 Power connector 2 VGA connector Function Connects the power cable to the monitor Connects the VGA cable to the monitor 3
User Guide
Page 11
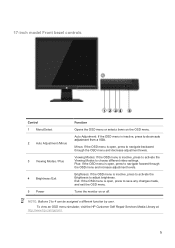
... forward through the OSD menu and decrease adjustment levels. Plus: If the OSD menu is open , press to 4 can be assigned a different function by user. 17-inch model Front bezel controls Control 1 Menu/Select 2 Auto Adjustment /Minus 3 Viewing Modes / Plus 4 Brightness /Exit 5 Power Function Opens the OSD menu or ...selects items on or off. To view an OSD menu simulator, visit the HP Customer Self Repair Services Media Library at http://www.hp.com/go/sml. 5 Minus: If the OSD menu is open , press to navigate backward through the OSD menu and ...
... forward through the OSD menu and decrease adjustment levels. Plus: If the OSD menu is open , press to 4 can be assigned a different function by user. 17-inch model Front bezel controls Control 1 Menu/Select 2 Auto Adjustment /Minus 3 Viewing Modes / Plus 4 Brightness /Exit 5 Power Function Opens the OSD menu or ...selects items on or off. To view an OSD menu simulator, visit the HP Customer Self Repair Services Media Library at http://www.hp.com/go/sml. 5 Minus: If the OSD menu is open , press to navigate backward through the OSD menu and ...
User Guide
Page 22
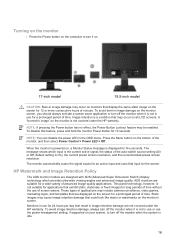
...turn off the monitor when it on the computer to turn off the monitor when the system is not covered under the HP warranty. Press the Power button on . 17-inch model 19.5-inch model CAUTION: Burn-in use of the monitor, and then select Power Control > Power LED > ...angles and advanced image quality. ADS monitors are designed with ADS (Advanced Super Dimension Switch) display technology which input is displayed for 10 seconds. HP Watermark and Image Retention Policy The ADS monitor models are suitable for a prolonged period of time. Press the Menu button on , a Monitor Status...
...turn off the monitor when it on the computer to turn off the monitor when the system is not covered under the HP warranty. Press the Power button on . 17-inch model 19.5-inch model CAUTION: Burn-in use of the monitor, and then select Power Control > Power LED > ...angles and advanced image quality. ADS monitors are designed with ADS (Advanced Super Dimension Switch) display technology which input is displayed for 10 seconds. HP Watermark and Image Retention Policy The ADS monitor models are suitable for a prolonged period of time. Press the Menu button on , a Monitor Status...
User Guide
Page 23
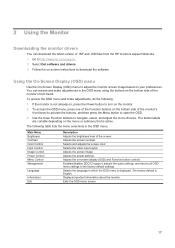
... Power Control Menu Control Management Language Information Exit Description Adjusts the brightness level of .INF and .ICM files from the HP monitors support Web site. 1. Selects the video input signal. Adjusts the on the monitor. 2. Selects and adjusts the...screen image. Go to navigate, select, and adjust the menu choices. Use the three Function buttons to http://www.hp.com/support. 2. To access the OSD menu and make adjustments in the OSD menu using the buttons on the ... the software. Displays important information about the monitor. Exits the OSD menu screen. 17
... Power Control Menu Control Management Language Information Exit Description Adjusts the brightness level of .INF and .ICM files from the HP monitors support Web site. 1. Selects the video input signal. Adjusts the on the monitor. 2. Selects and adjusts the...screen image. Go to navigate, select, and adjust the menu choices. Use the three Function buttons to http://www.hp.com/support. 2. To access the OSD menu and make adjustments in the OSD menu using the buttons on the ... the software. Displays important information about the monitor. Exits the OSD menu screen. 17
User Guide
Page 31
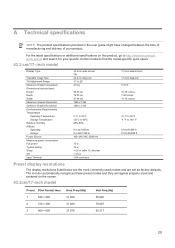
... might have changed between the time of manufacturing and delivery of your specific monitor model to find the model-specific quick specs. 43.2 cm/17-inch model Display Type Viewable Image Size Tilt Adjustment Range Maximum Weight (Unpacked) Dimensions (include base) Height Depth Width Maximum Graphic Resolution Optimum .... The monitor automatically recognizes these preset modes and they will appear properly sized and centered on this product, go to http://www.hp.com/go/ quick specs/ and search for your product. For the latest specifications or additional specifications on the screen. 43.2cm...
... might have changed between the time of manufacturing and delivery of your specific monitor model to find the model-specific quick specs. 43.2 cm/17-inch model Display Type Viewable Image Size Tilt Adjustment Range Maximum Weight (Unpacked) Dimensions (include base) Height Depth Width Maximum Graphic Resolution Optimum .... The monitor automatically recognizes these preset modes and they will appear properly sized and centered on this product, go to http://www.hp.com/go/ quick specs/ and search for your product. For the latest specifications or additional specifications on the screen. 43.2cm...


