

Product Notices
Page 14
...figures géométriques simples, d'éclairs ou d'explosions. Si vous-même ou par votre enfant. This feature allows the monitor to operate on input voltages between 100-120V or 200-240V. Consult your physician (such as eye or muscle twitching, convulsions, nausea, loss....saIfrysybmrepatkosmmsaypevarsryisftr,ocmonpseurlstoanptohypseircsiaonn.. • Avoid using functionality. • Avoid prolonged use of 6) is still under development. Power cord notice The monitor power supply is not likely to be walked on or pinched by items placed upon it or against it.
...figures géométriques simples, d'éclairs ou d'explosions. Si vous-même ou par votre enfant. This feature allows the monitor to operate on input voltages between 100-120V or 200-240V. Consult your physician (such as eye or muscle twitching, convulsions, nausea, loss....saIfrysybmrepatkosmmsaypevarsryisftr,ocmonpseurlstoanptohypseircsiaonn.. • Avoid using functionality. • Avoid prolonged use of 6) is still under development. Power cord notice The monitor power supply is not likely to be walked on or pinched by items placed upon it or against it.

Product Notices
Page 33
... or disposed of Energy Efficiency and Energy Efficiency Grades for PC Monitors"(CEL rule), this data is expressed in GB21520, this monitor has an Energy Efficiency Label. China environmental notices http://www.hp.com/hpinfo/globalcitizenship/environment/productdata/chinasepa.html http://www.hp.com.cn/hardwarerecycle http://www.sepa.gov.cn 3 The Display CEL...
... or disposed of Energy Efficiency and Energy Efficiency Grades for PC Monitors"(CEL rule), this data is expressed in GB21520, this monitor has an Energy Efficiency Label. China environmental notices http://www.hp.com/hpinfo/globalcitizenship/environment/productdata/chinasepa.html http://www.hp.com.cn/hardwarerecycle http://www.sepa.gov.cn 3 The Display CEL...
User Guide
Page 3
... to complete a task. IMPORTANT: Indicates information considered important but not hazard-related (for completing a task. About This Guide This guide provides information on monitor features, setting up the monitor, using the software and technical specifications. Indicates a hazardous situation that , if not avoided, could result in loss of the main text. CAUTION: Indicates...
... to complete a task. IMPORTANT: Indicates information considered important but not hazard-related (for completing a task. About This Guide This guide provides information on monitor features, setting up the monitor, using the software and technical specifications. Indicates a hazardous situation that , if not avoided, could result in loss of the main text. CAUTION: Indicates...
User Guide
Page 4
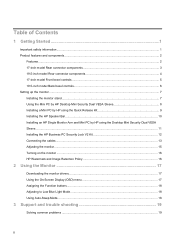
... Setting up the monitor...7 Installing the monitor stand...7 Using the Mini PC by HP Desktop Mini Security Dual VESA Sleeve 8 Installing a Mini PC by HP using the Quick Release Kit 9 Installing the HP Speaker Bar...10 Installing an HP Single Monitor Arm and Mini PC by HP using the Desktop Mini... Security Dual VESA Sleeve...11 Installing the HP Business PC Security Lock V2 Kit 12 Connecting the cables ...13 Adjusting the monitor...15 Turning on the monitor ...16 HP Watermark and Image Retention Policy 16 2 Using the Monitor 17 Downloading the monitor drivers...17 Using the On-Screen Display ...
... Setting up the monitor...7 Installing the monitor stand...7 Using the Mini PC by HP Desktop Mini Security Dual VESA Sleeve 8 Installing a Mini PC by HP using the Quick Release Kit 9 Installing the HP Speaker Bar...10 Installing an HP Single Monitor Arm and Mini PC by HP using the Desktop Mini... Security Dual VESA Sleeve...11 Installing the HP Business PC Security Lock V2 Kit 12 Connecting the cables ...13 Adjusting the monitor...15 Turning on the monitor ...16 HP Watermark and Image Retention Policy 16 2 Using the Monitor 17 Downloading the monitor drivers...17 Using the On-Screen Display ...

User Guide
Page 5
...to call technical support ...22 Locating the serial number and product number 23 4 Maintaining the monitor 24 Maintenance guidelines...24 Cleaning the monitor ...24 Shipping the monitor...24 A Technical specifications 25 17-inch model technical specifications and Preset display resolutions 25 19.5-......28 International Association of Accessibility Professionals (IAAP 28 Finding the best assistive technology 29 Assessing your needs ...29 Accessibility for HP products ...29 Standards and legislation ...30 Standards...30 Mandate 376 - EN 301 549...30 Web Content Accessibility Guidelines (WCAG...
...to call technical support ...22 Locating the serial number and product number 23 4 Maintaining the monitor 24 Maintenance guidelines...24 Cleaning the monitor ...24 Shipping the monitor...24 A Technical specifications 25 17-inch model technical specifications and Preset display resolutions 25 19.5-......28 International Association of Accessibility Professionals (IAAP 28 Finding the best assistive technology 29 Assessing your needs ...29 Accessibility for HP products ...29 Standards and legislation ...30 Standards...30 Mandate 376 - EN 301 549...30 Web Content Accessibility Guidelines (WCAG...

User Guide
Page 7
...current rating of the cord. It describes proper workstation, setup, posture, and health and work habits for entertainment purposes. Never disconnect the monitor by attaching a 2-pin adapter. Use a power strip whose manufacturer offers a Damage Replacement Policy so you can replace the equipment, if ... documentation kit. Not all cords and cables connected to some form of the products connected to properly support your HP LCD monitor. Consider placing the monitor in your safety, do not place anything on the correct power cord set to use only a power source and...
...current rating of the cord. It describes proper workstation, setup, posture, and health and work habits for entertainment purposes. Never disconnect the monitor by attaching a 2-pin adapter. Use a power strip whose manufacturer offers a Damage Replacement Policy so you can replace the equipment, if ... documentation kit. Not all cords and cables connected to some form of the products connected to properly support your HP LCD monitor. Consider placing the monitor in your safety, do not place anything on the correct power cord set to use only a power source and...

User Guide
Page 8
...• Plug-and-play capability if supported by your operating system • Cable management feature for placement of HP programs and drivers, go to http://www.hp.com/support and follow the instructions to the Product Notices provided in your product. 2 includes custom scaling for ... for reduced power consumption NOTE: For safety and regulatory information, refer to find your documentation kit. Product features and components Features The monitors include the following features: • 43.2 cm (17-inch) diagonal viewable screen area with 1280 x 1024 resolution, plus full-screen...
...• Plug-and-play capability if supported by your operating system • Cable management feature for placement of HP programs and drivers, go to http://www.hp.com/support and follow the instructions to the Product Notices provided in your product. 2 includes custom scaling for ... for reduced power consumption NOTE: For safety and regulatory information, refer to find your documentation kit. Product features and components Features The monitors include the following features: • 43.2 cm (17-inch) diagonal viewable screen area with 1280 x 1024 resolution, plus full-screen...
User Guide
Page 9
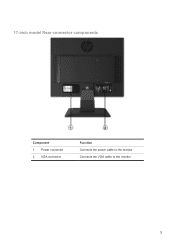
17-inch model Rear connector components Component 1 Power connector 2 VGA connector Function Connects the power cable to the monitor Connects the VGA cable to the monitor 3
17-inch model Rear connector components Component 1 Power connector 2 VGA connector Function Connects the power cable to the monitor Connects the VGA cable to the monitor 3
User Guide
Page 10
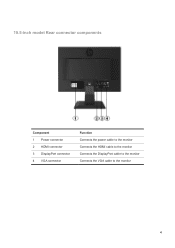
19.5-inch model Rear connector components Component 1 Power connector 2 HDMI connector 3 DisplayPort connector 4 VGA connector Function Connects the power cable to the monitor Connects the HDMI cable to the monitor Connects the DisplayPort cable to the monitor Connects the VGA cable to the monitor 4
19.5-inch model Rear connector components Component 1 Power connector 2 HDMI connector 3 DisplayPort connector 4 VGA connector Function Connects the power cable to the monitor Connects the HDMI cable to the monitor Connects the DisplayPort cable to the monitor Connects the VGA cable to the monitor 4
User Guide
Page 11
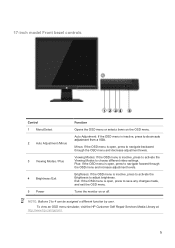
...: Buttons 2 to navigate forward through the OSD menu and decrease adjustment levels. To view an OSD menu simulator, visit the HP Customer Self Repair Services Media Library at http://www.hp.com/go/sml. 5 Viewing Modes: If the OSD menu is inactive, press to navigate backward through the OSD menu and ...increase adjustment levels. Turns the monitor on the OSD menu. Plus: If the OSD menu is open, press to do an auto adjustment...
...: Buttons 2 to navigate forward through the OSD menu and decrease adjustment levels. To view an OSD menu simulator, visit the HP Customer Self Repair Services Media Library at http://www.hp.com/go/sml. 5 Viewing Modes: If the OSD menu is inactive, press to navigate backward through the OSD menu and ...increase adjustment levels. Turns the monitor on the OSD menu. Plus: If the OSD menu is open, press to do an auto adjustment...
User Guide
Page 12
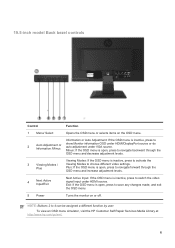
...to activate the Viewing Modes to save any changes made, and exit the OSD menu. 5 Power Turns the monitor on the OSD menu. Minus: If the OSD menu is open , press to choose different video settings. Plus:...Exit Next Active Input: If the OSD menu is inactive, press to 2 Auto Adjustment or Information /Minus show Monitor information OSD under HDMI/DisplayPort source or do auto adjustment under HDMI source. 19.5-inch model Back bezel controls Control...a different function by user. To view an OSD menu simulator, visit the HP Customer Self Repair Services Media Library at http://www...
...to activate the Viewing Modes to save any changes made, and exit the OSD menu. 5 Power Turns the monitor on the OSD menu. Minus: If the OSD menu is open , press to choose different video settings. Plus:...Exit Next Active Input: If the OSD menu is inactive, press to 2 Auto Adjustment or Information /Minus show Monitor information OSD under HDMI/DisplayPort source or do auto adjustment under HDMI source. 19.5-inch model Back bezel controls Control...a different function by user. To view an OSD menu simulator, visit the HP Customer Self Repair Services Media Library at http://www...
User Guide
Page 13
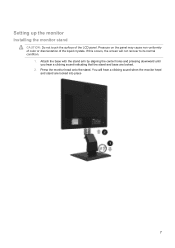
Press the monitor head onto the stand. Pressure on the panel may cause non-uniformity of color or disorientation of the LCD panel. You will not recover to its normal condition. 1. Attach the base with the stand arm by aligning the center holes and pressing downward until you hear a clicking sound indicating that the stand and base are locked into place 7 If this occurs, the screen will hear a clicking sound when the monitor head and stand are locked. 2. Setting up the monitor Installing the monitor stand CAUTION: Do not touch the surface of the liquid crystals.
Press the monitor head onto the stand. Pressure on the panel may cause non-uniformity of color or disorientation of the LCD panel. You will not recover to its normal condition. 1. Attach the base with the stand arm by aligning the center holes and pressing downward until you hear a clicking sound indicating that the stand and base are locked into place 7 If this occurs, the screen will hear a clicking sound when the monitor head and stand are locked. 2. Setting up the monitor Installing the monitor stand CAUTION: Do not touch the surface of the liquid crystals.
User Guide
Page 14
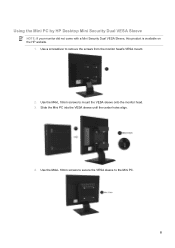
Slide the Mini PC into the VESA sleeve until the center holes align. 4. Using the Mini PC by HP Desktop Mini Security Dual VESA Sleeve NOTE: If your monitor did not come with a Mini Security Dual VESA Sleeve, this product is available on the HP website. 1. Use the M4xL 10mm screws to secure the VESA sleeve to remove the screws from the monitor head's VESA mount. 2. Use a screwdriver to the Mini PC. 8 Use the M4xL 10mm screws to mount the VESA sleeve onto the monitor head. 3.
Slide the Mini PC into the VESA sleeve until the center holes align. 4. Using the Mini PC by HP Desktop Mini Security Dual VESA Sleeve NOTE: If your monitor did not come with a Mini Security Dual VESA Sleeve, this product is available on the HP website. 1. Use the M4xL 10mm screws to secure the VESA sleeve to remove the screws from the monitor head's VESA mount. 2. Use a screwdriver to the Mini PC. 8 Use the M4xL 10mm screws to mount the VESA sleeve onto the monitor head. 3.
User Guide
Page 15
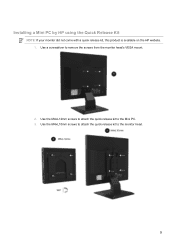
Installing a Mini PC by HP using the Quick Release Kit NOTE: If your monitor did not come with a quick release kit, this product is available on the HP website. 1. Use a screwdriver to the monitor head. 9 Use the M4xL10mm screws to attach the quick release kit to remove the screws from the monitor head's VESA mount. 2. Use the M4xL12mm screws to attach the quick release kit to the Mini PC. 3.
Installing a Mini PC by HP using the Quick Release Kit NOTE: If your monitor did not come with a quick release kit, this product is available on the HP website. 1. Use a screwdriver to the monitor head. 9 Use the M4xL10mm screws to attach the quick release kit to remove the screws from the monitor head's VESA mount. 2. Use the M4xL12mm screws to attach the quick release kit to the Mini PC. 3.
User Guide
Page 16
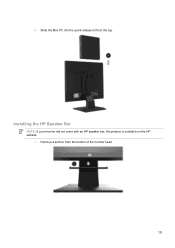
Remove a section from the top. 4. Installing the HP Speaker Bar NOTE: If your monitor did not come with an HP speaker bar, this product is available on the HP website. 1. Slide the Mini PC into the quick release kit from the bottom of the monitor head 10
Remove a section from the top. 4. Installing the HP Speaker Bar NOTE: If your monitor did not come with an HP speaker bar, this product is available on the HP website. 1. Slide the Mini PC into the quick release kit from the bottom of the monitor head 10
User Guide
Page 17
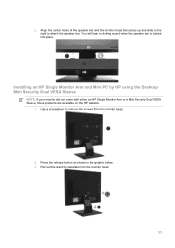
... the Desktop Mini Security Dual VESA Sleeve NOTE: If your monitor did not come with either an HP Single Monitor Arm or a Mini Security Dual VESA Sleeve, these products are available on the HP website. 1. Use a screwdriver to remove the screws from the monitor head. 11 Pull out the stand to attach the speaker bar... bar is locked into place. Press the release button as shown in the graphic below. 3. 2. Align the center holes of the speaker bar and the monitor head then press up and slide to the right to separate from the...
... the Desktop Mini Security Dual VESA Sleeve NOTE: If your monitor did not come with either an HP Single Monitor Arm or a Mini Security Dual VESA Sleeve, these products are available on the HP website. 1. Use a screwdriver to remove the screws from the monitor head. 11 Pull out the stand to attach the speaker bar... bar is locked into place. Press the release button as shown in the graphic below. 3. 2. Align the center holes of the speaker bar and the monitor head then press up and slide to the right to separate from the...
User Guide
Page 18
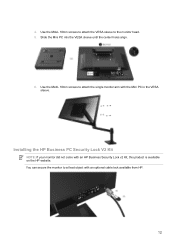
Use the Mx4L 10mm screws to attach the single monitor arm with an HP Business Security Lock v2 Kit, this product is available on the HP website. Use the M4xL 10mm screws to attach the VESA sleeve to a fixed object with an optional cable lock available from HP. 12 Slide the Mini PC into the VESA sleeve until the center holes align. 6. Installing the HP Business PC Security Lock V2 Kit NOTE: If your monitor did not come with the Mini PC in the VESA sleeve. 4. You can secure the monitor to the monitor head. 5.
Use the Mx4L 10mm screws to attach the single monitor arm with an HP Business Security Lock v2 Kit, this product is available on the HP website. Use the M4xL 10mm screws to attach the VESA sleeve to a fixed object with an optional cable lock available from HP. 12 Slide the Mini PC into the VESA sleeve until the center holes align. 6. Installing the HP Business PC Security Lock V2 Kit NOTE: If your monitor did not come with the Mini PC in the VESA sleeve. 4. You can secure the monitor to the monitor head. 5.
User Guide
Page 19
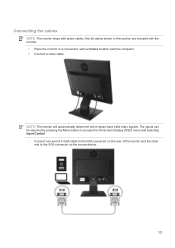
...VGA cable to the VGA connector on the rear of the monitor and the other end to the VGA connector on the source device. 13 Connecting the cables NOTE: The monitor ships with the monitor. 1. Place the monitor in this section are included with select cables. Connect a video... cable. Not all cables shown in a convenient, well-ventilated location near the computer. 2. NOTE: The monitor will automatically determine which inputs have valid...
...VGA cable to the VGA connector on the rear of the monitor and the other end to the VGA connector on the source device. 13 Connecting the cables NOTE: The monitor ships with the monitor. 1. Place the monitor in this section are included with select cables. Connect a video... cable. Not all cables shown in a convenient, well-ventilated location near the computer. 2. NOTE: The monitor will automatically determine which inputs have valid...
User Guide
Page 20
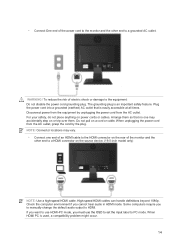
To reduce the risk of the power cord to the monitor and the other end to a HDMI connector on a cord or cable. Do not pull on the source device. (19.5-inch model only) NOTE: Use a high-... the power cord into a grounded (earthed) AC outlet that no one end of an HDMI cable to the HDMI connector on the rear of the monitor and the other end to a grounded AC outlet. Check the computer environment if you must use HDMI-PC mode, you cannot hear audio in HDMI...
To reduce the risk of the power cord to the monitor and the other end to a HDMI connector on a cord or cable. Do not pull on the source device. (19.5-inch model only) NOTE: Use a high-... the power cord into a grounded (earthed) AC outlet that no one end of an HDMI cable to the HDMI connector on the rear of the monitor and the other end to a grounded AC outlet. Check the computer environment if you must use HDMI-PC mode, you cannot hear audio in HDMI...
User Guide
Page 21
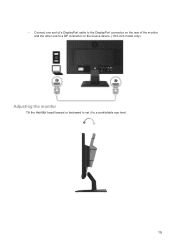
• Connect one end of a DisplayPort cable to the DisplayPort connector on the rear of the monitor and the other end to a comfortable eye level. 15 Adjusting the monitor Tilt the monitor head forward or backward to set it to a DP connector on the source device. (19.5-inch model only).
• Connect one end of a DisplayPort cable to the DisplayPort connector on the rear of the monitor and the other end to a comfortable eye level. 15 Adjusting the monitor Tilt the monitor head forward or backward to set it to a DP connector on the source device. (19.5-inch model only).


