
Product Notice
Page 2
... the part, series, or model number found to comply with the limits for a Class B digital device, pursuant to be used in conjunction with your product. Modifications The FCC requires the user to Part 15 of tablet PCs and notebook computers. Cables Connections to this product is subject to which can radiate radio frequency energy and, if not installed and used in a residential installation. Products...
... the part, series, or model number found to comply with the limits for a Class B digital device, pursuant to be used in conjunction with your product. Modifications The FCC requires the user to Part 15 of tablet PCs and notebook computers. Cables Connections to this product is subject to which can radiate radio frequency energy and, if not installed and used in a residential installation. Products...

Product Notice
Page 14
... monitor power supply is provided with this product on any of the following safety precautions before using Display(s) functionality when you purchased the equipment. A power cord should monitor and ask their children if they have any user, have an undiagnosed condition that can cause photosensitive epileptic seizures. Japanese power cord requirements For use in a well-lit area and moderate the brightness of Display(s). • Keep...
... monitor power supply is provided with this product on any of the following safety precautions before using Display(s) functionality when you purchased the equipment. A power cord should monitor and ask their children if they have any user, have an undiagnosed condition that can cause photosensitive epileptic seizures. Japanese power cord requirements For use in a well-lit area and moderate the brightness of Display(s). • Keep...
Product Notice
Page 31
.../reach. Η HP REACH 1907/2006 http://www.hp.com/go /reach. The default power management settings on the ENERGY STAR program, its environmental benefits and the potential energy and financial savings of the power management feature can increase power consumption. Examples include the user pressing the power/sleep button, receiving an input signal from an input device, receiving an input signal from the default power setting to vyž...
.../reach. Η HP REACH 1907/2006 http://www.hp.com/go /reach. The default power management settings on the ENERGY STAR program, its environmental benefits and the potential energy and financial savings of the power management feature can increase power consumption. Examples include the user pressing the power/sleep button, receiving an input signal from an input device, receiving an input signal from the default power setting to vyž...
User Guide 1
Page 5
... monitor stand 6 Attaching the monitor head to a mounting device (select products only 7 Connecting the cables ...8 Adjusting the monitor ...10 Installing a security cable ...10 Turning on the monitor ...11 HP watermark and image retention policy (select products only 11 2 Using the monitor ...12 Downloading software and utilities ...12 The Information file ...12 The Image Color Matching file ...12 Using the OSD menu ...13 Using the function buttons ...14 Reassigning the function buttons ...14 Using Auto-Sleep Mode ...14 Adjusting blue light output ...15 3 Support and troubleshooting...
... monitor stand 6 Attaching the monitor head to a mounting device (select products only 7 Connecting the cables ...8 Adjusting the monitor ...10 Installing a security cable ...10 Turning on the monitor ...11 HP watermark and image retention policy (select products only 11 2 Using the monitor ...12 Downloading software and utilities ...12 The Information file ...12 The Image Color Matching file ...12 Using the OSD menu ...13 Using the function buttons ...14 Reassigning the function buttons ...14 Using Auto-Sleep Mode ...14 Adjusting blue light output ...15 3 Support and troubleshooting...

User Guide 1
Page 9
.... 1 Getting started Important safety information A power cord is suitable for the computer and its peripheral devices (such as a monitor, printer, scanner) to a surge protection device such as having this monitor. It describes proper workstation setup and proper posture, health, and work habits for this capability. Not all cords and cables connected to properly support your user guides. Use the appropriate and correctly sized furniture designed...
.... 1 Getting started Important safety information A power cord is suitable for the computer and its peripheral devices (such as a monitor, printer, scanner) to a surge protection device such as having this monitor. It describes proper workstation setup and proper posture, health, and work habits for this capability. Not all cords and cables connected to properly support your user guides. Use the appropriate and correctly sized furniture designed...

User Guide 1
Page 10
... easy setup and screen optimization ● Support for lower resolutions; cable included in select regions) ● VGA video input (cable included in select regions) ● Audio-in jack (P21 models only) ● Four on IPS models to allow selection of the most commonly used operations ● Plug and Play capability if supported by display. ● Energy saver feature to the frame rate of a compatible graphics card (select products only). NOTE: Adaptive refresh rates...
... easy setup and screen optimization ● Support for lower resolutions; cable included in select regions) ● VGA video input (cable included in select regions) ● Audio-in jack (P21 models only) ● Four on IPS models to allow selection of the most commonly used operations ● Plug and Play capability if supported by display. ● Energy saver feature to the frame rate of a compatible graphics card (select products only). NOTE: Adaptive refresh rates...
User Guide 1
Page 11
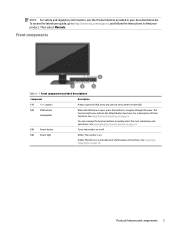
.... The function light icons indicate the default button functions. Product features and components 3 Then select Manuals. For a description of these functions, see the Product Notices provided in a reduced power state because of inactivity. Amber: Monitor is open, press the buttons to navigate through the menu. See Reassigning the function buttons on page 14. (3) Power button Turns the monitor on or off. (4) Power light White: The monitor is on...
.... The function light icons indicate the default button functions. Product features and components 3 Then select Manuals. For a description of these functions, see the Product Notices provided in a reduced power state because of inactivity. Amber: Monitor is open, press the buttons to navigate through the menu. See Reassigning the function buttons on page 14. (3) Power button Turns the monitor on or off. (4) Power light White: The monitor is on...
User Guide 1
Page 12
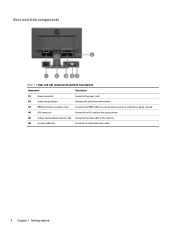
Rear and side components Table 1-2 Rear and side components and their descriptions Component Description (1) Power connector Connects the power cord. (2) Stand release button Releases the stand from the monitor. (3) HDMI port (select products only) Connects the HDMI cable to a source device such as a computer or game console. (4) VGA connector Connects the VGA cable to the source device. (5) Audio-in jack (select products only) Connects the audio cable to the monitor. (6) Security cable slot Connects an optional security cable. 4 Chapter 1 Getting started
Rear and side components Table 1-2 Rear and side components and their descriptions Component Description (1) Power connector Connects the power cord. (2) Stand release button Releases the stand from the monitor. (3) HDMI port (select products only) Connects the HDMI cable to a source device such as a computer or game console. (4) VGA connector Connects the VGA cable to the source device. (5) Audio-in jack (select products only) Connects the audio cable to the monitor. (6) Security cable slot Connects an optional security cable. 4 Chapter 1 Getting started

User Guide 1
Page 13
... the screen from getting scratched, defaced, or broken and to prevent damage to the control buttons, position the monitor facedown on the Web at http://www.hp.com/ergo. Slide the stand into the bottom of the LCD panel. Insert the base into the recess on the panel may cause nonuniformity of color or disorientation of the panel (1). 3. NOTE: The procedures for computer users...
... the screen from getting scratched, defaced, or broken and to prevent damage to the control buttons, position the monitor facedown on the Web at http://www.hp.com/ergo. Slide the stand into the bottom of the LCD panel. Insert the base into the recess on the panel may cause nonuniformity of color or disorientation of the panel (1). 3. NOTE: The procedures for computer users...
User Guide 1
Page 18
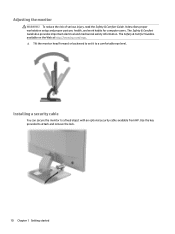
...; Tilt the monitor head forward or backward to set it to a fixed object with an optional security cable available from HP. Installing a security cable You can secure the monitor to a comfortable eye level. It describes proper workstation setup and proper posture, health, and work habits for computer users. Use the key provided to attach and remove the lock. 10 Chapter 1 Getting started The Safety & Comfort Guide also...
...; Tilt the monitor head forward or backward to set it to a fixed object with an optional security cable available from HP. Installing a security cable You can secure the monitor to a comfortable eye level. It describes proper workstation setup and proper posture, health, and work habits for computer users. Use the key provided to attach and remove the lock. 10 Chapter 1 Getting started The Safety & Comfort Guide also...

User Guide 1
Page 19
... and hold the monitor power button for 10 seconds. Press the Menu button to open the OSD, select Power, select Power LED, and then select Off. ▲ Press the power button on the monitor to turn it is On), the current preset display resolution, and the recommended preset display resolution. The message shows which provides ultrawide viewing angles and advanced image quality. default setting is not in use, or use 24 hours per day...
... and hold the monitor power button for 10 seconds. Press the Menu button to open the OSD, select Power, select Power LED, and then select Off. ▲ Press the power button on the monitor to turn it is On), the current preset display resolution, and the recommended preset display resolution. The message shows which provides ultrawide viewing angles and advanced image quality. default setting is not in use, or use 24 hours per day...
User Guide 1
Page 21
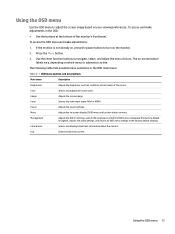
... the power button to turn on -screen display (OSD) menu and function button controls. The on-screen button labels vary, depending on your viewing preferences. Table 2-1 OSD menu options and descriptions Main menu Description Brightness+ Color Image Input Power Menu Management Information Exit Adjusts the brightness, contrast, and black stretch levels of the monitor's front bezel. Adjusts the screen image. Selects and displays important information about the monitor. Using the OSD menu 13 Use the three function buttons to navigate, select, and adjust the menu choices. Adjusts the...
... the power button to turn on -screen display (OSD) menu and function button controls. The on-screen button labels vary, depending on your viewing preferences. Table 2-1 OSD menu options and descriptions Main menu Description Brightness+ Color Image Input Power Menu Management Information Exit Adjusts the brightness, contrast, and black stretch levels of the monitor's front bezel. Adjusts the screen image. Selects and displays important information about the monitor. Using the OSD menu 13 Use the three function buttons to navigate, select, and adjust the menu choices. Adjusts the...

User Guide 1
Page 22
...(1) Menu button Opens the OSD main menu, selects a menu item from the OSD, or closes the OSD menu. (2) Brightness+ button Assignable function button Opens the Brightness+ adjustment scale. (3) Color button Assignable function button Opens the Color menu where you to the next active input. To reassign the function buttons: 1. Using Auto-Sleep Mode The monitor supports an OSD menu option called Auto-Sleep Mode that allows you can quickly access commonly used menu items. You cannot reassign the Menu button. Upon entering this reduced power state. For information about changing...
...(1) Menu button Opens the OSD main menu, selects a menu item from the OSD, or closes the OSD menu. (2) Brightness+ button Assignable function button Opens the Brightness+ adjustment scale. (3) Color button Assignable function button Opens the Color menu where you to the next active input. To reassign the function buttons: 1. Using Auto-Sleep Mode The monitor supports an OSD menu option called Auto-Sleep Mode that allows you can quickly access commonly used menu items. You cannot reassign the Menu button. Upon entering this reduced power state. For information about changing...

User Guide 1
Page 24
... video sources. Connect the power cord. Press the monitor power button. Open the OSD menu, and select Brightness to its maximum setting. "Check Video Cable" is displayed. "OSD Lockout" is displayed on the screen. The monitor's OSD Lockout function is improperly connected. The refresh rate might be VRR capable. In Windows, set auto-sleep to one of each issue, and the recommended solutions. Video cable is enabled. or Replace the video card or connect the video cable to On. Monitor video cable is VRR capable. 16 Chapter 3 Support and troubleshooting Change...
... video sources. Connect the power cord. Press the monitor power button. Open the OSD menu, and select Brightness to its maximum setting. "Check Video Cable" is displayed. "OSD Lockout" is displayed on the screen. The monitor's OSD Lockout function is improperly connected. The refresh rate might be VRR capable. In Windows, set auto-sleep to one of each issue, and the recommended solutions. Video cable is enabled. or Replace the video card or connect the video cable to On. Monitor video cable is VRR capable. 16 Chapter 3 Support and troubleshooting Change...

User Guide 1
Page 25
... following conditions: ● Monitor setup ● Factory reset of the computer ● Changing monitor resolution You can re-enable the button by holding the button down the power button or Menu button for 20 minutes before adjusting. 2. Press the Menu button to the monitor using a VGA (analog) input, this procedure can download the auto-adjustment pattern software utility from the Auto Adjustment menu in the OSD. If the result is connected to open the OSD menu, select Image, and then select Auto-Adjustment. Solution Be sure...
... following conditions: ● Monitor setup ● Factory reset of the computer ● Changing monitor resolution You can re-enable the button by holding the button down the power button or Menu button for 20 minutes before adjusting. 2. Press the Menu button to the monitor using a VGA (analog) input, this procedure can download the auto-adjustment pattern software utility from the Auto Adjustment menu in the OSD. If the result is connected to open the OSD menu, select Image, and then select Auto-Adjustment. Solution Be sure...

User Guide 1
Page 26
Optimizing image performance (analog input) You can adjust two controls in the OSD menu). To restore the factory settings, press the Menu button to open the OSD menu, select Image, and then select Clock and Phase. 2. These controls are adjustable only when you use the OSD buttons on the screen background. ● Phase: Increases or decreases the value to adjust the Phase. You can download this utility from http://www.hp.com/support.) The setup test pattern is...
Optimizing image performance (analog input) You can adjust two controls in the OSD menu). To restore the factory settings, press the Menu button to open the OSD menu, select Image, and then select Clock and Phase. 2. These controls are adjustable only when you use the OSD buttons on the screen background. ● Phase: Increases or decreases the value to adjust the Phase. You can download this utility from http://www.hp.com/support.) The setup test pattern is...

User Guide 1
Page 27
... use the OSD buttons on troubleshooting. The Horizontal Position shifts the image left or right; Contacting support To resolve a hardware or software problem, go to open the OSD menu, select Image, and then select Image Position. 2. Use this section, you are using the troubleshooting tips in the display area of the monitor. NOTE: Contact customer support to replace the power cord or any other cables that shipped with your product, including links to discussion forums and instructions...
... use the OSD buttons on troubleshooting. The Horizontal Position shifts the image left or right; Contacting support To resolve a hardware or software problem, go to open the OSD menu, select Image, and then select Image Position. 2. Use this section, you are using the troubleshooting tips in the display area of the monitor. NOTE: Contact customer support to replace the power cord or any other cables that shipped with your product, including links to discussion forums and instructions...

User Guide 1
Page 29
... service provider. ● Use only a power source and connection appropriate for each device. ● Install the monitor near an outlet that are covered in a well-ventilated area, away from the outlet. Cleaning the monitor 1. Dust the monitor by grasping the plug firmly and pulling it from excessive light, heat, or moisture. For more difficult cleaning situations, use the damp cloth to gently wipe the screen surface...
... service provider. ● Use only a power source and connection appropriate for each device. ● Install the monitor near an outlet that are covered in a well-ventilated area, away from the outlet. Cleaning the monitor 1. Dust the monitor by grasping the plug firmly and pulling it from excessive light, heat, or moisture. For more difficult cleaning situations, use the damp cloth to gently wipe the screen surface...

User Guide 1
Page 35
...monitor automatically recognizes these preset modes, and they will appear properly sized and centered on the screen. 68.6 cm (27.0 in 41°F to 95°F -40°F to 240 V ac 50/60 Hz Input terminal One HDMI port (select products only), one VGA port 13.61 in 6.18 in 17.38 in ) models Table A-8 Preset display resolutions Preset Pixel... 59.954 60.000 Preset display resolutions 27 Table A-7 47.0 cm (18.5 in) model specifications (continued) Specification Measurement Dimensions (include base) Height Depth Width 34.58 cm 15.70 cm 44.14 cm Tilt adjustment range -5° to 22°...
...monitor automatically recognizes these preset modes, and they will appear properly sized and centered on the screen. 68.6 cm (27.0 in 41°F to 95°F -40°F to 240 V ac 50/60 Hz Input terminal One HDMI port (select products only), one VGA port 13.61 in 6.18 in 17.38 in ) models Table A-8 Preset display resolutions Preset Pixel... 59.954 60.000 Preset display resolutions 27 Table A-7 47.0 cm (18.5 in) model specifications (continued) Specification Measurement Dimensions (include base) Height Depth Width 34.58 cm 15.70 cm 44.14 cm Tilt adjustment range -5° to 22°...

User Guide 1
Page 39
Upon detecting the absence of either the horizontal sync signal or the vertical sync signal. When the monitor is turned off, and the power light turns amber. Table A-15 Preset timing resolutions (continued) Preset Timing name Pixel format Horz freq (kHz) Vert freq (Hz) 2 576p 720 × 576 31... 6 1080p50 1920 × 1080 56.250 50 Energy saver feature The monitor supports a reduced power state. The reduced power state is initiated if the monitor detects the absence of these signals, the monitor screen is blank, the backlight is in the reduced power state, the monitor uses
Upon detecting the absence of either the horizontal sync signal or the vertical sync signal. When the monitor is turned off, and the power light turns amber. Table A-15 Preset timing resolutions (continued) Preset Timing name Pixel format Horz freq (kHz) Vert freq (Hz) 2 576p 720 × 576 31... 6 1080p50 1920 × 1080 56.250 50 Energy saver feature The monitor supports a reduced power state. The reduced power state is initiated if the monitor detects the absence of these signals, the monitor screen is blank, the backlight is in the reduced power state, the monitor uses


