
User Guide
Page 5
...monitor head ...6 Removing the monitor stand 6 Attaching the monitor head to a mounting device 7 Connecting the cables ...7 Adjusting the monitor ...9 Turning on the monitor ...11 Installing a security cable ...12 2 Using the monitor ...13 Software and utilities ...13 The Information file ...13 The Image Color Matching file ...13 Using the OSD menu ...13 Using the function buttons ...15 Reassigning the function buttons ...15 Adjusting blue light output (select products only 15 Using Auto-Sleep Mode ...16 Changing the Power Mode setting (select products only 16 3 Support and troubleshooting...
...monitor head ...6 Removing the monitor stand 6 Attaching the monitor head to a mounting device 7 Connecting the cables ...7 Adjusting the monitor ...9 Turning on the monitor ...11 Installing a security cable ...12 2 Using the monitor ...13 Software and utilities ...13 The Information file ...13 The Image Color Matching file ...13 Using the OSD menu ...13 Using the function buttons ...15 Reassigning the function buttons ...15 Adjusting blue light output (select products only 15 Using Auto-Sleep Mode ...16 Changing the Power Mode setting (select products only 16 3 Support and troubleshooting...
User Guide
Page 6
... disability resources ...31 HP links ...32 Contacting support ...32 vi 4 Maintaining the monitor ...22 Maintenance guidelines ...22 Cleaning the monitor ...22 Shipping the monitor ...23 Appendix A Technical specifications ...24 60.5 cm/23.8 in model ...24 68.6 cm/27 in model ...25 Preset display resolutions ...26 Energy saver feature ...27 Appendix B Accessibility ...28 HP and accessibility ...28 Finding the technology tools you need 28 The HP...
... disability resources ...31 HP links ...32 Contacting support ...32 vi 4 Maintaining the monitor ...22 Maintenance guidelines ...22 Cleaning the monitor ...22 Shipping the monitor ...23 Appendix A Technical specifications ...24 60.5 cm/23.8 in model ...24 68.6 cm/27 in model ...25 Preset display resolutions ...26 Energy saver feature ...27 Appendix B Accessibility ...28 HP and accessibility ...28 Finding the technology tools you need 28 The HP...

User Guide
Page 7
... accessible at http://www.hp.com/ergo. To reduce the risk of the monitor and the computer, connect all power strips provide surge protection; Use the appropriate and correctly sized furniture designed to a surge protection device such as a monitor, printer, scanner) to properly support your user guides. 1 Getting started Important safety information A power cord is also available on power cords or cables. IMPORTANT: For the protection...
... accessible at http://www.hp.com/ergo. To reduce the risk of the monitor and the computer, connect all power strips provide surge protection; Use the appropriate and correctly sized furniture designed to a surge protection device such as a monitor, printer, scanner) to properly support your user guides. 1 Getting started Important safety information A power cord is also available on power cords or cables. IMPORTANT: For the protection...
User Guide
Page 8
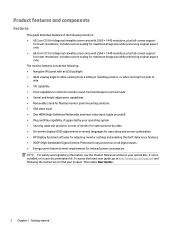
.../support and following : ● Nonglare IPS panel with an LED backlight ● Wide viewing angle to allow viewing from a sitting or standing position, or when moving from side to side ● Tilt capability ● Pivot capability to rotate the monitor panel from landscape to portrait mode ● Swivel and height adjustment capabilities ● Removable stand for flexible monitor panel mounting solutions ● VGA video input ● One HDMI (High-Definition Multimedia Interface) video input (cable provided) ● Plug...
.../support and following : ● Nonglare IPS panel with an LED backlight ● Wide viewing angle to allow viewing from a sitting or standing position, or when moving from side to side ● Tilt capability ● Pivot capability to rotate the monitor panel from landscape to portrait mode ● Swivel and height adjustment capabilities ● Removable stand for flexible monitor panel mounting solutions ● VGA video input ● One HDMI (High-Definition Multimedia Interface) video input (cable provided) ● Plug...
User Guide
Page 10
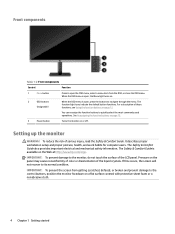
See Reassigning the function buttons on page 15. 3 Power button Turns the monitor on a flat surface covered with protective sheet foam or a nonabrasive cloth. 4 Chapter 1 Getting started IMPORTANT: To prevent the screen from the OSD, or close the OSD menu. For a description of the liquid crystals. Setting up the monitor WARNING! To reduce the risk of the LCD panel. The Safety & Comfort Guide also provides important electrical and...
See Reassigning the function buttons on page 15. 3 Power button Turns the monitor on a flat surface covered with protective sheet foam or a nonabrasive cloth. 4 Chapter 1 Getting started IMPORTANT: To prevent the screen from the OSD, or close the OSD menu. For a description of the liquid crystals. Setting up the monitor WARNING! To reduce the risk of the LCD panel. The Safety & Comfort Guide also provides important electrical and...
User Guide
Page 12
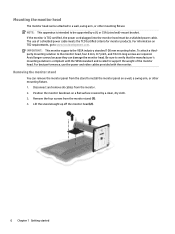
... power cord plugged into the monitor head must be supported by a clean, dry cloth. 3. For best performance, use of the monitor head. Removing the monitor stand You can remove the monitor panel from the monitor. 2. Remove the four screws from the monitor stand (1). 4. Mounting the monitor head The monitor head can be attached to a wall, swing arm, or other mounting fixture. 1. Position the monitor facedown on a wall, a swing arm, or other mounting fixture. The use the power and video cables provided with the VESA...
... power cord plugged into the monitor head must be supported by a clean, dry cloth. 3. For best performance, use of the monitor head. Removing the monitor stand You can remove the monitor panel from the monitor. 2. Remove the four screws from the monitor stand (1). 4. Mounting the monitor head The monitor head can be attached to a wall, swing arm, or other mounting fixture. 1. Position the monitor facedown on a wall, a swing arm, or other mounting fixture. The use the power and video cables provided with the VESA...
User Guide
Page 13
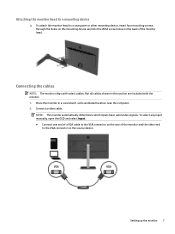
Connect a video cable. NOTE: The monitor automatically determines which inputs have valid video signals. To select any input manually, open the OSD and select Input. ● Connect one end of a VGA cable to the VGA connector on the back of the monitor and the other mounting device, insert four mounting screws through the holes on the mounting device and into the VESA screw holes on the source device. Setting up the monitor 7 Not all cables shown in a convenient, well...
Connect a video cable. NOTE: The monitor automatically determines which inputs have valid video signals. To select any input manually, open the OSD and select Input. ● Connect one end of a VGA cable to the VGA connector on the back of the monitor and the other mounting device, insert four mounting screws through the holes on the mounting device and into the VESA screw holes on the source device. Setting up the monitor 7 Not all cables shown in a convenient, well...
User Guide
Page 14
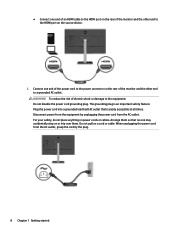
... electric shock or damage to the HDMI port on the source device. 3. ● Connect one end of an HDMI cable to the HDMI port on the rear of the monitor and the other end to a grounded AC outlet. WARNING! Plug the power cord into a grounded (earthed) AC outlet that no one end of the power cord to the power connector on or trip over them so...
... electric shock or damage to the HDMI port on the source device. 3. ● Connect one end of an HDMI cable to the HDMI port on the rear of the monitor and the other end to a grounded AC outlet. WARNING! Plug the power cord into a grounded (earthed) AC outlet that no one end of the power cord to the power connector on or trip over them so...
User Guide
Page 17
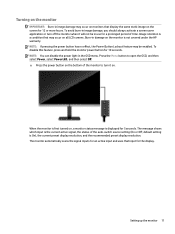
... which input is On), the current preset display resolution, and the recommended preset display resolution. When the monitor is first turned on, a monitor status message is displayed for 10 seconds. Image retention is not covered under the HP warranty. Press the Menu button to open the OSD, and then select Power, select Power LED, and then select Off. ▲ Press the power button on the bottom of the monitor to turn off the monitor...
... which input is On), the current preset display resolution, and the recommended preset display resolution. When the monitor is first turned on, a monitor status message is displayed for 10 seconds. Image retention is not covered under the HP warranty. Press the Menu button to open the OSD, and then select Power, select Power LED, and then select Off. ▲ Press the power button on the bottom of the monitor to turn off the monitor...
User Guide
Page 18
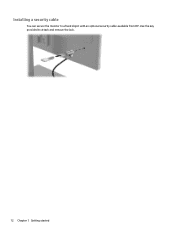
Installing a security cable You can secure the monitor to attach and remove the lock. 12 Chapter 1 Getting started Use the key provided to a fixed object with an optional security cable available from HP.
Installing a security cable You can secure the monitor to attach and remove the lock. 12 Chapter 1 Getting started Use the key provided to a fixed object with an optional security cable available from HP.
User Guide
Page 19
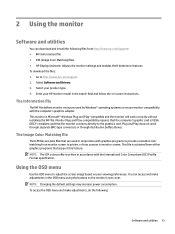
Select Software and Drivers. 3. The Image Color Matching file The ICM files are data files that are used by Windows® operating systems to ensure monitor compatibility with the computer's graphics adapter. You can download and install the following : Software and utilities 13 Using the OSD menu Use the OSD menu to adjust the screen image based on the monitor's rear cover. NOTE: Changing the default settings may increase power consumption. Go to http://www.hp.com/support. 2. Plug and Play does...
Select Software and Drivers. 3. The Image Color Matching file The ICM files are data files that are used by Windows® operating systems to ensure monitor compatibility with the computer's graphics adapter. You can download and install the following : Software and utilities 13 Using the OSD menu Use the OSD menu to adjust the screen image based on the monitor's rear cover. NOTE: Changing the default settings may increase power consumption. Go to http://www.hp.com/support. 2. Plug and Play does...
User Guide
Page 20
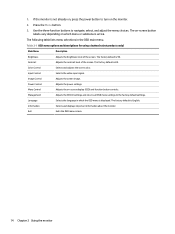
...power button to the factory default settings. Information Selects and displays important information about the monitor. 1. Image Control Adjusts the screen image. If the monitor is 80. Exit Exits the OSD menu screen. 14 Chapter 2 Using the monitor Table 2-1 OSD menu options and descriptions for using a button (select products only) Main Menu Description Brightness Adjusts the brightness level of the screen. Power Control Adjusts the power settings. Press the Menu button. 3. Input Control Selects the video input signal. Language Selects the language...
...power button to the factory default settings. Information Selects and displays important information about the monitor. 1. Image Control Adjusts the screen image. If the monitor is 80. Exit Exits the OSD menu screen. 14 Chapter 2 Using the monitor Table 2-1 OSD menu options and descriptions for using a button (select products only) Main Menu Description Brightness Adjusts the brightness level of the screen. Power Control Adjusts the power settings. Press the Menu button. 3. Input Control Selects the video input signal. Language Selects the language...
User Guide
Page 21
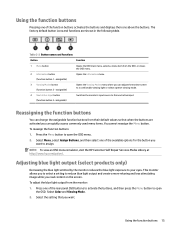
... view an OSD menu simulator, visit the HP Customer Self Repair Services Media Library at http://www.hp.com/go/sml. assignable) Opens the Information menu. 3 Viewing Modes button (function button 2 - This monitor allows you to select a setting to the next active input. To adjust the blue light output from the OSD, or closes the OSD menu. 2 Information button (function button 1 - Select Color and Viewing Mode. 2. Select Menu, select Assign Buttons, and then select one of the rear panel OSD buttons to...
... view an OSD menu simulator, visit the HP Customer Self Repair Services Media Library at http://www.hp.com/go/sml. assignable) Opens the Information menu. 3 Viewing Modes button (function button 2 - This monitor allows you to select a setting to the next active input. To adjust the blue light output from the OSD, or closes the OSD menu. 2 Information button (function button 1 - Select Color and Viewing Mode. 2. Select Menu, select Assign Buttons, and then select one of the rear panel OSD buttons to...

User Guide
Page 22
... on sleep. ● Reading: Optimizes blue light and brightness for the monitor. Using Auto-Sleep Mode The monitor supports an on page 16. 16 Chapter 2 Using the monitor To change the Power Mode setting from the sleep mode when the host device sends an active signal to keep the USB ports enabled even when the monitor is in Auto-Sleep Mode, change the Power Mode setting: 1. NOTE: To change Auto-Sleep Mode, see Using Auto-Sleep Mode on -screen display (OSD) menu option called Auto-Sleep Mode that allows you do not want to save your display supports Performance mode, then...
... on sleep. ● Reading: Optimizes blue light and brightness for the monitor. Using Auto-Sleep Mode The monitor supports an on page 16. 16 Chapter 2 Using the monitor To change the Power Mode setting from the sleep mode when the host device sends an active signal to keep the USB ports enabled even when the monitor is in Auto-Sleep Mode, change the Power Mode setting: 1. NOTE: To change Auto-Sleep Mode, see Using Auto-Sleep Mode on -screen display (OSD) menu option called Auto-Sleep Mode that allows you do not want to save your display supports Performance mode, then...
User Guide
Page 23
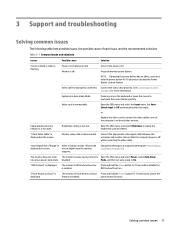
.... Video card is in Auto-Sleep Mode. Image appears blurred, indistinct, or too dark. Change the settings to one of the computer's on screen. Mode, and then set higher than the monitor supports. Connect the power cord. System is incompatible. Brightness setting is displayed. "Power Button Lockout" is too low. Power cord is off . See Connecting the cables on page 7 for 10 seconds to unlock the feature is Video resolution and/or refresh rate displayed on -board video sources. Open the OSD menu and select the Input menu. Open the OSD menu...
.... Video card is in Auto-Sleep Mode. Image appears blurred, indistinct, or too dark. Change the settings to one of the computer's on screen. Mode, and then set higher than the monitor supports. Connect the power cord. System is incompatible. Brightness setting is displayed. "Power Button Lockout" is too low. Power cord is off . See Connecting the cables on page 7 for 10 seconds to unlock the feature is Video resolution and/or refresh rate displayed on -board video sources. Open the OSD menu and select the Input menu. Open the OSD menu...
User Guide
Page 24
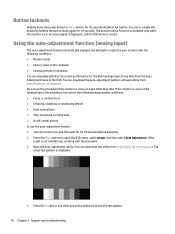
.... 3. Turn the monitor on, and then wait for for 10 seconds disables that button. If the result is using an input other key on , an active signal is displayed, and the OSD menu is using a VGA (analog) input, this procedure can correct the following conditions: ● Monitor setup ● Factory reset of the computer ● Changing monitor resolution You can download the auto-adjustment pattern software utility from http://www.hp.com/support.) The setup test pattern is displayed. 4. Button...
.... 3. Turn the monitor on, and then wait for for 10 seconds disables that button. If the result is using an input other key on , an active signal is displayed, and the OSD menu is using a VGA (analog) input, this procedure can correct the following conditions: ● Monitor setup ● Factory reset of the computer ● Changing monitor resolution You can download the auto-adjustment pattern software utility from http://www.hp.com/support.) The setup test pattern is displayed. 4. Button...
User Guide
Page 25
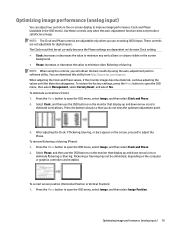
....hp.com/support. NOTE: The Clock and Phase controls are adjustable only when you will obtain the best results by using the controls, you use an analog (VGA) input. To eliminate vertical bars (Clock): 1. To remove flickering or blurring (Phase): 1. Optimizing image performance (analog input) 19 Press the buttons slowly so that display up and down arrow icons to eliminate flickering or blurring. You can adjust two controls in the OSD menu). Press the Menu button to open...
....hp.com/support. NOTE: The Clock and Phase controls are adjustable only when you will obtain the best results by using the controls, you use an analog (VGA) input. To eliminate vertical bars (Clock): 1. To remove flickering or blurring (Phase): 1. Optimizing image performance (analog input) 19 Press the buttons slowly so that display up and down arrow icons to eliminate flickering or blurring. You can adjust two controls in the OSD menu). Press the Menu button to open...
User Guide
Page 26
... replace the power cord, the AC adapter (select products only), or any other cables that display up or down arrow icons to properly adjust the position of the image in this site to get more information about how to http://www.hp.com/support. Contacting support To resolve a hardware or software problem, go to contact HP and open a support case. NOTE: Contact customer support to call : ● Monitor model number ● Monitor serial number...
... replace the power cord, the AC adapter (select products only), or any other cables that display up or down arrow icons to properly adjust the position of the image in this site to get more information about how to http://www.hp.com/support. Contacting support To resolve a hardware or software problem, go to contact HP and open a support case. NOTE: Contact customer support to call : ● Monitor model number ● Monitor serial number...
User Guide
Page 28
Adjust only those controls that you can cause damage to clean the monitor screen or cabinet. Never disconnect the monitor by pulling the cord. ● Turn the monitor off the monitor and unplug the power cord from excessive light, heat, or moisture. Cleaning the monitor 1. Dust the monitor by grasping the plug firmly and pulling it on the power label to the cord does not exceed the rating of the cabinet...
Adjust only those controls that you can cause damage to clean the monitor screen or cabinet. Never disconnect the monitor by pulling the cord. ● Turn the monitor off the monitor and unplug the power cord from excessive light, heat, or moisture. Cleaning the monitor 1. Dust the monitor by grasping the plug firmly and pulling it on the power label to the cord does not exceed the rating of the cabinet...

User Guide
Page 33
... its normal operating mode. There is connected to enter into if the monitor detects the absence of power. By selecting the settings in the reduced power state, the monitor will utilize 0.5 watts of either the horizontal sync signal or the vertical sync signal. Upon detecting the absence of these signals, the monitor screen is blanked, the backlight is turned off, and the power light is in the monitor's Energy Saver utility...
... its normal operating mode. There is connected to enter into if the monitor detects the absence of power. By selecting the settings in the reduced power state, the monitor will utilize 0.5 watts of either the horizontal sync signal or the vertical sync signal. Upon detecting the absence of these signals, the monitor screen is blanked, the backlight is turned off, and the power light is in the monitor's Energy Saver utility...


