

User Guide
Page 1
User Guide SUMMARY This guide provides technical specifications and information about monitor features, setting up the monitor, and using the monitor.
User Guide SUMMARY This guide provides technical specifications and information about monitor features, setting up the monitor, and using the monitor.

User Guide
Page 3
... the user that , if not avoided, could result in this guide This guide provides technical specifications and information about monitor features, setting up the monitor, and using the software. About this guide. Indicates a hazardous situation that failure to follow a procedure exactly as ...described could result in loss of the main text. This product incorporates HDMI technology. WARNING! Depending on the model, your monitor may not have all the features included in minor or moderate injury. IMPORTANT: Indicates information considered important but not hazard-related (for...
... the user that , if not avoided, could result in this guide This guide provides technical specifications and information about monitor features, setting up the monitor, and using the software. About this guide. Indicates a hazardous situation that failure to follow a procedure exactly as ...described could result in loss of the main text. This product incorporates HDMI technology. WARNING! Depending on the model, your monitor may not have all the features included in minor or moderate injury. IMPORTANT: Indicates information considered important but not hazard-related (for...

User Guide
Page 5
... ...4 Locating the serial number and product number 5 Setting up the monitor ...6 Attaching the monitor stand ...6 Mounting the monitor head ...7 Removing the monitor stand 8 Attaching the monitor head to a mounting device 8 Connecting the cables ...9 Adjusting the monitor (select products only 12 Installing a security cable ...13 Turning on the monitor ...14 HP watermark and image retention policy 15 2 Using the...
... ...4 Locating the serial number and product number 5 Setting up the monitor ...6 Attaching the monitor stand ...6 Mounting the monitor head ...7 Removing the monitor stand 8 Attaching the monitor head to a mounting device 8 Connecting the cables ...9 Adjusting the monitor (select products only 12 Installing a security cable ...13 Turning on the monitor ...14 HP watermark and image retention policy 15 2 Using the...
User Guide
Page 6
... Maintenance guidelines ...23 Cleaning the monitor ...23 Shipping the monitor ...24 Appendix A Technical specifications ...25 86.36 cm (34 in) model specifications ...25 Preset display resolutions ...25 86.36 cm (34 in) model ...26 Energy saver feature ...26 Appendix B Accessibility ...28 HP and accessibility ...28 Finding the technology tools you need 28 The...
... Maintenance guidelines ...23 Cleaning the monitor ...23 Shipping the monitor ...24 Appendix A Technical specifications ...25 86.36 cm (34 in) model specifications ...25 Preset display resolutions ...25 86.36 cm (34 in) model ...26 Energy saver feature ...26 Appendix B Accessibility ...28 HP and accessibility ...28 Finding the technology tools you need 28 The...

User Guide
Page 7
...all power strips provide surge protection; Use the appropriate and correctly sized furniture designed to find additional HP resources. To prevent injury, securely attach the monitor to the monitor so that is also available on power cords or cables. For information about safety information and where... the cord into an AC outlet that they cannot be present. More HP resources Use this capability. WARNING! NOTE: This product is not suitable for entertainment purposes. 1 Getting started Read this monitor. Take care to route all power cords for this chapter to learn ...
...all power strips provide surge protection; Use the appropriate and correctly sized furniture designed to find additional HP resources. To prevent injury, securely attach the monitor to the monitor so that is also available on power cords or cables. For information about safety information and where... the cord into an AC outlet that they cannot be present. More HP resources Use this capability. WARNING! NOTE: This product is not suitable for entertainment purposes. 1 Getting started Read this monitor. Take care to route all power cords for this chapter to learn ...

User Guide
Page 8
...you cannot solve a problem using Getting to know your monitor. This section provides details about your product. - Table 1-1 Additional information Resource Contents Setup Instructions Overview of monitor setup and features HP support For HP support or to resolve a hardware or software problem,... go to http://www.hp.com/support, and follow the instructions to find your components, where...
...you cannot solve a problem using Getting to know your monitor. This section provides details about your product. - Table 1-1 Additional information Resource Contents Setup Instructions Overview of monitor setup and features HP support For HP support or to resolve a hardware or software problem,... go to http://www.hp.com/support, and follow the instructions to find your components, where...
User Guide
Page 9
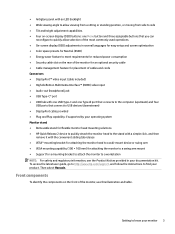
... (downstream) ● DisplayPort cable provided ● Plug and Play capability, if supported by your operating system Monitor stand ● Removable stand for flexible monitor head mounting solutions ● HP Quick Release 2 device to quickly attach the monitor head to the stand with a simple click, and then remove it with the convenient sliding tab release...
... (downstream) ● DisplayPort cable provided ● Plug and Play capability, if supported by your operating system Monitor stand ● Removable stand for flexible monitor head mounting solutions ● HP Quick Release 2 device to quickly attach the monitor head to the stand with a simple click, and then remove it with the convenient sliding tab release...
User Guide
Page 10
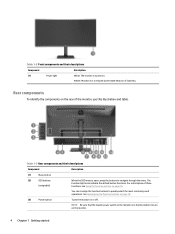
... To identify the components on page 18. Table 1-3 Rear components and their descriptions Component Description (1) Power light White: The monitor is open, press the buttons to navigate through the menu. See Reassigning the function buttons on page 18. (3) Power button Turns the... monitor on the monitor. 4 Chapter 1 Getting started NOTE: Be sure that the master power switch on the monitor is in the On position to quickly select the most commonly used operations. Amber...
... To identify the components on page 18. Table 1-3 Rear components and their descriptions Component Description (1) Power light White: The monitor is open, press the buttons to navigate through the menu. See Reassigning the function buttons on page 18. (3) Power button Turns the... monitor on the monitor. 4 Chapter 1 Getting started NOTE: Be sure that the master power switch on the monitor is in the On position to quickly select the most commonly used operations. Amber...
User Guide
Page 11
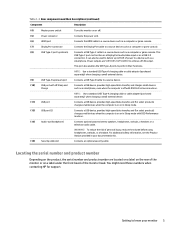
...Audio-out (headphone) Connects optional powered stereo speakers, headphones, earbuds, a headset, or a television audio cable. Getting to 65 W of the monitor head. This USB Type-C port can also be used to deliver up to know your documentation kit. (14) Security cable slot Connects an optional..., and (for select products) charges small devices when the computer is on or in your monitor 5 For additional safety information, see the Product Notices provided in Sleep mode with HP Sleep and Connects a USB device, provides high-speed data transfer, and charges small devices Charge...
...Audio-out (headphone) Connects optional powered stereo speakers, headphones, earbuds, a headset, or a television audio cable. Getting to 65 W of the monitor head. This USB Type-C port can also be used to deliver up to know your documentation kit. (14) Security cable slot Connects an optional..., and (for select products) charges small devices when the computer is on or in your monitor 5 For additional safety information, see the Product Notices provided in Sleep mode with HP Sleep and Connects a USB device, provides high-speed data transfer, and charges small devices Charge...
User Guide
Page 12
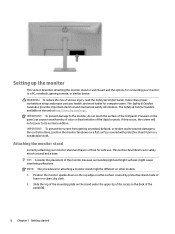
... the panel (1). 6 Chapter 1 Getting started The Safety & Comfort Guide also provides important electrical and mechanical safety information. NOTE: The procedures for attaching a monitor stand might cause interfering reflections. Pressure on other models. 1. IMPORTANT: To prevent damage to its normal condition. WARNING! To reduce the risk of foam or..., read the Safety & Comfort Guide. It describes proper workstation setup and proper posture, health, and work habits for computer users. Position the monitor upside-down on the top edge on the web at http://www.hp.com/ergo.
... the panel (1). 6 Chapter 1 Getting started The Safety & Comfort Guide also provides important electrical and mechanical safety information. NOTE: The procedures for attaching a monitor stand might cause interfering reflections. Pressure on other models. 1. IMPORTANT: To prevent damage to its normal condition. WARNING! To reduce the risk of foam or..., read the Safety & Comfort Guide. It describes proper workstation setup and proper posture, health, and work habits for computer users. Position the monitor upside-down on the top edge on the web at http://www.hp.com/ergo.

User Guide
Page 13
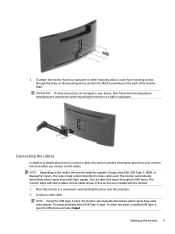
...the power and video cables provided with the thumbscrew (2). To attach a thirdparty mounting solution to the stand (1), and then secure the base with the monitor. For best performance, use four 4 mm, 0.7 pitch, and 10 mm long screws. Be sure that the manufacturer's mounting solution is compliant with... the VESA standard and is locked in this section to safely and securely connect your monitor to support the weight of the monitor head. Longer screws might damage the monitor. Setting up when the stand is rated to a wall using a swing arm or other mounting ...
...the power and video cables provided with the thumbscrew (2). To attach a thirdparty mounting solution to the stand (1), and then secure the base with the monitor. For best performance, use four 4 mm, 0.7 pitch, and 10 mm long screws. Be sure that the manufacturer's mounting solution is compliant with... the VESA standard and is locked in this section to safely and securely connect your monitor to support the weight of the monitor head. Longer screws might damage the monitor. Setting up when the stand is rated to a wall using a swing arm or other mounting ...
User Guide
Page 14
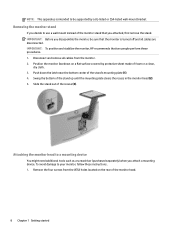
... two people perform these instructions. 1. Swing the bottom of the monitor head. 8 Chapter 1 Getting started Remove the four screws from the monitor. 2. IMPORTANT: To position and stabilize the monitor, HP recommends that you attached, first remove the stand. IMPORTANT: Before you decide to your monitor, follow these procedures. 1. Slide the stand out of the stand...
... two people perform these instructions. 1. Swing the bottom of the monitor head. 8 Chapter 1 Getting started Remove the four screws from the monitor. 2. IMPORTANT: To position and stabilize the monitor, HP recommends that you attached, first remove the stand. IMPORTANT: Before you decide to your monitor, follow these procedures. 1. Slide the stand out of the stand...
User Guide
Page 15
.... You can select the inputs through the holes on the mounting device and into the VESA screw holes on the model, the monitor might be capable of the monitor head. Connect a video cable. IMPORTANT: If these instructions do not apply to a swing arm or other mounting device, insert ...four mounting screws through the OSD menu. NOTE: Except for USB Type-C input, the monitor automatically determines which inputs have valid video signals. NOTE: Depending on the back of supporting VGA, USB Type-C, HDMI, or DisplayPort inputs. 2.
.... You can select the inputs through the holes on the mounting device and into the VESA screw holes on the model, the monitor might be capable of the monitor head. Connect a video cable. IMPORTANT: If these instructions do not apply to a swing arm or other mounting device, insert ...four mounting screws through the OSD menu. NOTE: Except for USB Type-C input, the monitor automatically determines which inputs have valid video signals. NOTE: Depending on the back of supporting VGA, USB Type-C, HDMI, or DisplayPort inputs. 2.
User Guide
Page 16
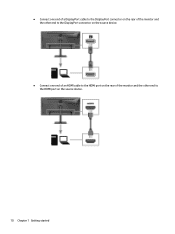
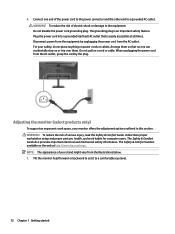
● Connect one end of a DisplayPort cable to the DisplayPort connector on the rear of the monitor and the other end to the DisplayPort connector on the source device. ● Connect one end of an HDMI cable to the HDMI port on the rear of the monitor and the other end to the HDMI port on the source device. 10 Chapter 1 Getting started
● Connect one end of a DisplayPort cable to the DisplayPort connector on the rear of the monitor and the other end to the DisplayPort connector on the source device. ● Connect one end of an HDMI cable to the HDMI port on the rear of the monitor and the other end to the HDMI port on the source device. 10 Chapter 1 Getting started

User Guide
Page 17
... with USB Type-CThunderbolt™-enabled ports. 3. Connect a USB cable. ● Connect one end of the USB Type-B cable to a USB Type-B port on the monitor and the other end to a USB Type-A port on the source device. ● Connect one end of a USB Type-C cable to the USB Type-C port... on the rear of a USB cable to a USB port on the monitor and the other end to the DisplayPort connector on the source device. ● Connect one end of the monitor and the other end to the USB port on the source device. The host device must...
... with USB Type-CThunderbolt™-enabled ports. 3. Connect a USB cable. ● Connect one end of the USB Type-B cable to a USB Type-B port on the monitor and the other end to a USB Type-A port on the source device. ● Connect one end of a USB Type-C cable to the USB Type-C port... on the rear of a USB cable to a USB port on the monitor and the other end to the DisplayPort connector on the source device. ● Connect one end of the monitor and the other end to the USB port on the source device. The host device must...
User Guide
Page 18
...cords or cables. To reduce the risk of electric shock or damage to the equipment: Do not disable the power cord grounding plug. Tilt the monitor head forward or backward to set it to a grounded AC outlet. Connect one can accidentally step on the web at all times. When unplugging ... power from the equipment by the plug. The grounding plug is available on or trip over them so that is easily accessible at http://www.hp.com/ergo. WARNING! It describes proper workstation setup and proper posture, health, and work space, your safety, do not place anything on a cord or...
...cords or cables. To reduce the risk of electric shock or damage to the equipment: Do not disable the power cord grounding plug. Tilt the monitor head forward or backward to set it to a grounded AC outlet. Connect one can accidentally step on the web at all times. When unplugging ... power from the equipment by the plug. The grounding plug is available on or trip over them so that is easily accessible at http://www.hp.com/ergo. WARNING! It describes proper workstation setup and proper posture, health, and work space, your safety, do not place anything on a cord or...
User Guide
Page 19
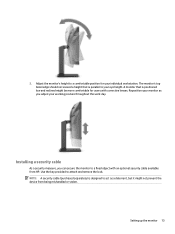
... position for users with an optional security cable available from being mishandled or stolen. Use the key provided to your individual workstation. Adjust the monitor's height to a fixed object with corrective lenses. NOTE: A security cable (purchased separately) is parallel to attach and remove the lock.... Installing a security cable As a security measure, you adjust your monitor as a deterrent, but it might be more comfortable for your eye height. The monitor's top bezel edge should not exceed a height that is positioned low and reclined might not...
... position for users with an optional security cable available from being mishandled or stolen. Use the key provided to your individual workstation. Adjust the monitor's height to a fixed object with corrective lenses. NOTE: A security cable (purchased separately) is parallel to attach and remove the lock.... Installing a security cable As a security measure, you adjust your monitor as a deterrent, but it might be more comfortable for your eye height. The monitor's top bezel edge should not exceed a height that is positioned low and reclined might not...
User Guide
Page 20
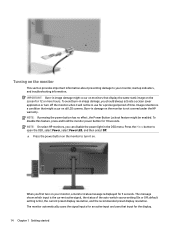
...-in damage on the monitor is not covered under the HP warranty. To disable this feature, press and hold the monitor power button for the display. 14 Chapter 1 Getting started The message shows which input is a condition that might occur on all LCD screens. The monitor automatically scans the signal ... Image retention is the current active signal, the status of time. Burn-in image damage might be in the OSD menu. NOTE: On select HP monitors, you can disable the power light in use for 5 seconds. default setting is displayed for a prolonged period of the auto-switch source setting...
...-in damage on the monitor is not covered under the HP warranty. To disable this feature, press and hold the monitor power button for the display. 14 Chapter 1 Getting started The message shows which input is a condition that might occur on all LCD screens. The monitor automatically scans the signal ... Image retention is the current active signal, the status of time. Burn-in image damage might be in the OSD menu. NOTE: On select HP monitors, you can disable the power light in use for 5 seconds. default setting is displayed for a prolonged period of the auto-switch source setting...

User Guide
Page 21
...look like stains or watermarks on the monitor's screen. HP watermark and image retention policy Some monitors are in use, or use the power management setting, if supported on your computer, to turn off the monitor when it is not covered under the HP warranty. To avoid image retention damage,... always turn off the monitor when the computer is idle. Static images can include camera surveillance, video games, marketing ...
...look like stains or watermarks on the monitor's screen. HP watermark and image retention policy Some monitors are in use, or use the power management setting, if supported on your computer, to turn off the monitor when it is not covered under the HP warranty. To avoid image retention damage,... always turn off the monitor when the computer is idle. Static images can include camera surveillance, video games, marketing ...
User Guide
Page 22
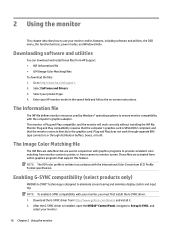
...can download and install these files from https://www.geforce.com/drivers and install it. 2. NOTE: To enable G-SYNC compatibility with your HP monitor model in accordance with the computer's graphics adapter. Enabling G-SYNC compatibility (select products only) NVIDIA's G-SYNC® technology is written ... not work correctly without installing the INF file. NOTE: The ICM color profile is designed to monitor screen. 2 Using the monitor This chapter describes how to http://www.hp.com/support. 2. The Image Color Matching file The ICM files are data files that are activated...
...can download and install these files from https://www.geforce.com/drivers and install it. 2. NOTE: To enable G-SYNC compatibility with your HP monitor model in accordance with the computer's graphics adapter. Enabling G-SYNC compatibility (select products only) NVIDIA's G-SYNC® technology is written ... not work correctly without installing the INF file. NOTE: The ICM color profile is designed to monitor screen. 2 Using the monitor This chapter describes how to http://www.hp.com/support. 2. The Image Color Matching file The ICM files are data files that are activated...


