
Limited Warranty and Support Guide (Refurbished Desktops)
Page 2
... entitlements. Warranty terms, service availability, and service response times may be required to the hardware components and required firmware. are free from HP are provided "AS IS" without voiding the warranty. Your dated sales or delivery receipt, showing the date of purchase or lease of receiving warranty service. Refurbished HP Pavilion desktop Computers, HP Pavilion Media Center Computers, HP Digital Entertainment Center, HP Displays, and HP Notebook Consumer products...
... entitlements. Warranty terms, service availability, and service response times may be required to the hardware components and required firmware. are free from HP are provided "AS IS" without voiding the warranty. Your dated sales or delivery receipt, showing the date of purchase or lease of receiving warranty service. Refurbished HP Pavilion desktop Computers, HP Pavilion Media Center Computers, HP Digital Entertainment Center, HP Displays, and HP Notebook Consumer products...

Limited Warranty and Support Guide (Refurbished Desktops)
Page 3
..., OR REMOVABLE STORAGE MEDIA. Limitation of HP. Unless otherwise stated, and to the extent permitted by local law, new HP Hardware Products may be free from which they are warranted to be manufactured using new materials or new and used products or parts equivalent to new in performance and reliability, or (b) with the product; (c) by software, interfacing, parts or supplies not supplied by HP; (d) improper site preparation or maintenance...
..., OR REMOVABLE STORAGE MEDIA. Limitation of HP. Unless otherwise stated, and to the extent permitted by local law, new HP Hardware Products may be free from which they are warranted to be manufactured using new materials or new and used products or parts equivalent to new in performance and reliability, or (b) with the product; (c) by software, interfacing, parts or supplies not supplied by HP; (d) improper site preparation or maintenance...

Limited Warranty and Support Guide (Refurbished Desktops)
Page 5
... all repair, logistics and insurance costs in this process. On-site Warranty Service (Digital Entertainment Centers ONLY) Your HP Limited Warranty service may involve performing routine diagnostic procedures, installing software updates or patches, removing third party options and/or substituting options. Non-HP options are also required to cooperate with HP in attempting to resolve the problem over the telephone. Service Upgrades HP has a range of additional support and service coverage...
... all repair, logistics and insurance costs in this process. On-site Warranty Service (Digital Entertainment Centers ONLY) Your HP Limited Warranty service may involve performing routine diagnostic procedures, installing software updates or patches, removing third party options and/or substituting options. Non-HP options are also required to cooperate with HP in attempting to resolve the problem over the telephone. Service Upgrades HP has a range of additional support and service coverage...

Start Here Guide
Page 4
... desktop on a TV screen 49 Adjusting the screen resolution 49 Connecting more than one display 50 Using the Windows Media Center Setup for Optional Setup of Your TV Display...........50 Disabling the TV-out Option 51 Disconnecting the TV 51 Connecting to a Monitor or High-Definition TV 52 Choosing the AV connection to use 52 Connecting an HDMI device 54 Connecting a DVI device 55 Connecting to a Standard TV 56 Connecting to component video 56 Connecting to S-video 57 iv Start...
... desktop on a TV screen 49 Adjusting the screen resolution 49 Connecting more than one display 50 Using the Windows Media Center Setup for Optional Setup of Your TV Display...........50 Disabling the TV-out Option 51 Disconnecting the TV 51 Connecting to a Monitor or High-Definition TV 52 Choosing the AV connection to use 52 Connecting an HDMI device 54 Connecting a DVI device 55 Connecting to a Standard TV 56 Connecting to component video 56 Connecting to S-video 57 iv Start...

Start Here Guide
Page 20
... a wireless network: Click the Windows Start Button on the router. Change the default network name (SSID) and password. NOTE: If no WLAN device is listed, either your computer does not have an integrated WLAN device, or the driver for the device is installed on your network from unauthorized access. When setting up a wireless network into the Search box, and then click Network and Sharing Center to open the Device Manager window. 3 Click Network adapters. Set security on the taskbar. 5 Type Network...
... a wireless network: Click the Windows Start Button on the router. Change the default network name (SSID) and password. NOTE: If no WLAN device is listed, either your computer does not have an integrated WLAN device, or the driver for the device is installed on your network from unauthorized access. When setting up a wireless network into the Search box, and then click Network and Sharing Center to open the Device Manager window. 3 Click Network adapters. Set security on the taskbar. 5 Type Network...

Start Here Guide
Page 26
..., see the setup poster. HP computers support many different audio options, sound connections, and speaker configurations. You may set up your speakers. "Connecting 4.1 (Four Speakers and a Subwoofer) Audio Speakers" Two front speakers, two "Connecting 5.1 (Five Speakers and a rear speakers, a center Subwoofer) Audio Speakers" speaker, and a subwoofer. 20 Start Here Speaker Configurations You may set up your computer for two stereo speakers or for multichannel audio speaker systems. Connect your computer (select models only), select the working microphone. a Subwoofer...
..., see the setup poster. HP computers support many different audio options, sound connections, and speaker configurations. You may set up your speakers. "Connecting 4.1 (Four Speakers and a Subwoofer) Audio Speakers" Two front speakers, two "Connecting 5.1 (Five Speakers and a rear speakers, a center Subwoofer) Audio Speakers" speaker, and a subwoofer. 20 Start Here Speaker Configurations You may set up your computer for two stereo speakers or for multichannel audio speaker systems. Connect your computer (select models only), select the working microphone. a Subwoofer...

Getting Started Guide
Page 4
... Speed 29 Using the Windows Media Center Remote Control 31 Remote Control Buttons Overview 32 Teletext access buttons 34 About the Remote Control 35 Troubleshooting the remote control 36 Remote sensor is not receiving a signal from the remote control 36 Introducing Your Computer Software 37 Learning More About Software 37 Using the Desktop 37 Removing desktop icons 38 Retrieving desktop icons 38 Using the Windows Start Button Menu 38 Using the All Programs menu 38 Organizing your All Programs list 39 Using the Control Panel 39 Resizing Windows 40 Working...
... Speed 29 Using the Windows Media Center Remote Control 31 Remote Control Buttons Overview 32 Teletext access buttons 34 About the Remote Control 35 Troubleshooting the remote control 36 Remote sensor is not receiving a signal from the remote control 36 Introducing Your Computer Software 37 Learning More About Software 37 Using the Desktop 37 Removing desktop icons 38 Retrieving desktop icons 38 Using the Windows Start Button Menu 38 Using the All Programs menu 38 Organizing your All Programs list 39 Using the Control Panel 39 Resizing Windows 40 Working...
Getting Started Guide
Page 24
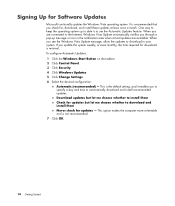
To configure Automatic Updates: 1 Click the Windows Start Button on the taskbar. 2 Click Control Panel. 3 Click Security. 4 Click Windows Updates. 5 Click Change Settings. 6 Select the desired configuration: Automatic (recommended) - This option makes the computer more vulnerable and is recommended that you to specify a day and time to your system. This is the default setting, and it enables you check for updates - Signing Up for download is minimal. When you update the...
To configure Automatic Updates: 1 Click the Windows Start Button on the taskbar. 2 Click Control Panel. 3 Click Security. 4 Click Windows Updates. 5 Click Change Settings. 6 Select the desired configuration: Automatic (recommended) - This option makes the computer more vulnerable and is recommended that you to specify a day and time to your system. This is the default setting, and it enables you check for updates - Signing Up for download is minimal. When you update the...
Getting Started Guide
Page 35
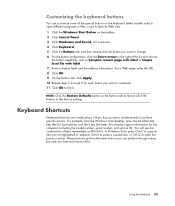
... the Windows Start Button on the Buttons tab to restore all of the buttons to the factory settings. For example, from the Windows Vista desktop, press the Alt (alternate) key, the Ctrl (control) key, and the S key (the letter S) to display support information for each button you time and mouse clicks. You will see this combination of keys represented as Complex remote page with label or Simple local file with label. 7 Enter a display...
... the Windows Start Button on the Buttons tab to restore all of the buttons to the factory settings. For example, from the Windows Vista desktop, press the Alt (alternate) key, the Ctrl (control) key, and the S key (the letter S) to display support information for each button you time and mouse clicks. You will see this combination of keys represented as Complex remote page with label or Simple local file with label. 7 Enter a display...

Getting Started Guide
Page 185
... turning off PC 10 remote control 32 buttons, keyboard customizing 25 C card reader, memory 61 carpal tunnel syndrome 5 CDs creating a music CD in Music 101, 102 erasing rewritable 120 playing in Music 96, 98 change the speed of the cursor 29 Computer Playback 149 country/region codes 111 cursor speed 29 customizing keyboard buttons 25 Index D desktop switching from Media Center 80 digital images 129 digital picture 61, 129 digital video...
... turning off PC 10 remote control 32 buttons, keyboard customizing 25 C card reader, memory 61 carpal tunnel syndrome 5 CDs creating a music CD in Music 101, 102 erasing rewritable 120 playing in Music 96, 98 change the speed of the cursor 29 Computer Playback 149 country/region codes 111 cursor speed 29 customizing keyboard buttons 25 Index D desktop switching from Media Center 80 digital images 129 digital picture 61, 129 digital video...
Getting Started Guide
Page 188
... Start menu Media Center 78 Support messages 2 SVCD 150 switching mouse button functions 29 T Teletext buttons, using 34 Television Program Guide no data available 159 recording TV programs 165 searching for TV programs 163 setting up a download method 160 using the More information button 159 viewing 159 troubleshooting remote sensor 36 turning off PC 10 TV adding missing channels to the guide 162 advanced recording options 165 editing channels in the guide 162 manually downloading...
... Start menu Media Center 78 Support messages 2 SVCD 150 switching mouse button functions 29 T Teletext buttons, using 34 Television Program Guide no data available 159 recording TV programs 165 searching for TV programs 163 setting up a download method 160 using the More information button 159 viewing 159 troubleshooting remote sensor 36 turning off PC 10 TV adding missing channels to the guide 162 advanced recording options 165 editing channels in the guide 162 manually downloading...

PC Troubleshooting and Maintenance Guide
Page 4
Repairing Software Problems 21 Software Repair Overview 21 Restarting Your Computer 22 Turning Off Your Computer 22 Updating Drivers 22 Microsoft System Restore 23 Software Program and Hardware Driver Reinstallation 24 System Recovery 25 Creating Recovery Discs 25 Choosing Recovery Disc Media 26 System Recovery Options 27 Running System Recovery from the Hard Disk Drive 27 Starting System Recovery from the Windows Vista Start menu 27 Starting System Recovery from system startup 28 iv Troubleshooting and Maintenance Guide
Repairing Software Problems 21 Software Repair Overview 21 Restarting Your Computer 22 Turning Off Your Computer 22 Updating Drivers 22 Microsoft System Restore 23 Software Program and Hardware Driver Reinstallation 24 System Recovery 25 Creating Recovery Discs 25 Choosing Recovery Disc Media 26 System Recovery Options 27 Running System Recovery from the Hard Disk Drive 27 Starting System Recovery from the Windows Vista Start menu 27 Starting System Recovery from system startup 28 iv Troubleshooting and Maintenance Guide

PC Troubleshooting and Maintenance Guide
Page 13
... Eject button: 1 Click the Windows Start Button and then Computer. 2 Right-click the CD or DVD drive you are using the correct disc type (media) for the type of media. I cannot remove a CD or DVD. Some recording programs can make sure that it is blank or appendable (with a disc cleaning kit, available from the menu. Make sure the disc is clean and undamaged. You can record only to open the...
... Eject button: 1 Click the Windows Start Button and then Computer. 2 Right-click the CD or DVD drive you are using the correct disc type (media) for the type of media. I cannot remove a CD or DVD. Some recording programs can make sure that it is blank or appendable (with a disc cleaning kit, available from the menu. Make sure the disc is clean and undamaged. You can record only to open the...

PC Troubleshooting and Maintenance Guide
Page 18
... correct modem speed and COM port are selected: 1 Click the Windows Start Button, and then click Control Panel. 2 Click Hardware and Sound. 3 Double-click Phone and Modem Options. 4 Select the Modems tab, and then click the Properties button. 5 In the Device status area, verify the modem is installed and set up connection. A modem uses a standard telephone cable to make a dial-up to work with AOL. 14 Troubleshooting and Maintenance Guide Web pages...
... correct modem speed and COM port are selected: 1 Click the Windows Start Button, and then click Control Panel. 2 Click Hardware and Sound. 3 Double-click Phone and Modem Options. 4 Select the Modems tab, and then click the Properties button. 5 In the Device status area, verify the modem is installed and set up connection. A modem uses a standard telephone cable to make a dial-up to work with AOL. 14 Troubleshooting and Maintenance Guide Web pages...

PC Troubleshooting and Maintenance Guide
Page 20
... Troubleshooting and Maintenance Guide Refer to the Limited Warranty and Support Guide to : http://www.hp.com/support Select your country/region and language, search on the keyboard at the same time to save your computer. Wireless keyboard does not work . Restart your computer model number, and then search on the keyboard at the same time to display the Start menu. 4 Use the arrow keys to select the Arrow button...
... Troubleshooting and Maintenance Guide Refer to the Limited Warranty and Support Guide to : http://www.hp.com/support Select your country/region and language, search on the keyboard at the same time to save your computer. Wireless keyboard does not work . Restart your computer model number, and then search on the keyboard at the same time to display the Start menu. 4 Use the arrow keys to select the Arrow button...

PC Troubleshooting and Maintenance Guide
Page 24
... memory card. Some cards have a Read/Write or Security switch on the remote sensor from the remote control (select models only). 1 Click the Windows Start Button, right-click Computer, and then select Properties. 2 Under Tasks, click Device Manager. 3 Click the plus (+) sign next to Universal Serial Bus Controllers. 4 If the eHome Infrared Receiver is listed under Universal Serial Bus Controllers, Windows Vista is fully inserted into the same USB port. 6 Disconnect all open...
... memory card. Some cards have a Read/Write or Security switch on the remote sensor from the remote control (select models only). 1 Click the Windows Start Button, right-click Computer, and then select Properties. 2 Under Tasks, click Device Manager. 3 Click the plus (+) sign next to Universal Serial Bus Controllers. 4 If the eHome Infrared Receiver is listed under Universal Serial Bus Controllers, Windows Vista is fully inserted into the same USB port. 6 Disconnect all open...

Upgrading and Servicing Guide
Page 9
... PC. If so, connect the sound cable. 7 Push the optical drive all the way; You can replace it toward you are replacing the old drive with another memory card reader. See "Opening and Closing the PC" on page 1. 2 Remove the front panel. Removing a Memory Card Reader Your PC has a memory card reader above your optical drive bay is empty, remove the drive cover by pressing the tabs on each side of the drive cover, and then pulling it with a new drive, remove the four guide...
... PC. If so, connect the sound cable. 7 Push the optical drive all the way; You can replace it toward you are replacing the old drive with another memory card reader. See "Opening and Closing the PC" on page 1. 2 Remove the front panel. Removing a Memory Card Reader Your PC has a memory card reader above your optical drive bay is empty, remove the drive cover by pressing the tabs on each side of the drive cover, and then pulling it with a new drive, remove the four guide...

Upgrading and Servicing Guide
Page 10
... PC and to remove the side panel as described in your HP Personal Media Drive bay. Please read "System Recovery" in "Opening and Closing the PC" on page 3. 3 Make a note of each cable attached to the hard disk drive and back of the memory card reader. The hard disk drive is either a Serial ATA (advanced technology attachment) drive that uses a narrow data cable, or a Parallel ATA drive that is aligned with the system recovery partition of your PC...
... PC and to remove the side panel as described in your HP Personal Media Drive bay. Please read "System Recovery" in "Opening and Closing the PC" on page 3. 3 Make a note of each cable attached to the hard disk drive and back of the memory card reader. The hard disk drive is either a Serial ATA (advanced technology attachment) drive that uses a narrow data cable, or a Parallel ATA drive that is aligned with the system recovery partition of your PC...

Upgrading and Servicing Guide
Page 13
... open Parallel ATA connector, you cannot add an additional hard disk drive. Upgrading and Servicing Guide 9 If your PC (select models only). In a typical installation, a secondary Serial ATA hard disk drive connects to press the tip of the stud on the inside of the PC case and then pull the head of the plastic plug out from the outside of the hard disk drive. Use needle-nose pliers to a Serial ATA connector on page 1. 2 Remove the four plastic plugs...
... open Parallel ATA connector, you cannot add an additional hard disk drive. Upgrading and Servicing Guide 9 If your PC (select models only). In a typical installation, a secondary Serial ATA hard disk drive connects to press the tip of the stud on the inside of the PC case and then pull the head of the plastic plug out from the outside of the hard disk drive. Use needle-nose pliers to a Serial ATA connector on page 1. 2 Remove the four plastic plugs...

Upgrading and Servicing Guide
Page 17
See "Opening and Closing the PC" on page 1. NOTE: If the new card or device isn't working, read through the card manufacturer's installation instructions, and recheck all connections, including those to the card, power supply, keyboard, and monitor. Installing an Add-in Card 1 Align the edge of the add-in card slot. 2 Attach the screw to secure the card. 3 Connect any external or internal cables attached to the card, and then disconnect them. The whole connector should be seated...
See "Opening and Closing the PC" on page 1. NOTE: If the new card or device isn't working, read through the card manufacturer's installation instructions, and recheck all connections, including those to the card, power supply, keyboard, and monitor. Installing an Add-in Card 1 Align the edge of the add-in card slot. 2 Attach the screw to secure the card. 3 Connect any external or internal cables attached to the card, and then disconnect them. The whole connector should be seated...


