

User Guide
Page 5
... model 9 Attaching the monitor head to a mounting device (select products only 10 Connecting the cables...11 Adjusting the monitor...13 Installing a security cable ...13 Turning on the monitor...14 HP watermark and image retention policy (select products only 14 2 Using the monitor ...16 Downloading software and utilities ...16 The Information file ...16 The Image Color Matching file ...16 Using the OSD menu ...16 Using the OSD function buttons ...17 Reassigning the function buttons ...18 Using Auto-Sleep Mode ...18 3 Support and troubleshooting...
... model 9 Attaching the monitor head to a mounting device (select products only 10 Connecting the cables...11 Adjusting the monitor...13 Installing a security cable ...13 Turning on the monitor...14 HP watermark and image retention policy (select products only 14 2 Using the monitor ...16 Downloading software and utilities ...16 The Information file ...16 The Image Color Matching file ...16 Using the OSD menu ...16 Using the OSD function buttons ...17 Reassigning the function buttons ...18 Using Auto-Sleep Mode ...18 3 Support and troubleshooting...

User Guide
Page 7
... cables connected to properly support your user guides. To reduce the risk of serious injury, read the Safety & Comfort Guide provided with your monitor. To reduce the risk of electric shock or damage to the equipment: ● Plug the power cord into a grounded (earthed) three-pin outlet. ● Disconnect power from surrounding light and bright surfaces that they cannot be included with the installation instructions...
... cables connected to properly support your user guides. To reduce the risk of serious injury, read the Safety & Comfort Guide provided with your monitor. To reduce the risk of electric shock or damage to the equipment: ● Plug the power cord into a grounded (earthed) three-pin outlet. ● Disconnect power from surrounding light and bright surfaces that they cannot be included with the installation instructions...
User Guide
Page 8
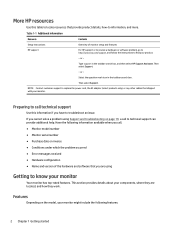
... a hardware or software problem, go to http://www.hp.com/support, and follow the instructions to information, and more. NOTE: Contact customer support to know your components, where they are using Getting to replace the power cord, the AC adapter (select products only), or any other cables that provide product details, how-to find your monitor. Table 1-1 Additional information Resource Contents Setup Instructions HP support Overview of...
... a hardware or software problem, go to http://www.hp.com/support, and follow the instructions to information, and more. NOTE: Contact customer support to know your components, where they are using Getting to replace the power cord, the AC adapter (select products only), or any other cables that provide product details, how-to find your monitor. Table 1-1 Additional information Resource Contents Setup Instructions HP support Overview of...

User Guide
Page 9
... several languages for easy setup and screen optimization ● Energy saver feature to meet requirements for reduced power consumption Connectors ● High-Definition Multimedia Interface™ (HDMI) video input (cable included in select regions) ● VGA video input ● DisplayPort™ (DP) video input (select products only) ● Audio-in jack ● Plug and Play capability if supported by your operating system Monitor stand ● Removable stand for flexible monitor head mounting solutions ● HP Quick...
... several languages for easy setup and screen optimization ● Energy saver feature to meet requirements for reduced power consumption Connectors ● High-Definition Multimedia Interface™ (HDMI) video input (cable included in select regions) ● VGA video input ● DisplayPort™ (DP) video input (select products only) ● Audio-in jack ● Plug and Play capability if supported by your operating system Monitor stand ● Removable stand for flexible monitor head mounting solutions ● HP Quick...
User Guide
Page 10
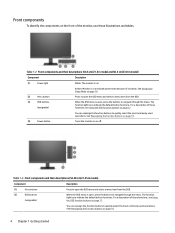
... default button functions. For a description of these illustrations and tables. For a description of these functions, see Using the OSD function buttons on page 17. Table 1-3 Front components and their descriptions (54.6 cm/21.5 in model and 60.5 cm/23.8 in model) Component Description (1) Power light White: The monitor is open , press the buttons to navigate through the menu. You can reassign the function buttons to quickly...
... default button functions. For a description of these illustrations and tables. For a description of these functions, see Using the OSD function buttons on page 17. Table 1-3 Front components and their descriptions (54.6 cm/21.5 in model and 60.5 cm/23.8 in model) Component Description (1) Power light White: The monitor is open , press the buttons to navigate through the menu. You can reassign the function buttons to quickly...
User Guide
Page 11
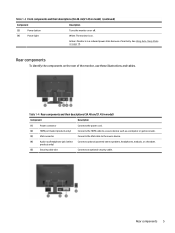
... Description (3) Power button Turns the monitor on or off. (4) Power light White: The monitor is in model) Component Description (1) Power connector Connects the power cord. (2) HDMI port (select products only) Connects the HDMI cable to a source device such as a computer or game console. (3) VGA connector Connects the VGA cable to the source device. (4) Audio-out/headphone jack (select Connects optional powered stereo speakers, headphones, earbuds, or a headset. Rear components 5 Rear components To identify the components on page 18. See Using Auto-Sleep Mode on...
... Description (3) Power button Turns the monitor on or off. (4) Power light White: The monitor is in model) Component Description (1) Power connector Connects the power cord. (2) HDMI port (select products only) Connects the HDMI cable to a source device such as a computer or game console. (3) VGA connector Connects the VGA cable to the source device. (4) Audio-out/headphone jack (select Connects optional powered stereo speakers, headphones, earbuds, or a headset. Rear components 5 Rear components To identify the components on page 18. See Using Auto-Sleep Mode on...

User Guide
Page 13
... monitor, because surrounding light and bright surfaces might be different on a flat surface covered with protective sheet foam or a nonabrasive cloth. IMPORTANT: To prevent damage to safely attach a stand. IMPORTANT: To prevent the screen from getting scratched, defaced, or broken and to prevent damage to the control buttons, position the monitor facedown on other models. 1. The Safety & Comfort Guide is critical for connecting your monitor stand...
... monitor, because surrounding light and bright surfaces might be different on a flat surface covered with protective sheet foam or a nonabrasive cloth. IMPORTANT: To prevent damage to safely attach a stand. IMPORTANT: To prevent the screen from getting scratched, defaced, or broken and to prevent damage to the control buttons, position the monitor facedown on other models. 1. The Safety & Comfort Guide is critical for connecting your monitor stand...
User Guide
Page 15
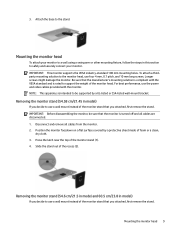
... a clean, dry cloth. 3. To attach a thirdparty mounting solution to the monitor head, use the power and video cables provided with the VESA standard and is intended to use a wall mount instead of the monitor stand that the monitor is turned off and all cables from the monitor. 2. Disconnect and remove all cables are disconnected. 1. Slide the stand out of the monitor stand (1). 4. Mounting the monitor head To attach your monitor. Longer screws might damage the monitor. For best...
... a clean, dry cloth. 3. To attach a thirdparty mounting solution to the monitor head, use the power and video cables provided with the VESA standard and is intended to use a wall mount instead of the monitor stand that the monitor is turned off and all cables from the monitor. 2. Disconnect and remove all cables are disconnected. 1. Slide the stand out of the monitor stand (1). 4. Mounting the monitor head To attach your monitor. Longer screws might damage the monitor. For best...
User Guide
Page 19
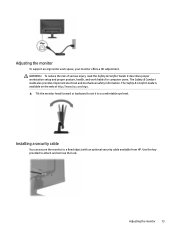
WARNING! It describes proper workstation setup and proper posture, health, and work space, your monitor offers a tilt adjustment. Use the key provided to a fixed object with an optional security cable available from HP. Adjusting the monitor 13 Adjusting the monitor To support an ergonomic work habits for computer users. Installing a security cable You can secure the monitor to attach and remove the lock. To reduce the risk of serious injury, read the...
WARNING! It describes proper workstation setup and proper posture, health, and work space, your monitor offers a tilt adjustment. Use the key provided to a fixed object with an optional security cable available from HP. Adjusting the monitor 13 Adjusting the monitor To support an ergonomic work habits for computer users. Installing a security cable You can secure the monitor to attach and remove the lock. To reduce the risk of serious injury, read the...

User Guide
Page 20
... turned on, a monitor status message is not suitable for applications that display the same static image on the screen for the display. IMPORTANT: Burn-in image damage might be in damage on all LCD screens. default setting is located on . Image retention is not covered under the HP warranty. Burn-in use of screen savers. The monitor automatically scans the signal inputs for an active input and uses that can disable the power light...
... turned on, a monitor status message is not suitable for applications that display the same static image on the screen for the display. IMPORTANT: Burn-in image damage might be in damage on all LCD screens. default setting is located on . Image retention is not covered under the HP warranty. Burn-in use of screen savers. The monitor automatically scans the signal inputs for an active input and uses that can disable the power light...

User Guide
Page 21
... the system is not covered under the HP warranty. HP watermark and image retention policy (select products only) 15 types of applications may cause image retention damage that are in use, or use the power management setting, if supported on monitors that could look like stains or watermarks on the monitor's screen. To avoid image retention damage, always turn off the monitor when it is not...
... the system is not covered under the HP warranty. HP watermark and image retention policy (select products only) 15 types of applications may cause image retention damage that are in use, or use the power management setting, if supported on monitors that could look like stains or watermarks on the monitor's screen. To avoid image retention damage, always turn off the monitor when it is not...

User Guide
Page 22
... -screen instructions. Plug and Play does not work correctly without installing the INF file. Use the OSD menu to suit your monitor and its features, including software and utilities, the OSD menu, the function buttons, power modes, and Windows Hello. Select Software and Drivers. 3. Downloading software and utilities You can adjust your HP monitor to customize the viewing features of the monitor. 16 Chapter 2 Using the monitor Enter your HP monitor model in the OSD, use your preferences. To access and make adjustments in...
... -screen instructions. Plug and Play does not work correctly without installing the INF file. Use the OSD menu to suit your monitor and its features, including software and utilities, the OSD menu, the function buttons, power modes, and Windows Hello. Select Software and Drivers. 3. Downloading software and utilities You can adjust your HP monitor to customize the viewing features of the monitor. 16 Chapter 2 Using the monitor Enter your HP monitor model in the OSD, use your preferences. To access and make adjustments in...
User Guide
Page 23
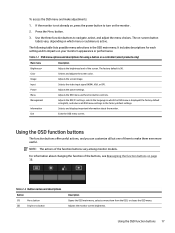
... Opens the OSD main menu, selects a menu item from the OSD, or closes the OSD menu. To access the OSD menu and make them even more useful. Use the three function buttons to make adjustments: 1. Table 2-1 OSD menu options and descriptions for each setting and its impacts on the monitor. 2. Adjusts the screen image. Power Adjusts the power settings. Selects and displays important information about changing the function of the function buttons vary among monitor models. Color Image Input Selects and adjusts the screen color. Selects the video input signal (HDMI, VGA...
... Opens the OSD main menu, selects a menu item from the OSD, or closes the OSD menu. To access the OSD menu and make them even more useful. Use the three function buttons to make adjustments: 1. Table 2-1 OSD menu options and descriptions for each setting and its impacts on the monitor. 2. Adjusts the screen image. Power Adjusts the power settings. Selects and displays important information about changing the function of the function buttons vary among monitor models. Color Image Input Selects and adjusts the screen color. Selects the video input signal (HDMI, VGA...

User Guide
Page 25
... power button. Replace the video card or connect the video cable to On. Connect the appropriate video signal cable between the computer and monitor. power button function. Monitor is improperly connected. Video cable is off while connecting the video cable. Set Auto Switch Input to disable the OSD Lockout function. Brightness setting is Video resolution and/or refresh rate displayed on page 11. "Input Signal Out of Range" is too low. Change the settings to adjust the brightness scale as needed. Open the OSD menu, and select Brightness to a supported...
... power button. Replace the video card or connect the video cable to On. Connect the appropriate video signal cable between the computer and monitor. power button function. Monitor is improperly connected. Video cable is off while connecting the video cable. Set Auto Switch Input to disable the OSD Lockout function. Brightness setting is Video resolution and/or refresh rate displayed on page 11. "Input Signal Out of Range" is too low. Change the settings to adjust the brightness scale as needed. Open the OSD menu, and select Brightness to a supported...

User Guide
Page 26
... is using a VGA (analog) input, this procedure if the monitor is using an input other than VGA. Turn the monitor on , an active signal is displayed, and the OSD menu is closed. Using the auto-adjustment function (analog input) The auto-adjustment feature automatically engages and attempts to open the OSD menu, select Image, and then select Auto Adjustment. Do not use the auto-adjustment feature: 1. Press the Menu button to optimize your screen under several conditions. ● Monitor setup ● Factory reset of the computer ● Changing monitor resolution You...
... is using a VGA (analog) input, this procedure if the monitor is using an input other than VGA. Turn the monitor on , an active signal is displayed, and the OSD menu is closed. Using the auto-adjustment function (analog input) The auto-adjustment feature automatically engages and attempts to open the OSD menu, select Image, and then select Auto Adjustment. Do not use the auto-adjustment feature: 1. Press the Menu button to optimize your screen under several conditions. ● Monitor setup ● Factory reset of the computer ● Changing monitor resolution You...

User Guide
Page 27
... auto-adjustment pattern software utility. To eliminate vertical bars (Clock): 1. These controls are dependent on the main Clock setting. ● Clock-Increases or decreases the value to minimize any other key on the screen background. ● Phase-Increases or decreases the value to open the OSD menu, then select Management, select Factory Reset, and select Yes. Optimizing image performance (analog input) 21 Press the Menu button to minimize video flickering...
... auto-adjustment pattern software utility. To eliminate vertical bars (Clock): 1. These controls are dependent on the main Clock setting. ● Clock-Increases or decreases the value to minimize any other key on the screen background. ● Phase-Increases or decreases the value to open the OSD menu, then select Management, select Factory Reset, and select Yes. Optimizing image performance (analog input) 21 Press the Menu button to minimize video flickering...
User Guide
Page 29
... an authorized HP dealer, reseller, or service provider. ● Use only a power source and connection appropriate for each device. ● Install the monitor near an outlet that are covered in the operating instructions. Turn off when it is not in image on the label or back plate of the monitor. ● Be sure that the total ampere rating of the products connected to the outlet...
... an authorized HP dealer, reseller, or service provider. ● Use only a power source and connection appropriate for each device. ● Install the monitor near an outlet that are covered in the operating instructions. Turn off when it is not in image on the label or back plate of the monitor. ● Be sure that the total ampere rating of the products connected to the outlet...
User Guide
Page 32
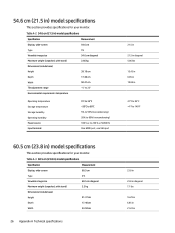
....5 cm (23.8 in) model specifications Specification Measurement Display, wide-screen 60.5 cm Type IPS Viewable image size 60.5 cm diagonal Maximum weight (unpacked, with stand) Dimensions (include base) Height Depth Width 2.66 kg 39.19 cm 17.40 cm 50.41 cm Tilt adjustment range Environmental requirements temperature -5° to 22° Operating temperature Storage temperature Storage humidity Operating humidity Power source Input terminal 5°C to 35...
....5 cm (23.8 in) model specifications Specification Measurement Display, wide-screen 60.5 cm Type IPS Viewable image size 60.5 cm diagonal Maximum weight (unpacked, with stand) Dimensions (include base) Height Depth Width 2.66 kg 39.19 cm 17.40 cm 50.41 cm Tilt adjustment range Environmental requirements temperature -5° to 22° Operating temperature Storage temperature Storage humidity Operating humidity Power source Input terminal 5°C to 35...
User Guide
Page 33
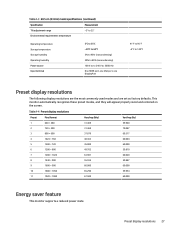
... Power source Input terminal 5°C to 35°C -20°C to 60°C 5% to 95% (noncondensing) 20% to 80% (noncondensing) 100 V ac to 240 V ac 50/60 Hz One HDMI port, one VGA port, one DisplayPort 41°F to 95°F -4°F to 140°F Preset display resolutions The following display resolutions are the most commonly used modes and are set as factory defaults. Table A-4 Preset display resolutions...
... Power source Input terminal 5°C to 35°C -20°C to 60°C 5% to 95% (noncondensing) 20% to 80% (noncondensing) 100 V ac to 240 V ac 50/60 Hz One HDMI port, one VGA port, one DisplayPort 41°F to 95°F -4°F to 140°F Preset display resolutions The following display resolutions are the most commonly used modes and are set as factory defaults. Table A-4 Preset display resolutions...
User Guide
Page 34
... power state, the monitor uses < 0.5 W of either the horizontal sync signal or the vertical sync signal. See the computer manual for instructions on setting the energy saver mode (sometimes called "power management feature"). The reduced power state is initiated if the monitor detects the absence of power. Upon detecting the absence of these signals, the monitor screen is blank, the backlight is connected to its normal operating state. NOTE: This power saver feature works...
... power state, the monitor uses < 0.5 W of either the horizontal sync signal or the vertical sync signal. See the computer manual for instructions on setting the energy saver mode (sometimes called "power management feature"). The reduced power state is initiated if the monitor detects the absence of power. Upon detecting the absence of these signals, the monitor screen is blank, the backlight is connected to its normal operating state. NOTE: This power saver feature works...


