User Manual
Page 3
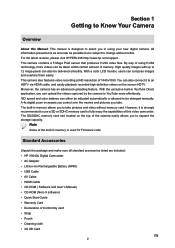
... changed manually. A 4x digital zoom increases you control over the movies and pictures you can also connect it is used for Firmware code. Standard Accessories Unpack the package and make sure all standard accessories listed are included: • HP V5040u Digital Camcorder • AC Adapter • Lithiun-ion Rechargeable Battery (NP60) • USB Cable • AV Cable • HDMI Cable • CD-ROM ( Software and User's Manual) • CD-ROM (Nero 9 software) • Quick Start Guide • Warranty Card...
... changed manually. A 4x digital zoom increases you control over the movies and pictures you can also connect it is used for Firmware code. Standard Accessories Unpack the package and make sure all standard accessories listed are included: • HP V5040u Digital Camcorder • AC Adapter • Lithiun-ion Rechargeable Battery (NP60) • USB Cable • AV Cable • HDMI Cable • CD-ROM ( Software and User's Manual) • CD-ROM (Nero 9 software) • Quick Start Guide • Warranty Card...

User Manual
Page 6
... by using the camera, users must load Lithium-ion rechargeable battery. 1. Insert the battery following to store pictures and movies. Follow the arrow A direction and slide to the figure. 2. Close the battery cover firmly. You can be recorded when the SD card is locked. When the card pops out, gently remove it . 3. Recommended memory capacity: 1GB above Note • When a memory card is fitted, movies/pictures are saved on card...
... by using the camera, users must load Lithium-ion rechargeable battery. 1. Insert the battery following to store pictures and movies. Follow the arrow A direction and slide to the figure. 2. Close the battery cover firmly. You can be recorded when the SD card is locked. When the card pops out, gently remove it . 3. Recommended memory capacity: 1GB above Note • When a memory card is fitted, movies/pictures are saved on card...

User Manual
Page 8
... Left Button: Digital Light On/ Light On/ Light OFF Tele Button(Up Button) : Digital Zoom In Wide Button(Down Button) : Digital Zoom out OK Button: Menu ON/Validate the setting Power Button: Press down for one second to the previous page 3. RECORD/PLAY mode toggle and RETURN Button functions: 1. Macro Focus Switch: Use this to switch between Record /Playback Mode 2. To stop recording, press it after recording Movie Shutter Button: 1. For quick review, press it again. Start to take movie. 2. Switch between Macro/ close lens focus mode and Normal lens focus Mode. Return to turn on...
... Left Button: Digital Light On/ Light On/ Light OFF Tele Button(Up Button) : Digital Zoom In Wide Button(Down Button) : Digital Zoom out OK Button: Menu ON/Validate the setting Power Button: Press down for one second to the previous page 3. RECORD/PLAY mode toggle and RETURN Button functions: 1. Macro Focus Switch: Use this to switch between Record /Playback Mode 2. To stop recording, press it after recording Movie Shutter Button: 1. For quick review, press it again. Start to take movie. 2. Switch between Macro/ close lens focus mode and Normal lens focus Mode. Return to turn on...
User Manual
Page 11
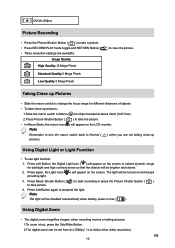
... the LCD monitor. Using Digital Zoom • The digital zoom magnifies images, when recording movies or taking close -up Using Digital Light or Light Function • To use light function: 1. Press again, the Light icon( providing light. ) will appear on the screen. Press Movie Shutter Button ( ) to start recording or press the Picture Shutter Button ( ) to take a picture. • Press RECORD/PLAY mode toggle and RETURN Button( • Three resolution settings are not taking pictures. 1.To zoom in/out, press the Tele/Wide Button. 2.The digital zoom can...
... the LCD monitor. Using Digital Zoom • The digital zoom magnifies images, when recording movies or taking close -up Using Digital Light or Light Function • To use light function: 1. Press again, the Light icon( providing light. ) will appear on the screen. Press Movie Shutter Button ( ) to start recording or press the Picture Shutter Button ( ) to take a picture. • Press RECORD/PLAY mode toggle and RETURN Button( • Three resolution settings are not taking pictures. 1.To zoom in/out, press the Tele/Wide Button. 2.The digital zoom can...

User Manual
Page 12
Press RECORD/PLAY mode toggle and RETURN Button( ) to enter the folder of main option you select. 4. EN 11 Display Screen 2. Options for Record Menu Movie Mode • Resolution • Stabilization • Motion Detect Picture Mode • Resolution • Self-timer Effect • Scene • WB (White Balance) • ISO Operations for Record Mode Operation 1. Press Down Button to exit. Use Right/Left Buttons to validate. 5. Press Right/Left Button to select the setting options...
Press RECORD/PLAY mode toggle and RETURN Button( ) to enter the folder of main option you select. 4. EN 11 Display Screen 2. Options for Record Menu Movie Mode • Resolution • Stabilization • Motion Detect Picture Mode • Resolution • Self-timer Effect • Scene • WB (White Balance) • ISO Operations for Record Mode Operation 1. Press Down Button to exit. Use Right/Left Buttons to validate. 5. Press Right/Left Button to select the setting options...

User Manual
Page 13
... Buttons to enter record menu screen. 2. In Movie Mode submenu, press Down Button to validate the setting. Press OK Button to enter Resolution. 2. Movie Resolution Operation 1. Press OK Button to enter Stabilization. 2. In Movie Mode submenu, press Up/Down Button to validate the setting. Use Right/Left Buttons to select Movie Mode. 3. Stabilization Operation 1. EN 12 Use Right/Left Buttons to choose On or Off. 3. Resolution, Stabilization, and Motion Detect--for you to adjust the camera setting. Display Screen Display Screen Display Screen...
... Buttons to enter record menu screen. 2. In Movie Mode submenu, press Down Button to validate the setting. Press OK Button to enter Resolution. 2. Movie Resolution Operation 1. Press OK Button to enter Stabilization. 2. In Movie Mode submenu, press Up/Down Button to validate the setting. Use Right/Left Buttons to select Movie Mode. 3. Stabilization Operation 1. EN 12 Use Right/Left Buttons to choose On or Off. 3. Resolution, Stabilization, and Motion Detect--for you to adjust the camera setting. Display Screen Display Screen Display Screen...
User Manual
Page 15
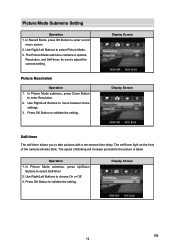
... 2 options, Resolution, and Self-timer, for you to move between three settings. 3. In Picture Mode submenu, press Up/Down Buttons to adjust the camera setting. In Record Mode, press OK Button to enter Resolution. 2. In Picture Mode submenu, press Down Button to enter record menu screen. 2. Use Right/Left Buttons to take pictures with a ten-second time delay. Picture Resolution Operation 1. Display Screen Display Screen Self-timer The self-timer allows you to select Self-timer...
... 2 options, Resolution, and Self-timer, for you to move between three settings. 3. In Picture Mode submenu, press Up/Down Buttons to adjust the camera setting. In Record Mode, press OK Button to enter Resolution. 2. In Picture Mode submenu, press Down Button to enter record menu screen. 2. Use Right/Left Buttons to take pictures with a ten-second time delay. Picture Resolution Operation 1. Display Screen Display Screen Self-timer The self-timer allows you to select Self-timer...

User Manual
Page 16
... Record Mode, press OK Button to select Scene. 2. In Effect submenu, press Up/Down Button to enter record menu screen. 2. Use Right/Left Buttons to adjust the camera setting. The Effect submenu contains 3 options, Scene, WB(White Balance), and ISO for night scenes or low light conditions. • Backlight: You can take shots when bright light is behind the subject. • B/W: The image is converted to black-and-white...
... Record Mode, press OK Button to select Scene. 2. In Effect submenu, press Up/Down Button to enter record menu screen. 2. Use Right/Left Buttons to adjust the camera setting. The Effect submenu contains 3 options, Scene, WB(White Balance), and ISO for night scenes or low light conditions. • Backlight: You can take shots when bright light is behind the subject. • B/W: The image is converted to black-and-white...

User Manual
Page 17
... Menu/OK Button to validate the setting then press RECORD/PLAY mode toggle and RETURN Button ( ) to back to select ISO. 2. Use Right/Left Buttons to move between four settings. Display Screen EN 16 The larger the number, the higher the sensitivity. • Auto: The camera automatically adjusts ISO sensitivity. • ISO 800 • ISO 1600 Operation 1. Display Screen ISO The camera adjust the ISO sensitivity of images automatically. WB (White Balance) The camera adjusts the color balance...
... Menu/OK Button to validate the setting then press RECORD/PLAY mode toggle and RETURN Button ( ) to back to select ISO. 2. Use Right/Left Buttons to move between four settings. Display Screen EN 16 The larger the number, the higher the sensitivity. • Auto: The camera automatically adjusts ISO sensitivity. • ISO 800 • ISO 1600 Operation 1. Display Screen ISO The camera adjust the ISO sensitivity of images automatically. WB (White Balance) The camera adjusts the color balance...

User Manual
Page 20
...button to view the movies/ picture. Operation 1. Use direction buttons to locate the movies/ picture you want to view. 5. Display Screen 3. Press Menu/OK button to stop. 4. Use Up/Down Buttons to Playback Mode Main Menu.There are 2 options in memory or on the built-in the Playback Mode, Movie and Picture. 2. Press RECORD/PLAY mode toggle and RETURN Button ( ) to switch from Record Mode to adjust volume. Operations for Playback Mode The Playback Mode is for viewing and managing movies and pictures on an SD card. Press Direction Button to view. 2. Display...
...button to view the movies/ picture. Operation 1. Use direction buttons to locate the movies/ picture you want to view. 5. Display Screen 3. Press Menu/OK button to stop. 4. Use Up/Down Buttons to Playback Mode Main Menu.There are 2 options in memory or on the built-in the Playback Mode, Movie and Picture. 2. Press RECORD/PLAY mode toggle and RETURN Button ( ) to switch from Record Mode to adjust volume. Operations for Playback Mode The Playback Mode is for viewing and managing movies and pictures on an SD card. Press Direction Button to view. 2. Display...

User Manual
Page 21
... operation. 6. Use Up Button to delete all movies or Down Button to exit. 5. Movie Playback Mode Menu Operation 1. Or Press RECORD/PLAY mode toggle and RETURN Button( ) to delete single movie. Before a movie is inserted, you can delete only those movies stored on the card. • Movies on a written-protected memory card cannot be deleted. Display Screen Delete Movies Operation 1. Press Menu/OK Button to select four options, Delete, YouTube Direct, Repeat One, and Repeat All. In Movie Playback Mode, press Menu/OK Button to enter Movie Playback menu screen. 2. .Use...
... operation. 6. Use Up Button to delete all movies or Down Button to exit. 5. Movie Playback Mode Menu Operation 1. Or Press RECORD/PLAY mode toggle and RETURN Button( ) to delete single movie. Before a movie is inserted, you can delete only those movies stored on the card. • Movies on a written-protected memory card cannot be deleted. Display Screen Delete Movies Operation 1. Press Menu/OK Button to select four options, Delete, YouTube Direct, Repeat One, and Repeat All. In Movie Playback Mode, press Menu/OK Button to enter Movie Playback menu screen. 2. .Use...
User Manual
Page 22
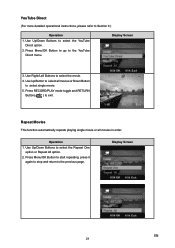
... repeating, press it again to stop and return to the YouTube Direct menu. Display Screen EN 21 Use Up/Down Buttons to select the YouTube Direct option. 2. Use Up/Down Buttons to select the Repeat One option or Repeat All option. 2. Use Right/Left Buttons to exit. Press RECORD/PLAY mode toggle and RETURN Button( ) to select the movie. 4. YouTube Direct (For more detailed operational instructions, please refer to select...
... repeating, press it again to stop and return to the YouTube Direct menu. Display Screen EN 21 Use Up/Down Buttons to select the YouTube Direct option. 2. Use Up/Down Buttons to select the Repeat One option or Repeat All option. 2. Use Right/Left Buttons to exit. Press RECORD/PLAY mode toggle and RETURN Button( ) to select the movie. 4. YouTube Direct (For more detailed operational instructions, please refer to select...

User Manual
Page 23
Display Screen 3. While the picture is selected, use Direction Buttons to locate the picture you want to enter navigation mode(The inner Magnification Indicator turns orange). Press OK Button again to magnify. 5. In Picture thumbnail preview folder, use Tele Button to exit navigation mode. To navigate the magnified picture, press OK Button to view. 2. Use Direction Buttons to the next or last picture. 4. Picture Playback Operation 1. Use Right/Left Buttons to go to navigate the magnified picture. Press OK Button to view the picture. EN 22
Display Screen 3. While the picture is selected, use Direction Buttons to locate the picture you want to enter navigation mode(The inner Magnification Indicator turns orange). Press OK Button again to magnify. 5. In Picture thumbnail preview folder, use Tele Button to exit navigation mode. To navigate the magnified picture, press OK Button to view. 2. Use Direction Buttons to the next or last picture. 4. Picture Playback Operation 1. Use Right/Left Buttons to go to navigate the magnified picture. Press OK Button to view the picture. EN 22
User Manual
Page 24
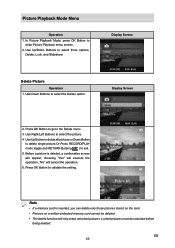
... before being deleted. Display Screen Delete Picture Operation 1. choosing "Yes" will execute the operation, "No" will appear; Use Down Buttons to the Delete menu. 3. Use Up Button to delete all pictures or Down Button to delete single picture.Or Press RECORD/PLAY mode toggle and RETURN Button( ) to validate the setting. Press OK Button to exit. 5. Locked pictures must be deleted. • The delete function will only erase unlocked pictures. EN 23 Use Up/Down Buttons to enter Picture Playback menu screen. 2. In Picture Playback Mode, press OK Button to...
... before being deleted. Display Screen Delete Picture Operation 1. choosing "Yes" will execute the operation, "No" will appear; Use Down Buttons to the Delete menu. 3. Use Up Button to delete all pictures or Down Button to delete single picture.Or Press RECORD/PLAY mode toggle and RETURN Button( ) to validate the setting. Press OK Button to exit. 5. Locked pictures must be deleted. • The delete function will only erase unlocked pictures. EN 23 Use Up/Down Buttons to enter Picture Playback menu screen. 2. In Picture Playback Mode, press OK Button to...

User Manual
Page 26
... are Sound (operation sound),Information,Time Setting,Format,TV,Language,and Default Setting. Display Screen Information To change Information setting by either hot key (Up Button) or Option Setting: On: Show the indicator(s) on the LCD screen. Press OK Button to choose On or Off. 3. Use Right/Left Buttons to validate the setting. In Record Mode, press OK Button to enter Sound. 2. The Setting submenu contains 7 options for configuring your camera set up. Display Screen EN 25 In setting submenu...
... are Sound (operation sound),Information,Time Setting,Format,TV,Language,and Default Setting. Display Screen Information To change Information setting by either hot key (Up Button) or Option Setting: On: Show the indicator(s) on the LCD screen. Press OK Button to choose On or Off. 3. Use Right/Left Buttons to validate the setting. In Record Mode, press OK Button to enter Sound. 2. The Setting submenu contains 7 options for configuring your camera set up. Display Screen EN 25 In setting submenu...

User Manual
Page 27
Adjust the numeric value by using Up/Down Buttons. 4. Display Screen 3. Note All video and picture files will be erased if the SD card is an SD Card in the camera). Day, Hour and Minute by using Right/Left Buttons. choosing "Yes" will execute the operation, "No" will appear; EN 26 Display Screen 3. Or Press RECORD/PLAY mode toggle and RETURN Button ( ) to validate the setting. No: Do not format the built-in memory ( When...
Adjust the numeric value by using Up/Down Buttons. 4. Display Screen 3. Note All video and picture files will be erased if the SD card is an SD Card in the camera). Day, Hour and Minute by using Right/Left Buttons. choosing "Yes" will execute the operation, "No" will appear; EN 26 Display Screen 3. Or Press RECORD/PLAY mode toggle and RETURN Button ( ) to validate the setting. No: Do not format the built-in memory ( When...

User Manual
Page 29
... the setting. Display Screen The following table indicates the camera's default setting Resolution Stabilization Setting Default Factory Setting HD (1080p) for Movie Standard for Picture Off Motion Detect Self-timer Scene ISO WB (White Balance) Sound Information TV Language Volume Off Off Auto Auto Auto On On Depends on shipping area Depends on shipping area Level 12 EN 28 Operation 1. Press OK Button to select Default Setting. 2. Default Setting To restore the default factory setting, select...
... the setting. Display Screen The following table indicates the camera's default setting Resolution Stabilization Setting Default Factory Setting HD (1080p) for Movie Standard for Picture Off Motion Detect Self-timer Scene ISO WB (White Balance) Sound Information TV Language Volume Off Off Auto Auto Auto On On Depends on shipping area Depends on shipping area Level 12 EN 28 Operation 1. Press OK Button to select Default Setting. 2. Default Setting To restore the default factory setting, select...
User Manual
Page 30
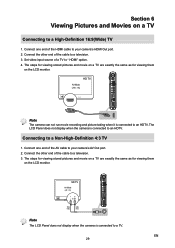
.... 2. Section 6 Viewing Pictures and Movies on a TV Connecting to a television. 3. Connect the other end of the cable to a High-Definition 16:9(Wide) TV 1. The steps for viewing stored pictures and movie on a TV are exactly the same as for viewing them on the LCD monitor. ( 4 : 3 ) Note The LCD Panel does not display when the camera is connected to a television. 3. Set video input source of the cable to a TV. Connect one...
.... 2. Section 6 Viewing Pictures and Movies on a TV Connecting to a television. 3. Connect the other end of the cable to a High-Definition 16:9(Wide) TV 1. The steps for viewing stored pictures and movie on a TV are exactly the same as for viewing them on the LCD monitor. ( 4 : 3 ) Note The LCD Panel does not display when the camera is connected to a television. 3. Set video input source of the cable to a TV. Connect one...
User Manual
Page 31
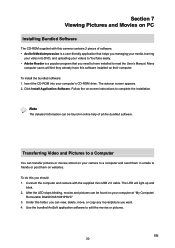
... media, burning your video into your camera to a computer and send them on websites. Transferring Video and Pictures to a Computer You can view, delete, move, or copy any movie/picture you should: 1. Many computer users will light up and blink. 2. Insert the CD-ROM into DVD, and uploading your computer at "My Computer\ Removable Disk\DCIM\100HPDVC" 3. Under this software installed on their computer. Use the bundled ArcSoft application software to complete the installation. Connect...
... media, burning your video into your camera to a computer and send them on websites. Transferring Video and Pictures to a Computer You can view, delete, move, or copy any movie/picture you should: 1. Many computer users will light up and blink. 2. Insert the CD-ROM into DVD, and uploading your computer at "My Computer\ Removable Disk\DCIM\100HPDVC" 3. Under this software installed on their computer. Use the bundled ArcSoft application software to complete the installation. Connect...
User Manual
Page 38
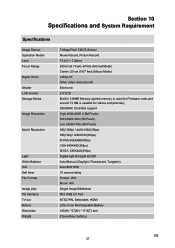
... battery) EN 37 Section 10 Specifications and System Requirement Specifications Image Sensor Operation Modes Lens Focus Range Digital Zoom Shutter LCD monitor Storage Media Image Resolution Movie Resolution Light White Balance ISO Self timer File Format Image play PC Interface TV out Battery Dimension Weight 5 Mega Pixel CMOS Sensor Movie Record, Picture Record F3.2 (f = 7.2mm) 200cm (6.7 feet)~infinite (Normal Mode) Center: 20 cm (0.67 feet) (Macro Mode) 1080p:2X Other video resolution:4X Electronic 2.5"LCD Built-in 128MB Memory (partial memory is used for Firmware code...
... battery) EN 37 Section 10 Specifications and System Requirement Specifications Image Sensor Operation Modes Lens Focus Range Digital Zoom Shutter LCD monitor Storage Media Image Resolution Movie Resolution Light White Balance ISO Self timer File Format Image play PC Interface TV out Battery Dimension Weight 5 Mega Pixel CMOS Sensor Movie Record, Picture Record F3.2 (f = 7.2mm) 200cm (6.7 feet)~infinite (Normal Mode) Center: 20 cm (0.67 feet) (Macro Mode) 1080p:2X Other video resolution:4X Electronic 2.5"LCD Built-in 128MB Memory (partial memory is used for Firmware code...


