
User Guide
Page 9
... Cleaning the display ...37 Cleaning the sides or cover 37 Cleaning the TouchPad, keyboard, or mouse (select products only 37 Traveling with or shipping your computer ...37 8 Securing your computer and information ...39 Using passwords ...39 Setting Windows passwords ...39 Setting Setup Utility (BIOS) passwords 40 Using Windows Hello (select products only) ...40 Using Internet security software ...41 Using antivirus software ...41 Using firewall software ...41 Installing software updates ...41 Using HP Managed Services (select products only 42 Securing your wireless network ...42...
... Cleaning the display ...37 Cleaning the sides or cover 37 Cleaning the TouchPad, keyboard, or mouse (select products only 37 Traveling with or shipping your computer ...37 8 Securing your computer and information ...39 Using passwords ...39 Setting Windows passwords ...39 Setting Setup Utility (BIOS) passwords 40 Using Windows Hello (select products only) ...40 Using Internet security software ...41 Using antivirus software ...41 Using firewall software ...41 Installing software updates ...41 Using HP Managed Services (select products only 42 Securing your wireless network ...42...
User Guide
Page 26
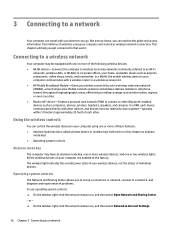
.... Connecting to a wireless network Your computer may have an airplane mode key, one or more wireless devices, and one or more of your computer communicates with you wherever you go. Using the wireless controls You can control the wireless devices in corporate offices, your computer and a wired or wireless network connection. This chapter will help you to set up a connection or network, connect to a network, and diagnose and repair network problems. To use operating system controls: ▲...
.... Connecting to a wireless network Your computer may have an airplane mode key, one or more wireless devices, and one or more of your computer communicates with you wherever you go. Using the wireless controls You can control the wireless devices in corporate offices, your computer and a wired or wireless network connection. This chapter will help you to set up a connection or network, connect to a network, and diagnose and repair network problems. To use operating system controls: ▲...
User Guide
Page 43
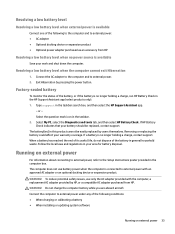
... computer is connected to external power. 2. Resolving a low battery level Resolving a low battery level when external power is available Connect one of the following conditions: ● When charging or calibrating a battery ● When installing or updating system software Running on external power For information about connecting to external power, refer to the Setup Instructions poster provided in the computer box. Type support in the taskbar search box, and then select the HP Support Assistant...
... computer is connected to external power. 2. Resolving a low battery level Resolving a low battery level when external power is available Connect one of the following conditions: ● When charging or calibrating a battery ● When installing or updating system software Running on external power For information about connecting to external power, refer to the Setup Instructions poster provided in the computer box. Type support in the taskbar search box, and then select the HP Support Assistant...
User Guide
Page 69
... in Windows 10 action key 13 GPS 18 H HDMI port 5, 6 connecting 22 headphones, connecting 20 headsets, connecting 21 Hibernation exiting 30 initiated during critical battery level 32 initiating 30 high-definition devices, connecting 22, 24 HP 3D DriveGuard 35 HP Fast Charge 31 HP Mobile Broadband activating 18 IMEI number 18 MEID number 18 HP PC Hardware Diagnostics UEFI downloading 47 starting 47 using 46 HP PC Hardware Diagnostics Windows downloading 45 installing 46 using 45 HP Recovery Manager correcting boot problems 54 starting...
... in Windows 10 action key 13 GPS 18 H HDMI port 5, 6 connecting 22 headphones, connecting 20 headsets, connecting 21 Hibernation exiting 30 initiated during critical battery level 32 initiating 30 high-definition devices, connecting 22, 24 HP 3D DriveGuard 35 HP Fast Charge 31 HP Mobile Broadband activating 18 IMEI number 18 MEID number 18 HP PC Hardware Diagnostics UEFI downloading 47 starting 47 using 46 HP PC Hardware Diagnostics Windows downloading 45 installing 46 using 45 HP Recovery Manager correcting boot problems 54 starting...
User Guide
Page 70
... (network) 5, 6 K keyboard and optional mouse using 28 keyboard backlight action key 13 keypad integrated numeric 12 keys action 12 airplane mode 14 esc 12 fn 12 num lock 12 Windows 12 L labels Bluetooth 15 regulatory 15 serial number 15 service 14 wireless certification 15 WLAN 15 lights caps lock 10 drive 7 mute 10 power 5, 6, 10 locating information hardware 4 software 4 low battery level 32 M maintenance Disk Cleanup 35 Disk Defragmenter 35 updating programs and drivers 36 managing power 29 MEID number 18 memory card reader, identifying 7 memory card...
... (network) 5, 6 K keyboard and optional mouse using 28 keyboard backlight action key 13 keypad integrated numeric 12 keys action 12 airplane mode 14 esc 12 fn 12 num lock 12 Windows 12 L labels Bluetooth 15 regulatory 15 serial number 15 service 14 wireless certification 15 WLAN 15 lights caps lock 10 drive 7 mute 10 power 5, 6, 10 locating information hardware 4 software 4 low battery level 32 M maintenance Disk Cleanup 35 Disk Defragmenter 35 updating programs and drivers 36 managing power 29 MEID number 18 memory card reader, identifying 7 memory card...
User Guide
Page 71
... action key 13 supported discs, recovery 51 switch screen image action key 13 system recovery 52 system restore point creating 51 system restore point, creating 50 T tap TouchPad and touch screen gesture 25 three-finger swipe TouchPad gesture 27 Thunderbolt, connecting USB Type- See audio sound settings, using 51 wired network (LAN) 19 wireless action key 14 wireless button 16 wireless certification label 15 Index 61 security cable, installing 42 serial number, computer 15 service labels, locating 14 Setup Utility (BIOS) passwords 40 shipping the computer 37 shutdown 30 Sleep exiting...
... action key 13 supported discs, recovery 51 switch screen image action key 13 system recovery 52 system restore point creating 51 system restore point, creating 50 T tap TouchPad and touch screen gesture 25 three-finger swipe TouchPad gesture 27 Thunderbolt, connecting USB Type- See audio sound settings, using 51 wired network (LAN) 19 wireless action key 14 wireless button 16 wireless certification label 15 Index 61 security cable, installing 42 serial number, computer 15 service labels, locating 14 Setup Utility (BIOS) passwords 40 shipping the computer 37 shutdown 30 Sleep exiting...
Maintenance and Service Guide
Page 41
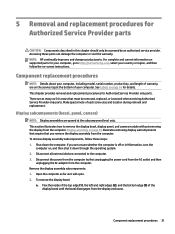
... external devices connected to remove the display bezel, display panel, and camera module without removing the display from the computer. Flex the inside of the top edge (1), the left and right edges (2), and the bottom edge (3) of each screw size and location during removal and replacement. 5 Removal and replacement procedures for Authorized Service Provider parts CAUTION: Components described in Hibernation, turn the computer on, and then shut it will open...
... external devices connected to remove the display bezel, display panel, and camera module without removing the display from the computer. Flex the inside of the top edge (1), the left and right edges (2), and the bottom edge (3) of each screw size and location during removal and replacement. 5 Removal and replacement procedures for Authorized Service Provider parts CAUTION: Components described in Hibernation, turn the computer on, and then shut it will open...
Maintenance and Service Guide
Page 86
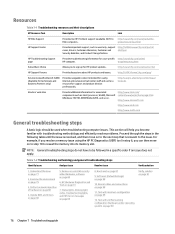
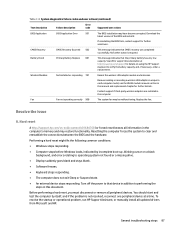
... issue. Remove or uninstall recently added hardware, software on page 88 10. products/overview.html HP Support Center Provides important support, such as Intel (processor, WLAN), Microsoft (Windows 7/8/10), AMD/NVidia (GPU), and so on to step 10 to reseat the memory into its memory slot. Update BIOS and drivers on page 87 9. Hard reset on page 80 5. Test with troubleshooting methodology and efficiently resolve problems. Proceed...
... issue. Remove or uninstall recently added hardware, software on page 88 10. products/overview.html HP Support Center Provides important support, such as Intel (processor, WLAN), Microsoft (Windows 7/8/10), AMD/NVidia (GPU), and so on to step 10 to reseat the memory into its memory slot. Update BIOS and drivers on page 87 9. Hard reset on page 80 5. Test with troubleshooting methodology and efficiently resolve problems. Proceed...
Maintenance and Service Guide
Page 97
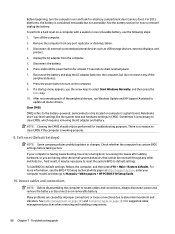
... restore functionality. General troubleshooting steps 87 CMOS Recovery CMOS Recovery Occurred 502 This message indicates that the primary battery has very low capacity. Because seating or reseating a wireless LAN adapter is unique to clear and reestablish the connections between the BIOS and the hardware. Hard reset A http://support.hp.com/us-en/document/c01684768 (or forced reset) erases all peripheral devices. To resolve the startup or operational problem, run HP Support Assistant, or manually install all updated drivers from Microsoft and HP. Replace...
... restore functionality. General troubleshooting steps 87 CMOS Recovery CMOS Recovery Occurred 502 This message indicates that the primary battery has very low capacity. Because seating or reseating a wireless LAN adapter is unique to clear and reestablish the connections between the BIOS and the hardware. Hard reset A http://support.hp.com/us-en/document/c01684768 (or forced reset) erases all peripheral devices. To resolve the startup or operational problem, run HP Support Assistant, or manually install all updated drivers from Microsoft and HP. Replace...
Maintenance and Service Guide
Page 98
... device drivers. Disconnect the battery. 6. If a startup menu appears, use the following steps: 1. See the battery section for a battery compartment door (service door). Before beginning, turn on the computer. 9. Press the power button to select Start Windows Normally, and then press the Enter key. 10. Notebooks store low-level settings like the system time and hardware settings in CMOS. Reseat cables and connections NOTE: Before disassembling the computer to clear CMOS, which requires removing the AC adapter and battery...
... device drivers. Disconnect the battery. 6. If a startup menu appears, use the following steps: 1. See the battery section for a battery compartment door (service door). Before beginning, turn on the computer. 9. Press the power button to select Start Windows Normally, and then press the Enter key. 10. Notebooks store low-level settings like the system time and hardware settings in CMOS. Reseat cables and connections NOTE: Before disassembling the computer to clear CMOS, which requires removing the AC adapter and battery...
Maintenance and Service Guide
Page 100
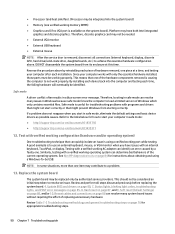
... removed, disconnect all steps discussed previously before replacing the system board. 4. Similarly, testing with a verified working AC adapter can resolve many system board issues without requiring the effort of the current operating system. Testing with a verified working part while testing. Review and perform all connections (internal keyboard, display, discrete GPU, hard drive/solid-state drive, daughterboards, etc.) to a problem. 13. Safe mode A driver conflict often results in safe mode, eliminate the default settings and basic device drivers...
... removed, disconnect all steps discussed previously before replacing the system board. 4. Similarly, testing with a verified working AC adapter can resolve many system board issues without requiring the effort of the current operating system. Testing with a verified working part while testing. Review and perform all connections (internal keyboard, display, discrete GPU, hard drive/solid-state drive, daughterboards, etc.) to a problem. 13. Safe mode A driver conflict often results in safe mode, eliminate the default settings and basic device drivers...
Maintenance and Service Guide
Page 102
... with the network plug or cable. 7. Or plug an external monitor into the network connection. 4. Turn up the brightness and contrast controls of BIOS, drivers, and software are equipped with lights to an external power source) and the front power light is dim. For example, if you upgrade to a solid-state drive, you update BIOS to reconfigure the boot order. 5. There might support new features or fix the problem. 11. Remove all cables for loose or incorrect connections (external devices, power cords, dock...
... with the network plug or cable. 7. Or plug an external monitor into the network connection. 4. Turn up the brightness and contrast controls of BIOS, drivers, and software are equipped with lights to an external power source) and the front power light is dim. For example, if you upgrade to a solid-state drive, you update BIOS to reconfigure the boot order. 5. There might support new features or fix the problem. 11. Remove all cables for loose or incorrect connections (external devices, power cords, dock...
Maintenance and Service Guide
Page 110
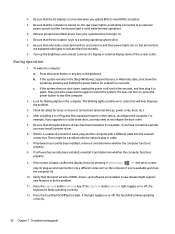
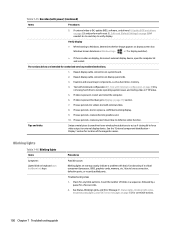
...on display panel side. 3. Reseat display cable connection on system board. 2. If video is OK, update BIOS, software, and drivers (4. If issue persists (no video), test with basic functionality of a critical component (processor, BIOS, graphics cards, memory, etc.) due to loose connection, defective parts, or recently added parts. If issue persists, replace discrete graphics card. 10. Blinking lights Table 7-16 Blinking lights Items Symptoms Lights blink on keyboard caps lock/num lock keys Procedures Possible causes Blinking lights on startup usually indicate a problem with external...
...on display panel side. 3. Reseat display cable connection on system board. 2. If video is OK, update BIOS, software, and drivers (4. If issue persists (no video), test with basic functionality of a critical component (processor, BIOS, graphics cards, memory, etc.) due to loose connection, defective parts, or recently added parts. If issue persists, replace discrete graphics card. 10. Blinking lights Table 7-16 Blinking lights Items Symptoms Lights blink on keyboard caps lock/num lock keys Procedures Possible causes Blinking lights on startup usually indicate a problem with external...
Maintenance and Service Guide
Page 111
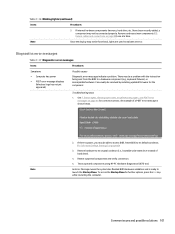
... a hardware component (e.g., keyboard failures), or incompatible hardware. Table 7-16 Blinking lights (continued) Items Procedures 3. Note Since the display may be able to indicate an error. Soft reset (Default Settings) on page 88) one at a time. Test suspected components using HP PC Hardware Diagnostics (UEFI) tool. If internal hardware components (memory, hard drive, etc.) have been recently added, a component may be resolved by installing updated firmware for the component. Status lights, blinking light codes, troubleshooting lights, and POST error messages...
... a hardware component (e.g., keyboard failures), or incompatible hardware. Table 7-16 Blinking lights (continued) Items Procedures 3. Note Since the display may be able to indicate an error. Soft reset (Default Settings) on page 88) one at a time. Test suspected components using HP PC Hardware Diagnostics (UEFI) tool. If internal hardware components (memory, hard drive, etc.) have been recently added, a component may be resolved by installing updated firmware for the component. Status lights, blinking light codes, troubleshooting lights, and POST error messages...
Maintenance and Service Guide
Page 131
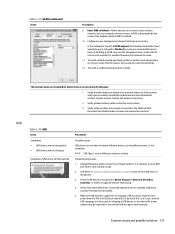
... WLAN module removal and replacement section). USB driver could be required for example, USB 3.0 device requires more power drawn (0.9A) from USB port than USB 2.0 device (0.5A). Common issues and possible solutions 121 Restore BIOS to resolve an incompatible access point. Reseat wireless module and antenna connection. 2. Soft Reset (9. If disabling U-APSD improves the throughput issue, check with a verified working operating system or perform operating system recovery to your wireless network, but your computer cannot connect, a BIOS setting might...
... WLAN module removal and replacement section). USB driver could be required for example, USB 3.0 device requires more power drawn (0.9A) from USB port than USB 2.0 device (0.5A). Common issues and possible solutions 121 Restore BIOS to resolve an incompatible access point. Reseat wireless module and antenna connection. 2. Soft Reset (9. If disabling U-APSD improves the throughput issue, check with a verified working operating system or perform operating system recovery to your wireless network, but your computer cannot connect, a BIOS setting might...

Maintenance and Service Guide
Page 134
...is detected in Windows Device Manager. 5. Reset User Account Settings to the latest BIOS and choose appropriate TB Port settings. 2. Verify that includes firmware version (for Windows, see https://thunderbolttechnology.net/products. 124 Chapter 7 Troubleshooting guide Update to default. 3. Verify TB port, cable and connection. 6. Test with Windows. Troubleshooting steps 1. Update Intel Thunderbolt software that TB device is new technology. To determine whether your device is Thunderbolt Certified for TB controller), driver version (operating system driver), and application...
...is detected in Windows Device Manager. 5. Reset User Account Settings to the latest BIOS and choose appropriate TB Port settings. 2. Verify that includes firmware version (for Windows, see https://thunderbolttechnology.net/products. 124 Chapter 7 Troubleshooting guide Update to default. 3. Verify TB port, cable and connection. 6. Test with Windows. Troubleshooting steps 1. Update Intel Thunderbolt software that TB device is new technology. To determine whether your device is Thunderbolt Certified for TB controller), driver version (operating system driver), and application...
Maintenance and Service Guide
Page 159
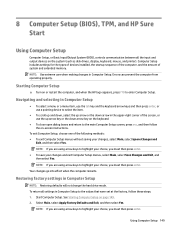
... must then press enter. Using Computer Setup 149 NOTE: Use extreme care when making changes in Computer Setup NOTE: Restoring defaults will not change the hard drive mode. Starting Computer Setup ▲ Turn on page 149. 2. Your changes go into effect when the computer restarts. Errors can prevent the computer from operating properly. To return all the input and output devices on -screen instructions. Computer Setup includes settings for the types of devices installed, the startup sequence of...
... must then press enter. Using Computer Setup 149 NOTE: Use extreme care when making changes in Computer Setup NOTE: Restoring defaults will not change the hard drive mode. Starting Computer Setup ▲ Turn on page 149. 2. Your changes go into effect when the computer restarts. Errors can prevent the computer from operating properly. To return all the input and output devices on -screen instructions. Computer Setup includes settings for the types of devices installed, the startup sequence of...
Maintenance and Service Guide
Page 182
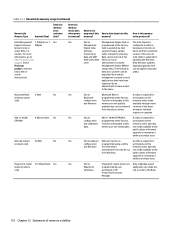
screen instructions.) Stores Management Engine Code, Settings, Provisioning Data and iAMT third-party data store. Webcam (select 64 Kbit No Yes Stores webcam Webcam memory is A utility is necessary to this and firmware. public unless a firmware upgrade is required for EEPROM configuration programmed at the factory or by user enrollment in select Elite or Z models. Intel Management 1.5 MBytes or 7 Yes Yes Engine Firmware MBytes (present only in HP ProtectTools Security Manager. Code is...
screen instructions.) Stores Management Engine Code, Settings, Provisioning Data and iAMT third-party data store. Webcam (select 64 Kbit No Yes Stores webcam Webcam memory is A utility is necessary to this and firmware. public unless a firmware upgrade is required for EEPROM configuration programmed at the factory or by user enrollment in select Elite or Z models. Intel Management 1.5 MBytes or 7 Yes Yes Engine Firmware MBytes (present only in HP ProtectTools Security Manager. Code is...
Maintenance and Service Guide
Page 187
... screen image 14 using 14 wireless 14 airplane mode key 15 antenna illustrated 22 antennas removing 68, 69 audible codes 73 audio adjusting volume 14 audio board removing 59 spare part number 18 audio, product description 3 audio-out (headphone)/audio-in (microphone) combo jack, identifying 7 B backup, creating 153 backups 153 battery illustrated 18 removing 40 beep codes 73 BIOS determining version 150 downloading an update 150 updating 150 Bluetooth label 16 boot order changing using the f9 prompt 151 boot order, changing 154 bottom cover illustrated 20 removing 38 buttons left TouchPad...
... screen image 14 using 14 wireless 14 airplane mode key 15 antenna illustrated 22 antennas removing 68, 69 audible codes 73 audio adjusting volume 14 audio board removing 59 spare part number 18 audio, product description 3 audio-out (headphone)/audio-in (microphone) combo jack, identifying 7 B backup, creating 153 backups 153 battery illustrated 18 removing 40 beep codes 73 BIOS determining version 150 downloading an update 150 updating 150 Bluetooth label 16 boot order changing using the f9 prompt 151 boot order, changing 154 bottom cover illustrated 20 removing 38 buttons left TouchPad...
Maintenance and Service Guide
Page 189
... screen action key, identifying 14 processor product description 1 product description audio 3 camera 3 display panel 1 docking 3 Ethernet 3 external media cards 3 graphics 1 keyboard 4 memory module 2 operating system 4 pointing device 4 ports 3 power requirements 4 primary storage, 2.5 inch 2 primary storage, M.2 2 processor 1 product name 1 security 4 serviceability 5 wireless 3 product name 1 product name and number, computer 16 R recovery 153 discs 154 HP Recovery partition 154 media 154 USB flash drive 154 recovery media creating using HP Cloud Recovery Download Tool 153 creating using...
... screen action key, identifying 14 processor product description 1 product description audio 3 camera 3 display panel 1 docking 3 Ethernet 3 external media cards 3 graphics 1 keyboard 4 memory module 2 operating system 4 pointing device 4 ports 3 power requirements 4 primary storage, 2.5 inch 2 primary storage, M.2 2 processor 1 product name 1 security 4 serviceability 5 wireless 3 product name 1 product name and number, computer 16 R recovery 153 discs 154 HP Recovery partition 154 media 154 USB flash drive 154 recovery media creating using HP Cloud Recovery Download Tool 153 creating using...


