
HP USB Digital Drive
Page 3
Installing the SD Memory Card 1. Insert the SD memory card into the SD slot 2 with the notched corner positioned on the lower left as shown. If the SD memory card does not slide in properly, gently pull it out and reinsert it. 2 User Guide Remove the cap 1 of the Digital Drive. 2.
Installing the SD Memory Card 1. Insert the SD memory card into the SD slot 2 with the notched corner positioned on the lower left as shown. If the SD memory card does not slide in properly, gently pull it out and reinsert it. 2 User Guide Remove the cap 1 of the Digital Drive. 2.

Hardware Guide
Page 29
... notebook. ✎ The purpose of security solutions is accessing digital media. 3 PC Card slot Supports an optional Type I or Type II 32-bit (CardBus) or 16-bit PC Card. 4 PC Card eject button Ejects an optional PC Card from being mishandled or stolen. 2 5-in-1 Digital Media slot and Supports 5 optional digital media light (select models) formats: SD Memory...
... notebook. ✎ The purpose of security solutions is accessing digital media. 3 PC Card slot Supports an optional Type I or Type II 32-bit (CardBus) or 16-bit PC Card. 4 PC Card eject button Ejects an optional PC Card from being mishandled or stolen. 2 5-in-1 Digital Media slot and Supports 5 optional digital media light (select models) formats: SD Memory...

Hardware Guide
Page 37
As shipped, the memory slot might be filled with a replaceable memory module, or it might be vacant, depending on the notebook model. 1-30 Hardware Guide Hardware Components Bottom Components Component Description 1 Battery release ...latch Releases the battery pack from the battery bay. 2 Battery bay Holds the battery pack. 3 Exhaust vents Allow airflow to block airflow. 4 Hard drive bay Holds the primary hard drive. 5 Memory compartment Contains 2 memory slots...
As shipped, the memory slot might be filled with a replaceable memory module, or it might be vacant, depending on the notebook model. 1-30 Hardware Guide Hardware Components Bottom Components Component Description 1 Battery release ...latch Releases the battery pack from the battery bay. 2 Battery bay Holds the battery pack. 3 Exhaust vents Allow airflow to block airflow. 4 Hard drive bay Holds the primary hard drive. 5 Memory compartment Contains 2 memory slots...

Hardware Guide
Page 38
... internal components. Ä To prevent overheating, do not obstruct the vent. Holds the primary hard drive. Hardware Guide 1-31 As shipped, the memory slot might be filled with a replaceable memory module, or it might be vacant, depending on the notebook model. Hardware Components Component 1 Battery release latch 2 Battery bay 3 Exhaust vents 4 Hard drive bay...
... internal components. Ä To prevent overheating, do not obstruct the vent. Holds the primary hard drive. Hardware Guide 1-31 As shipped, the memory slot might be filled with a replaceable memory module, or it might be vacant, depending on the notebook model. Hardware Components Component 1 Battery release latch 2 Battery bay 3 Exhaust vents 4 Hard drive bay...
Hardware Guide
Page 87
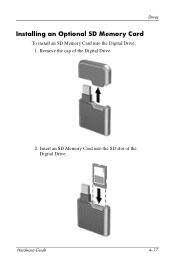
Drives Installing an Optional SD Memory Card To install an SD Memory Card into the SD slot of the Digital Drive. 2. Hardware Guide 4-17 Remove the cap of the Digital Drive. Insert an SD Memory Card into the Digital Drive: 1.
Drives Installing an Optional SD Memory Card To install an SD Memory Card into the SD slot of the Digital Drive. 2. Hardware Guide 4-17 Remove the cap of the Digital Drive. Insert an SD Memory Card into the Digital Drive: 1.

Hardware Guide
Page 134
The 5-in-1 Digital Media slot supports the following digital media formats: ■ Secure Digital (SD) ■ MultiMediaCard ■ Memory Stick ■ Memory Stick Pro ■ SmartMedia 8-6 Hardware Guide Hardware Upgrades Removing a PC Card Using Digital Media Cards (Select Models) Optional digital media cards are removable storage devices that provide a convenient method of storing data and sharing it with other devices such as PDAs, cameras, and other memory card-equipped PCs.
The 5-in-1 Digital Media slot supports the following digital media formats: ■ Secure Digital (SD) ■ MultiMediaCard ■ Memory Stick ■ Memory Stick Pro ■ SmartMedia 8-6 Hardware Guide Hardware Upgrades Removing a PC Card Using Digital Media Cards (Select Models) Optional digital media cards are removable storage devices that provide a convenient method of storing data and sharing it with other devices such as PDAs, cameras, and other memory card-equipped PCs.

Hardware Guide
Page 139
... can be replaced at any time. Select Start > Control Panel > Performance and Maintenance > Power Options > Hibernate. The notebook contains 2 memory slots, one of which is increased, the operating system increases the hard drive space reserved for the Hibernation file. Depending on your hard ...drive has enough free space for an optional 128-MB, 256-MB, 512-MB, or 1024-MB memory module upgrade. Displaying Memory Information When RAM is accessible for the larger hibernation file. ■ To display the amount of space required by HP. Hardware Guide 8-11
... can be replaced at any time. Select Start > Control Panel > Performance and Maintenance > Power Options > Hibernate. The notebook contains 2 memory slots, one of which is increased, the operating system increases the hard drive space reserved for the Hibernation file. Depending on your hard ...drive has enough free space for an optional 128-MB, 256-MB, 512-MB, or 1024-MB memory module upgrade. Displaying Memory Information When RAM is accessible for the larger hibernation file. ■ To display the amount of space required by HP. Hardware Guide 8-11

Hardware Guide
Page 143
Pull away the retention clips on each side of the memory slot 2. c. Grasp the edges of the memory module and gently pull it in an electrostatic-safe container. Remove or insert the memory module. To protect a memory module after removal, place it out of the module 1. (The module tilts up.) b. Hardware Upgrades 7. To remove a memory module: a. Removing a memory module Hardware Guide 8-15
Pull away the retention clips on each side of the memory slot 2. c. Grasp the edges of the memory module and gently pull it in an electrostatic-safe container. Remove or insert the memory module. To protect a memory module after removal, place it out of the module 1. (The module tilts up.) b. Hardware Upgrades 7. To remove a memory module: a. Removing a memory module Hardware Guide 8-15

Hardware Guide
Page 145
b. Hardware Upgrades To insert a memory module: a. Press the module down until the retention clips snap into the slot until it is seated 2. From a 45-degree angle, press the module into place. Inserting a memory module Hardware Guide 8-17 c. Align the keyed (notched) edge of the module with the keyed area in the expansion slot 1.
b. Hardware Upgrades To insert a memory module: a. Press the module down until the retention clips snap into the slot until it is seated 2. From a 45-degree angle, press the module into place. Inserting a memory module Hardware Guide 8-17 c. Align the keyed (notched) edge of the module with the keyed area in the expansion slot 1.

Hardware Guide
Page 147
Replace the battery pack, reconnect AC power, and then restart the notebook. Closing the memory compartment Hardware Guide 8-19 Hardware Upgrades 8. Tilt the cover down until it is seated 1. 10. Reinsert and tighten the screw that secures the cover to the notebook 2. 11. Align the tabs on the memory compartment cover with the cover slots on the notebook. 9.
Replace the battery pack, reconnect AC power, and then restart the notebook. Closing the memory compartment Hardware Guide 8-19 Hardware Upgrades 8. Tilt the cover down until it is seated 1. 10. Reinsert and tighten the screw that secures the cover to the notebook 2. 11. Align the tabs on the memory compartment cover with the cover slots on the notebook. 9.

Hardware Guide
Page 162
... contents of 4-5 inserting/removing CD or DVD 4-8 types and terms 4-2 memory compartment location 1-30, 1-31 displaying amount of 8-11 Memory Stick 8-6 Memory Stick Pro 8-6 microphone jack 1-26, 1-29 microphone, external 5-4, 5-5 ...Microsoft Certificate of Authenticity 1-32 Modem approval 1-32 product identification 1-32 Service Tag 1-32 System 1-32 wireless certification 1-32 LAN connection 7-7 left-side components 1-22, 1-24 lights battery 1-5, 1-6, 1-17, 1-19 caps lock 1-7, 1-8 Digital Media slot...
... contents of 4-5 inserting/removing CD or DVD 4-8 types and terms 4-2 memory compartment location 1-30, 1-31 displaying amount of 8-11 Memory Stick 8-6 Memory Stick Pro 8-6 microphone jack 1-26, 1-29 microphone, external 5-4, 5-5 ...Microsoft Certificate of Authenticity 1-32 Modem approval 1-32 product identification 1-32 Service Tag 1-32 System 1-32 wireless certification 1-32 LAN connection 7-7 left-side components 1-22, 1-24 lights battery 1-5, 1-6, 1-17, 1-19 caps lock 1-7, 1-8 Digital Media slot...

Hardware Guide
Page 164
...11 R RAM (Random Access Memory) 8-11 regulatory information Modem ..., 1-29 S scroll button 2-2, 2-3 Secure Digital (SD) 8-6 security cable slot 1-22, 1-24 security features 6-7 security, PC Smart Card Reader (optional) 8-2 serial number 1-32 Service Tag label 1-32... sleep button. See Standby SmartMedia 8-6 software AutoPlay/Autorun/auto insert notification 4-5 infrared 6-4 USB support 6-3 speakers 5-3 external (optional) 5-4 internal stereo 1-17, 1-18 Standby avoiding when playing media 4-4 avoiding with notebook...
...11 R RAM (Random Access Memory) 8-11 regulatory information Modem ..., 1-29 S scroll button 2-2, 2-3 Secure Digital (SD) 8-6 security cable slot 1-22, 1-24 security features 6-7 security, PC Smart Card Reader (optional) 8-2 serial number 1-32 Service Tag label 1-32... sleep button. See Standby SmartMedia 8-6 software AutoPlay/Autorun/auto insert notification 4-5 infrared 6-4 USB support 6-3 speakers 5-3 external (optional) 5-4 internal stereo 1-17, 1-18 Standby avoiding when playing media 4-4 avoiding with notebook...
Getting Started
Page 30
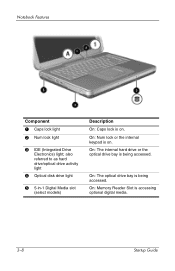
On: The internal hard drive or the optical drive bay is being accessed. On: The optical drive bay is being accessed. On: Memory Reader Slot is on . also referred to as hard drive/optical drive activity light 4 Optical disk drive light 5 5-in-1 Digital Media slot (select models) Description On: Caps lock is accessing optional digital media. 3-8 Startup Guide Notebook Features Component 1 Caps lock light 2 Num lock light 3 IDE (Integrated Drive Electronics) light; On: Num lock or the internal keypad is on .
On: The internal hard drive or the optical drive bay is being accessed. On: The optical drive bay is being accessed. On: Memory Reader Slot is on . also referred to as hard drive/optical drive activity light 4 Optical disk drive light 5 5-in-1 Digital Media slot (select models) Description On: Caps lock is accessing optional digital media. 3-8 Startup Guide Notebook Features Component 1 Caps lock light 2 Num lock light 3 IDE (Integrated Drive Electronics) light; On: Num lock or the internal keypad is on .
Getting Started
Page 43
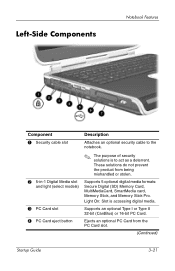
... stolen. Supports 5 optional digital media formats: Secure Digital (SD) Memory Card, MultiMediaCard, SmartMedia card, Memory Stick, and Memory Stick Pro. Left-Side Components Notebook Features Component Description 1 Security cable slot Attaches an optional security cable to the notebook. 2 5-in-1 Digital Media slot and light (select models) 3 PC Card slot 4 PC Card eject button ✎ The purpose of security solutions is...
... stolen. Supports 5 optional digital media formats: Secure Digital (SD) Memory Card, MultiMediaCard, SmartMedia card, Memory Stick, and Memory Stick Pro. Left-Side Components Notebook Features Component Description 1 Security cable slot Attaches an optional security cable to the notebook. 2 5-in-1 Digital Media slot and light (select models) 3 PC Card slot 4 PC Card eject button ✎ The purpose of security solutions is...

Getting Started
Page 51
... internal components. Ä To prevent overheating, do not obstruct the vent. Contains 2 memory slots, one of which is accessible for an optional 128-MB, 256-MB, 512-MB, or 1024-MB memory module upgrade. Holds the primary hard drive. Bottom Components Notebook Features Component 1 Battery release latch 2 Battery bay 3 Exhaust vents 4 Hard drive bay...
... internal components. Ä To prevent overheating, do not obstruct the vent. Contains 2 memory slots, one of which is accessible for an optional 128-MB, 256-MB, 512-MB, or 1024-MB memory module upgrade. Holds the primary hard drive. Bottom Components Notebook Features Component 1 Battery release latch 2 Battery bay 3 Exhaust vents 4 Hard drive bay...

Getting Started
Page 52
..., such as bedding or clothing, to cool internal components. Ä To prevent overheating, do not obstruct the vent. As shipped, the memory slot might be filled with a replaceable memory module, or it might be vacant, depending on the notebook model. 5 Battery release latch Releases the battery pack from the battery bay. 3-30 Startup Guide...
..., such as bedding or clothing, to cool internal components. Ä To prevent overheating, do not obstruct the vent. As shipped, the memory slot might be filled with a replaceable memory module, or it might be vacant, depending on the notebook model. 5 Battery release latch Releases the battery pack from the battery bay. 3-30 Startup Guide...

Getting Started
Page 55
... and Travel guide 2-1 memory compartment location 3-29, 3-30 microphone jack 3-25, 3-27 Modem and Networking guide 2-1 N num lock light 3-7, 3-8 O opening the notebook 1-6, 1-7 optical drive bay 3-22 optical drive bay configurations 3-22, 3-24 P parallel connector, identifying 3-19, 3-20 PC Card 3-21, 3-23... jack 3-26, 3-28 S Safety & Comfort Guide 2-2 safety considerations 1-11 screen settings 1-10 security cable slot 3-21, 3-23 Service ID tag 2-4 shutting down the notebook 1-12 software Adobe Acrobat Reader 2-2 antivirus 1-13 installing 1-10 license 1-9 setup 1-9 Software Setup utility 1-10...
... and Travel guide 2-1 memory compartment location 3-29, 3-30 microphone jack 3-25, 3-27 Modem and Networking guide 2-1 N num lock light 3-7, 3-8 O opening the notebook 1-6, 1-7 optical drive bay 3-22 optical drive bay configurations 3-22, 3-24 P parallel connector, identifying 3-19, 3-20 PC Card 3-21, 3-23... jack 3-26, 3-28 S Safety & Comfort Guide 2-2 safety considerations 1-11 screen settings 1-10 security cable slot 3-21, 3-23 Service ID tag 2-4 shutting down the notebook 1-12 software Adobe Acrobat Reader 2-2 antivirus 1-13 installing 1-10 license 1-9 setup 1-9 Software Setup utility 1-10...


