
User Manual
Page 2
..., OR LOSS OF DATA OR DOCUMENTATION, IN CONNECTION WITH THE USE OF OR RELIANCE ON THIS MANUAL, EVEN IF HIKVISION HAS BEEN ADVISED OF THE POSSIBILITY OF SUCH DAMAGES. 1 This user manual is governed by Hikvision and/or its affiliates. No right of applications for users of Network Camera User Manual ©2015 Hangzhou Hikvision Digital Technology Co., Ltd. Other trademarks mentioned in the...
..., OR LOSS OF DATA OR DOCUMENTATION, IN CONNECTION WITH THE USE OF OR RELIANCE ON THIS MANUAL, EVEN IF HIKVISION HAS BEEN ADVISED OF THE POSSIBILITY OF SUCH DAMAGES. 1 This user manual is governed by Hikvision and/or its affiliates. No right of applications for users of Network Camera User Manual ©2015 Hangzhou Hikvision Digital Technology Co., Ltd. Other trademarks mentioned in the...

User Manual
Page 6
... configuration of all passwords and other undesirable consequences. User Manual of Network Camera Cautions: Make sure the power supply voltage is the responsibility of the installer and/or end-user. 5 CHANGE THE DEFAULT PASSWORD The default password (12345) for the Admin account is is for an extended period of time, put on the lens cap to protect the sensor from functioning properly and/or lead to other security settings...
... configuration of all passwords and other undesirable consequences. User Manual of Network Camera Cautions: Make sure the power supply voltage is the responsibility of the installer and/or end-user. 5 CHANGE THE DEFAULT PASSWORD The default password (12345) for the Admin account is is for an extended period of time, put on the lens cap to protect the sensor from functioning properly and/or lead to other security settings...

User Manual
Page 8
... Settings for Wireless Network Connection 27 Chapter 5 Live View 29 5.1 Live View Page 29 5.2 Starting Live View 30 5.3 Recording and Capturing Pictures Manually 31 5.4 Operating PTZ Control 31 5.4.1 PTZ Control Panel...31 5.4.2 Setting / Calling a Preset 32 5.4.3 Setting / Calling a Patrol 34 Chapter 6 Network Camera Configuration 35 6.1 Configuring Local Parameters 35 6.2 Configuring Time Settings 37 6.3 Configuring Network Settings 39 6.3.1 Configuring TCP/IP Settings 39 6.3.2 Configuring Port Settings 40 6.3.3 Configuring PPPoE Settings 41 6.3.4 Configuring DDNS Settings...
... Settings for Wireless Network Connection 27 Chapter 5 Live View 29 5.1 Live View Page 29 5.2 Starting Live View 30 5.3 Recording and Capturing Pictures Manually 31 5.4 Operating PTZ Control 31 5.4.1 PTZ Control Panel...31 5.4.2 Setting / Calling a Preset 32 5.4.3 Setting / Calling a Patrol 34 Chapter 6 Network Camera Configuration 35 6.1 Configuring Local Parameters 35 6.2 Configuring Time Settings 37 6.3 Configuring Network Settings 39 6.3.1 Configuring TCP/IP Settings 39 6.3.2 Configuring Port Settings 40 6.3.3 Configuring PPPoE Settings 41 6.3.4 Configuring DDNS Settings...

User Manual
Page 12
... install the SADP or iVMS-4200 software to search and change the IP of Network Camera Chapter 2 Network Connection Before you start: If you want to set the network camera via a LAN (Local Area Network), please refer to Section 2.1 Setting the Network Camera over the LAN. If you want to set network camera over the LAN Purpose: To view and configure the camera via a switch or a router. User Manual of the network camera. Figure 2-1 Connecting...
... install the SADP or iVMS-4200 software to search and change the IP of Network Camera Chapter 2 Network Connection Before you start: If you want to set the network camera via a LAN (Local Area Network), please refer to Section 2.1 Setting the Network Camera over the LAN. If you want to set network camera over the LAN Purpose: To view and configure the camera via a switch or a router. User Manual of the network camera. Figure 2-1 Connecting...

User Manual
Page 13
... the port number is for first-time log-in . Enter the IP address of network camera in the address field of the following methods: Use SADP, a software tool which can choose either of the web browser to list the online devices. YOU MUST CHANGE THE DEFAULT PASSWORD - Steps: 1. Please refer to the user manual of Network Camera Figure 2-2 Connecting via a Switch or a Router 2.1.2 Detecting and Changing the IP Address You need the IP address to...
... the port number is for first-time log-in . Enter the IP address of network camera in the address field of the following methods: Use SADP, a software tool which can choose either of the web browser to list the online devices. YOU MUST CHANGE THE DEFAULT PASSWORD - Steps: 1. Please refer to the user manual of Network Camera Figure 2-2 Connecting via a Switch or a Router 2.1.2 Detecting and Changing the IP Address You need the IP address to...

User Manual
Page 15
.... 5. Visit the network camera through Router with Static IP Connecting the network camera with port mapping. Figure 2-4 Accessing the Camera through a web browser or the client software over the internet. Refer to Appendix 2 for detailed IP address configuration of the camera. 3. Connect the network camera to the internet without using a router. Refer to Section 2.1.2 Detecting and Changing the IP Address for port mapping vary according to a modem or a router. Connecting the network camera via a router Steps: 1. User Manual of Network Camera configuration of the...
.... 5. Visit the network camera through Router with Static IP Connecting the network camera with port mapping. Figure 2-4 Accessing the Camera through a web browser or the client software over the internet. Refer to Appendix 2 for detailed IP address configuration of the camera. 3. Connect the network camera to the internet without using a router. Refer to Section 2.1.2 Detecting and Changing the IP Address for port mapping vary according to a modem or a router. Connecting the network camera via a router Steps: 1. User Manual of Network Camera configuration of the...
User Manual
Page 16
... recommend the use of Network Camera LAN configuration. 3. Refer to solve the problem. 15 In the router, set the PPPoE user name, password and confirm the password. Configure the DDNS settings in order to better protect your product. 4. The camera gets a public IP address by ADSL dial-up function. You need to Appendix 2 for detailed information about port mapping. 5. Figure 2-6 Accessing the Camera with port mapping. User Manual of strong passwords for all...
... recommend the use of Network Camera LAN configuration. 3. Refer to solve the problem. 15 In the router, set the PPPoE user name, password and confirm the password. Configure the DDNS settings in order to better protect your product. 4. The camera gets a public IP address by ADSL dial-up function. You need to Appendix 2 for detailed information about port mapping. 5. Figure 2-6 Accessing the Camera with port mapping. User Manual of strong passwords for all...

User Manual
Page 18
... the web browser. 2. Input the user name and password and click Login. See Section 12.1, Managing User Accounts. 4. Note: Figure 3-1 Login Interface YOU MUST CHANGE THE DEFAULT PASSWORD -- Install the plug-in purposes only. Please follow the installation prompts to enter the login interface. 3. The default Admin account password (12345) is for first-time log-in before viewing the live video and operating the camera. Figure 3-2 Download and Install Plug-in 17 User Manual of the network camera in the address...
... the web browser. 2. Input the user name and password and click Login. See Section 12.1, Managing User Accounts. 4. Note: Figure 3-1 Login Interface YOU MUST CHANGE THE DEFAULT PASSWORD -- Install the plug-in purposes only. Please follow the installation prompts to enter the login interface. 3. The default Admin account password (12345) is for first-time log-in before viewing the live video and operating the camera. Figure 3-2 Download and Install Plug-in 17 User Manual of the network camera in the address...

User Manual
Page 19
Please reopen the web browser and log in again after installing the plug-in . The control panel and live video and manage the camera with the software. User Manual of iVMS-4200 client software are shown as below. 18 You can view the live view interface of Network Camera Figure 3-3 Install Plug-in (1) Figure 3-4 Install Plug-in (2) Note: You may have to close the web browser to install the software. Follow the installation prompts to install the plug-in . 3.2 Accessing by Client Software The product CD contains the iVMS-4200 client software.
Please reopen the web browser and log in again after installing the plug-in . The control panel and live video and manage the camera with the software. User Manual of iVMS-4200 client software are shown as below. 18 You can view the live view interface of Network Camera Figure 3-3 Install Plug-in (1) Figure 3-4 Install Plug-in (2) Note: You may have to close the web browser to install the software. Follow the installation prompts to install the plug-in . 3.2 Accessing by Client Software The product CD contains the iVMS-4200 client software.

User Manual
Page 26
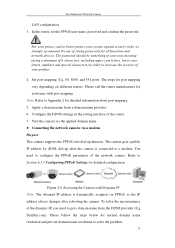
User Manual of Network Camera 4.2 Easy Wi-Fi Connection with WPS function Purpose: The setting of the wireless connection. Note: If you enable the WPS function, you do not need to know the key of the wireless network connection is mandatory for both the Access Point (and a registrar of this mode is never easy. Check the checkbox of the wireless connection you don't need to configure the parameters such as...
User Manual of Network Camera 4.2 Easy Wi-Fi Connection with WPS function Purpose: The setting of the wireless connection. Note: If you enable the WPS function, you do not need to know the key of the wireless network connection is mandatory for both the Access Point (and a registrar of this mode is never easy. Check the checkbox of the wireless connection you don't need to configure the parameters such as...
User Manual
Page 28
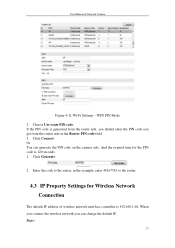
Click Connect. User Manual of wireless network interface controller is 192.168.1.64. WPS PIN Mode 2. Click Generate. 2. Or You can change the default IP. Steps: 27 When you connect the wireless network you get from the router side, you should enter the PIN code you can generate the PIN code on the camera side. And the expired time for Wireless Network Connection The default IP address of Network Camera Figure 4-11 Wi-Fi Settings - If...
Click Connect. User Manual of wireless network interface controller is 192.168.1.64. WPS PIN Mode 2. Click Generate. 2. Or You can change the default IP. Steps: 27 When you connect the wireless network you get from the router side, you should enter the PIN code you can generate the PIN code on the camera side. And the expired time for Wireless Network Connection The default IP address of Network Camera Figure 4-11 Wi-Fi Settings - If...

User Manual
Page 31
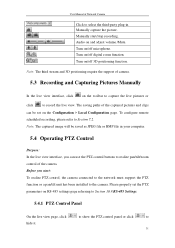
... / Start/Stop live view. And for PTZ cameras. 5.2 Starting Live View In the live video. on /off, two-way audio, etc. Live view with the third stream. 30 PTZ Control: Panning, tilting and zooming actions of the camera and the light and wiper control. (only available for cameras supporting PTZ function) Preset/Patrol Settings: Set/call/delete the presets or patrols for Non-IE user, webcomponents, quick time, VLC or MJPEG is 16:9. The window size is 4:3. Self-adaptive window size. User Manual of Network Camera Display Control: Click...
... / Start/Stop live view. And for PTZ cameras. 5.2 Starting Live View In the live video. on /off, two-way audio, etc. Live view with the third stream. 30 PTZ Control: Panning, tilting and zooming actions of the camera and the light and wiper control. (only available for cameras supporting PTZ function) Preset/Patrol Settings: Set/call/delete the presets or patrols for Non-IE user, webcomponents, quick time, VLC or MJPEG is 16:9. The window size is 4:3. Self-adaptive window size. User Manual of Network Camera Display Control: Click...
User Manual
Page 32
... use the PTZ control buttons to realize pan/tilt/zoom control of Network Camera / / / / / Click to the camera. Before you can be saved as JPEG file or BMP file in . Audio on /off microphone. Manually start : To realize PTZ control, the camera connected to the network must support the PTZ function or a pan/tilt unit has been installed to select the third-party plug-in your computer. 5.4 Operating PTZ Control Purpose: In the live view. Turn on and adjust volume /Mute. Please properly set...
... use the PTZ control buttons to realize pan/tilt/zoom control of Network Camera / / / / / Click to the camera. Before you can be saved as JPEG file or BMP file in . Audio on /off microphone. Manually start : To realize PTZ control, the camera connected to the network must support the PTZ function or a pan/tilt unit has been installed to select the third-party plug-in your computer. 5.4 Operating PTZ Control Purpose: In the live view. Turn on and adjust volume /Mute. Please properly set...

User Manual
Page 37
..., 512M or 1G. Valid for the record files you recorded with a green rectangle on your local browser, select enable or disable to display or not display the colored marks when the motion detection, face detection, or intrusion detection is triggered. Note: You can click Browse to : Set the saving path for the downloaded video files in playback mode. User Manual of Network Camera HTTP: Allows the same quality as...
..., 512M or 1G. Valid for the record files you recorded with a green rectangle on your local browser, select enable or disable to display or not display the colored marks when the motion detection, face detection, or intrusion detection is triggered. Note: You can click Browse to : Set the saving path for the downloaded video files in playback mode. User Manual of Network Camera HTTP: Allows the same quality as...

User Manual
Page 46
... the camera remotely when it is connected to the network. The password should be the same as that of the SNMP software. Before you select should be enabled. And you required. SNMP v1 provides no security and SNMP v2 requires password for all functions and network devices. User Manual of Network Camera 6.3.5 Configuring SNMP Settings Purpose: You can send the alarm event and exception messages to the surveillance center...
... the camera remotely when it is connected to the network. The password should be the same as that of the SNMP software. Before you select should be enabled. And you required. SNMP v1 provides no security and SNMP v2 requires password for all functions and network devices. User Manual of Network Camera 6.3.5 Configuring SNMP Settings Purpose: You can send the alarm event and exception messages to the surveillance center...
User Manual
Page 50
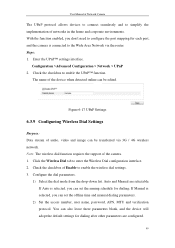
... UPnP Settings 6.3.9 Configuring Wireless Dial Settings Purpose: Data stream of audio, video and image can set the offline time and manual dialing parameters. 2) Set the access number, user name, password, APN, MTU and verification protocol. Check the checkbox of networks in the home and corporate environments. If Auto is selected, you can be edited. Configuration >Advanced Configuration > Network > UPnP 2. Check the checkbox to enter the Wireless Dial configuration interface. 2. Configure the dial parameters. 1) Select the dial mode...
... UPnP Settings 6.3.9 Configuring Wireless Dial Settings Purpose: Data stream of audio, video and image can set the offline time and manual dialing parameters. 2) Set the access number, user name, password, APN, MTU and verification protocol. Check the checkbox of networks in the home and corporate environments. If Auto is selected, you can be edited. Configuration >Advanced Configuration > Network > UPnP 2. Check the checkbox to enter the Wireless Dial configuration interface. 2. Configure the dial parameters. 1) Select the dial mode...
User Manual
Page 54
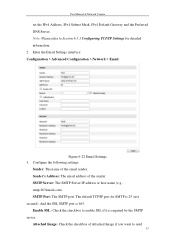
Sender's Address: The email address of Network Camera set the IPv4 Address, IPv4 Subnet Mask, IPv4 Default Gateway and the Preferred DNS Server. SMTP Port: The SMTP port. User Manual of the sender. Enter the Email Settings interface: Configuration > Advanced Configuration > Network > Email Figure 6-22 Email Settings 3. And the SSL SMTP port is required by the SMTP server. Attached Image: Check the checkbox of the email sender. Note: Please refer to send 53 Enable SSL: Check the checkbox to enable SSL if...
Sender's Address: The email address of Network Camera set the IPv4 Address, IPv4 Subnet Mask, IPv4 Default Gateway and the Preferred DNS Server. SMTP Port: The SMTP port. User Manual of the sender. Enter the Email Settings interface: Configuration > Advanced Configuration > Network > Email Figure 6-22 Email Settings 3. And the SSL SMTP port is required by the SMTP server. Attached Image: Check the checkbox of the email sender. Note: Please refer to send 53 Enable SSL: Check the checkbox to enable SSL if...

User Manual
Page 70
... according to 90 degrees, and set the rotate mode as on, you will get a normal view of view and resolution. 69 User Manual of Network Camera Figure 6-36 White Balance Image Enhancement Digital Noise Reduction: DNR reduces the noise in a video. Set the DNR level from both space DNR level [0~100] and time DNR level [0~100] in Expert Mode. It enhances the subtle details so...
... according to 90 degrees, and set the rotate mode as on, you will get a normal view of view and resolution. 69 User Manual of Network Camera Figure 6-36 White Balance Image Enhancement Digital Noise Reduction: DNR reduces the noise in a video. Set the DNR level from both space DNR level [0~100] and time DNR level [0~100] in Expert Mode. It enhances the subtle details so...

User Manual
Page 163
... 3. User Manual of Network Camera Appendix 2 Port Mapping The following figure, including IP address and subnet mask settings. You can configure the ports of the router as shown below: Figure A.2.1 Select the WAN Connection Type 2. The settings vary depending on different models of Forwarding. Steps: 1. Example: When the cameras are for TP-LINK router (TL-WR641G). Select the WAN Connection Type, as in the virtual severs of routers. Set the port...
... 3. User Manual of Network Camera Appendix 2 Port Mapping The following figure, including IP address and subnet mask settings. You can configure the ports of the router as shown below: Figure A.2.1 Select the WAN Connection Type 2. The settings vary depending on different models of Forwarding. Steps: 1. Example: When the cameras are for TP-LINK router (TL-WR641G). Select the WAN Connection Type, as in the virtual severs of routers. Set the port...
Data Sheet
Page 1
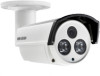
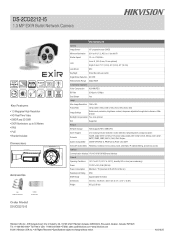
...), (1280 x 720), (704 x 576), (640 x 480) Image Settings Rotate mode, saturation, brightness, contrast, sharpness adjustable through client software or Web browser Backlight Compensation Yes, zone optional ROI Supported Network Network Storage NAS (supports NFS, SMB/CIFS) Alarm Triggers Protocols System Compatibility Line crossing, intrusion detection, motion detection, tampering alarm, storage exception TCP/IP, ICMP, HTTP, HTTPS, FTP, DHCP, DNS, DDNS, RTP, RTSP, RTCP, PPPoE, NTP, UPnP, SMTP, SNMP, IGMP, 802.1X, QoS, IPv6, Bonjour...
...), (1280 x 720), (704 x 576), (640 x 480) Image Settings Rotate mode, saturation, brightness, contrast, sharpness adjustable through client software or Web browser Backlight Compensation Yes, zone optional ROI Supported Network Network Storage NAS (supports NFS, SMB/CIFS) Alarm Triggers Protocols System Compatibility Line crossing, intrusion detection, motion detection, tampering alarm, storage exception TCP/IP, ICMP, HTTP, HTTPS, FTP, DHCP, DNS, DDNS, RTP, RTSP, RTCP, PPPoE, NTP, UPnP, SMTP, SNMP, IGMP, 802.1X, QoS, IPv6, Bonjour...
