
Quick Start Guide
Page 47
... admin user should configure the device accounts and user/operator permissions properly. Delete the unnecessary accounts and user/operator permissions. You are recommended to change the IP address to enter the login interface. Network Turret Camera·Quick Start Guide 4 Access via Web Browser System Requirement: Operating System: Microsoft Windows XP SP1 and above version CPU: 2.0 GHz or higher RAM: 1G or higher Display: 1024×768 resolution or higher Web Browser: Internet Explorer 8.0 and above version...
... admin user should configure the device accounts and user/operator permissions properly. Delete the unnecessary accounts and user/operator permissions. You are recommended to change the IP address to enter the login interface. Network Turret Camera·Quick Start Guide 4 Access via Web Browser System Requirement: Operating System: Microsoft Windows XP SP1 and above version CPU: 2.0 GHz or higher RAM: 1G or higher Display: 1024×768 resolution or higher Web Browser: Internet Explorer 8.0 and above version...
Quick Start Guide
Page 51
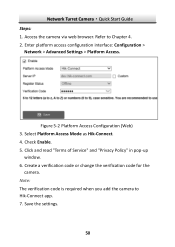
Network Turret Camera·Quick Start Guide Steps: 1. Click and read "Terms of Service" and "Privacy Policy" in pop-up window. 6. Access the camera via web browser. Enter platform access configuration interface: Configuration > Network > Advanced Settings > Platform Access. Select Platform Access Mode as Hik-Connect. 4. Create a verification code or change the verification code for the camera. Save the settings. 50 Refer to Hik-Connect app. 7. Figure 5-2 Platform Access Configuration (Web) 3. Check Enable. 5. Note: The verification code is required when you add the camera ...
Network Turret Camera·Quick Start Guide Steps: 1. Click and read "Terms of Service" and "Privacy Policy" in pop-up window. 6. Access the camera via web browser. Enter platform access configuration interface: Configuration > Network > Advanced Settings > Platform Access. Select Platform Access Mode as Hik-Connect. 4. Create a verification code or change the verification code for the camera. Save the settings. 50 Refer to Hik-Connect app. 7. Figure 5-2 Platform Access Configuration (Web) 3. Check Enable. 5. Note: The verification code is required when you add the camera ...

User Manual
Page 14
... recommend you create a strong password of your own choosing (using a minimum of 8 characters, including at least three of the following categories: upper case letters, lower case letters, numbers, and special characters) in order to save the password and enter the live view interface. Activation via Web Browser 3. Follow the steps to search the IP address. Network Camera User Manual to activate the...
... recommend you create a strong password of your own choosing (using a minimum of 8 characters, including at least three of the following categories: upper case letters, lower case letters, numbers, and special characters) in order to save the password and enter the live view interface. Activation via Web Browser 3. Follow the steps to search the IP address. Network Camera User Manual to activate the...

User Manual
Page 15
... enable the Hik-Connect service for details. 3. Select inactive device. Create and input the password in batch. We highly recommend you reset your password regularly, especially in the high security system, resetting the password monthly or weekly can better protect your product. Note: You can check whether the activation is not allowed. SADP Interface Note: The SADP software supports activating the camera...
... enable the Hik-Connect service for details. 3. Select inactive device. Create and input the password in batch. We highly recommend you reset your password regularly, especially in the high security system, resetting the password monthly or weekly can better protect your product. Note: You can check whether the activation is not allowed. SADP Interface Note: The SADP software supports activating the camera...

User Manual
Page 20
... ports. The steps for detailed IP address configuration of the network camera. 3. With the static IP address, you start: Please apply a static IP from an ISP (Internet Service Provider). Refer to Section 2.1.2 for port mapping vary according to set up window to reset the admin password when admin user forgets the password. Please call the router manufacturer for detailed information about port mapping. 19 Or, admin user can connect the network camera via a router or connect...
... ports. The steps for detailed IP address configuration of the network camera. 3. With the static IP address, you start: Please apply a static IP from an ISP (Internet Service Provider). Refer to Section 2.1.2 for port mapping vary according to set up window to reset the admin password when admin user forgets the password. Please call the router manufacturer for detailed information about port mapping. 19 Or, admin user can connect the network camera via a router or connect...

User Manual
Page 32
...: The setting of the wireless network connection is the responsibility of the wireless connection you don't need to the easy configuration of strong passwords for all passwords and other security settings is never easy. Network Camera User Manual strongly recommend the use of the encrypted connection between the device and the wireless router. WPS (Wi-Fi Protected Setup) refers to configure the parameters such as the encryption type and you can enable the...
...: The setting of the wireless network connection is the responsibility of the wireless connection you don't need to the easy configuration of strong passwords for all passwords and other security settings is never easy. Network Camera User Manual strongly recommend the use of the encrypted connection between the device and the wireless router. WPS (Wi-Fi Protected Setup) refers to configure the parameters such as the encryption type and you can enable the...
User Manual
Page 38
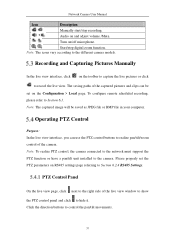
Network Camera User Manual Icon Description / Manually start/stop recording. / Audio on and adjust volume /Mute. / Turn on the Configuration > Local page. To configure remote scheduled recording, please refer to control the pan/tilt movements. 37 The saving paths of the camera. Note: The captured image will be set the PTZ parameters on the toolbar to capture the live pictures or click to the different camera models. Operating PTZ Control Purpose: In the live view. Click the direction buttons to...
Network Camera User Manual Icon Description / Manually start/stop recording. / Audio on and adjust volume /Mute. / Turn on the Configuration > Local page. To configure remote scheduled recording, please refer to control the pan/tilt movements. 37 The saving paths of the camera. Note: The captured image will be set the PTZ parameters on the toolbar to capture the live pictures or click to the different camera models. Operating PTZ Control Purpose: In the live view. Click the direction buttons to...
User Manual
Page 44
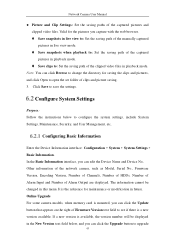
... cannot be displayed in playback mode. Save clips to: Set the saving path of Firmware Version text field to configure the system settings, include System Settings, Maintenance, Security, and User Management, etc. Online Upgrade For some camera models, when memory card is mounted, you can click the Update button that appears on the right of the clipped video files in this menu. Configure System Settings Purpose: Follow the instructions below , and...
... cannot be displayed in playback mode. Save clips to: Set the saving path of Firmware Version text field to configure the system settings, include System Settings, Maintenance, Security, and User Management, etc. Online Upgrade For some camera models, when memory card is mounted, you can click the Update button that appears on the right of the clipped video files in this menu. Configure System Settings Purpose: Follow the instructions below , and...

User Manual
Page 52
Network Camera User Manual the others are hidden. • The function may not be careful for this action. • For camera that applies to create an encryption password. Go to proceed. This operation requires admin password to Configuration > System Settings > About. Enter the Maintenance interface: Configuration > System > Maintenance > Upgrade & Maintenance. Reboot: Restart the device. Restore: Reset all the parameters, except the IP parameters and...
Network Camera User Manual the others are hidden. • The function may not be careful for this action. • For camera that applies to create an encryption password. Go to proceed. This operation requires admin password to Configuration > System Settings > About. Enter the Maintenance interface: Configuration > System > Maintenance > Upgrade & Maintenance. Reboot: Restart the device. Restore: Reset all the parameters, except the IP parameters and...

User Manual
Page 69
... camera remotely when it is connected to the surveillance center. SNMP v1 provides no security and SNMP v2 requires password for the camera, or you can customize the value of the SNMP software. If you select Manual, you can configure the parameters, including SNMP, FTP, Email, HTTPS, QoS, 802.1x, etc., by following the instructions in this section. Configure Advanced Settings Purpose: You can use the default...
... camera remotely when it is connected to the surveillance center. SNMP v1 provides no security and SNMP v2 requires password for the camera, or you can customize the value of the SNMP software. If you select Manual, you can configure the parameters, including SNMP, FTP, Email, HTTPS, QoS, 802.1x, etc., by following the instructions in this section. Configure Advanced Settings Purpose: You can use the default...
User Manual
Page 77
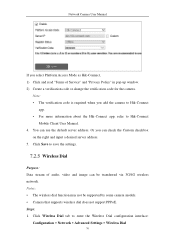
... wireless network. You can check the Custom checkbox on the right and input a desired server address. 5. Note: • The verification code is required when you can use the default server address. Click Save to enter the Wireless Dial configuration interface: Configuration > Network > Advanced Settings > Wireless Dial 76 Network Camera User Manual If you select Platform Access Mode as Hik-Connect, 1) Click and read "Terms of audio, video and image can be supported by some camera models. • Camera that supports wireless...
... wireless network. You can check the Custom checkbox on the right and input a desired server address. 5. Note: • The verification code is required when you can use the default server address. Click Save to enter the Wireless Dial configuration interface: Configuration > Network > Advanced Settings > Wireless Dial 76 Network Camera User Manual If you select Platform Access Mode as Hik-Connect, 1) Click and read "Terms of audio, video and image can be supported by some camera models. • Camera that supports wireless...

User Manual
Page 78
... wireless network. 5. If Auto is selected, the network selection priority comes as: 4G > 3G > Wired Network. 4) Input the offline time if Manual is selected as the dial mode. 7) Click Save to the device, and the device will adopt the default settings for SMS push, and click OK. The mobile phone number on the white list, and click the Edit button. 3) Input the mobile phone number for dialing; Network Camera User Manual 2. Configure...
... wireless network. 5. If Auto is selected, the network selection priority comes as: 4G > 3G > Wired Network. 4) Input the offline time if Manual is selected as the dial mode. 7) Click Save to the device, and the device will adopt the default settings for SMS push, and click OK. The mobile phone number on the white list, and click the Edit button. 3) Input the mobile phone number for dialing; Network Camera User Manual 2. Configure...
User Manual
Page 85
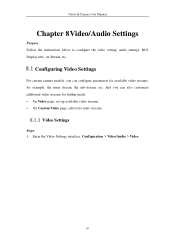
... video streams for example, the main stream, the sub-stream, etc. on Stream, etc. Configuring Video Settings For certain camera models, you can configure parameters for available video streams, for further needs. • On Video page, set-up available video streams. • On Custom Video page, add extra video streams Video Settings Steps: 1. Network Camera User Manual Chapter 8Video/Audio Settings Purpose: Follow the instructions below to configure the video setting, audio settings, ROI, Display info. Enter the Video Settings interface, Configuration > Video/Audio > Video...
... video streams for example, the main stream, the sub-stream, etc. on Stream, etc. Configuring Video Settings For certain camera models, you can configure parameters for available video streams, for further needs. • On Video page, set-up available video streams. • On Custom Video page, add extra video streams Video Settings Steps: 1. Network Camera User Manual Chapter 8Video/Audio Settings Purpose: Follow the instructions below to configure the video setting, audio settings, ROI, Display info. Enter the Video Settings interface, Configuration > Video/Audio > Video...
User Manual
Page 92
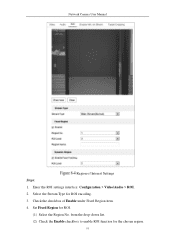
Set Fixed Region for the chosen region. 91 Enter the ROI settings interface: Configuration > Video/Audio > ROI. 2. Check the checkbox of Interest Settings Steps: 1. from the drop-down list. (2) Check the Enable checkbox to enable ROI function for ROI. (1) Select the Region No. Select the Stream Type for ROI encoding. 3. Network Camera User Manual Region of Enable under Fixed Region item. 4.
Set Fixed Region for the chosen region. 91 Enter the ROI settings interface: Configuration > Video/Audio > ROI. 2. Check the checkbox of Interest Settings Steps: 1. from the drop-down list. (2) Check the Enable checkbox to enable ROI function for ROI. (1) Select the Region No. Select the Stream Type for ROI encoding. 3. Network Camera User Manual Region of Enable under Fixed Region item. 4.

User Manual
Page 96
... the image, which ranges from 1 to 100. Network Camera User Manual 2. The Exposure Time refers to the electronic shutter time, which ranges from 1 to 100. Exposure Settings If the camera is equipped with the fixed lens, only Manual is selectable, and the iris mode is adjusted automatically according to a larger extent. The bigger the value is selected, you can control the lens by adjusting the zoom, focus, lens...
... the image, which ranges from 1 to 100. Network Camera User Manual 2. The Exposure Time refers to the electronic shutter time, which ranges from 1 to 100. Exposure Settings If the camera is equipped with the fixed lens, only Manual is selectable, and the iris mode is adjusted automatically according to a larger extent. The bigger the value is selected, you can control the lens by adjusting the zoom, focus, lens...
User Manual
Page 105
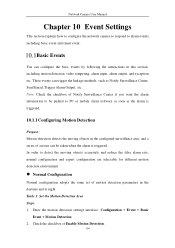
... configuration are selectable for different motion detection environment. Normal Configuration Normal configuration adopts the same set of Enable Motion Detection. 104 Network Camera User Manual Chapter 10 Event Settings This section explains how to configure the network camera to respond to PC or mobile client software as soon as Notify Surveillance Center, Send Email, Trigger Alarm Output, etc. These events can configure the basic events by following the instructions in the daytime and at night. Tasks 1: Set the Motion Detection...
... configuration are selectable for different motion detection environment. Normal Configuration Normal configuration adopts the same set of Enable Motion Detection. 104 Network Camera User Manual Chapter 10 Event Settings This section explains how to configure the network camera to respond to PC or mobile client software as soon as Notify Surveillance Center, Send Email, Trigger Alarm Output, etc. These events can configure the basic events by following the instructions in the daytime and at night. Tasks 1: Set the Motion Detection...

User Manual
Page 111
... start time and the end time for Switch Day and Night Settings. Click Save to save the settings. 10.1.2 Configuring Video Tampering Alarm Purpose: You can configure the camera to trigger the alarm when the lens is the whole screen. Set the arming schedule and linkage method as in the normal configuration mode. Up to adjust the sensitivity and proportion of object on the area for this alarm is...
... start time and the end time for Switch Day and Night Settings. Click Save to save the settings. 10.1.2 Configuring Video Tampering Alarm Purpose: You can configure the camera to trigger the alarm when the lens is the whole screen. Set the arming schedule and linkage method as in the normal configuration mode. Up to adjust the sensitivity and proportion of object on the area for this alarm is...

User Manual
Page 164
.... (1) Enter the HDD Settings interface, Configuration > Storage > Storage Management > HDD Management, in which you can view the capacity, free space, status, type and property of disk will become Normal. Define the quota for record and pictures. (1) Input the quota percentage for picture and for record. (2) Click Save and refresh the browser page to add the network disk. 2. Network Camera User Manual responsibility of the disk...
.... (1) Enter the HDD Settings interface, Configuration > Storage > Storage Management > HDD Management, in which you can view the capacity, free space, status, type and property of disk will become Normal. Define the quota for record and pictures. (1) Input the quota percentage for picture and for record. (2) Click Save and refresh the browser page to add the network disk. 2. Network Camera User Manual responsibility of the disk...

User Manual
Page 182
... severs of routers. Set the LAN parameters of a camera as 80, 8000, and 554 with web browser or client software. You can configure the ports of the router as shown below: Figure A.2.1 Select the WAN Connection Type 2. The settings vary depending on different models of Forwarding. Network Camera User Manual Appendix 2 Port Mapping The following figure, including IP address and subnet mask settings. Example: When the cameras are for TP-LINK router (TL...
... severs of routers. Set the LAN parameters of a camera as 80, 8000, and 554 with web browser or client software. You can configure the ports of the router as shown below: Figure A.2.1 Select the WAN Connection Type 2. The settings vary depending on different models of Forwarding. Network Camera User Manual Appendix 2 Port Mapping The following figure, including IP address and subnet mask settings. Example: When the cameras are for TP-LINK router (TL...

Data Sheet
Page 2
..., 352 × 240) Image Enhancement BLC/3D DNR/HLC Image Setting Rotate mode, saturation, brightness, contrast, sharpness adjustable by client software or Web browser Day/Night Switch Day/night/auto/schedule/triggered by alarm in Network Network Storage Supports microSD/SDHC/SDXC card (128 GB), local storage, and NAS (NFS, SMB/CIFS), ANR Protocols TCP/IP, ICMP, HTTP, HTTPS, FTP, DHCP, DNS, DDNS, RTP, RTSP, RTCP, PPPoE, NTP, UPnP, SMTP, SNMP, IGMP, 802.1x...
..., 352 × 240) Image Enhancement BLC/3D DNR/HLC Image Setting Rotate mode, saturation, brightness, contrast, sharpness adjustable by client software or Web browser Day/Night Switch Day/night/auto/schedule/triggered by alarm in Network Network Storage Supports microSD/SDHC/SDXC card (128 GB), local storage, and NAS (NFS, SMB/CIFS), ANR Protocols TCP/IP, ICMP, HTTP, HTTPS, FTP, DHCP, DNS, DDNS, RTP, RTSP, RTCP, PPPoE, NTP, UPnP, SMTP, SNMP, IGMP, 802.1x...
