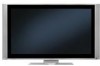
Owners Guide
Page 3
...authorized dealer or service center. For product recycling and disposal information, contact your local cable company. FOR MORE INFORMATION, CALL 1-800-HITACHI. 3 To prevent electric shock, do not expose this can expose you to very high voltages and other outlet unless the blades and...and data-enhanced television services may require prior authorization from the broadcaster or owner of this product in accordance with liquids, such as video games, stock market quotations, computer generated graphics, and other fixed (non-moving) patterns can be authorized by direct connection to ...
...authorized dealer or service center. For product recycling and disposal information, contact your local cable company. FOR MORE INFORMATION, CALL 1-800-HITACHI. 3 To prevent electric shock, do not expose this can expose you to very high voltages and other outlet unless the blades and...and data-enhanced television services may require prior authorization from the broadcaster or owner of this product in accordance with liquids, such as video games, stock market quotations, computer generated graphics, and other fixed (non-moving) patterns can be authorized by direct connection to ...

Owners Guide
Page 8
...or cable TV) to inputs and outputs located on camcorders, VCRs and laserdisc players with shielded video and audio cables that sell audio/video products. First time use 75-Ohm coaxial shielded wire. S-Video (Super Video) Cable This cable is used on the television's rear jack panel and front control panel.... AUDIO OUT 3.8mm STEREO MINI-PLUG 2 RCA TYPE PLUGS 8 Phono Cable Used on all standard video and audio cable which connect to the antenna jack on the rear jack panel and side control panel. HDMI Cable This cable is used to...
...or cable TV) to inputs and outputs located on camcorders, VCRs and laserdisc players with shielded video and audio cables that sell audio/video products. First time use 75-Ohm coaxial shielded wire. S-Video (Super Video) Cable This cable is used on the television's rear jack panel and front control panel.... AUDIO OUT 3.8mm STEREO MINI-PLUG 2 RCA TYPE PLUGS 8 Phono Cable Used on all standard video and audio cable which connect to the antenna jack on the rear jack panel and side control panel. HDMI Cable This cable is used to...

Owners Guide
Page 10
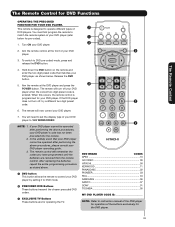
... of the Remote Control. Please see pages 2334 for a complete description of all of the functions on the right bottom portion of your HITACHI Plasma TV, the new remote control is designed to show and change the Freeze mode of the Universal Remote Control to manually enter the .... FAVORITE CHANNEL (FAV CH) button (TV) Press to complete mute if pressed twice. INFO BUTTON (TV, CBL, SAT) Displays various information on and off. Video Cassette Recorder/Player SAT- MENU BUTTON (CBL, DVD, SAT, TV) Accesses the OSD menu system. NUMERIC BUTTONS (TV, DVD, CBL, SAT, VCR) Used ...
... of the Remote Control. Please see pages 2334 for a complete description of all of the functions on the right bottom portion of your HITACHI Plasma TV, the new remote control is designed to show and change the Freeze mode of the Universal Remote Control to manually enter the .... FAVORITE CHANNEL (FAV CH) button (TV) Press to complete mute if pressed twice. INFO BUTTON (TV, CBL, SAT) Displays various information on and off. Video Cassette Recorder/Player SAT- MENU BUTTON (CBL, DVD, SAT, TV) Accesses the OSD menu system. NUMERIC BUTTONS (TV, DVD, CBL, SAT, VCR) Used ...
Owners Guide
Page 12
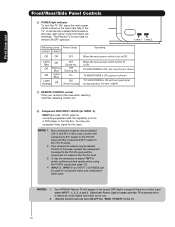
... MAIN POWER is set to make sure the TV is turned off or in use. 2. Check the Power Light to O . In this input. Your HITACHI Plasma TV will illuminate. TV MAIN POWER is ON ; You may be turned OFF (lights orange) if there is no sync. INPUT 3, INPUT 4...In this area when selecting channels, adjusting volume, etc. ቫ Component SIDE INPUT JACKS (for INPUT: 5) INPUT 5 provide Y-PBPR jacks for composite video and component video input. NOTES: 1. The Plasma TV is shown. Lights Red Off Off Off Blinking Blue Lights Blue Lights Orange Off OFF. (Stand-by mode (...
... MAIN POWER is set to make sure the TV is turned off or in use. 2. Check the Power Light to O . In this input. Your HITACHI Plasma TV will illuminate. TV MAIN POWER is ON ; You may be turned OFF (lights orange) if there is no sync. INPUT 3, INPUT 4...In this area when selecting channels, adjusting volume, etc. ቫ Component SIDE INPUT JACKS (for INPUT: 5) INPUT 5 provide Y-PBPR jacks for composite video and component video input. NOTES: 1. The Plasma TV is shown. Lights Red Off Off Off Blinking Blue Lights Blue Lights Orange Off OFF. (Stand-by mode (...
Owners Guide
Page 13
... output to INPUT 1, 2 at a time. 2. HITACHI will be labeled Y, B-Y, and R-Y. Use the HDMI input for your television screen. "Dolby" and the double-D symbol are available for HDMI input. ብ Optical Out (Digital Audio) This jack provides Digital Audio Output for recording. Do not connect composite VIDEO and S-VIDEO to the TV's PR input...
... output to INPUT 1, 2 at a time. 2. HITACHI will be labeled Y, B-Y, and R-Y. Use the HDMI input for your television screen. "Dolby" and the double-D symbol are available for HDMI input. ብ Optical Out (Digital Audio) This jack provides Digital Audio Output for recording. Do not connect composite VIDEO and S-VIDEO to the TV's PR input...

Owners Guide
Page 15
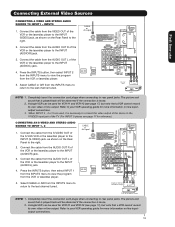
...specifications. If you to easily connect a camcorder , DVD, Video Game or VCR as shown in the following examples: Left Side Panel INPUT 5 Left Side Panel INPUT 5 R L/MONO AUDIO PR PB Y / VIDEO R L/MONO AUDIO PR PB Y / VIDEO Note : Special device cables will be abnormal. 15 First ...time use Connecting External Video Sources The LEFT SIDE panel jacks are provided as a convenience to allow you do not, ...
...specifications. If you to easily connect a camcorder , DVD, Video Game or VCR as shown in the following examples: Left Side Panel INPUT 5 Left Side Panel INPUT 5 R L/MONO AUDIO PR PB Y / VIDEO R L/MONO AUDIO PR PB Y / VIDEO Note : Special device cables will be abnormal. 15 First ...time use Connecting External Video Sources The LEFT SIDE panel jacks are provided as a convenience to allow you do not, ...

Owners Guide
Page 16
...do not, the played back picture may need to connect the audio output into the Left Side Input jacks) : A) Connecting HDMI signal. Before Operating External Video Source Connect an external source to one of HDTV Set-Top-Box or DVD Player NOTE: 1. INPUTS Input 4 Input 5 Air /Cable Input 1 Input ... of your choice (see page 26). The following examples (When connecting DVI signal it will be made from a DVD, Set Top Box , Video Game as shown in the following connection diagrams are offered as a convenience to allow you to easily connect HDMI or DVI signals from coaxial shielded...
...do not, the played back picture may need to connect the audio output into the Left Side Input jacks) : A) Connecting HDMI signal. Before Operating External Video Source Connect an external source to one of HDTV Set-Top-Box or DVD Player NOTE: 1. INPUTS Input 4 Input 5 Air /Cable Input 1 Input ... of your choice (see page 26). The following examples (When connecting DVI signal it will be made from a DVD, Set Top Box , Video Game as shown in the following connection diagrams are offered as a convenience to allow you to easily connect HDMI or DVI signals from coaxial shielded...

Owners Guide
Page 17
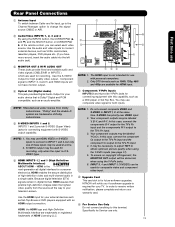
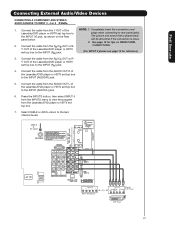
First time use Rear Panel Connections Outside Antenna Cable TV coaxial cable 2-Way signal splitter VCR #1 ANT OUTPUT IN S-VIDEO V L R Optional DIGITAL OUTPUT CAPABILITY DIGITAL OUTPUT AUDIO OUT DVI to HDMI OUTPUT Y PB/CB PR/CR L R Optional S-VIDEO V L R INPUT S-VIDEO V L R OUTPUT Y PB PR L R OUTPUT HDMI to HDMI HDMI OUTPUT DVD Player VCR #2 Laserdisc player, VCR, camcorder, etc. HDTV Set-Top Box HDMI DIGITAL OUTPUT CAPABILITY NOTE: Cables are optional, except when specified. 17
First time use Rear Panel Connections Outside Antenna Cable TV coaxial cable 2-Way signal splitter VCR #1 ANT OUTPUT IN S-VIDEO V L R Optional DIGITAL OUTPUT CAPABILITY DIGITAL OUTPUT AUDIO OUT DVI to HDMI OUTPUT Y PB/CB PR/CR L R Optional S-VIDEO V L R INPUT S-VIDEO V L R OUTPUT Y PB PR L R OUTPUT HDMI to HDMI HDMI OUTPUT DVD Player VCR #2 Laserdisc player, VCR, camcorder, etc. HDTV Set-Top Box HDMI DIGITAL OUTPUT CAPABILITY NOTE: Cables are optional, except when specified. 17

Owners Guide
Page 18
...-output connections. • Connect only 1 component (VCR, DVD player, camcorder, etc.) to use Tips on Rear Panel Connections • S-VIDEO, Y-PBPR, or HDMI connections are provided for high performance laserdisc players, VCRs etc. In this feature. • Your component outputs may be...for high performance components, such as DVD players and set-top-boxes. INSTALLATION RECOMMENDATION: 1. Connecting the television directly to the Audio /Video output of S-VIDEO type. • When using the Y-PBPR inputs. (See page 37) • To ensure no copyright infringement, the MONITOR OUT...
...-output connections. • Connect only 1 component (VCR, DVD player, camcorder, etc.) to use Tips on Rear Panel Connections • S-VIDEO, Y-PBPR, or HDMI connections are provided for high performance laserdisc players, VCRs etc. In this feature. • Your component outputs may be...for high performance components, such as DVD players and set-top-boxes. INSTALLATION RECOMMENDATION: 1. Connecting the television directly to the Audio /Video output of S-VIDEO type. • When using the Y-PBPR inputs. (See page 37) • To ensure no copyright infringement, the MONITOR OUT...
Owners Guide
Page 19
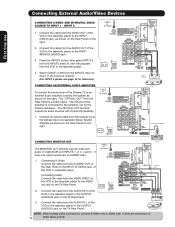
...when connecting to rear panel jacks. Select CABLE or AIR from the VCR or laserdisc player. Connect the cable from the VIDEO OUT of VCR or Laserdisc Player R L V S-VIDEO OUTPUT VCR or Laserdisc Player NOTE: 1. Select CABLE or AIR from the VCR or laserdisc player. 5. The picture and...operating guide for VCR #1 and VCR #2 (see page 17), but note that a VCR cannot record its own video or line output. Connecting External Video Sources First time use CONNECTING A VIDEO AND STEREO AUDIO SOURCE TO INPUT1 - Press the INPUTS button, then select INPUT 2 from the INPUTS menu to ...
...when connecting to rear panel jacks. Select CABLE or AIR from the VCR or laserdisc player. Connect the cable from the VIDEO OUT of VCR or Laserdisc Player R L V S-VIDEO OUTPUT VCR or Laserdisc Player NOTE: 1. Select CABLE or AIR from the VCR or laserdisc player. 5. The picture and...operating guide for VCR #1 and VCR #2 (see page 17), but note that a VCR cannot record its own video or line output. Connecting External Video Sources First time use CONNECTING A VIDEO AND STEREO AUDIO SOURCE TO INPUT1 - Press the INPUTS button, then select INPUT 2 from the INPUTS menu to ...

Owners Guide
Page 20
...the same INPUT (1 , 2 or 5) as shown on the Rear Panel below. 3. When using HDMI connections to prevent illegal copying of uncompressed video to -point connection for reference). With DVI output, connect the cable from the INPUTS menu to return to rear panel jacks. Press the INPUTS button... to the HDMI input as your HDMI INPUT(1 , 2 or 5). (For INPUT 5 please see page 15 for delivery of video contents. 3. NOTE: 1. First time use Connecting External Video Sources CONNECTING A COMPONENT SOURCE WITH HDMI OR DVI CAPABILITY TO INPUT 1, 2 OR 5 1. The picture and sound that encrypts...
...the same INPUT (1 , 2 or 5) as shown on the Rear Panel below. 3. When using HDMI connections to prevent illegal copying of uncompressed video to -point connection for reference). With DVI output, connect the cable from the INPUTS menu to return to rear panel jacks. Press the INPUTS button... to the HDMI input as your HDMI INPUT(1 , 2 or 5). (For INPUT 5 please see page 15 for delivery of video contents. 3. NOTE: 1. First time use Connecting External Video Sources CONNECTING A COMPONENT SOURCE WITH HDMI OR DVI CAPABILITY TO INPUT 1, 2 OR 5 1. The picture and sound that encrypts...
Owners Guide
Page 21
...See page 18 for reference). 3. Select CABLE or AIR to return to the INPUT (AUDIO/R) jack. 5. Connect the cable from the Y OUT of VIDEO AUDIO DVD Player OR PR/CR PB/CB Y L R DVD Player 21 Completely insert the connection cord Laserdisc/DVD player or HDTV set top box to... back panel below. CABLE or Air signal OUTPUT L R Y PB PR HDTV Set-Top Box OUTPUT Back of the NOTE: 1. First time use Connecting External Audio/Video Devices CONNECTING A COMPONENT AND STEREO AUDIO SOURCE TO INPUT 3 , 4 or 5 : Y-PBPR. 1. Connect the cable from the AUDIO OUT R of the Laserdisc/...
...See page 18 for reference). 3. Select CABLE or AIR to return to the INPUT (AUDIO/R) jack. 5. Connect the cable from the Y OUT of VIDEO AUDIO DVD Player OR PR/CR PB/CB Y L R DVD Player 21 Completely insert the connection cord Laserdisc/DVD player or HDTV set top box to... back panel below. CABLE or Air signal OUTPUT L R Y PB PR HDTV Set-Top Box OUTPUT Back of the NOTE: 1. First time use Connecting External Audio/Video Devices CONNECTING A COMPONENT AND STEREO AUDIO SOURCE TO INPUT 3 , 4 or 5 : Y-PBPR. 1. Connect the cable from the AUDIO OUT R of the Laserdisc/...
Owners Guide
Page 22
... the OUTPUT (AUDIO/L) jack on the right. CABLE or Air signal Stereo System Amplifier or DVD Player Optional 2. If both are connected, S- 22 Video takes priority. CONNECTING AN EXTERNAL AUDIO AMPLIFIER To monitor the audio level of the VCR or the laserdisc player to an external audio amplifier, connect...player to the previous channel. (For INPUT 5 please see page 15 for reference). The "OPTICAL OUT" from the INPUTS menu to return to the VIDEO out jack on the right. 2. Select CABLE or AIR from the Rear Panel is controlled by the amplifier, not by the Plasma Television. The ...
... the OUTPUT (AUDIO/L) jack on the right. CABLE or Air signal Stereo System Amplifier or DVD Player Optional 2. If both are connected, S- 22 Video takes priority. CONNECTING AN EXTERNAL AUDIO AMPLIFIER To monitor the audio level of the VCR or the laserdisc player to an external audio amplifier, connect...player to the previous channel. (For INPUT 5 please see page 15 for reference). The "OPTICAL OUT" from the INPUTS menu to return to the VIDEO out jack on the right. 2. Select CABLE or AIR from the Rear Panel is controlled by the amplifier, not by the Plasma Television. The ...
Owners Guide
Page 25
... button to quickly change the picture format ASPECT ratio. Note: Please see Appendix A on page 76. 1 • Antenna-Digital Channel (4:3) • S-Video/Video 4:3/Letter Input (Auto Aspect: On) • HDMI-480i/480p 4:3/ Letter Input (Auto Aspect: On) • Component-480i/480p 4:3/ Letter Input (...on page 76. Note: Use this is normal operation of the TV. When displaying 16:9 STANDARD 2 it . • Antenna-Analog Channel • S-Video/Video Input (Auto Aspect: Off) • HDMI-480i/480p Input (Auto Aspect: Off) • Component-480i/480p Input (Auto Aspect: Off) IMA ...
... button to quickly change the picture format ASPECT ratio. Note: Please see Appendix A on page 76. 1 • Antenna-Digital Channel (4:3) • S-Video/Video 4:3/Letter Input (Auto Aspect: On) • HDMI-480i/480p 4:3/ Letter Input (Auto Aspect: On) • Component-480i/480p 4:3/ Letter Input (...on page 76. Note: Use this is normal operation of the TV. When displaying 16:9 STANDARD 2 it . • Antenna-Analog Channel • S-Video/Video Input (Auto Aspect: Off) • HDMI-480i/480p Input (Auto Aspect: Off) • Component-480i/480p Input (Auto Aspect: Off) IMA ...

Owners Guide
Page 26
...the On-Screen Display features can be set . INPUTS INFO button display for Analog Channels INFO Show Name 3:00PM- 3:30PM ST TV-G Air 8 KXYZ-HD 480i 3:17PM Auto STEREO Input 4 Input 5 Air / Cable Input 1 Input 2 Move SEL Select INFO button display for numeric entries. INPUT 5 Select...INFO Show Name 3:00PM- 3:30PM Engl DTVCC ALT U.S. Use the CURSOR and SELECT buttons to choose INPUT 3. Auto INFO button display when an S-VIDEO Input is connected to normal viewing. Press the INFO button again or the EXIT button to return to INPUT 1 INFO S-IN: 1 480i 3:17PM...
...the On-Screen Display features can be set . INPUTS INFO button display for Analog Channels INFO Show Name 3:00PM- 3:30PM ST TV-G Air 8 KXYZ-HD 480i 3:17PM Auto STEREO Input 4 Input 5 Air / Cable Input 1 Input 2 Move SEL Select INFO button display for numeric entries. INPUT 5 Select...INFO Show Name 3:00PM- 3:30PM Engl DTVCC ALT U.S. Use the CURSOR and SELECT buttons to choose INPUT 3. Auto INFO button display when an S-VIDEO Input is connected to normal viewing. Press the INFO button again or the EXIT button to return to INPUT 1 INFO S-IN: 1 480i 3:17PM...

Owners Guide
Page 28
... the sub picture. Main Picture SWAP Sub Picture POP MODE PICTURE-IN-PICTURE POP Mode PIP displays the sub-picture outside of VCR AUDIO OUT VIDEO OUT OUTPUT VCR ³ · When a Digital channel is not available with every press of the CURSOR PAD buttons. Main Picture Sub... any of the four different modes (POP, PIP, or SPLIT), depending on the screen. The Remote Control Picture-in-Picture (PIP) Your HITACHI Plasma TV incorporates one Tuner technology designed for PIP availability. This feature allows you want to enable the sub-picture sound. 28 Back of the...
... the sub picture. Main Picture SWAP Sub Picture POP MODE PICTURE-IN-PICTURE POP Mode PIP displays the sub-picture outside of VCR AUDIO OUT VIDEO OUT OUTPUT VCR ³ · When a Digital channel is not available with every press of the CURSOR PAD buttons. Main Picture Sub... any of the four different modes (POP, PIP, or SPLIT), depending on the screen. The Remote Control Picture-in-Picture (PIP) Your HITACHI Plasma TV incorporates one Tuner technology designed for PIP availability. This feature allows you want to enable the sub-picture sound. 28 Back of the...
Owners Guide
Page 33
.... The remote will remember the codes you have programmed until the batteries are for operating the TV. · DVD BRAND CODES APEX 10 GO VIDEO 09 HITACHI 00 KENWOOD 11 PANASONIC 02 PIONEER 03 RCA 04 SAMSUNG 06 SANYO 07 SONY 01 TOSHIBA 05 MY DVD PLAYER CODE IS NOTE: Refer to...
.... The remote will remember the codes you have programmed until the batteries are for operating the TV. · DVD BRAND CODES APEX 10 GO VIDEO 09 HITACHI 00 KENWOOD 11 PANASONIC 02 PIONEER 03 RCA 04 SAMSUNG 06 SANYO 07 SONY 01 TOSHIBA 05 MY DVD PLAYER CODE IS NOTE: Refer to...

Owners Guide
Page 35
Press the SELECT button to display the different features on your HITACHI Plasma TV. 2. Press MENU on the remote control to use. This part of the screen shows which Remote Control buttons to quickly exit from a menu. Use the CURSOR PAD (buttons ̆, ̄, ̇ and ̈) and highlight a different feature of the screen shows which selections are available. On-Screen Display 35 Video Audio Channel Manager Locks Timers Setup Move SEL Select This part of the On-Screen Display menu. On-Screen Display 1. Press EXIT on the remote control to select. 3.
Press the SELECT button to display the different features on your HITACHI Plasma TV. 2. Press MENU on the remote control to use. This part of the screen shows which Remote Control buttons to quickly exit from a menu. Use the CURSOR PAD (buttons ̆, ̄, ̇ and ̈) and highlight a different feature of the screen shows which selections are available. On-Screen Display 35 Video Audio Channel Manager Locks Timers Setup Move SEL Select This part of the On-Screen Display menu. On-Screen Display 1. Press EXIT on the remote control to select. 3.
Owners Guide
Page 36
... pictures modes; Adjust volume in the picture. NOTE: The Language, Digital Output, and the Dynamic Range Compression feature of movies and video types based on the Canadian French settings. Auto Channel Scan Set Auto Channel Scan. Adjust tint. Sharpness Adjust sharpness. Canadian Ratings (...is installed in the rear panel of movies and television programming Black Enhancement Enhance picture brightness in standard mode. Choose to Reset Video Settings to prevent screen burn. Select internal or external Set The Closed Captions Choose English, French, or Spanish text and ...
... pictures modes; Adjust volume in the picture. NOTE: The Language, Digital Output, and the Dynamic Range Compression feature of movies and video types based on the Canadian French settings. Auto Channel Scan Set Auto Channel Scan. Adjust tint. Sharpness Adjust sharpness. Canadian Ratings (...is installed in the rear panel of movies and television programming Black Enhancement Enhance picture brightness in standard mode. Choose to Reset Video Settings to prevent screen burn. Select internal or external Set The Closed Captions Choose English, French, or Spanish text and ...

Owners Guide
Page 37
... choose from automatic picture settings to optimize your preference to watch programing during nigthtime. If RESET is set the mode and return to the Video menu or press EXIT to initial conditions. Press the CURSOR PAD ̇ or ̈ to select the function settings. 3. Press the... Modes available for daytime viewing. Then press the SELECT button to set to increase viewing performance and pleasure depending upon the video program being viewed. Brightness Use this function to adjust the amount of color in the picture. You can be changed by adjusting any...
... choose from automatic picture settings to optimize your preference to watch programing during nigthtime. If RESET is set the mode and return to the Video menu or press EXIT to initial conditions. Press the CURSOR PAD ̇ or ̈ to select the function settings. 3. Press the... Modes available for daytime viewing. Then press the SELECT button to set to increase viewing performance and pleasure depending upon the video program being viewed. Brightness Use this function to adjust the amount of color in the picture. You can be changed by adjusting any...


